
THE 12-VOLT RACK
Dave Herbert
I have recently rediscovered electric flying. Most folks know that I fly anything I can get my hands on. For example, I fly aerobatics with my Concept 30 SX helicopter every weekend, and I usually fly several fixed-wing planes, including my ducted-fan P-80 Shooting Star.
It takes quite a bit of ground support to fly these models. For my helicopter, I have a special flight box that I use to transport the model and its ground-support equipment. It is self-contained and protects the equipment during transport — the helicopter fits snugly inside the box.
My helicopter flight box has helped me combine some of the equipment I carry, but in recent weeks I have been flying the Electric Cox Flyboy, an MRC Electric Cessna, a Hobby Shack Stick-E, and I've been running my Kraft Eleck-Cycle. This is in addition to all the gas equipment I usually have.
Here's the problem: each battery pack is a different voltage and mAh, requiring various chargers, methods of charging, and charging times. All my chargers seemed to be in boxes that were coming apart, wrapped with wires around them, or not consistently placed where I could get to them and use them at a moment's notice.
Another problem was that when I wanted to fly my electric models, I'd throw the chargers, cables, and meters on the floor of my car. The car had become my major charging station since that's where my cigarette lighter is, and it was very inconvenient and disorganized. Flying electric planes at school yards is no problem because of the low noise; however, I had to park my car a long way from where I'd fly and carry chargers, planes, and batteries a long distance. That took the fun out of flying since I couldn't take the car out onto the football field.
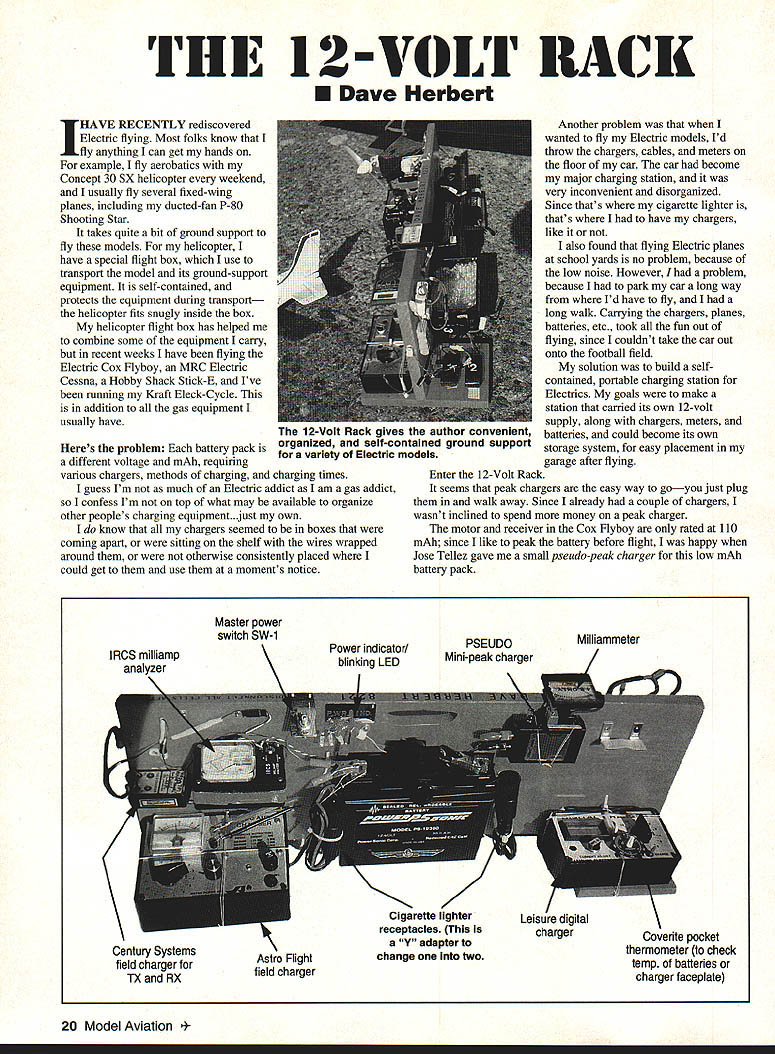
My solution was to build a self-contained, portable charging station for electrics. My goals were to make a station that carried its own 12-volt supply, along with chargers, meters, and batteries, and could become its own storage system for easy placement in my garage after flying.
Enter the 12-Volt Rack.
Design goals and general layout
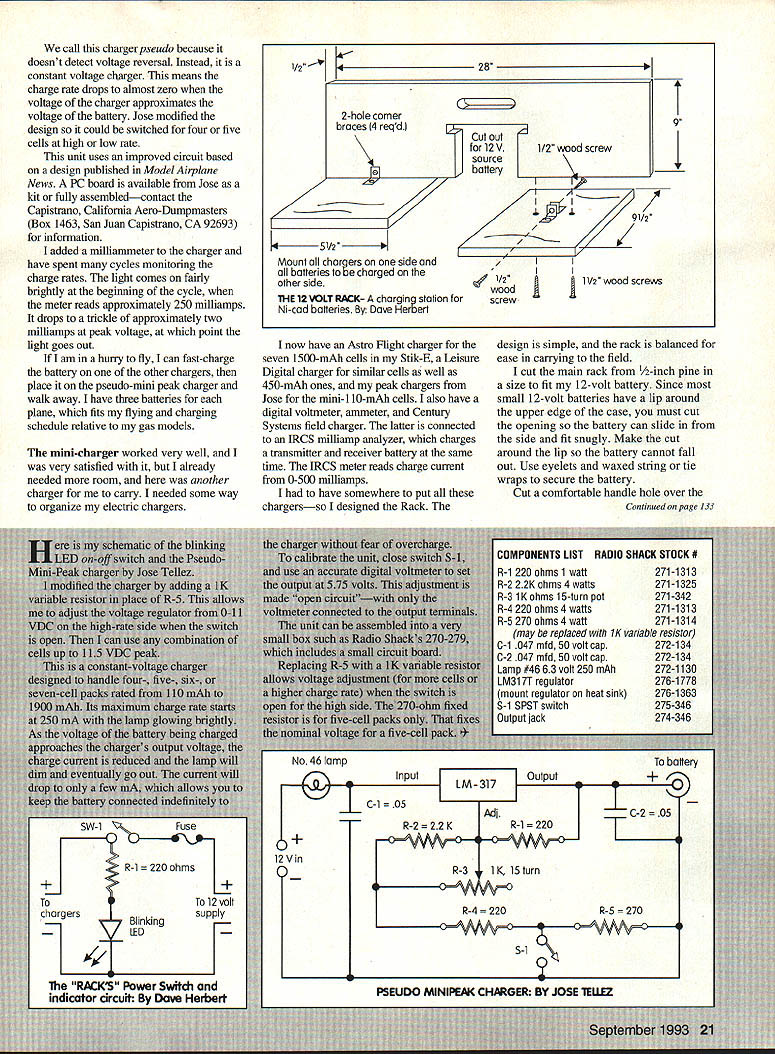
- A portable rack that contains a 12-volt supply battery, chargers, meters, and storage for batteries and wiring.
- All chargers placed on one side of the rack, all batteries on the other.
- Meters located near the battery being charged for easy monitoring of peak voltages.
- Batteries attached with Velcro; boxes mounted to hold discharged batteries and extra wiring.
- One box marked "dead" so I know at a glance what is charged and what isn't.
- A blinking LED indicator, a main on-off switch, and a 15-amp fuse to assure safety and to remind me to shut everything down when I return home or finish charging.
- A chart of charge rates and times for each battery and which charger each one takes.
I attached a cigarette lighter receptacle to my 12-volt battery so I could easily plug in a 12-volt soldering iron for field repairs or a spotlight for night flying. A 5 VDC silicon solar cell trickle-charges the 12-volt source battery.
The rack feet are screwed in with 1-1/2-inch wood screws and supported with angle braces. The feet have small sliding casters to keep the 12-volt battery off the ground. My 12-volt battery is from PowerSonic, Redwood City, California. It is rated at 30 Ah and has lasted through any all-day flying sessions I've had.
If I shut off the main power switch and still have a Ni-Cd battery hooked to one of the chargers, the LED will continue to blink from the Ni-Cd's reverse current flow. This is a great warning to remind me to unhook the batteries. A high-power diode could be installed, but I like the warning feature.
Why not make a 12-Volt Rack for your chargers, too? It's a great way to keep things organized and to carry everything to the flying field. You may have to make modifications for your equipment, but you will find this an easy way to carry your stuff.
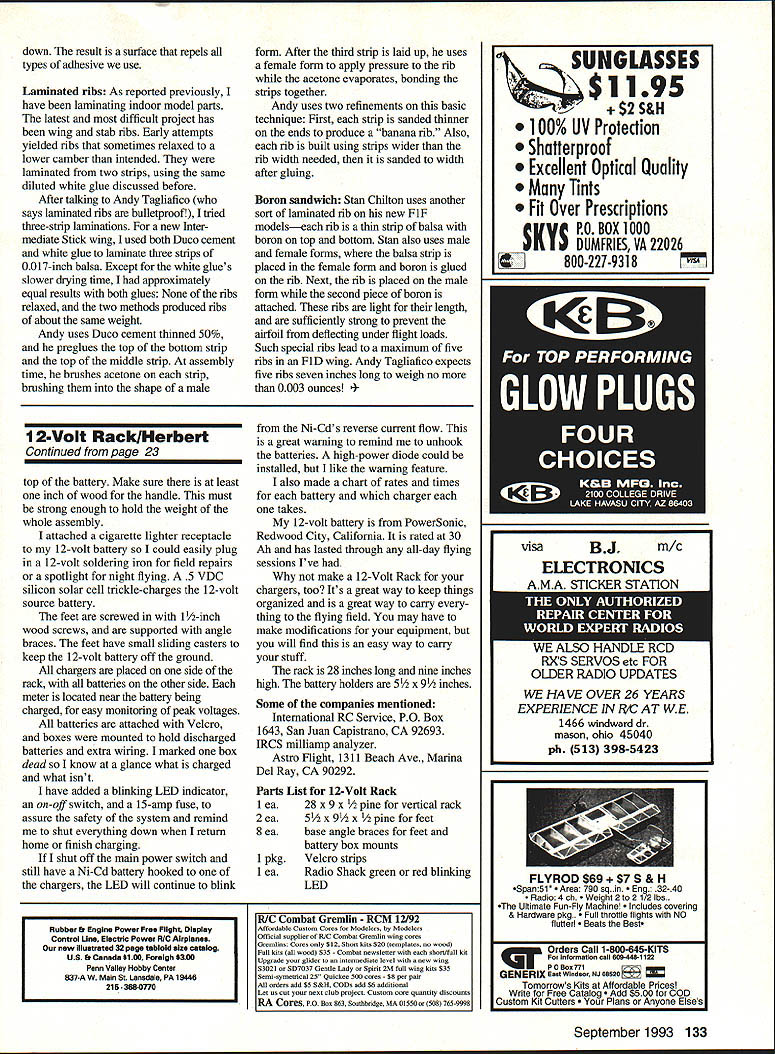
Dimensions
- Rack length: 28 inches
- Rack height: 9 inches
- Battery holders: 5-1/2 x 9-1/2 inches
Pseudo-Mini-Peak Charger (by Jose Tellez)
It seems that peak chargers are the easy way to go — you just plug them in and walk away. Since I already had a couple of chargers, I wasn't inclined to spend more money on a peak charger. The motor and receiver in the Cox Flyboy are only rated at 110 mAh; since I like to peak the battery before flight, I was happy when Jose Tellez gave me a small pseudo-mini-peak charger for this low-mAh battery pack.
We call this charger "pseudo" because it doesn't detect voltage reversal. Instead, it is a constant-voltage charger: the charge rate drops almost to zero as the battery voltage approaches the charger's output voltage. The pseudo-mini-peak charger approximates a true mini-peak charger.
Jose modified the design so it could be switched for four or five cells and for high/low rate. The unit uses an improved circuit based on a design published in Model Airplane News. A PC board is available; Jose's kit is fully assembled — contact Aero-Dumpmasters, Box 1463, San Juan Capistrano, CA 92693 for information.
I added a milliammeter to the charger and have spent many cycles monitoring the charge rates. The lamp comes on fairly brightly at the beginning of the cycle when the meter reads approximately 250 milliamps; it drops to a trickle of approximately two milliamps at peak voltage, at which point the lamp goes out. If I'm in a hurry to fly, I can fast-charge the battery on one of the other chargers, then place it on the pseudo-mini-peak charger and walk away. I keep three batteries for each plane, which fits my flying and charging schedule relative to my gas models.
This is a constant-voltage charger designed to handle four-, five-, six-, or seven-cell packs rated from 110 mAh to 1900 mAh. Its maximum charge rate starts at about 250 mA with the lamp glowing brightly. As the battery voltage approaches the charger's output voltage, the charge current is reduced and the lamp will dim and eventually go out. The current will drop to only a few mA, which allows you to keep the battery connected indefinitely without fear of overcharge.
Calibration and modification
- To calibrate the unit: close switch S-1 and use an accurate digital voltmeter to set the output at 5.75 volts. This adjustment is made "open circuit" — with only the voltmeter connected to the output terminals.
- The unit can be assembled into a small box such as Radio Shack's 270-279, which includes a small circuit board.
- I modified the charger by replacing R-5 with a 1K variable resistor. This allows adjustment of the regulator up to about 11 VDC on the high side when the switch is open, so you can use any combination of cells up to about 11.5 VDC peak.
- The 270-ohm fixed resistor is for five-cell packs only and thus fixes the nominal voltage for a five-cell pack.
Components list — Radio Shack stock #
- R-1: 220 ohms, 1 watt — 271-1313
- R-2: 2.2K ohms, 4 watts — 271-1325
- R-3: 1K ohm 15-turn pot — 271-1324
- R-4: 220 ohms, 4 watts — 271-1313
- R-5: 270 ohms, 4 watts — 271-1314
- C-1: 0.047 µF, 50 volt — 272-1353
- C-2: 0.047 µF, 50 volt — 272-1353
- No. 46 lamp (6 V) — 272-004
- LM-317T (regulator on heat sink) — 276-1768
- 1-SPST switch — 275-346
- Output jack — 274-346
PSEUDO MINI-PEAK CHARGER: BY JOSE TELLEZ
Building details and assembly notes
- Make sure the handle area has at least one inch of wood above the top of the battery. This must be strong enough to hold the weight of the whole assembly.
- Screw the feet in with 1-1/2-inch wood screws and support them with angle braces.
- Use small sliding casters on the feet to keep the 12-volt battery off the ground.
- Mount chargers on one side of the rack and batteries on the other for easy access.
- Place each meter near the battery it's monitoring to make peak-voltage checking convenient.
- Use Velcro strips to secure batteries so they are easy to remove and replace.
- Mount boxes to hold discharged batteries and extra wiring; label one box "dead" for quick identification.
I have an Astro Flight field charger, a Leisure Digital charger, and peak chargers for various capacity cells, as well as a digital voltmeter/ammeter. I also have a Century Systems field charger for TX and RX; the latter is connected to an IRCS milliamp analyzer which charges the transmitter/receiver battery at the same time. The IRCS meter reads charge current from 0–500 milliamps.
I added a blinking LED indicator, an on-off switch, and a 15-amp fuse to assure the safety of the system and to remind me to shut everything down when I return home or finish charging. If I shut off the main power switch and still have a Ni-Cd battery hooked to one of the chargers, the LED will continue to blink from the Ni-Cd's reverse current flow — a useful warning to remind me to unhook the batteries.
I also made a chart of rates and times for each battery and which charger each one takes.
Some of the companies mentioned:
- International RC Service, P.O. Box 1643, San Juan Capistrano, CA 92693 — IRCS milliamp analyzer
- Aero-Dumpmasters, Box 1463, San Juan Capistrano, CA 92693 — pseudo-mini-peak kit information
- Astro Flight, 1311 Beach Ave., Marina Del Rey, CA 90292
Parts list for 12-Volt Rack
- 2 ea. 28 x 9 x 1/2 in. pine for vertical rack
- 1 ea. 5-1/2 x 9-1/2 x 1/2 in. pine for feet
- 1 ea. base angle braces for feet and battery box mounts
- 8 ea. battery box mounts
- 1 pkg. Velcro strips
- 1 ea. Radio Shack green or red blinking LED
- 1 ea. Radio Shack 6 amp SPST power switch
- 1 ea. 220-ohm or variable resistor for blinking LED
- 4 ea. nail-in casters for feet
- 1 pkg. assorted tie wraps/nylon cable clamps
- 1 can Krylon paint
So that's how I handle all my chargers. It has made flying electrics more convenient and fun for me. I know it will do the same for you.
Happy Flying! Dave Herbert
Transcribed from original scans by AI. Minor OCR errors may remain.

