
1/2A Challenger
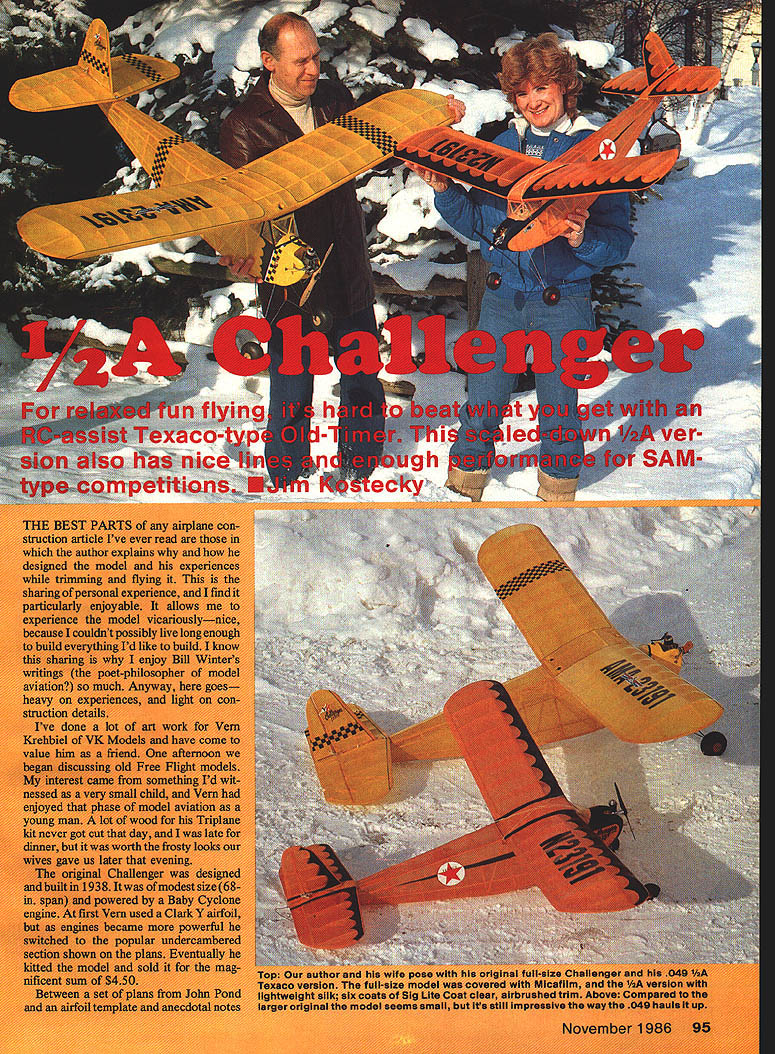
For relaxed fun flying, it's hard to beat what you get with an RC-assist Texaco-type Old-Timer. This scaled-down 1/2A version also has nice lines and enough performance for SAM-type competitions. — Jim Kostecky
The best parts of any airplane construction article are those in which the author explains why and how he designed the model and his experiences while trimming and flying it. This is the sharing of personal experience, and I find it particularly enjoyable. It allows me to experience the model vicariously—nice, because I couldn't possibly live long enough to build everything I'd like to build. I know this sharing is why I enjoy Bill Winter's writings (the poet-philosopher of model aviation?) so much. Anyway, here goes—heavy on experiences, and light on construction details.
I've done a lot of air work for Vern Krehbiel of VK Models and have come to value him as a friend. One afternoon we began discussing old free-flight models. My interest came from something I'd witnessed as a very small child, and Vern had enjoyed that phase of model aviation as a young man. A lot of wood for his triplane kit never got cut that day, and I was late for dinner, but it was worth the trashy looks our wives gave us later that evening.
The original Challenger was designed and built in 1938. It was of modest size (68 in. span) and powered by a Baby Cyclone engine. At first Vern used a Clark Y airfoil, but as engines became more powerful he switched to the popular undercambered section shown on the plan. Eventually he kitted the model and sold it for the magnificent sum of $4.50.
Between a set of plans from John Pond and an airfoil template and anecdotal notes from Vern, my Challenger, powered by an O.S. .35, took wing. Four summers, and many enjoyable flights with no mishaps, made that airplane one of my all-time favorites. It still looks and flies like new.
Enter the 1/2A Texaco craze. This is the best event ever to happen to anyone with limited time and unlimited capacity for fun and competition. The rules are simple, and there's lots of room for strategy; I was hooked instantly. Should I send it up screaming for a short time and then hunt thermals for a max? Or should I experiment with low power and a long engine run and max on pure determination? The die was cast, and I needed a plane.
No one I knew was flying a 1/2A Texaco Challenger. That was important to me and so was its dependability and uncanny thermalling performance in the original size. I just couldn't afford to pass it up. As it turned out, the Challenger, with top, bottom, and side longerons added to the simple stick-box fuselage, was a real ego boost. People suddenly began to think of me as a "super builder." What they didn't know was how easy (as well as strong) this type of construction really is.
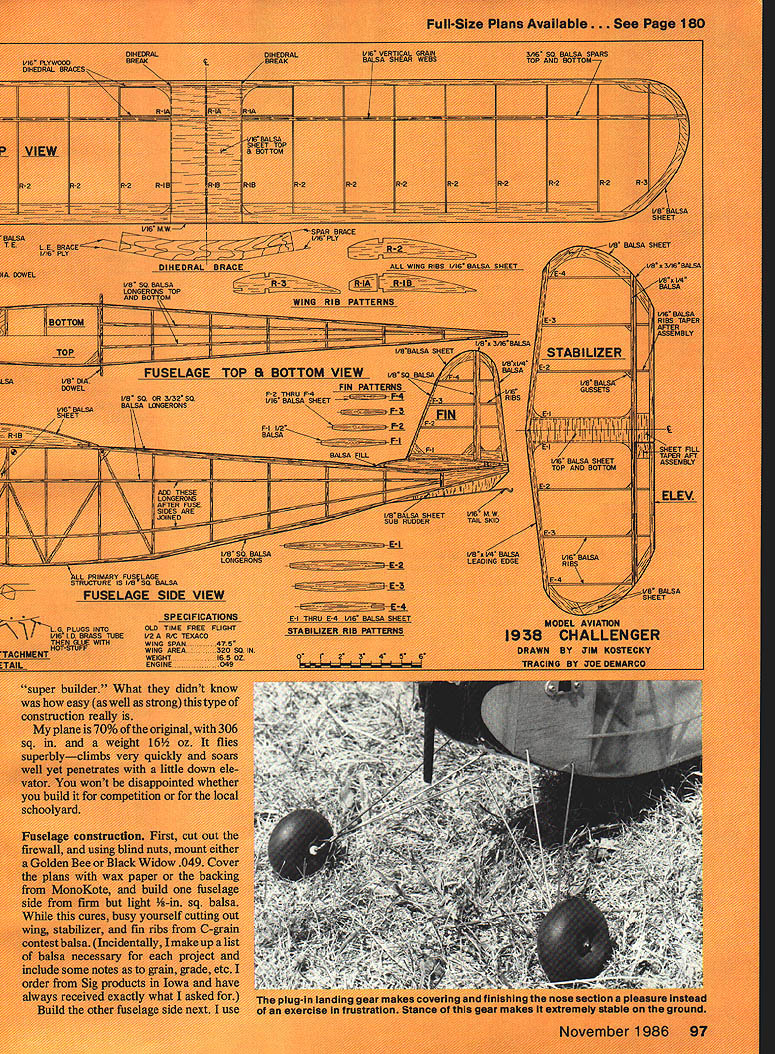
My plane is 70% of the original, with 306 sq. in. area and a weight of 16½ oz. It flies superbly—climbs very quickly and soars well yet penetrates with a little down elevator. You won't be disappointed whether you build it for competition or for the local schoolyard.
Fuselage construction
- Cut out the firewall, and using blind nuts, mount either a Golden Bee or Black Widow .049.
- Cover the plans with wax paper or the backing from MonoKote, and build one fuselage side from firm but light 3/32-in. square balsa. While this cures, cut out wing, stabilizer, and fin ribs from C-grain contest balsa. (I make up a list of balsa necessary for each project and include notes as to grain, grade, etc. I order from Sig Products in Iowa and have always received exactly what I asked for.)
- Build the other fuselage side. I use cyanoacrylate (CyA) glues almost exclusively, but Titebond or Elmer's Carpenter's Glue work well. When cured, join the two sides. Jig them upside down on the top view with drafting triangles and wooden braces.
- Add all cross members as well as the firewall, remove from the board, and add F-2 and the 1/2 top nose sheeting (CyA with a little water on the outside of the sheet makes this easy).
- Add the 3/32-in. plywood bottom and nose cowl blocks. The front windshield supports and 3/32-in. square top, bottom, and side longerons finish the job except for sanding and a little shaping on the nose.
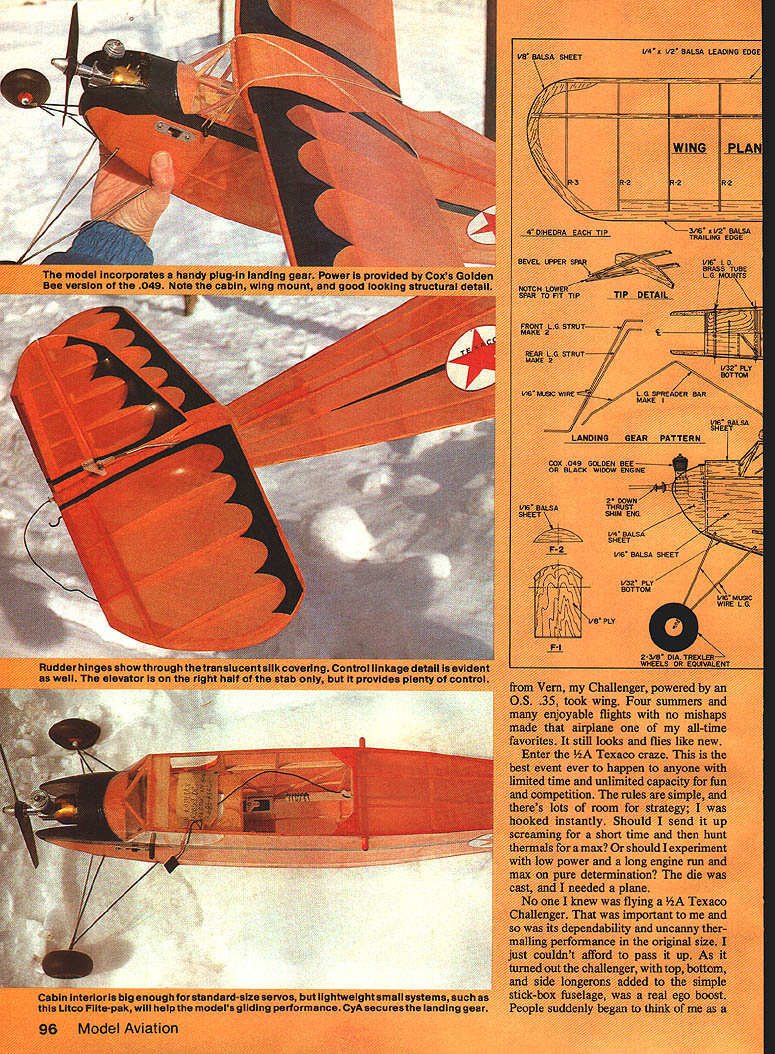
- Install 1/16-in. (inside diameter) brass landing gear tubes. The gear will be plugged into these later, as covering and finishing the fuselage is infinitely easier without the gear sticking out.
Wing construction
- Select the bottom 1/16-in. square spars, and trim a bevel on the bottom as indicated on the plans to allow for the airfoil undercamber. I did this by marking it with a ball-point pen; then one slice with an X-Acto knife followed by a sanding block finished it quicker than it takes to write it.
- Pin the trailing edge and 1/16 x 1/2-in. bottom sheeting to the plan. Shim up the bottom spar, and add all the ribs except the three center undercut ones. These will be added when the panels are joined.
- Add the vertical-grained shear web to the lower spar. Cut out the wing tips and add them according to the detail on the plan.
- When dry, block up the tips to the appropriate dihedral, and sand the proper angle into the leading edge, spars, and trailing edge at the root. The center section will be flat.
- Pin both panels back onto the plan, elevate to the proper dihedral at the tips, and add the center section leading edge, trailing edge, and spars. Add the 1/16-in. plywood leading edge and spar doublers, then the ribs and top sheeting. When dry, remove the wing from the board and shape and sand where needed.
Tail surfaces
The fin and stabilizer leading edges, spars, and trailing edges must be shimmed off the plan with scraps to allow for the symmetrical airfoil. Add the ribs, tips, and sheeting; sand everything smooth, and you're done. The elevator is used on one side only. It is more than adequate since this is a "controlled" free-flight ship, not a pattern ship.
It's fun to pin everything together at this point, take the ship in hand, and run around the room with it while making airplane noises. (Do this while everyone else is outside!) Another, more mundane, reason for this is that you can check alignment—fin, stab, and fuselage joints—and trim and fill where necessary.
Landing gear
- Bend five landing gear pieces from 1/16-in. wire, and insert the main wires in the appropriate brass tubes in the fuselage.
- Use some fine copper receiving wire to hold them in place, and add the spreader.
- Neatly bind the joints where the three wires come together on each side. Solder the joints. The result is a neat plug-in gear assembly.
Covering and finishing
Decide which covering material you like best. I finally chose lightweight silk and clear dope, some as I used on my early RC planes and free-flight ships 25 years ago. Doped silkspan would be my second choice, Micafilm third, and MonoKote last—purely based on aesthetics, since they're all fine in terms of function.
- Start with two coats of Sig Lite Coat on the structure, then put down the wet silk using more Lite Coat as the adhesive.
- When the silk dries, apply a first coat of clear dope. After that it's smooth sailing. I used an airbrush for the scalloped trim, and the effect is great.
- Attach the windshield with RC 56 glue, and snap in the landing gear. I put a shot of CyA into the tubes to make sure the gear stayed put. If you've come this far, Trexler wheels are a must.
- I used Rocket City sheet hinges (plastic sheet with a fabric backing on each side). Simply insert hinges into a knife-blade slot after everything is covered, and hold in place with a drop of CyA (don't glue the moveable surfaces together).
- Run the antenna through a piece of Nyrod tubing placed in the belly of the fuselage.
Mount the engine, balance according to the plans, and rubber-band the wing onto the 1/8-in. dowels.
Flying
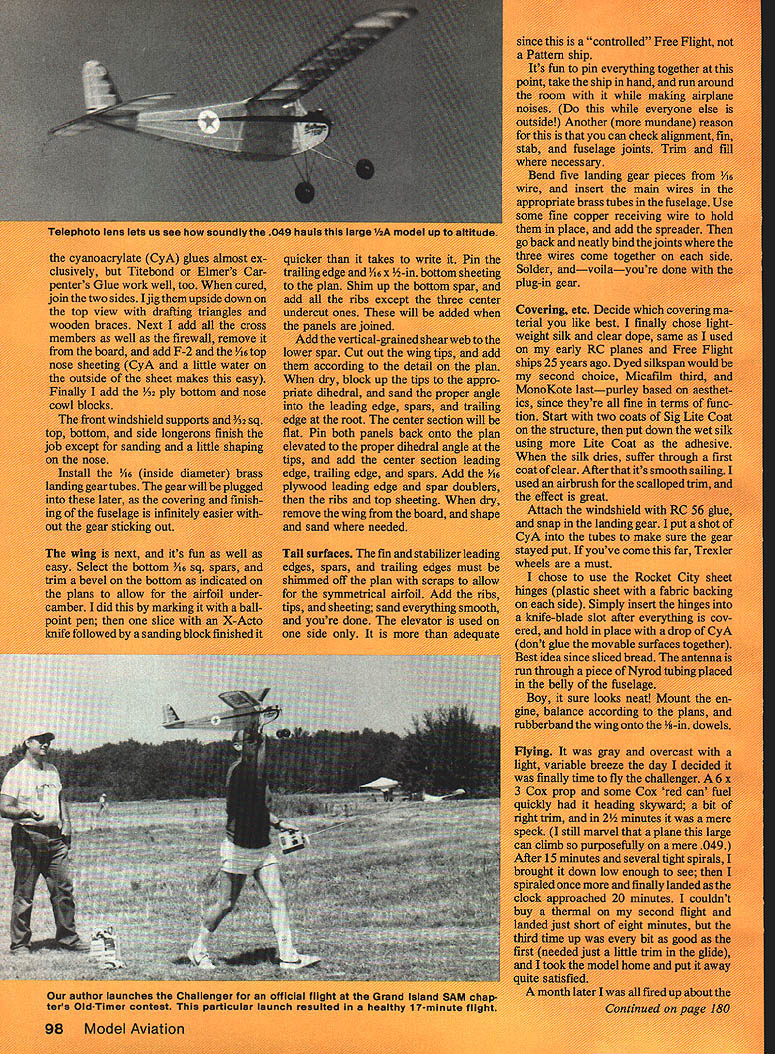
It was gray and overcast with a light, variable breeze the day I decided it was finally time to fly the Challenger. A 6x3 Cox prop and some Cox "red can" fuel quickly had it heading skyward; a bit of right trim, and in 2½ minutes it was a mere speck. (I still marvel that a plane this large can climb so purposefully on a mere .049.) After 15 minutes and several tight spirals, I brought it down low enough to see; then I spiraled once more and finally landed as the clock approached 20 minutes. I couldn't buy a thermal on my second flight and landed just short of eight minutes, but the third time up was every bit as good as the first (needed just a little trim in the glide), and I took the model home and put it away quite satisfied.
A month later I was all fired up about the SAM contest on Grand Island, NY, and I decided to fly the Challenger there just for the fun of it. The day of the contest was absolutely gorgeous with a brilliant blue sky and "green thermals" everywhere. If you could get up to 400 ft. you had to work hard not to max out. I launched the Challenger with one of those sporadic engine runs that give .049s a bad name. After 5½ minutes, never more than 200 ft. off the ground, the plane plopped down and out into a clump of weeds. The second flight, with a slightly richer setting, gave the old Challenger spiraling down several times just to keep in sight and finally recording over 15 minutes—a tad of overkill for a 10-minute max. Boy was I a pain in the neck the rest of the day. If I had a dollar for every time I sniveled, "I could have won," I could retire. So much for fun—next year, serious!
Balanced as shown, the model flies great. I suspect that the center of gravity (CG) should be moved back some, but I haven't bothered. This plane is super for quiet evenings on the schoolyard and an all-out competitor that can surpass most in its class at any SAM meet.
Transcribed from original scans by AI. Minor OCR errors may remain.

