
1/2A Owl Racer
YOU'D THINK I'd defected from the faith. "Racing? Scale? What is this?" my modeling buddies protest at sight of the Lil' Quickie. "We thought you were a Stunt flier!"
I thought so too. Still do, in fact, despite certain recent contest results. (Some judges just don't appreciate the "Underground Eight.") As it happens, however, my favorite event, OTS (Old-Time Stunt), requires the use of OPDs (Other Peoples' Designs), and so I've yet to produce an original Stunt model. It's generally agreed that the Stunt community hasn't suffered as a result of this.
At any rate, the Lil' Quickie is the product of one of my forays into the 1/2A CL racing world. Competition modelers sometimes need a safety valve, or alternate interest, to help avoid burnout. A Stunter can find that outlet by flying events such as 1/2A racing.
It's a category that offers a lot of fun for a reasonable investment. You don't have to take out a second mortgage to try 1/2A racing. Not in Class I, anyway. Class II is another story, and an alternate front end is shown on the drawing for those desiring to build the Top Fuel version.
Thanks to a good pitman, I've been able to participate in the category without total embarrassment. My friend Don Repp, a.k.a. the Wizard of La Habra, seems to have been born with a Go-Bee strapped to his arm. Right in step with our kinder, gentler nation, Don is an irrepressible source of valuable helpful hints: "Hey, PAMPA brain, you need more than 8,600 rpm here," or, "I don't think Bolly makes a three-blade 5 x 3." And my favorite: "Lose the white pants!" With a coach that sharp, you can't bungle everything.
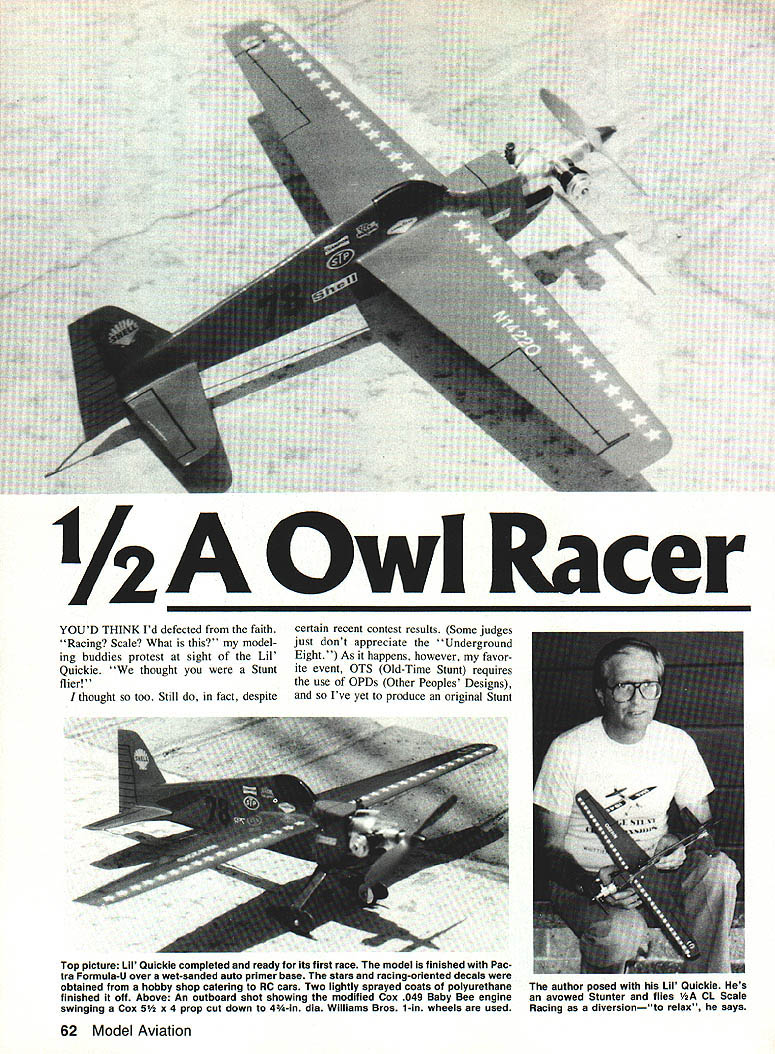
Like most modelers, I'm a closet Scale fan, so when a local 1/2A Racing Day was announced, it didn't take me long to decide to build and enter a Scale Racer. A few minutes' browsing through some air racing books produced a three-view of the attractive Formula One Owl Racer, OR-71. Designed by George Owl, the Lil' Quickie raced at Mojave in the 1970s. (It was the name that inspired me; like many of us, I just can't resist a quick racing one.)
In any racing event, results are determined by a balance of speed, fuel economy, and fast restarts. Being new at this event, I'm hardly qualified to suggest fuel/prop combinations (though of course I will anyway!).
Experimentation is the key. High speeds look impressive but are often at the expense of mileage — and worse yet — glow heads. (Keville's Law states: "With high-nitro fuel, glow heads last indefinitely — during practice. And about a half-lap during an official.") I use 25% nitro fuel during practice — which mostly involves perfecting pit stops (or attempting to) — and 40-to-60% depending on ambient temperature, humidity, and the state of the ol' family budget, in actual heats.
Most participants agree that there's no free lunch in the often-hilarious 1/2A racing events. Bolt on a stock Black Widow .049, get a few friends together, and have at it. Model specs are in the AMA rule book. For higher performance, order special engines, solid flying wires, and other accessories from Kustom Kraftsmanship (or move in with John McCollum). Addresses of suggested sources appear at the end of this article. Ask your local racing fraternity for advice, too. They love priming newcomers and will welcome your questions.
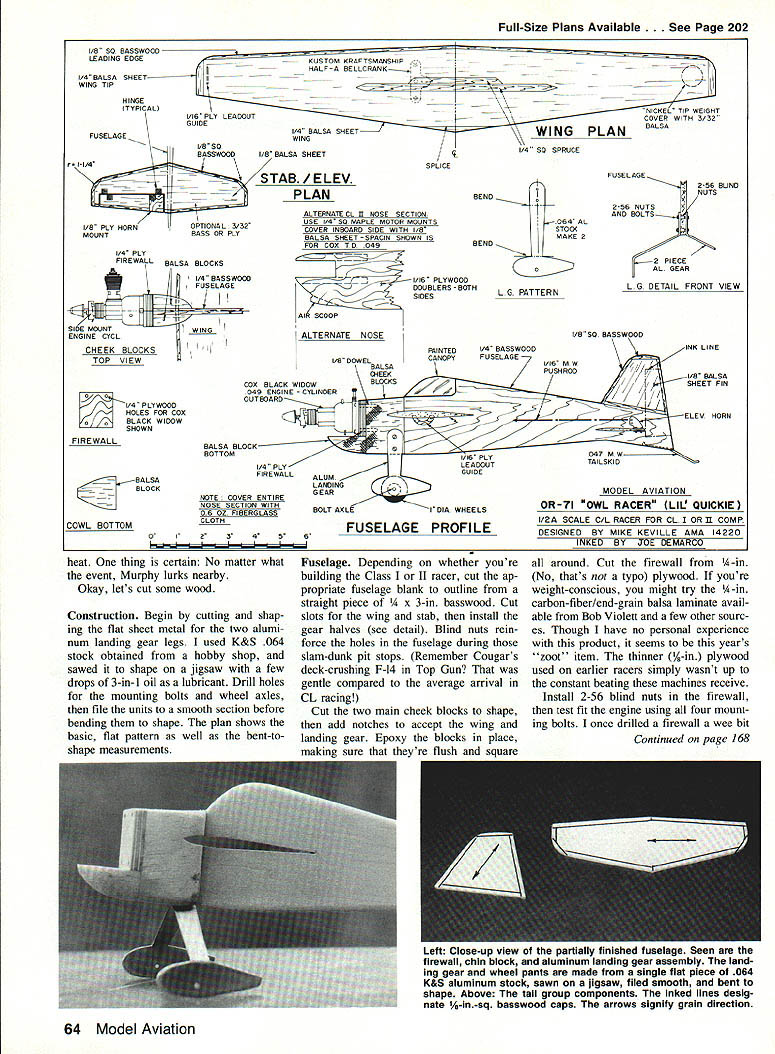
Built to 1-in. = 1-ft. scale, as required by AMA rules, our little Owl spans 20 inches. The Class I prototype shown has a reed-valve engine massaged by Repp. (When it comes to engines, all I can tell you is, "They're the heavy metal things that go up front.") The KK bellcrank has Monoline buttons to eliminate parasite drag from line clips. I fly on 42 ft. c/c (center-to-center) of .010 solid wire.
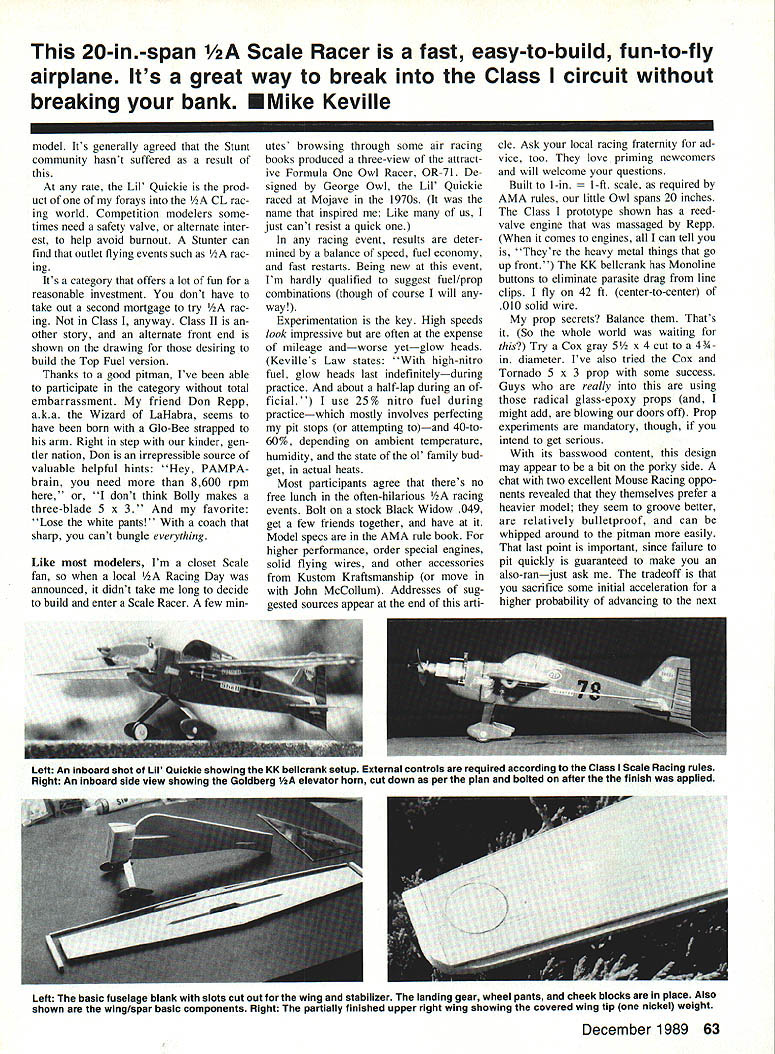
My prop secrets? Balance them. That's it. Try a Cox gray 5½ x 4 cut to a 4¾-in. diameter. I've also tried the Cox Tornado 5 x 3 prop with some success. Guys who are really into this are using those radical glass-epoxy props (and, I might add, are blowing our doors off). Prop experiments are mandatory, though, if you intend to get serious.
With its basswood content, this design may appear to be a bit on the porky side. A chat with two excellent Mouse Racing opponents revealed that they themselves prefer a heavier model; they seem to groove better, are relatively bulletproof, and can be whipped around the pitman more easily. That last point is important, since failure to pit quickly is guaranteed to make you an also-ran — just ask me. The tradeoff is that you sacrifice some initial acceleration for a higher probability of advancing to the next heat. One thing is certain: No matter what the event, Murphy lurks nearby.
Okay, let's cut some wood.
Construction
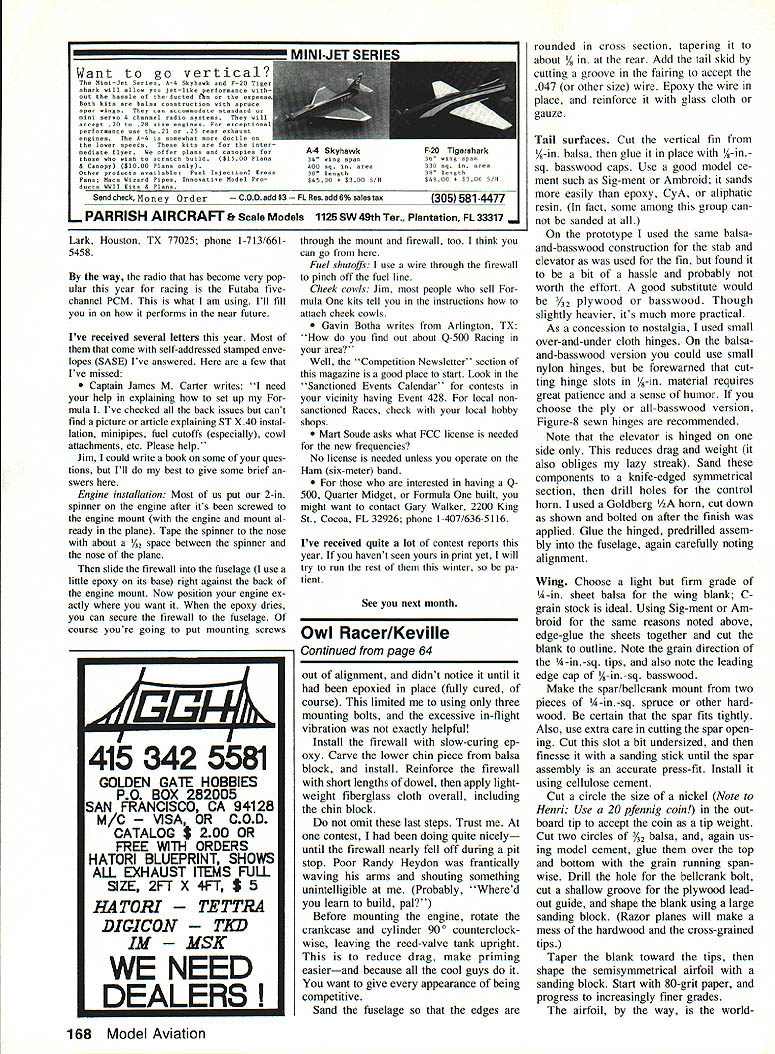
Begin by cutting and shaping the flat sheet metal for the two aluminum landing gear legs. I used K&S .064 stock obtained from a hobby shop, and sawed it to shape on a jigsaw with a few drops of 3-in-1 oil as a lubricant. Drill holes for the mounting bolts and wheel axles, then file the units to a smooth section before bending them to shape. The plan shows the basic, flat pattern as well as the bent-to-shape measurements.
Fuselage
Depending on whether you're building the Class I or II racer, cut the appropriate fuselage blank to outline from a straight piece of 1/4 x 3-in. basswood. Cut slots for the wing and stab, then install the gear halves (see detail). Blind nuts reinforce the holes in the fuselage during those slam-dunk pit stops. (Remember Cougar's deck-crushing F-14 in Top Gun? That was gentle compared to the average arrival in CL racing!)
Cut two main cheek blocks to shape, then add notches to accept the wing and landing gear. Epoxy the blocks in place, making sure that they're flush and square all around. Cut the firewall from 1/4-in. plywood. If you're weight-conscious, you might try the 1/8-in. carbon-fiber/end-grain balsa laminate available from Bob Violett and a few other sources. Though I have no personal experience with this product, it seems to be this year's "zoot" item. The thinner (1/8-in.) plywood used on earlier racers simply wasn't up to the constant beating these machines receive.
Install 2-56 blind nuts in the firewall, then test fit the engine using all four mounting bolts. I once drilled a firewall a wee bit out of alignment, and didn't notice it until it had been epoxied in place (fully cured, of course). This limited me to using only three mounting bolts, and the excessive in-flight vibration was not exactly helpful!
Install the firewall with slow-curing epoxy. Carve the lower chin piece from balsa block, and install. Reinforce the firewall with short lengths of dowel, then apply lightweight fiberglass cloth overall, including the chin block.
Do not omit these last steps. Trust me. At one contest I had been doing quite nicely until the firewall nearly fell off during a pit stop. Poor Randy Heydon was frantically waving his arms and shouting something unintelligible at me. (Probably, "Where'd you learn to build, pal?")
Before mounting the engine, rotate the crankcase and cylinder 90° counterclockwise, leaving the reed-valve tank upright. This is to reduce drag, make priming easier—and because all the cool guys do it. You want to give every appearance of being competitive.
Sand the fuselage so that the edges are rounded in cross section, tapering it to about 1/8 in. at the rear. Add the tail skid by cutting a groove in the fairing to accept the .047 (or other size) wire. Epoxy the wire in place, and reinforce it with glass cloth or gauze.
Tail surfaces
Cut the vertical fin from 1/8-in. balsa, then glue it in place with 1/4-in.-sq. basswood caps. Use a good model cement such as Sig-bond or Ambroid; it sands more easily than epoxy, CYA, or aliphatic resin. (In fact, some adhesives cannot be sanded at all.)
On the prototype I used the same basswood-and-balsa construction for the stab and elevator as was used for the fin, but found it to be a bit of a hassle and probably not worth the effort. A good substitute would be 1/8-in. plywood or basswood. Though slightly heavier, it is much more practical.
As a concession to nostalgia, I used small over-and-under cloth hinges. On the basswood-and-balsa version you could use small nylon hinges, but be forewarned that cutting hinge slots is, in my opinion, the largest maintenance requirement — it takes great patience and a sense of humor. If you choose the ply or all-basswood version, Figure-8 sewn hinges are recommended.
Note that the elevator is hinged on one side only. This reduces drag and weight (it also obliges my lazy streak). Sand the stab and elevator to a knife-edged symmetrical section, then drill holes for the control horn. I used a Goldberg 1/2A horn, cut down and bolted on after the fin/side was assembled. Glue the horn into the predrilled assembly, again carefully noting alignment.
Wing
Choose a light but firm grade of 1/8-in. sheet for the wing blank; 1/4-in.-sq. grain stock for the tips is ideal. Using Sig-bond or Ambroid for the same reasons noted above, edge-glue the sheets together and cut the blank to outline. Note the grain direction of the 1/4-in.-sq. tips, and also note the 1/8-in.-sq. basswood leading-edge cap.
Make the spar/bellcrank mount from two pieces of 1/4-in.-sq. spruce or other hard wood. Be certain that the spar fits tight. Also use extra care in cutting the spar opening. Cut this slot a bit undersized, and then sand to fit with a sanding stick until the spar assembly is an accurate press-fit. Install it using epoxy.
Cut a circle the size of a nickel in the outboard tip to accept the tip weight. (Note: use an appropriate coin or metal disk for your currency.) Cut two discs of 1/2-in. balsa and glue them into the tip to accept the weight, then cover and fair the tip as shown on the plan. Drill the hole for the bellcrank access and install the bellcrank using the usual linkages and clevises. Make sure the control throws are correct and that the bellcrank rotates freely.
Taper the blank toward the tips, then shape the ribs and tips to the planform. Sand the sections to the airfoil, starting with 80-grit paper and progressing to increasingly finer grades. The airfoil, by the way, is the world-class Clark-Y style section used on many successful 1/2A racers.
Note that a slight degree of washout is shaped into each tip. A habit from my Free Flight days, this follows full-scale practice and is a nod to low-speed stability for landings. The model would probably fly just as well (or better) without the washout, but some habits die hard.
Fuss with the foil until the wing fits snugly in the fuselage opening; then install it with epoxy. Measure and align everything so that the wing is true and square with the tail surfaces. After the assembly has cured, add small fillets of Epoxolite or other material, then install a lead-out guide.
Starting to look pretty racey, isn't it?
Temporarily hook up the controls and check for freedom of movement. Because of the short distance between the bellcrank and horn, no pushrod guide was used — nor has one seemed necessary. Remove the controls, and sand the entire model in preparation for finishing.
Final assembly
Install the engine, propeller, and muffler (if used). Set up the tank and fuel lines so that they are secure and can be quickly disconnected during pit stops. Test the control throws on the ground and make sure all linkages are tight.
The prototype used a slightly massaged Cox .049 engine with a modified mount and a Cox 5½ x 4 gray prop cut down to 4¾ in. diameter. Other engines and prop combinations can be used; experimentation is the key to finding the best balance of speed and fuel economy for your local racing conditions.
After permanently installing the controls, check the balance point and adjust as required.
Finishing
There are four basic things to remember:
- You can't do enough sanding.
- Be sure all products are compatible.
- You can do anything you want as long as you do it with style.
- An "expert" is anyone from out of town.
The model shown here is finished in Pactra Formula-U over a wet-sanded auto primer base. Initial filler coats (five) were a mixture of Sig Lite Coat and talcum. Be sure to prime the aluminum landing gear legs, unless you like flaking paint.
Markings were obtained from a hobby shop that caters to RC cars. Such shops often have an incredible variety of racing-oriented decals. If you plan to compete, be sure to include your AMA number on the upper right wing panel. Two light coats of clear polyurethane were sprayed overall.
For some great hints on obtaining a truly Kustom concours finish, write to Windy Urtnowski at Pro-Stunt Products. Ask for his free catalog when you do so; it's the most complete source of CL-oriented items available today. You may be somewhat dazzled by his enthusiasm, but he runs an honest game. If a mirrorlike finish is your goal, Windy is the master.
Install a set of 1-in. wheels, using bolts with soldered retaining nuts. Kustom Kraftsmanship's 1/2A racing wheels and Williams Bros.' WW T-style wheels have both been used on the prototype. In either case, I recommend bonding the tires to the hubs with a few drops of slow-setting CyA. If using the Williams Bros. wheels, insert short lengths of brass tubing bushings in the plastic hubs (otherwise it's going to be a short day at the ol' flying field).
Flying
Caution! Use only steel wires, which must be a minimum of .010 for solid wire or .008 for stranded cables. This design is not for use with Dacron or other string-type wires.
You'll need a hard, level surface. Let the model gain speed on release; don't yank it up. Because of a gyroscopic force called P-factor, which is associated with right-hand torque, racers tend to roll in on you. A few full-scale P-51 and F4U drivers have discovered this the hard way—while hanging upside-down from their shoulder harnesses. Some modelers counteract the P-factor by using left-hand props and crankshafts on racing models, and the nickel placed in the outboard tip also helps. Offset it how you will, though, the fact remains that "too soon is too soon."
Vary your fuel and props, aiming for 30-35 laps per tank while maintaining good speed. This will drive you nuts.
Races are usually engine-starting contests; they're won or lost in the pits. Practice getting the model to your pitman quickly. He/she will, it goes without saying, have you refueled and back into the air in three seconds flat. (If he/she does not, we need to talk. Please have that person contact me at once!)
Races are won or lost on the workbench, too—strength and alignment are critical to success. Don't let the Lil' Quickie's simplicity lull you into carelessness. Don't let that Need for Speed rush the construction.
Fly safely, and above all have fun.
See you next month.
Sources
- Kustom Kraftsmanship, P.O. Box 3010, Fallbrook, CA 92028
- Pro-Stunt Products, 9 Union Ave., Little Ferry, NJ 07643
- Bob Violett, 1373 Citrus Rd., Winter Springs, FL 32708
Transcribed from original scans by AI. Minor OCR errors may remain.

