
1992 Moffett Winner FF Bandit
Bob Bienenstein
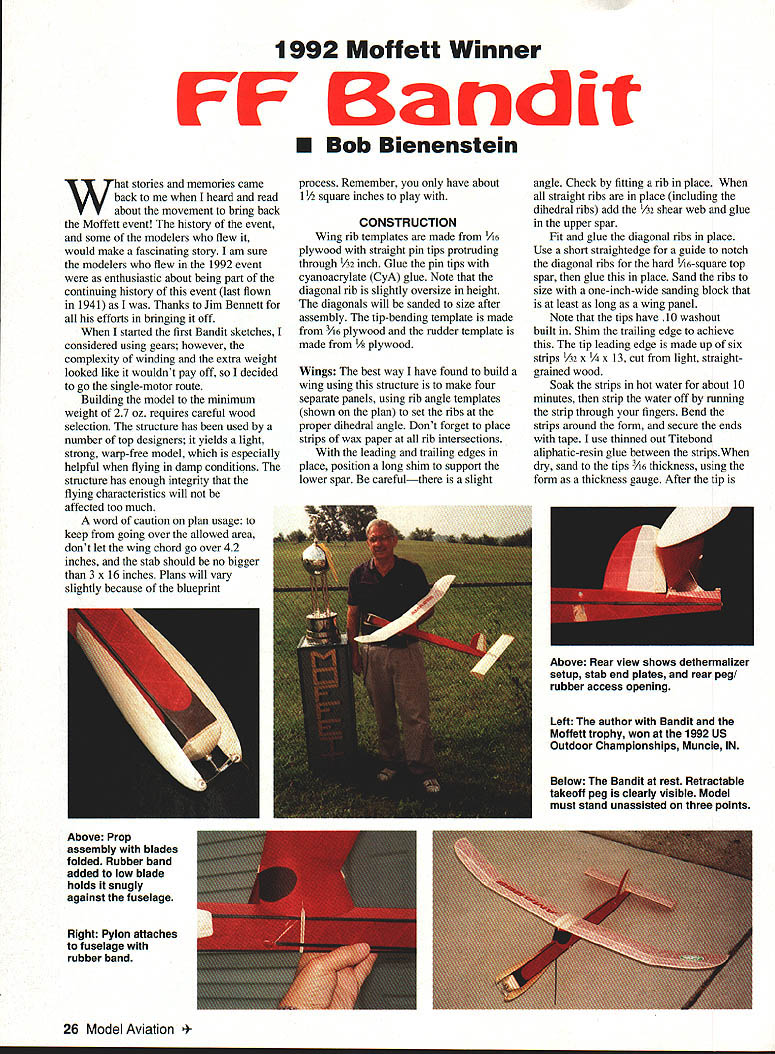
What stories and memories came back to me when I heard and read about the movement to bring back the Moffett event! The history of the event, and some of the modelers who flew it, would make a fascinating story. I am sure the modelers who flew in the 1992 event were as enthusiastic about being part of the continuing history of this event (last flown in 1941) as I was. Thanks to Jim Bennett for all his efforts in bringing it off.
When I started the first Bandit sketches, I considered using gears; however, the complexity of winding and the extra weight looked like it wouldn't pay off, so I decided to go the single-motor route.
Building the model to the minimum weight of 2.7 oz. requires careful wood selection. The structure has been used by a number of top designers; it yields a light, strong, warp-free model, which is especially helpful when flying in damp conditions. The structure has enough integrity that the flying characteristics will not be affected too much.
A word of caution on plan usage: to keep from going over the allowed area, don't let the wing chord go over 42 inches, and the stab should be no bigger than 3 x 16 inches. Plans will vary slightly because of the blueprint process. Remember, you only have about 1½ square inches to play with.
CONSTRUCTION
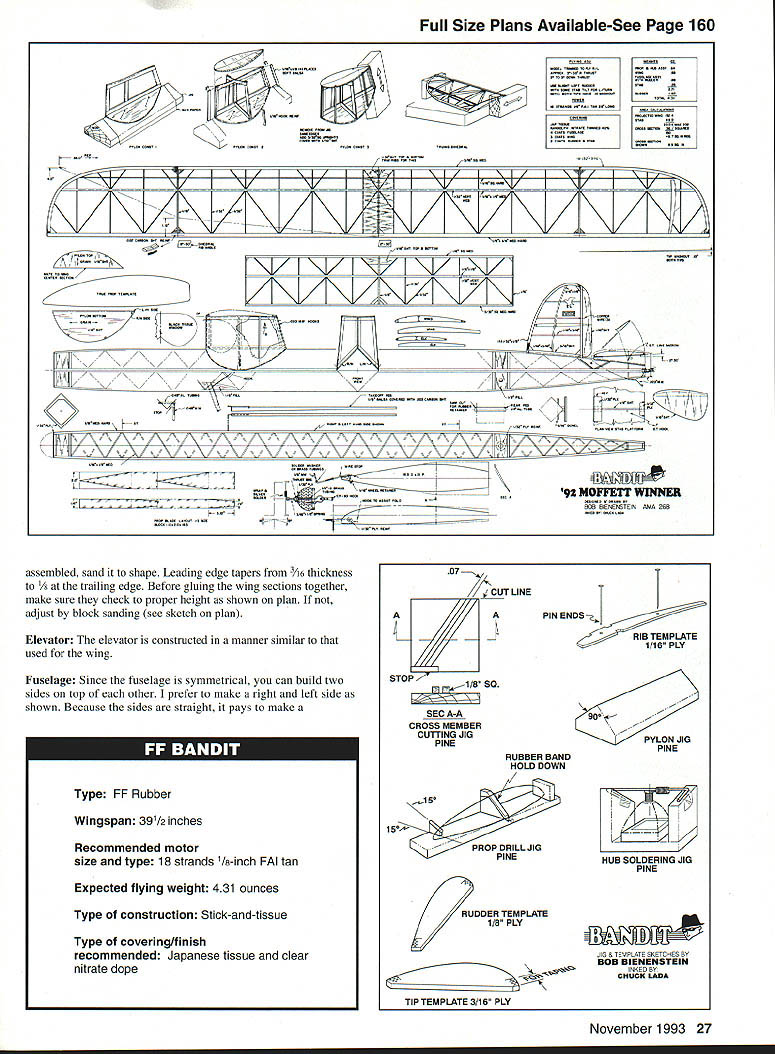
Wing rib templates are made from 1/16" plywood with straight pin tips protruding through 1/32". Glue the pin tips with cyanoacrylate (CyA) glue. Note that the diagonal rib is slightly oversize in height. The diagonals will be sanded to size after assembly. The tip-bending template is made from 3/16" plywood and the rudder template is made from 1/8" plywood.
Wings:
- The best method I have found for building a wing with this structure is to make four separate panels, using rib angle templates (shown on the plan) to set the ribs at the proper dihedral angle.
- Place strips of wax paper at all rib intersections to prevent unwanted glue joints.
- With the leading and trailing edges in place, position a long shim to support the lower spar—there is a slight angle, so check by fitting a rib in place.
- When all straight ribs are in place (including the dihedral ribs) add the 1/32" shear web and glue in the upper spar.
- Fit and glue the diagonal ribs in place. Use a short straightedge as a guide to notch the diagonal ribs for the hard 1/16" square top spar, then glue this in place.
- Sand the ribs to size with a one-inch-wide sanding block at least as long as a wing panel.
- Note that the tips have 10° washout built in. Shim the trailing edge to achieve the tip washout.
- The tip leading edge is made up of six strips 1/32" x 1/4" x 13" cut from light, straight-grained wood. Soak the strips in hot water for about 10 minutes, then strip the water off by running the strip through your fingers. Bend the strips around the form, secure the ends with tape, and use thinned Titebond aliphatic-resin glue between the strips. When dry, sand the tips to 3/64" thickness using the form as a thickness gauge. After the tip is assembled, sand and shape the leading edge to taper from 3/64" thickness to 1/32" at the trailing edge.
- Before gluing wing sections together, make sure to check proper height shown on the plan; adjust with block sanding (see sketch on plan).
Elevator:
- Constructed in a manner similar to the wing. Follow the same attention to rib and spar alignment and sanding for clean, warp-free surfaces.
Fuselage:
- Since the fuselage is symmetrical, you can build two sides on the plan, one on top of the other. Some prefer to make the right and left sides separately as shown. Because the sides are straight, it pays to make both sides at once.
- When both sides are completed, block up the plan view and glue in enough crossbraces so the fuselage stays square.
- Remove from the plan and add the rest of the crossmembers.
Pylon:
- Use light wood for the pylon. Otherwise, follow the steps on the plan.
Prop:
- The layout on the plan will give similar grain for both blades.
- After carving up the undercamber, cut the blade shape and trim the prop. Cover the undercamber with 1/2-ounce glass cloth using Hobbypoxy clear (two-part). Before using the cloth, give it a slight misting with clear Krylon to help in handling and cutting.
- When the undercamber cloth is dry, carve the top surface and cover it with 1/2-ounce cloth. The finished blades weighed 0.10 ounce each.
- It's hard to set up this type of prop without using jigs. I used 1/2" x 2" pine to make my jigs, which can be made in short order and glued with CyA (see jig sketches).
COVERING
- Predope the structure at all areas where the tissue attaches. On the fuselage, also dope the inside to reduce fuel penetration into the structure.
- With good-quality tissue, the wingtip can be covered in one piece by lightly water-misting the tissue as it is attached to the structure. Have patience.
- The wing is finished with two coats of clear nitrate dope; the elevator has two coats; and the fuselage has three coats. I use Randolph dope and thinner.
FF BANDIT
- Type: FF Rubber
- Wingspan: 39-1/2 inches
- Recommended motor size and type: 18 strands 1/8" FAI tan
- Expected flying weight: 4.31 ounces
- Type of construction: Stick-and-tissue
- Type of covering/finish recommended: Japanese tissue and clear nitrate dope
FLYING
- Check the model for any warps and remove them if necessary.
- The model should balance from 3/4" to 7/8" in front of the trailing edge.
- Power: 18 strands of 1/8" FAI tan, 28 inches long.
- Make sure the low prop blade is rubberband-loaded to keep it folded against the fuselage.
- Start with 3° down and 3° right thrust, slight left rudder tab and stab tilt for left glide.
- Begin with low-power flights and work your way up to full power.
REMEMBER
- Contests are not really won on the day of the contest—you must practice! Practice! Practice! Good luck!
Transcribed from original scans by AI. Minor OCR errors may remain.

