
The 3 Wonder
Duke Iden
Have you been wanting:
- A cheap airplane (because you're saving your money for the coming tax increases)?
- A small model that will fit in a super-subcompact car (because of the proposed gas tax increase)?
- An airplane that can be flown in a large back yard (because you don't want to drive to the flying field)?
Is that what you have been waiting for? Well, step right up and take a look at what Glenn (the Styrofoam King) Stucker has done now.
For a miserly $3 you can have a model that will fit in the old Zuzo disposable car, or can be tossed into the blue skies right near your home.
Background
Glenn invested $3 for the Sky Rider Glider at Dollywood in Tennessee. He brought the Sky Rider home, put it together, and played with it all day at the park. He had a lot of fun tossing and chasing it, but he wished it had a real engine and radio controls. So Glenn went home tired from chasing his Sky Rider Glider around the park, but full of glee, because he had an idea:
"Why not stick that Cox .049 on it that came from the airplane I got selling Christmas cards, and stick on a couple of servos and stuff and make it radio controlled?"
Materials
This project is so simple that formal plans are not needed; just follow the pictures.
Open the package and you will see all five pieces. Find or gather:
- Duct tape
- Balsa strips
- 1/8" Lite Ply
- 1/8" dowels
- A minimum two-channel radio system
- Foam-friendly glue (five-minute epoxy or yellow carpenter's glue)
- Rubber bands
- A small engine (e.g., Cox .049), servos, battery, receiver, pushrods
Assembly
- Cut some Lite Ply pieces so you will have something that looks like the engine mount / radio cover.
- Use the 1/8" dowels with rubber bands to hold components on.
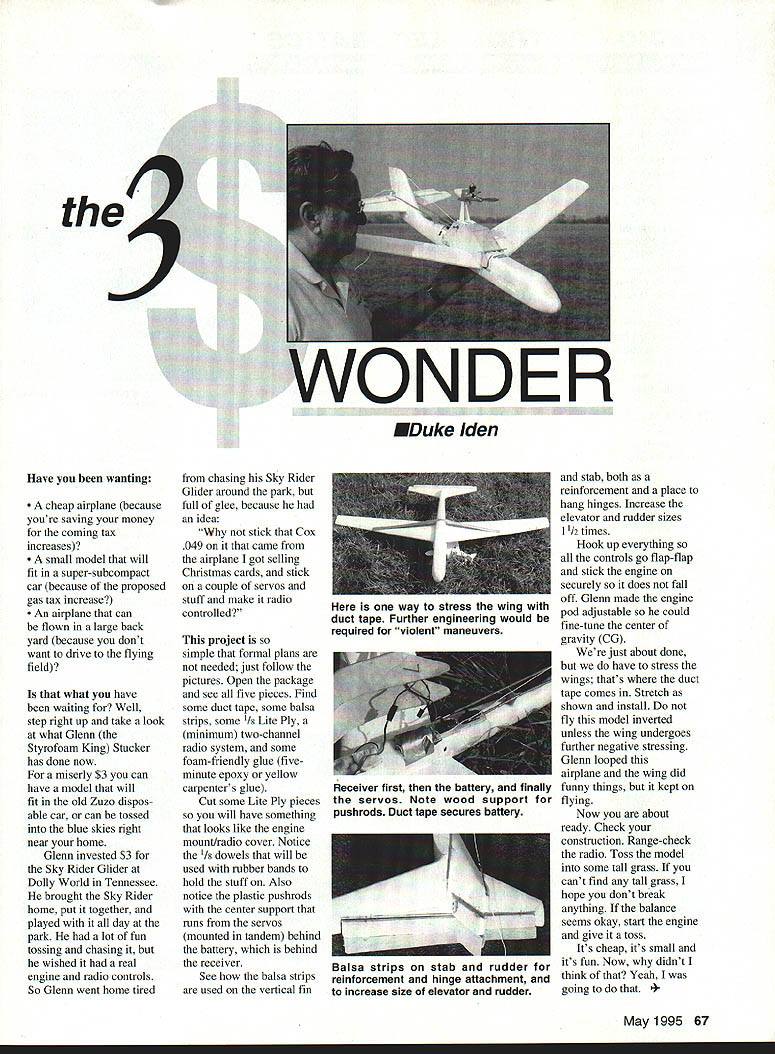
- Note the plastic pushrods with a center support that runs from the servos (mounted in tandem) behind the battery, which is behind the receiver.
- Use balsa strips on the vertical fin and stabilizer both as reinforcement and as places to hang hinges. Increase the elevator and rudder sizes by about 1½ times.
- Hook up everything so all the controls move — flap, flap, flap — and attach the engine securely so it does not fall off. Glenn made the engine pod adjustable so he could fine-tune the center of gravity (CG).
Wing stressing and finishing
We're just about done, but we do have to stress the wing; that's where the duct tape comes in. Stretch and install the tape as shown in the pictures. Do not fly this model inverted unless the wing has undergone further negative stressing. Glenn looped this airplane (performed aerobatic loops) and the wing did funny things, but it kept on flying.
Setup and first flight
- Check your construction carefully.
- Range-check the radio.
- Toss the model into some tall grass for the first throws. If you can't find any tall grass, be careful — I hope you don't break anything.
- If the balance seems okay, start the engine and give it a toss.
It's cheap, it's small and it's fun.
Now, why didn't I think of that? Yeah, I was going to do that.
Transcribed from original scans by AI. Minor OCR errors may remain.

