
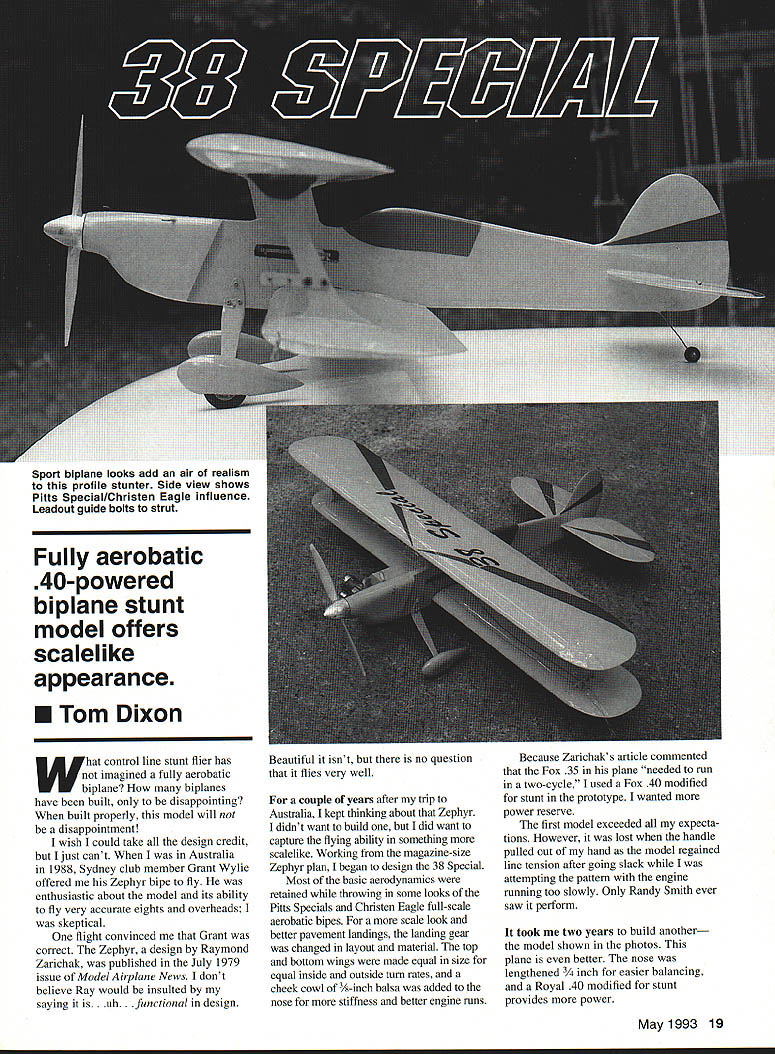

38 SPECIAL
Tom Dixon
Fully aerobatic .40-powered biplane stunt model offers scalelike appearance.
What control-line stunt flier has not imagined a fully aerobatic biplane? How many biplanes have been built, only to be disappointing? When built properly, this model will not be a disappointment!
I wish I could take all the design credit, but I just can't. When I was in Australia in 1988, Sydney club member Grant Wylie offered me his Zephyr bipe to fly. He was enthusiastic about the model and its ability to fly very accurate eights and overheads; I was skeptical.
One flight convinced me that Grant was correct. The Zephyr, a design by Raymond Zarichak, was published in the July 1979 issue of Model Airplane News. I don't believe Ray would be insulted by my saying it is... uh... functional in design.
Beautiful it isn't, but there is no question that it flies very well.
For a couple of years after my trip to Australia, I kept thinking about Zephyr. I didn't want to build one, but I did want to capture the flying ability in something more scalelike. Working from the magazine-size Zephyr plan, I began to design the 38 Special.
Most of the basic aerodynamics were retained while throwing in some looks of the Pitts Specials and Christen Eagle full-scale aerobatic bipes. For a more scale look and better pavement landings, the landing gear was changed in layout and material. The top and bottom wings were made equal in size for equal inside and outside turn rates, and a cheek cowl of 3/8-inch balsa was added to the nose for more stiffness and better engine runs.
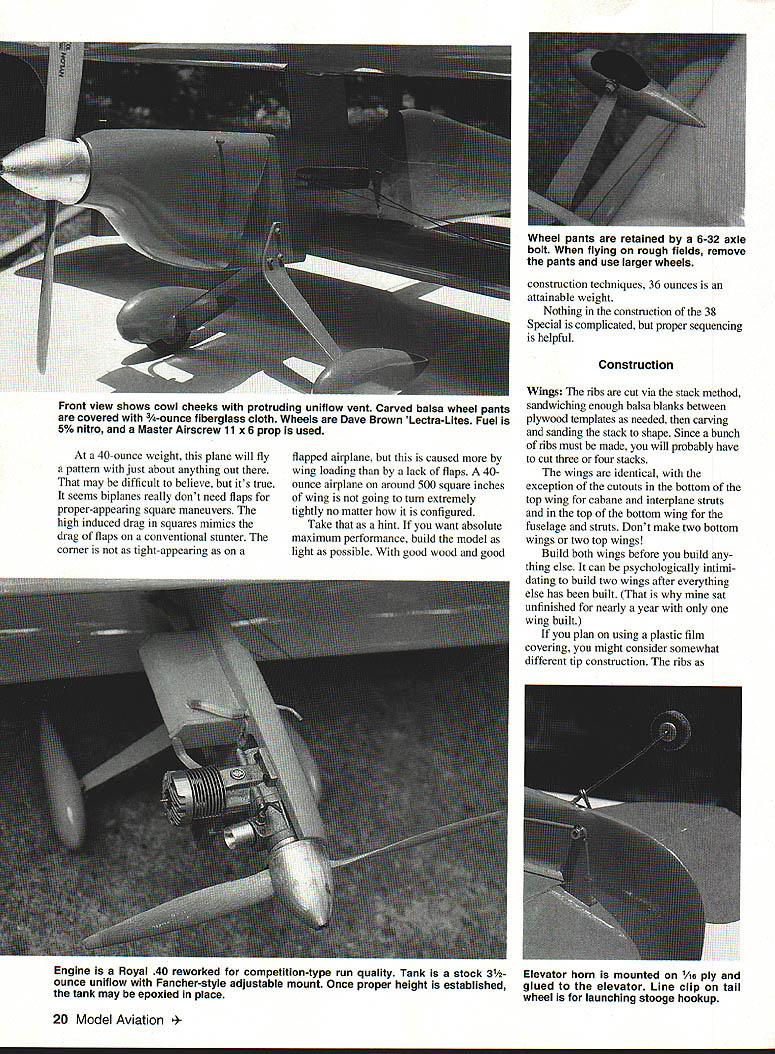
Because Zarichak's article commented that the Fox .35 in his plane "needed to run in a two-cycle," I used a Fox .40 modified for stunt in the prototype. I wanted more power reserve.
The first model exceeded all my expectations. However, it was lost when the handle pulled out of my hand as the model regained line tension after going slack while I was attempting the pattern with the engine running too slowly. Only Randy Smith ever saw it perform.
It took me two years to build another—the model shown in the photos. This plane is even better. The nose was lengthened 3/4 inch for easier balancing, and a Royal .40 modified for stunt provides more power.
At a 40-ounce weight, this plane will fly a pattern with just about anything out there. That may be difficult to believe, but it's true. It seems biplanes really don't need flaps for proper-appearing square maneuvers. The high induced drag in squares mimics the drag of flaps on a conventional stunter. The corner is not as tight-appearing as on a flapped airplane, but this is caused more by wing loading than by a lack of flaps. A 40-ounce airplane on around 500 square inches of wing is not going to turn extremely tightly no matter how it is configured.
Take that as a hint. If you want absolute maximum performance, build the model as light as possible. With good wood and good construction techniques, 36 ounces is an attainable weight.
Nothing in the construction of the 38 Special is complicated, but proper sequencing is helpful.
Construction
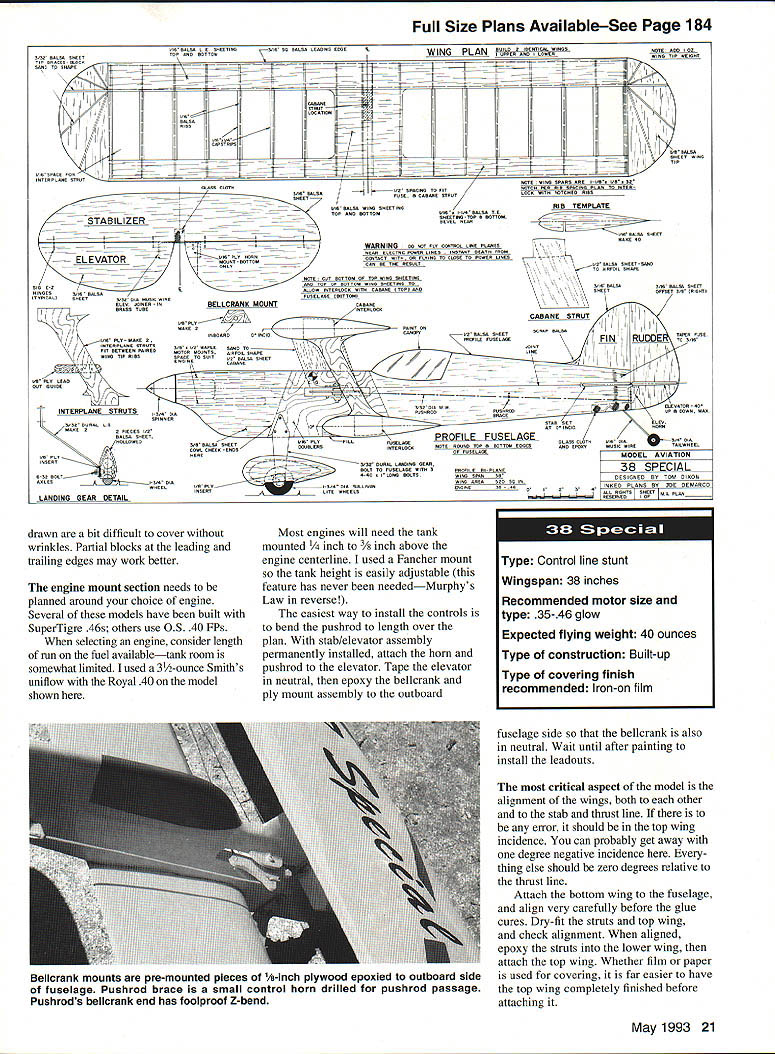
Wings
The ribs are cut via the stack method, sandwiching enough balsa blanks between plywood templates as needed, then carving and sanding the stack to shape. Since a bunch of ribs must be made, you will probably have to cut three or four stacks.
The wings are identical, with the exception of the cutouts in the bottom of the top wing for cabane and interplane struts and in the top of the bottom wing for the fuselage and struts. Don't make two bottom wings or two top wings!
Build both wings before you build anything else. It can be psychologically intimidating to build two wings after everything else has been built. (That is why mine sat unfinished for nearly a year with only one wing built.)
If you plan on using a plastic film covering, you might consider somewhat different tip construction. The ribs as drawn are a bit difficult to cover without wrinkles. Partial blocks at the leading and trailing edges may work better.
The engine-mount section needs to be planned around your choice of engine. Several of these models have been built with SuperTigre .46s; others use O.S. .40 FPs.
When selecting an engine, consider length of run on the fuel available—tank room is somewhat limited. I used a 3-1/2-ounce Smith's uniflow with the Royal .40 on the model shown here.
Most engines will need the tank mounted 1/4 inch to 3/8 inch above the engine centerline. I used a Fancher mount so the tank height is easily adjustable (this feature has never been needed—Murphy's Law in reverse!).
The easiest way to install the controls is to bend the pushrod to length over the plan. With the stab/elevator assembly permanently installed, attach the horn and pushrod to the elevator. Tape the elevator in neutral, then epoxy the bellcrank and ply mount assembly to the outboard fuselage side so that the bellcrank is also in neutral. Wait until after painting to install the leadouts.
The most critical aspect of the model is the alignment of the wings, both to each other and to the stab and thrust line. If there is to be any error, it should be in the top wing incidence. You can probably get away with one degree negative incidence here. Everything else should be zero degrees relative to the thrust line.
Attach the bottom wing to the fuselage, and align very carefully before the glue cures. Dry-fit the struts and top wing, and check alignment. When aligned, epoxy the struts into the lower wing, then attach the top wing. Whether film or paper is used for covering, it is far easier to have the top wing completely finished before attaching it.
Specifications
- Type: Control-line stunt
- Wingspan: 38 inches
- Recommended motor size and type: .35–.46 glow
- Expected flying weight: 40 ounces
- Type of construction: Built-up
- Type of covering finish recommended: Iron-on film
As for finishing technique, do whatever pleases you, but keep it as light as possible.
Flight trim for biplanes is a little different. Because of the short fuselage, the rudder and thrust offsets are very sensitive. I use zero engine offset and only about 1/16- to 1/4-inch rudder offset. Mine balances level when held 2-3/8 inches back from the leading edge of the top wing. If it's more nose heavy, the model won't do clean squares; more tail heavy and it won't groove in level flight. You may want it different, but don't vary too far from the balance point mentioned.
My 38 Special has exactly 1/2 ounce of built-in tip weight in the top outboard wing only. I didn't build in an adjustable tip weight box. With MonoKote, it's always adjustable: just cut and patch. However, with the outboard engine cylinder, even this verges on being too much tip weight. Start with about 3/8 ounce, or be ready to take some out if you find that the model rolls outboard too much in both inside and outside maneuvers.
Leadout placement
Leadout position is the big deal on a biplane. If it's wrong and you can't change it, then you have just another sport plane, not a real performer. Here's the way to get it correct right away:
- First locate the fore-and-aft CG (center of gravity) as indicated above.
- Hang the plane from a piece of string tied around the inboard strut. Slide the string up and down the strut until the model hangs vertical. Everything needs to be on the plane at this point—muffler, prop, wheel pants, tank—everything.
- Once the model hangs vertical, mark the string location on the strut.
- Make a line guide of 1/8-inch plywood, and bolt it to the strut with two 4-40 bolts. The guide should be extra-long to begin with.
- Tie the string around the guide. Slide the string back and forth on the guide so the plane hangs about two or three degrees nose down. The string is the midpoint between your two leadouts.
- Remove the guide, drill the holes, bush with eyelets or tubing, paint it, and bolt back in place when dry. Add your leadouts, and you're ready to fly.
You can make the guide adjustable if you wish, but the above method will be very, very close to final placement anyway. I prefer to make a new guide if needed, rather than carry the weight and drag all the time. The guide could be made vertically adjustable, but if it's properly located to begin with, it won't need vertical adjustment.
If the plane flies crooked and the guide is not in the correct place, there is a warp somewhere. Twist one or more of the wings in the proper direction while heating with a heat gun, and let it cool while holding the new setting. After a couple tries, the model will be flying with level wings. By the way, the heat gun also works on paint and paper, not just on plastic film. There are no flaps to tweak, and tabs are ugly, so do it this way.
From here on, the 38 Special trims and flies just like any other profile stunter. I ended up using an 11 x 6 Master Airscrew wood prop, 5% nitro Tefender P.A. fuel, .45 venturi, and 63-foot lines. Lap times are about 5.2 to 5.3 seconds. With the landing gear location shown for pavement, the model can be put down on the mains and rolled half a lap before the tail wheel comes down.
Enjoy your 38 Special, and fly safely!
Transcribed from original scans by AI. Minor OCR errors may remain.

