

4-60
A sequel to a highly successful original can often be a disappointment — witness some of the grim sequels in movies and on TV. Frequently the good movie is followed by Goodmovie II, III, IV, etc., each progressively worse as the creators have exhausted their originality on the first effort.
By good fortune, this sequel is even more outstanding than the original. The 4-60 retains all the virtues of the 4-40 and adds easier construction, higher strength, smoother aerobatics, and markedly improved visibility. The excellent ground-handling and takeoff/landing qualities are retained in the larger version. More importantly, the 4-60 handles much better in moderate to high wind than the smaller 4-40. We have consistently been able to fly various 4-60 prototypes in winds that have grounded more conventional designs.
Previous experience enlarging Old-Timers taught that a simple scale-up can markedly alter flying qualities. Therefore, the 4-60 includes several changes from the 4-40 developed by fine-tuning a series of prototypes. The resulting 4-60 possesses delightful flying characteristics, simple construction, and appealing lines.
Some see a Goodyear racer in this design; others are reminded of home-built aircraft, contemporary aerobatic full-size designs, or even something from WW I. Whatever the reference, the 4-60 is more attractive than ordinary "Stik" designs, yet is nearly as easy to build.
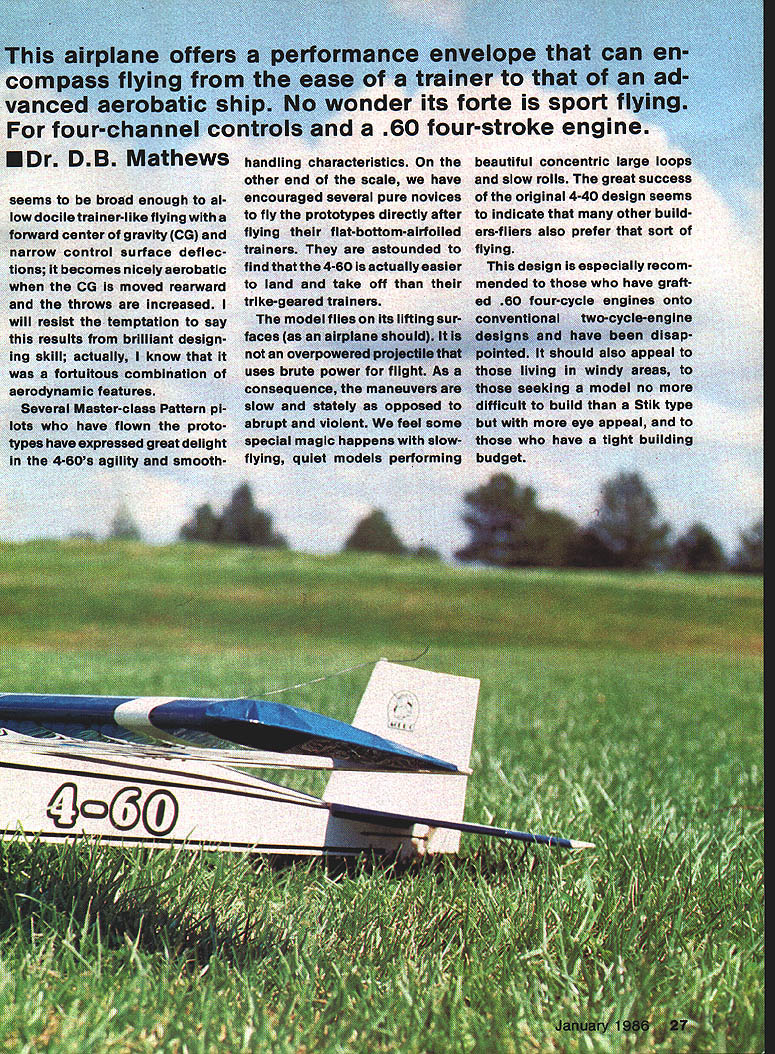
Dr. D. B. Mathews designed the model to allow docile, trainer-like flying with a forward center of gravity (CG) and narrow control-surface deflections; it becomes nicely aerobatic when the CG is moved rearward and throws are increased. The result is a fortuitous combination of aerodynamic features rather than a single brilliant design stroke.
Several Master-class Pattern pilots have flown prototypes and expressed great delight. The 4-60's agility and smooth handling are its forte. Sport .60 four-stroke engine handling characteristics at the other end of the scale have encouraged several novices to fly prototypes directly after flying flat-bottom-airfoiled trainers; they are astounded to find the 4-60 is actually easier to land and take off than trike-geared trainers. Beautiful concentric loops and slow rolls have proved a great success. The original 4-40 design suggests many builders and fliers prefer this flying style.
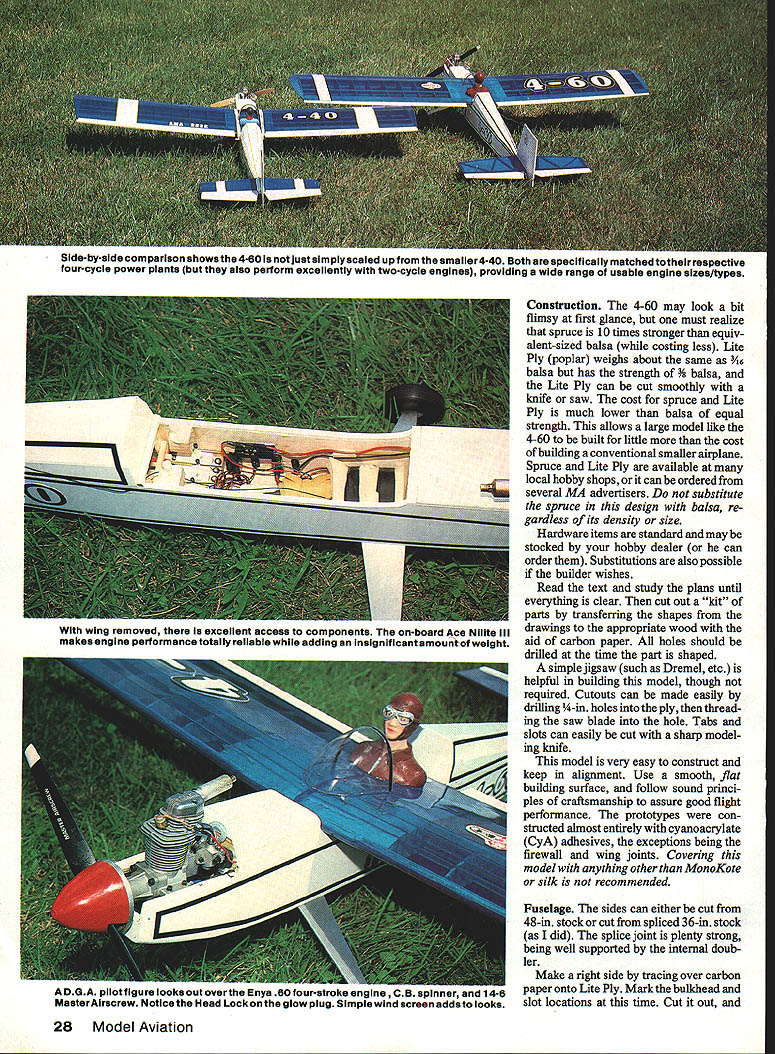
Some builders have grafted two-cycle engines onto fast models; when brute power is used the consequence may be slow, stately flight or abrupt, violent behavior. Special magic happens flying quiet models that perform on a budget. Side-by-side comparison shows the 4-60 is essentially a scaled-up 4-40. Both, when matched to their respective four-cycle power plants, also perform excellently with two-cycle engines, providing a wide range of usable engine sizes and types.
Construction
The 4-60 may look a bit flimsy at first glance, but spruce is about ten times stronger than equivalent-sized balsa and costs less. Lite Ply (poplar) weighs about the same as 3/16" balsa but has the strength of 3/8" balsa; it can be cut smoothly with a knife or saw. Because spruce and Lite Ply cost much less than balsa of equal strength, a large model like the 4-60 can be built at little more cost than a conventional smaller airplane. Spruce and Lite Ply are available from local hobby shops or from mail-order suppliers. Substitutions are possible if the builder wishes, but do not substitute the spruce in this design with balsa regardless of its density or size.
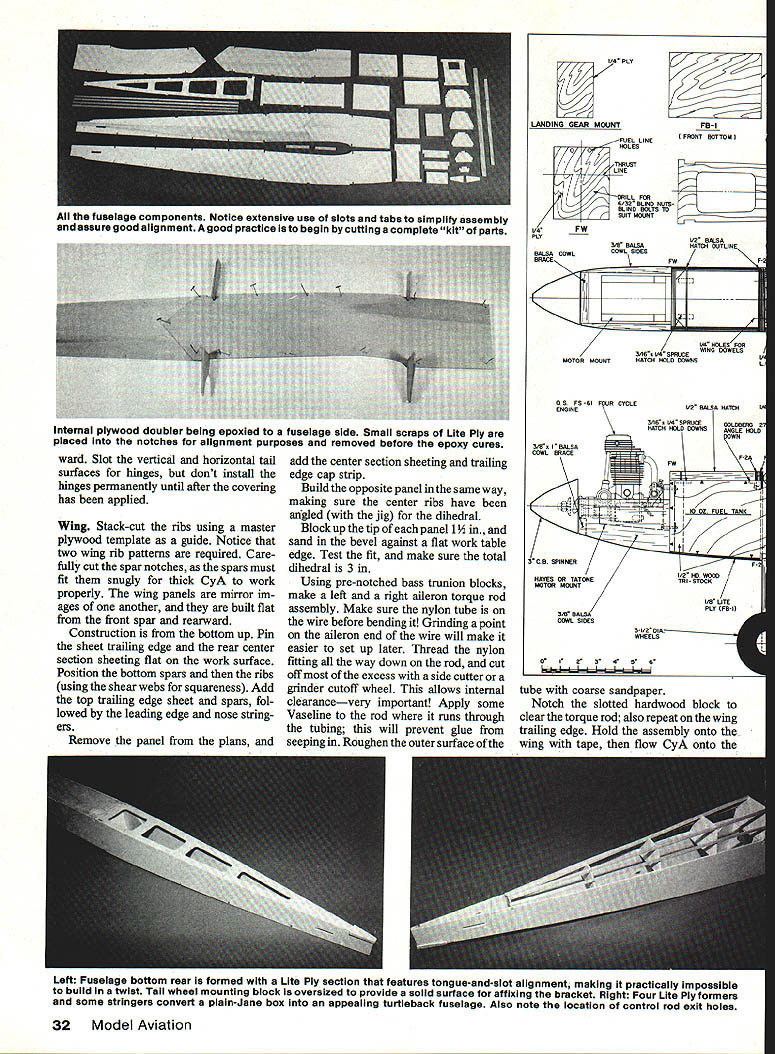
Hardware items are standard and may be stocked by your hobby dealer. Read the text and study the plans until everything is clear. Cut out a "kit" of parts by transferring shapes from the drawings to the appropriate wood with carbon paper. Drill holes before shaping the part. A simple jigsaw or Dremel tool is helpful but not required. Cutouts can be made by drilling 1/4" holes in ply and threading the saw blade through the hole. Tabs and slots can be cut with a sharp modeling knife.
- Keep alignment: use a smooth flat building surface and follow sound craftsmanship practices to ensure good flight performance.
- Adhesives: prototypes were constructed almost entirely with cyanoacrylate (CyA) adhesives, except the firewall and wing joints which used epoxy.
- Covering: MonoKote or silk is recommended; other coverings may be too flexible for some areas.
Fuselage
The fuselage sides can be cut from 48" stock or spliced from 36" stock. The splice joint is plenty strong if well supported with an internal doubler.
- Make the right side by tracing over carbon paper onto Lite Ply. Mark bulkhead and slot locations, cut it out, and use it as a pattern for the left side and both doublers. Note that the 1/8" ply called out is actually 3mm; slots should be a tight fit for the Lite Ply.
- Trace and develop the other parts, then dry-fit everything before final assembly. Cement the doublers, firewall reinforcing, and landing gear blocks to the fuselage sides with epoxy.
- Drill 1/4" holes in the F-2 assembly. Without gluing, fit the fuselage sides, F-2, F-3, and the middle bottom unit together; the tabs in the floor fit into the slots in the sides. The middle bottom holds the unit square. When satisfied, flow thin CyA into all joints, then follow with a bead of thick CyA for extra strength.
- Fit the rear bottom section and clamp the tail post together with clothespins or similar. Keep edges aligned and ensure the fuselage is square, then repeat the CyA gluing sequence. Add the turtledeck formers, tailwheel mount, and spruce stringers.
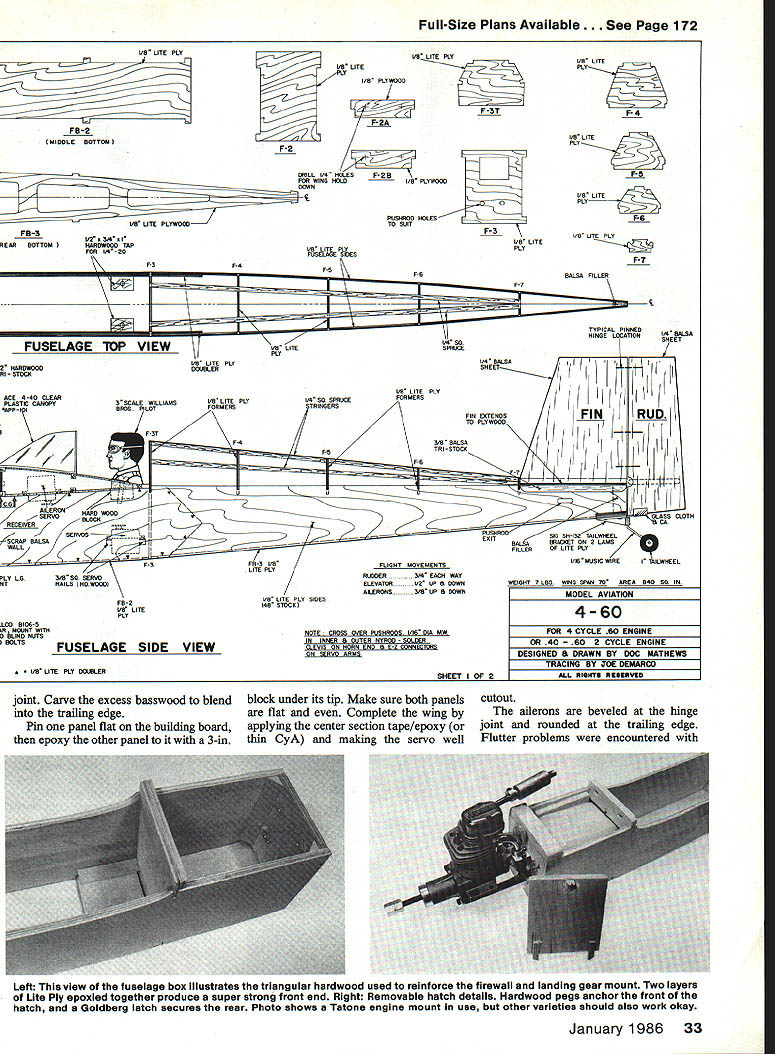
- Drill the firewall for engine mount, fuel lines, and throttle wire. Place the thrust line according to the drawings. Epoxy the firewall onto the sides and also the triangular stock; use masking tape to hold alignment while the epoxy sets.
- Install the fuselage front bottom section and the 1/8" ply landing gear mount. Tack-glue the block for the removable hatch onto the top, then cut the front segment with a razor saw. The prototype uses two hardwood sections at the front and a Goldberg Angle Hold-Down fitting to keep the hatch in place, but any popular hold-down will work.
Fuel tank and plumbing:
- A Sullivan SS-10 works well; be sure to place it all the way to the top of the compartment.
- Coat the tank area with fuel-proofer; warmed 30-min cure epoxy works well.
- Set the tank in a foam-rubber cocoon on top of the battery pack.
Throttle linkage:
- Conventional cable can be used, though space is limited on many four-stroke engines.
- A length of .047" music wire with a right-angle bend into the throttle arm makes a good substitute for cable. Run the inner (yellow) Goldenrod straight from the throttle arm to the servo. Use a threaded coupler and clevis on the servo end.
Nose and engine installation:
- Temporarily install engine and mount, then glue the nose blocks with CyA to the firewall. Ensure clearance for the spinner backplate, then carve the blocks to shape. Set the fuselage aside and work on other units.
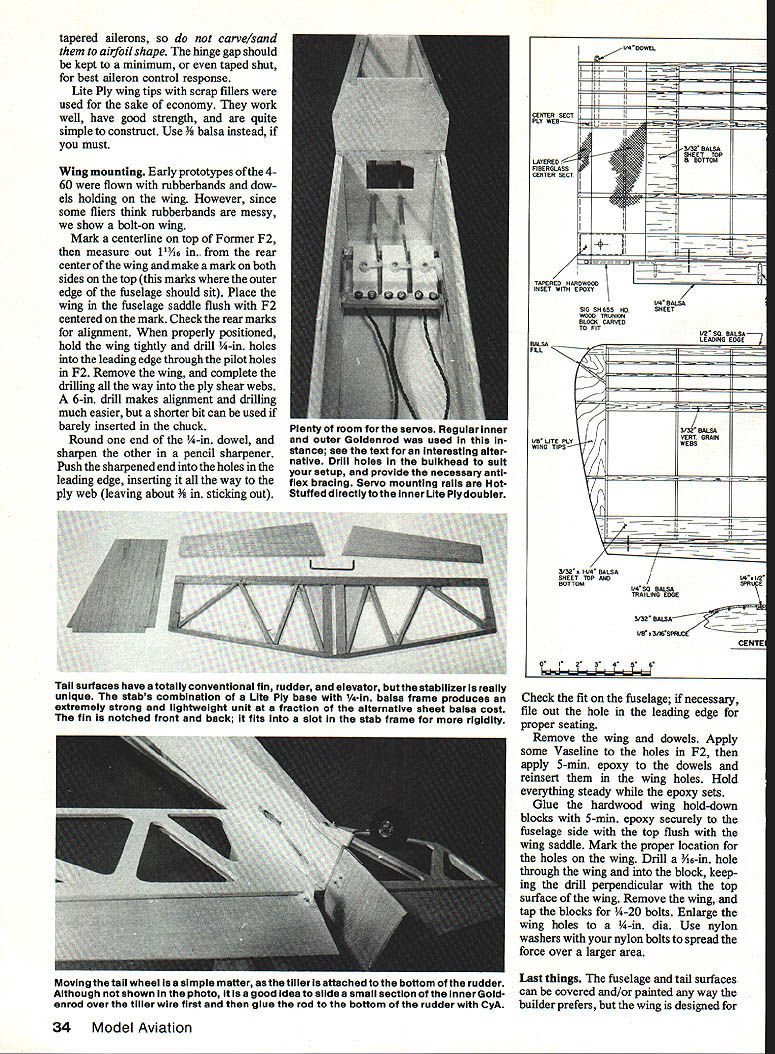
Tail surfaces
The elevator construction is unusual but very strong; it weighs only about an ounce more than a 3/16" balsa stab. The ply may warp slightly after cutouts, but pinning it flat on the building board and CyA-gluing the frame over it will produce a warp-free unit.
- Hinges are slotted entirely in balsa; they have proven secure.
- If preferred, the stab can be cut from balsa, but the ply-and-frame method is lighter and cheaper.
- Form elevators by beveling the leading edges and either rounding the trailing edges or sanding to an airfoil shape; no detectable difference was found in flying characteristics.
- Notch and drill for the 1/8" music-wire joiner, ensuring elevator ends match the stab ends.
Rudder/fin:
- Straightforward construction by gluing ply parts over a built-up balsa frame.
- Rudder hinge line is 1/8" from the trailing edge so the hinge slot stays entirely in balsa.
- Install 1/8" plywood doublers on the tail surfaces and sand to final shape.
Tailwheel:
- Cut and assemble the tailwheel leaf spring from 1/8" x 1/2" music wire. Bend the spring and fit it to the fuselage with a blind nut plate.
Wings
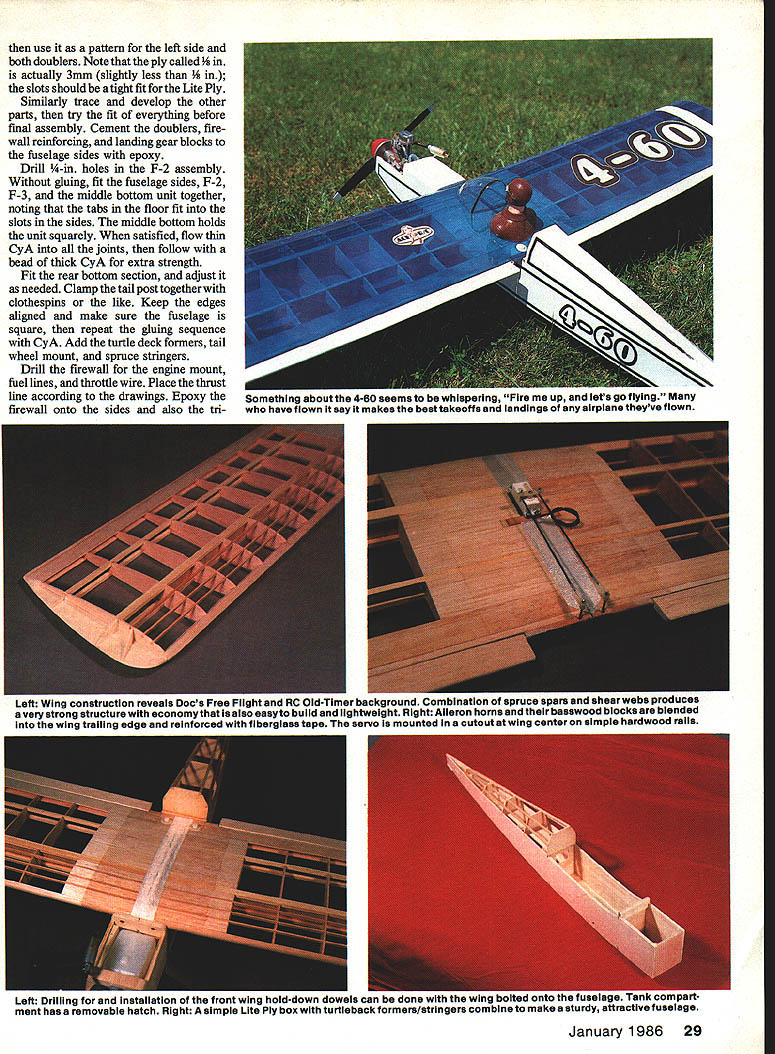
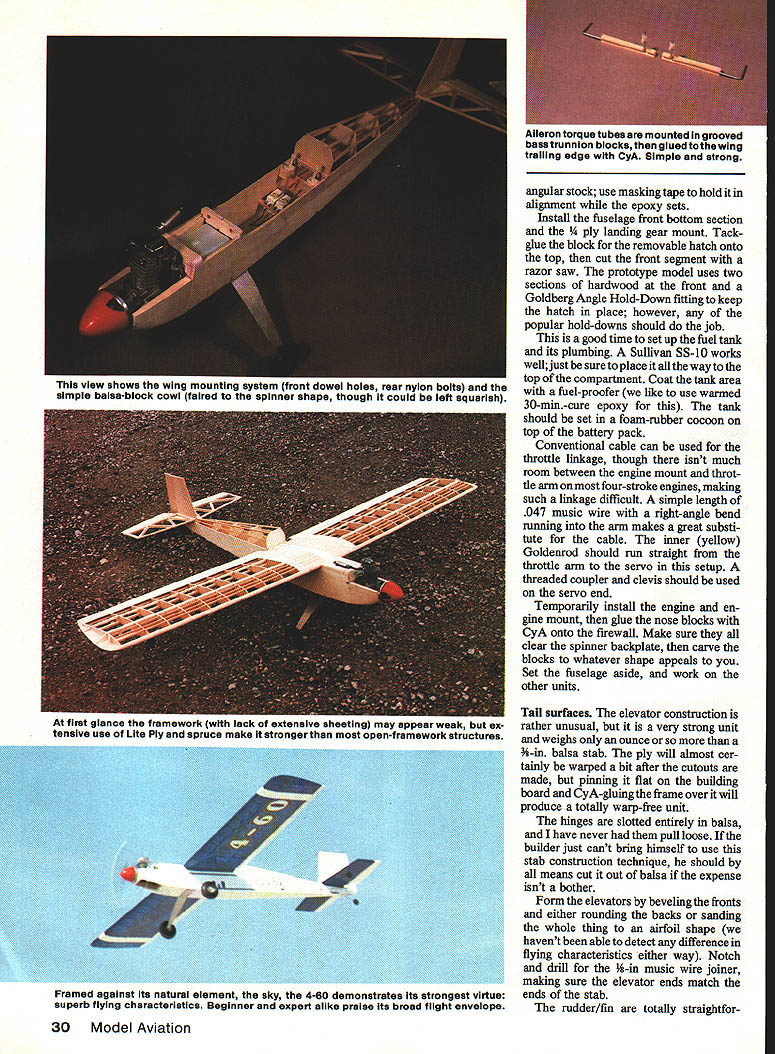
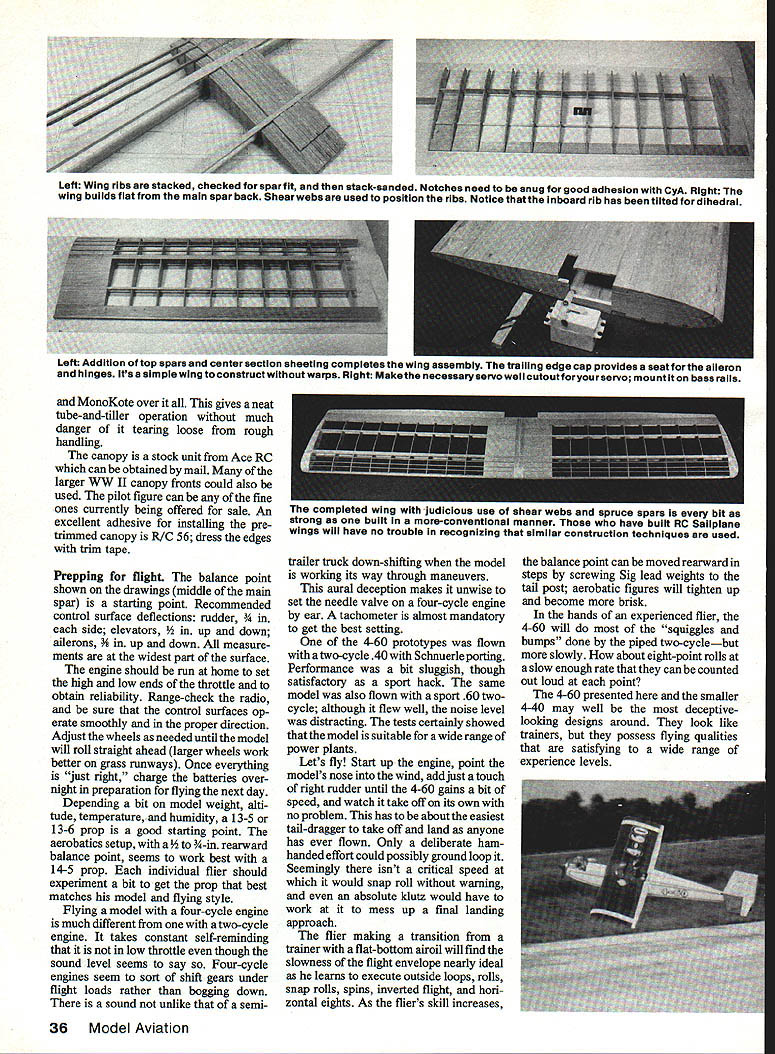
The wing uses a single spar constructed of 1/4" spruce with 1/8" Lite Ply shear webs. The ribs are 1/8" balsa with cap strips of 1/8" x 1/4" balsa. The center section is ply sheeting over spruce spars. The ailerons are full-span mass-balanced units using torque tubes mounted in grooved bass trunnion blocks, then glued to the wing trailing edge with CyA — simple and strong.
- Stack-cut ribs using a master plywood template; two wing rib patterns are required.
- Carefully cut spar notches so spars fit snugly; snug fit is important for thick CyA.
- Build panels flat from the front spar rearward. Construction is from the bottom up:
- Pin sheet trailing edge and rear center sheeting flat.
- Position bottom spars and ribs (use shear webs for squareness).
- Add top trailing edge sheet and spars, followed by leading edge and nose stringers.
- Remove the panel from the plans, add center section sheeting and trailing edge cap strip. Build the opposite panel similarly, ensuring center ribs are angled with a jig for dihedral.
- Block up the tip of each panel 1 1/4" and sand in bevel against a flat table edge. Test fit and make sure total dihedral is 3".
- Torque rod/aileron assembly:
- Use pre-notched bass trunnion blocks for left and right torque-rod assemblies.
- Ensure the nylon tube is on the wire before bending it.
- Grind a point on the aileron end of the wire to ease setup. Thread the nylon fitting down on the rod and trim excess for internal clearance.
- Apply Vaseline to the rod where it runs through tubing to prevent glue seeping in. Roughen the tube outer surface.
- Notch the slotted hardwood block to clear the torque rod and repeat on the wing trailing edge. Hold the assembly with tape, then flow CyA onto the tube and into the wood.
- Use the jig to ensure ailerons are identical.
- Join panels: pin one panel flat, epoxy the other to it with a 3" block under its tip. Ensure both panels are flat and even. Apply center section tape/epoxy (or thin CyA) and make servo well cutout.
- Ailerons are beveled at the hinge joint and rounded at the trailing edge. Do not carve/sand tapered ailerons to an airfoil shape — flutter problems were encountered. Keep hinge gap minimal; tape shut if necessary.
- Wing tips: Lite Ply wingtips with scrap fillers are economical and strong. Use 3/8" balsa if preferred.
Wing mounting:
- Early prototypes used rubber bands and dowels, but the plans show a bolt-on wing.
- Mark centerline on top of Former F2, measure 1-13/16" from the rear center of the wing on both sides, and position the wing flush with F2 centered on the mark. Check rear marks for alignment.
- Hold wing tightly and drill 1/4" holes into the leading edge through pilot holes in F2. Complete drilling into ply shear webs.
- Round one end of a 1/4" dowel and sharpen the other. Push the sharpened end into holes in the leading edge to the ply web, leaving about 3/8" protruding.
- Check fit on fuselage; file hole in leading edge if necessary.
- Remove wing and dowels. Apply Vaseline to holes in F2, then apply 5-minute epoxy to the dowels and reinsert them. Hold steady while epoxy sets.
- Glue hardwood wing hold-down blocks with 5-minute epoxy to fuselage side with top flush to wing saddle. Mark hole locations on wing, drill 3/16" hole through wing into block, keeping drill perpendicular. Tap blocks for 1/4-20 bolts. Enlarge wing holes to 1/4" dia. Use nylon washers with nylon bolts to spread force.
Parts and Callouts
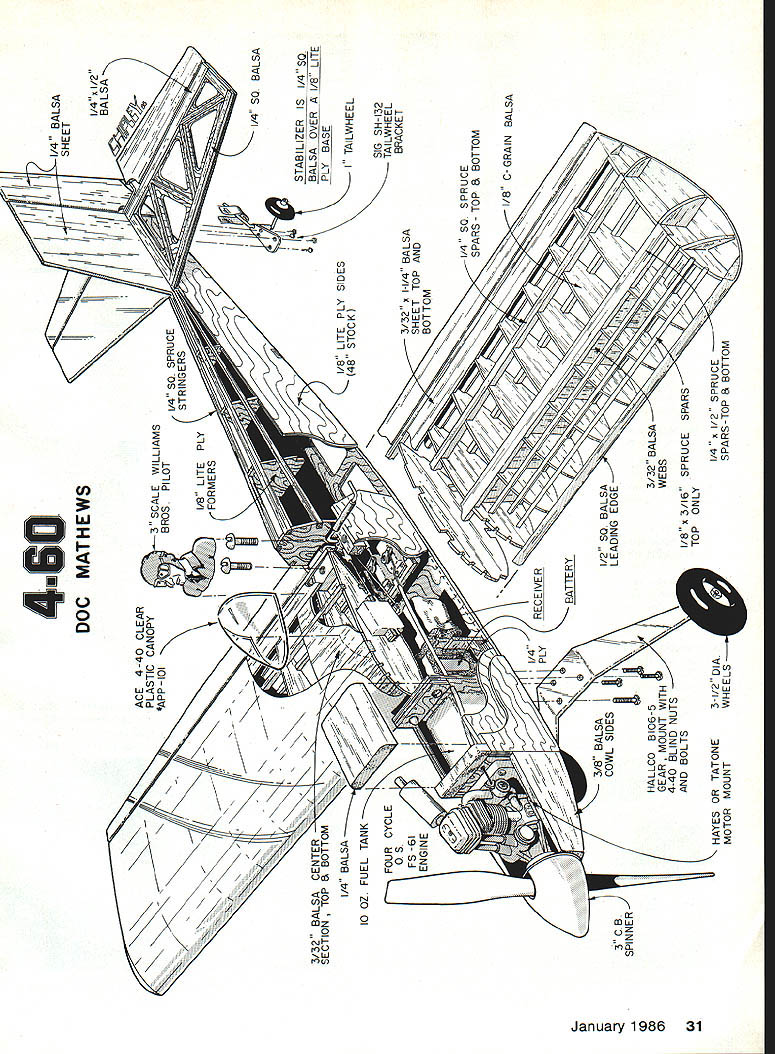
- Doc Mathews design
- Clear plastic canopy (approx. scale Williams Bros. pilot)
- 1/8" Lite Ply formers and sides (4'8" stock)
- 1/4" sq. spruce stringers
- 1/4" sq. balsa
- Stabilizer: 1/4" sq. balsa on 1/8" Lite Ply base
- Tailwheel and tailwheel bracket
- 1/8" Lite Ply wing ribs
- 1/8" spruce spars — top & bottom
- 3/32" x 3/16" spars top only
- 1/8" c-grain balsa leading edge
- 1/2" sq. balsa ribs
- Receiver, battery
- 1/4" ply center section
- 3/32" balsa center section, top & bottom
- 1/4" balsa
- 10 oz. fuel tank
- Four-cycle engine (typical)
- 3/8" balsa cowl sides
- HALICO, Big-5/16" hex bolts, nuts and washers
- 3" dia. wheels
- Hayes or Teton motor mount
- 3" C.B. spinner
- 3/32" sq. spruce leading edge and 1/8" balsa spars (other small callouts and dimensions related to wing and fuselage are on the drawing)
Last things / Finishing
- Covering: fuselage and tail surfaces can be covered and painted as desired. The wing is designed for MonoKote or silk covering; other materials may be too flexible.
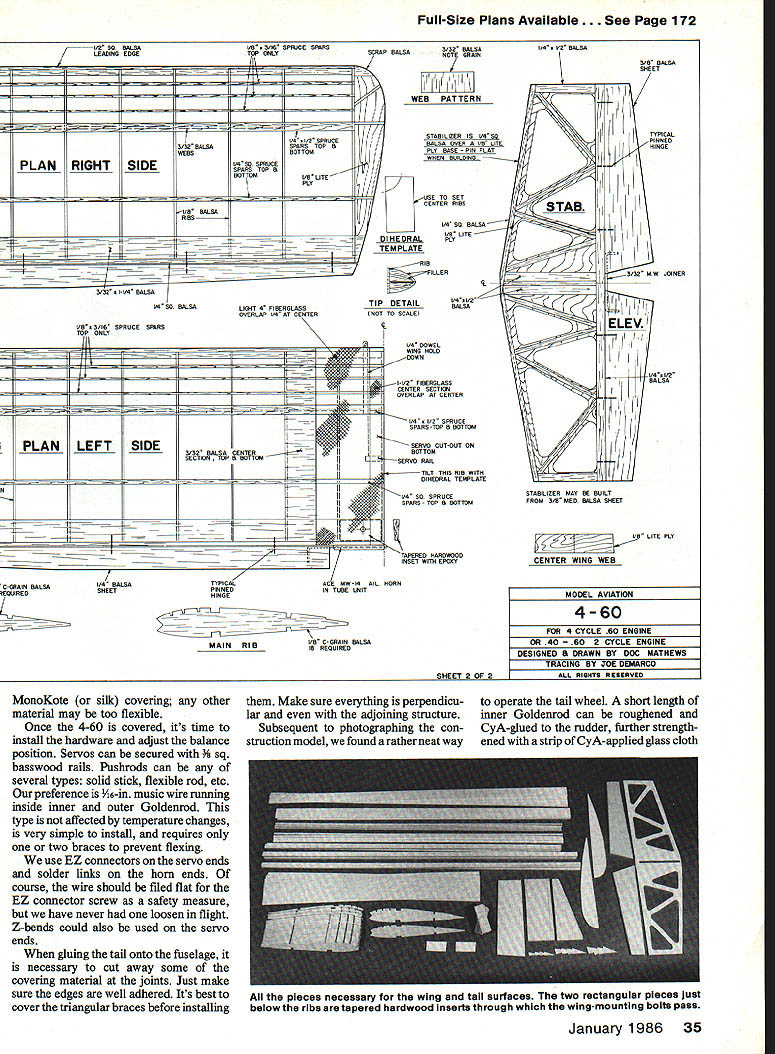
- Install hardware and adjust balance. Secure servos on 3/8" basswood rails. Pushrods may be any type; preference is 1/16" music wire inside inner and outer Goldenrod. This system is not affected by temperature, is simple to install, and requires only one or two braces to prevent flexing.
- Use EZ connectors on servo ends and solder links on horn ends. File the wire flat where the EZ connector screw contacts it.
- When gluing the tail onto the fuselage, cut away some covering at joints and ensure edges are well adhered. Cover triangular braces before installing them. Ensure everything is perpendicular and even.
- Tailwheel operation: roughen a short length of inner Goldenrod and CyA-glue it to the rudder, strengthen further with a strip of CyA-applied glass cloth if desired.
- Canopy: a stock unit from Ace RC or larger WWII-style canopy fronts can be used. Install pre-trimmed canopy with RC 56 adhesive and dress edges with trim tape.
Prepping for flight
- Balance point: the drawing's balance point (middle of the main spar) is a starting point.
- Recommended control surface deflections (measured at widest part of surface):
- Rudder: 3/4" each side
- Elevators: 1/2" up and down
- Ailerons: 3/8" up and down
- Engine: run at home to set high and low throttle and to ensure reliability. Range-check the radio and verify control surfaces operate smoothly and in the proper direction. Adjust wheels for straight rolling (larger wheels work better on grass).
- Battery: charge overnight before first flight.
Prop recommendations:
- Depending on weight, altitude, temperature, and humidity, a 13x5 or 13x6 prop is a good starting point.
- For aerobatics with a 1/2" rearward balance, a 14x5 prop tends to work well.
- Experiment to find the best prop for your model and flying style.
Four-cycle engine notes:
- Flying with a four-cycle engine is different from a two-cycle. The engine often sounds like it’s at low throttle even when it isn't. Four-strokes tend to "shift gears" under load rather than bogging down.
- Do not set the needle valve by ear — use a tachometer to obtain the best setting.
- One prototype flew with a two-cycle .40 (Schnuerle porting) — performance was satisfactory but a bit sluggish. A sport .60 two-cycle flew well but was noisy. The model accommodates a wide range of powerplants.
Flying
- Start with the engine running, point into the wind, add slight right rudder as needed, and the 4-60 will accelerate and take off on its own. It is among the easiest tail-draggers to take off and land. Only deliberate ham-handed control will ground loop it.
- The aircraft has no abrupt snap-roll speed, and even an inexperienced pilot will find it forgiving on final approach.
- Transitioning pilots from trainers with flat-bottom airfoils will find the 4-60's slowness ideal for learning outside loops, rolls, snap rolls, spins, inverted flight, and horizontal eights. As skill increases, move the balance rearward in steps (for example, by screwing 5-oz lead weights to the tail post) to tighten and brisk up aerobatic figures.
- In experienced hands, the 4-60 will perform many of the maneuvers done by piped two-cycle models — more slowly, with excellent control and feel (e.g., eight-point rolls slow enough to count each point).
The 4-60 and the smaller 4-40 may be the most deceptively simple-looking designs: they look like trainers but possess flying qualities satisfying to a wide range of experience levels.
Transcribed from original scans by AI. Minor OCR errors may remain.

