

Action Photography
Dave Garwood
Editor's note: Former MA columnist Dave Garwood is an accomplished photographer, with hundreds of published photos and a number of magazine covers to his credit. He uses 1960s‑vintage mechanical cameras.
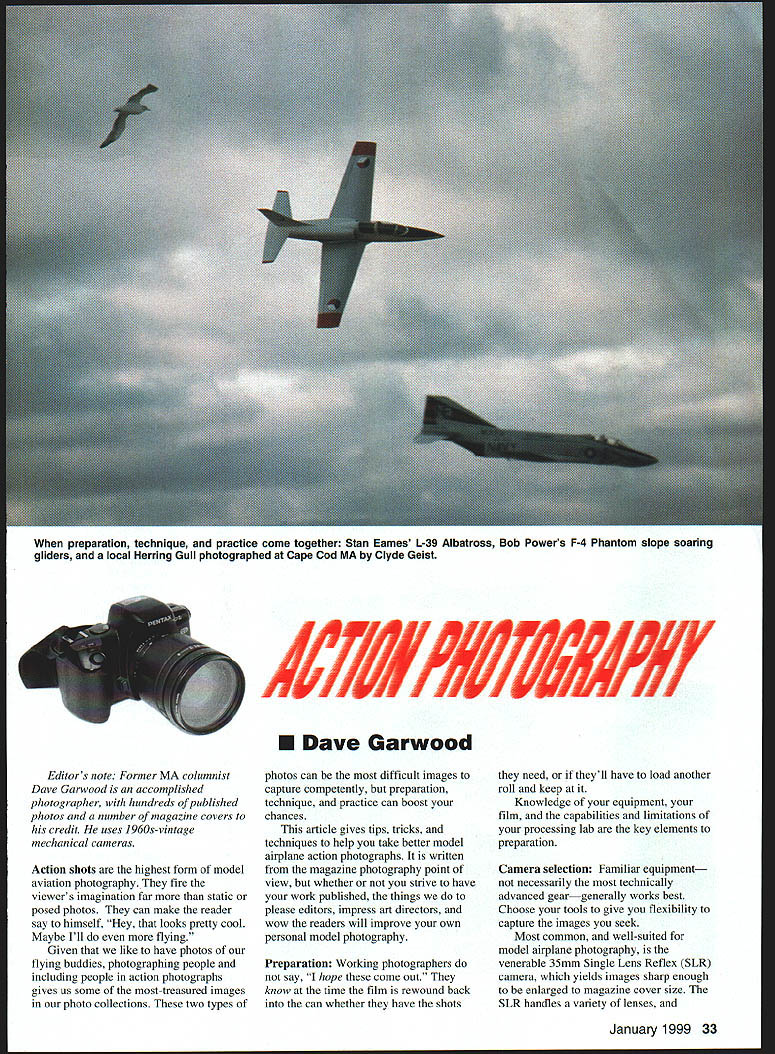
Action shots are the highest form of model aviation photography. They fire the viewer's imagination far more than static or posed photos, and can make the reader think, "Hey, that looks pretty cool. Maybe I'll do even more flying."
Photographing people and including them in action photographs gives us some of the most‑treasured images in our collections. These images can be difficult to capture competently, but preparation, technique, and practice greatly improve your chances.
This article gives tips, tricks, and techniques to help you take better model airplane action photographs. It is written from a magazine photography point of view, but whether you aim for publication or personal satisfaction, the practices that please editors and wow readers will improve your own work.
Preparation
Working photographers don't say, "I hope these come out." They know, often before the film is fully rewound, whether they have the shots they need or whether they'll have to load another roll and keep at it.
Knowledge of your equipment, your film, and the capabilities and limitations of your processing lab are the key elements of preparation.
Camera selection
Familiar equipment—not necessarily the most technically advanced gear—generally works best. Choose tools that give you flexibility to capture the images you seek.
The most common, well‑suited camera for model airplane photography is the 35mm Single‑Lens Reflex (SLR). It yields images sharp enough for magazine covers, handles a variety of lenses, and, because you look through the lens when framing, gives you an excellent idea of final composition.
Some SLRs give an exact 1:1 viewfinder image to the film frame; others show more or less. Read your camera's manual to learn your gear's limitations.
One limitation of SLRs is that at the instant of exposure the mirror flips up and the viewfinder blacks out. This can lead to unnoticed faults—glints off a wing, or a person with eyes closed—that you only discover when the film returns from the lab. This is why many photographers make multiple exposures of a given subject.
Twin‑lens reflex (TLR) and rangefinder (RF) cameras avoid that viewfinder blackout but have other limitations: TLRs are bulky and slower handling; RFs have a limited selection of lenses. Consult a basic photography book to weigh advantages and disadvantages before choosing gear based on expected use.
Camera knowledge
Be utterly familiar with the operation of your camera, lenses, and flash unit. Know what each button, knob, and lever does and the effect of incorrect settings. Sometimes an incorrect setting is tolerable; sometimes it spoils the shot—or an entire roll (for instance, with a wrong film‑speed setting). Study the manual that comes with the camera.
Composition and camera position
Put yourself in front of the subject when possible. Make sure the airplane is in good focus, the lighting is pleasing, and the pilot (if shown) knows and approves. Work downrange so the airplane is visible against an attractive eye‑level background; showing the upper surface of the wing is usually better than having the wing against the horizon.
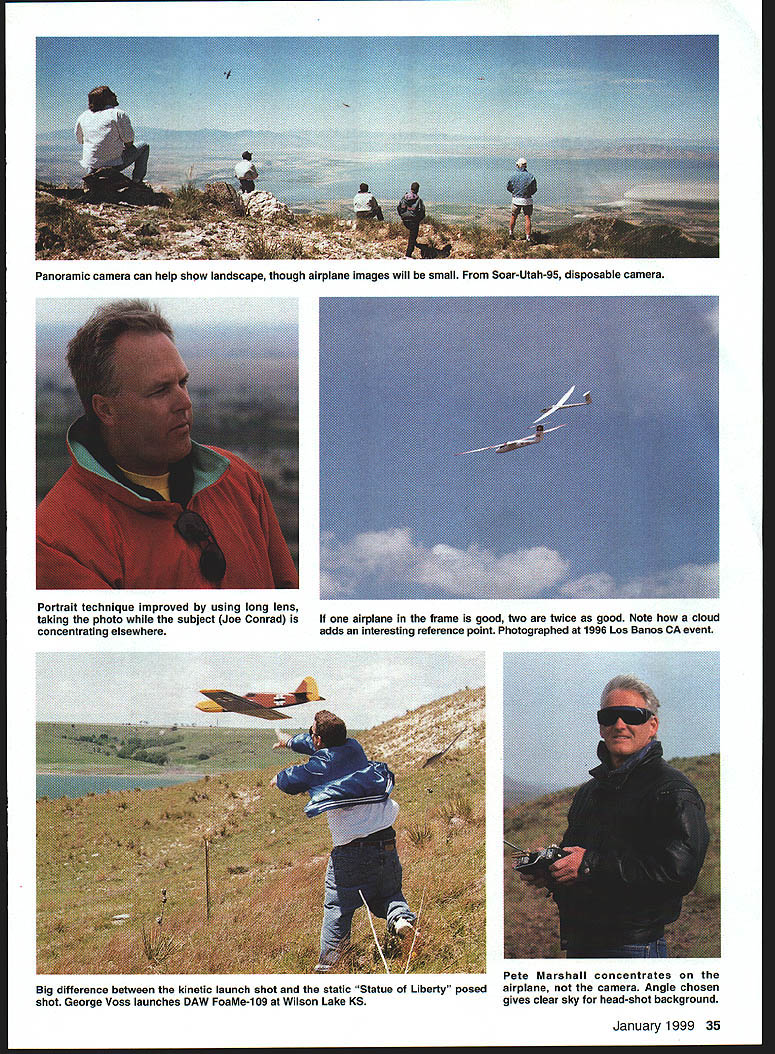
An airplane flying out of the frame makes the reader think the photographer missed the peak action—be careful with shutter timing and camera position so you catch the peak. Shifting camera position to catch the pilot's face can add interest, but watch for shading from hats or sun visors.
A panoramic camera can show landscape context, though the airplane will appear small. Portrait technique can be improved using a long lens when taking photos of people; if the airplane fills the frame, bigger is usually better. Note clouds and other background elements; they add interesting reference points.
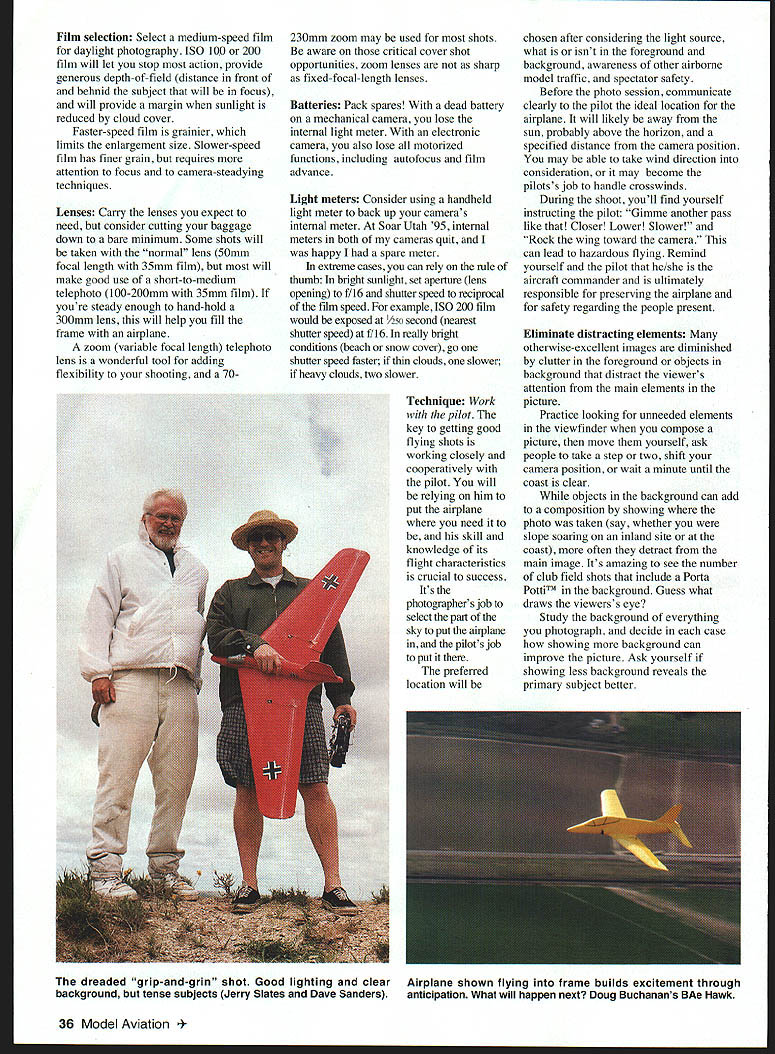
Point the camera slightly in front of the subject when possible so the airplane is moving into the frame—this gives a more exciting viewpoint than an object leaving the frame.
Film selection
Select medium‑speed film for daylight photography. ISO 100–200 film lets you stop action and provides a generous depth of field; distance from front to back of the subject will remain acceptably sharp and gives margin for subject movement in reduced sunlight or increased cloud cover.
Faster‑speed film is grainier, which limits enlargement size. Slower‑speed film has finer grain but requires more attention to focus and camera‑steadiness.
Lenses
Carry the lenses you expect to need but keep baggage minimal. Some shots will use the "normal" lens (about 50mm on 35mm film), but most benefit from a short‑to‑medium telephoto (100–200mm). If you can hand‑hold a 300mm lens steadily, it helps fill the frame with an airplane.
A zoom telephoto (for example 70–230mm) adds flexibility, but on critical cover opportunities fixed‑focal‑length lenses are usually sharper.
Batteries
Pack spares. On mechanical cameras a dead battery disables the internal light meter; on electronic cameras it can also disable motorized functions like autofocus and film advance.
Light meters
Consider a handheld light meter to back up your camera's internal meter. In bright sunlight you can also use the "sunny 16" rule: set aperture to f/16 and shutter speed to the reciprocal of the film speed (for ISO 200, use about 1/250 s). Adjust one stop faster for very bright scenes (beach, snow) and one‑to‑two stops slower for thin or heavy cloud cover.
Technique: Work with the pilot
The key to getting good flying shots is working closely and cooperatively with the pilot. You will rely on them to put the airplane where you need it; their skill and knowledge of the craft's flight characteristics are crucial.
It's the photographer's job to pick the part of the sky to place the airplane in; it's the pilot's job to put it there. Preferred locations depend on the light source, foreground and background content, other airborne traffic, and spectator safety.
Before the session, communicate clearly the ideal location: likely away from the sun, above the horizon, and at a specified distance from the camera. Wind direction may influence the approach or the pilot's task handling crosswinds.
During the shoot you'll give prompts: "Gimme another pass like that! Closer! Lower! Slower! Rock the wing toward the camera." Remember that the pilot is ultimately responsible for aircraft safety—avoid hazardous flying maneuvers.
Eliminate distracting elements
Many otherwise‑excellent images are diminished by clutter in the foreground or distracting background objects.
When composing, look for unnecessary elements in the viewfinder. Move them, ask people to step aside, shift your camera position, or wait until the scene clears. Backgrounds can add context, but often they detract from the main image. For example, a Porta Potty in the background will draw the viewer's eye away from the airplane.
When making head‑and‑shoulders portraits, squat and shoot upward so the open sky becomes the background.
Keep the airplane above the horizon
Position the airplane against the sky when possible. Airplanes at or below the horizon tend to blend with the background and become hard to see.
Study the light
Photography literally means "writing with light." Beyond exposure, the quality of light profoundly affects how your pictures record the scene.
Direct sunlight produces sharp, high‑contrast images and saturated color—often best for models. Diffuse light (overcast sky or open shade) softens rendering and mutes strong colors, and is generally more flattering for photographing people.
A useful rule: shoot with the sun behind the camera to fully illuminate the model. Backlight or side light can put parts of the airplane in shadow and obscure detail.
Set up portraits thoughtfully
Portrayals preserve memories; attend to a few basics to record character rather than snapshots.
Distinguish candid and posed shots. Candid photos often show natural expressions but offer less control over composition and background. Posed shots give creative control but can produce stiff expressions—people often tense, tighten jaws, or give a nervous grin.
Solutions:
- Photograph head‑and‑shoulders while the subject is engaged in activity or conversation.
- Use a long lens to isolate a subject from a group and take multiple frames to capture varied expressions.
- Move in tight: framing from the chest up with part of an airplane or a jacket or hat suggests the aviation context without competing with the person's face.
- For faces shaded by hats, consider fill flash (noting shutter sync limits on many SLRs), use a reflector to bounce light into the face, ask the subject to remove the hat, or intentionally expose a bit for the shadows and accept some highlight wash‑out.
Practice
"Amateurs try to save film; pros try to save time." If conserving film matters, be very careful setting up each shot. Having plenty of film gives flexibility to try more angles, bracket exposures, and make backups. National Geographic photographers often shoot hundreds of rolls to get a few spectacular images.
Practice with your tools improves performance. Preparation, technique, and practice—combined with technical understanding and study of successful published photographers—will help you make impressive and memorable action model airplane photographs.
Dave Garwood 5 Birch Ln. Scotia, NY 12302 DaveGarwood@CompuServe.com
For Further Reading
There is a well‑documented body of technical knowledge about camera operation (aperture, shutter speed, film sensitivity) that you should know. For the price of a roll or two of film and processing, you can buy books that help you avoid mistakes and accelerate your creative development.
I recommend these types of books:
- A basic how‑to photography book. Example: Learn Photography in a Weekend by Michael Langford (1995, Alfred A. Knopf. ISBN 0-679-41674-9).
- A compact technical and creative reference. Example: Kodak Pocket Guide to 35mm Photography (1996, Silver Pixel Press. ISBN 0-87985-769-2).
- A reference for your camera model. Example: How to Select & Use Minolta Maxxum SLR Cameras by Carl Shipman (1986, HP Books. ISBN 0-89586-812-1).
- An advanced, specialized book. Example: A Complete Guide to Aviation Photography by Peter M. Bowers (1988, TAB Books. ISBN 0-8306-0924-5).
- Photographs in magazines. Action model aviation photography is a form of sports photography—see Sports Illustrated for examples of anticipating action and composing shots that show both activity and players.
Beyond the basics, study published work of other photographers to develop anticipation, composition, and style.
Transcribed from original scans by AI. Minor OCR errors may remain.

