
Admire Those Curves—Laminated, Of Course!
With a good setup, laminating curves for wing and stabilizer tips, rudders, and even formers isn't tough at all—and the results look better and are stronger than when the parts are cut out. — Ned Kragness
Overview
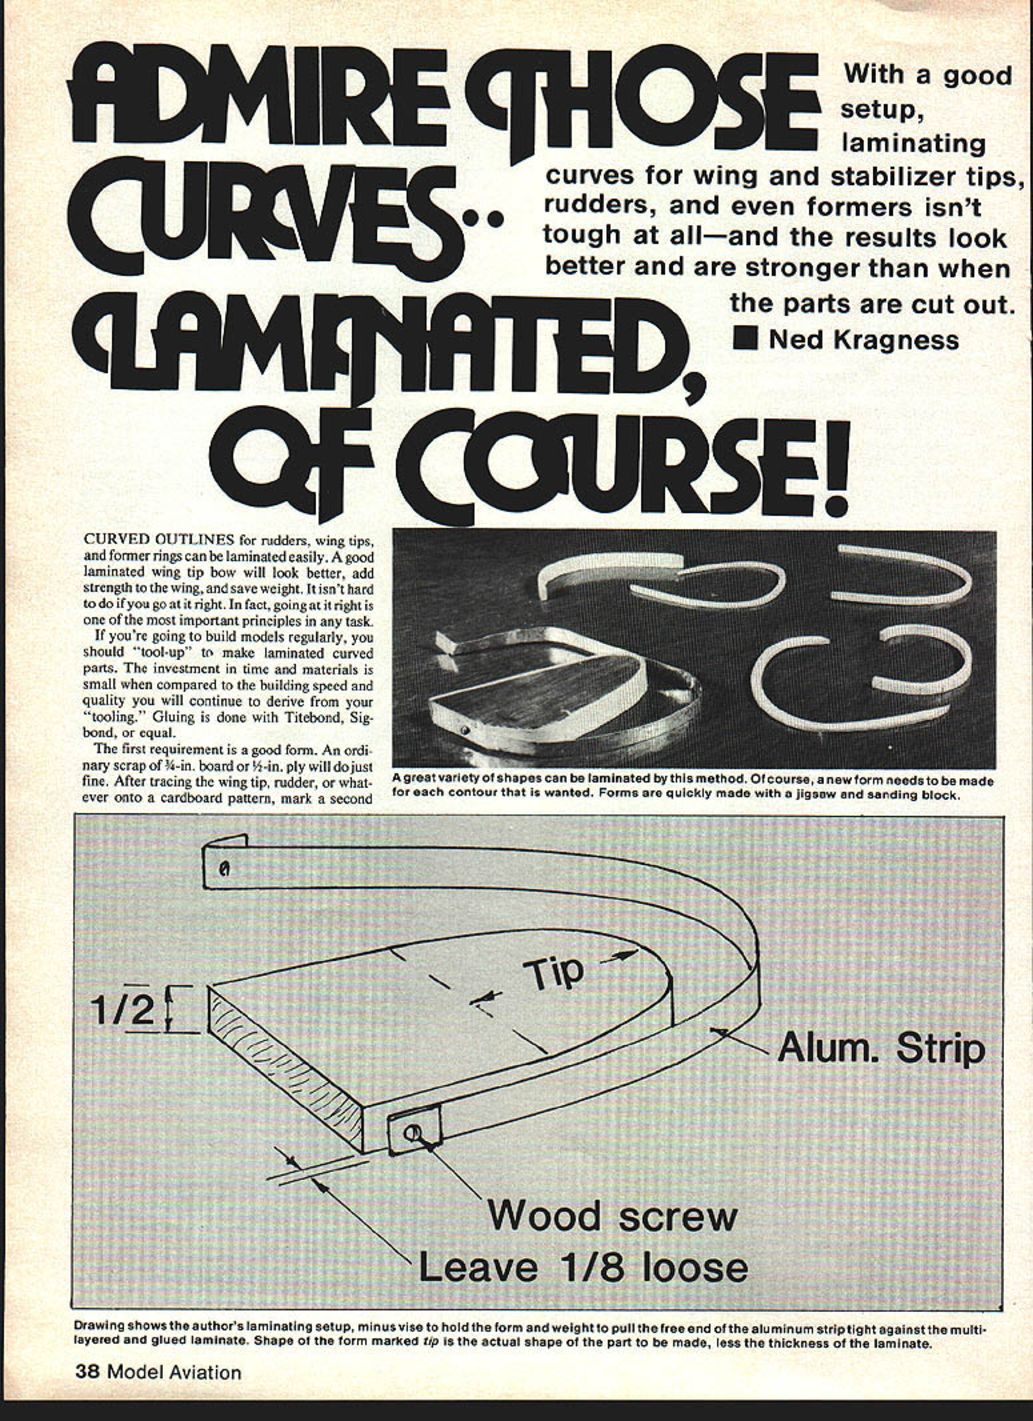
Curved outlines for rudders, wing tips, and former rings can be laminated easily. A good laminated wing-tip bow will look better, add strength to the wing, and save weight. It isn't hard to do if you go at it the right way. If you plan to build models regularly, it's worth "tooling up" to make laminated curved parts—the investment in time and materials is small compared to the improved speed and quality you'll get.
Gluing is done with aliphatic-resin glues such as Titebond or Sigbond.
Tools and materials
- Cardboard pattern material and scrap wood (3/4-in. board or 1/2-in. plywood)
- Aluminum dryer-duct sheet for metal straps
- Old X-Acto blade or industrial knife and metal straightedge
- Drill and small drill bits (pilot drill)
- Wood screws or sheet-metal screws (3/16-in. or 1/4-in. as noted)
- Clamps or bench vise and 10–15 lb. of weights (or equivalent tensioning)
- Cellophane or masking tape
- Balsa strips (straight-grain, not quarter-sawn; 1/32-in., 1/4-in., etc.)
- Aliphatic-resin glue (Titebond, Sigbond)
- Razor saw, sandpaper, plate glass (for truing)
Making the form
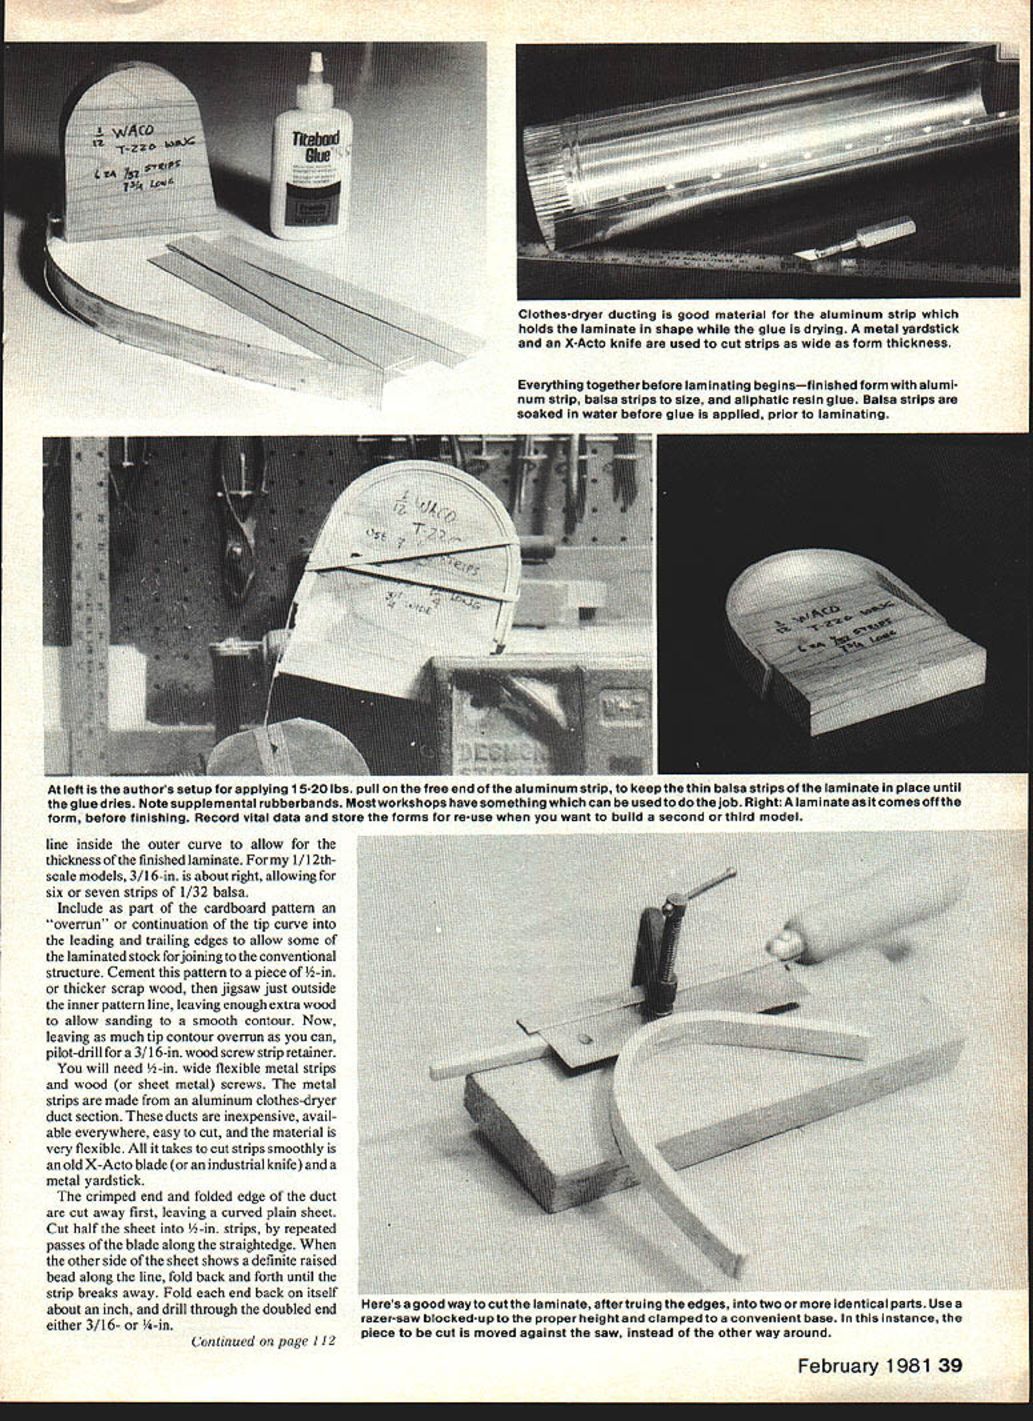
- Trace the wing tip, rudder, or former onto cardboard to make a pattern.
- Mark a second line inside the outer curve to allow for the thickness of the finished laminate. For 1/12-scale models, about 3/16-in. is right, allowing for six or seven strips of 1/32-in. balsa.
- Include an "overrun" on the cardboard pattern: extend the tip curve into the leading and trailing edges so some laminated stock remains for joining to the conventional structure.
- Cement the pattern to a piece of 1/2-in. or thicker scrap wood. Jigsaw just outside the inner pattern line, leaving extra wood for final sanding to a smooth contour.
- Leave as much tip-contour overrun as you can, and pilot-drill a hole for a 3/16-in. wood screw to retain the metal strap.
Preparing the metal strap
- Use aluminum dryer-duct sheet: inexpensive, widely available, easy to cut, and very flexible.
- Cut away the crimped/folded edges to get a plain curved sheet.
- Cut the sheet into 1/2-in.-wide strips by repeated passes with a blade along a straightedge. When the other side shows a raised bead along the line, fold back and forth until the strip breaks away cleanly.
- Fold each strap end back on itself about an inch and drill through the doubled end (either 3/16-in. or 1/4-in. hole).
- Attach the strap to the overrun part of the wooden form with a screw. Allow about 1/4-in. lateral freedom on the screw shank under the head (or allow the thickness of the laminated piece).
Laminating procedure
- Prepare enough balsa strips (and a spare or two). The strips should match the form-block thickness and be slightly over-length.
- Use straight-grain balsa; it can be softer stock than you'd want for the finished part because the adhesive will penetrate and harden the fibers.
- Make the tensioning setup before glue-up: clamp the form in a bench vise (or otherwise secure it) and arrange to apply 10–15 lb. of pull on the free end of the strap (hang weights or use a tensioning device). Cover the form edge with cellophane or masking tape to allow separating the cured laminate from the form.
- Soak the strips in water, mop off excess water, and apply glue to one side only.
- Lay the strips on the form with the glued side up, starting at the screw end. Wind the metal strap down snugly against the stacked strips, keeping alignment.
- Apply 10–15 lb. of tension on the strap and hold until the glue sets. Check occasionally during cure and tighten the strap if necessary.
Note: Curing will be slower than for single-piece glues because evaporation is restricted between layers.
Removing and finishing
- After the glue has fully cured and the laminate is dry, remove the strap and carefully separate the laminate from the form so the inner layer is not damaged.
- Cut the laminate to rough shape with a razor saw, leaving some overrun at the edges for trimming.
- Sand the edges to final contour and finish as you would any balsa part. A thin fillet of glue along the inner concave surface will help keep moisture out.
- Fine sandpaper placed face-up on a piece of plate glass makes a convenient truing surface.
Slicing identical pieces
- With careful alignment at lay-up, 1/4-in. strips can yield a finished ~7/16-in. laminated section that can be sliced into at least two identical parts.
- One way to divide the curved stock is to set up a razor saw on spacer blocks and cut individual, identical bows from the laminate.
This procedure is much simpler and easier in practice than this description makes it appear.
Transcribed from original scans by AI. Minor OCR errors may remain.

