
Adventures in Modeling
Bob Harrah
From the spanking-new WE-FLY LAB, our inquisitive in-house modeler and peerless test pilot turns in his first of a monthly series of reports. We won't clue you, no sir. It's different... oh, how different!
Until the moment before the first launch into the blue with great expectations, and when we hopefully fly, is there always that agony of the crash nibbling at our confidence? The aeromodeler, like the tuned athlete, must have confidence to succeed. True, there are always some natural abilities in both cases, and each of us can lessen the odds of failure with knowledge, training, patience and the proper tools of the trade. Sometimes there is that chance to excel and be a champion above champions, but many times this requires great risk and many failures. Perhaps it is as Webster writes, sport: "exertion, and carried on according to a set of rules." Whatever our motivation, we are the gainers if we can see the endless expanding world of aeromodeling giving forth new ideas, challenges and products that give us the needed confidence to meet that first flight with assurance that we will fly and land to do it again and again.
A Sunday Morning Memory
Before we fly the Taylorcraft, and to succeed or fail, there is a very fond past memory that kind of explains the above. It was one of those beautiful Sunday mornings that every modeler dreams about. We were flying at the old-timers spot; a couple of Hawk-Owls were circling with my Buzzard Bombshell. Not too far upwind in another thermal was a Dallaire Sportster being flown by Red from his director's chair, refreshment in one hand and the transmitter sitting on the ground, and others were going up and coming back for a refuel. This lasted as long as we dared count on our batteries, or almost three hours, including down time and yarn swapping.
During most of this time there was a young lad on another hill about a thousand yards north that seemed to be spending more time cranking than flying, and none of us could make out what it was, since his flights lasted about ten feet. His javelin toss would carry the model up the first five feet; momentum and gravity took care of the next five before the thud into the soft dirt.
I packed up and started home for clean-up-the-plane time. Almost reaching the turnout spot, curiosity got the best of me, so swinging the wheel I headed across the fields to the top of the hill that should now be called "propeller ding knoll." Yes, this curly-haired, tan, blue-jeaned lad of about twelve was still cranking, and gave a toss as I pulled up. That one went about fifteen feet, got caught in a crosswind on the downward leg (which accounted for the additional five feet). He walked past the car, stopped and asked if he could please see my planes. We chatted and I tactfully asked what his plane was.
The fuselage was as long as the wing and the tail section was almost nil. The powerplant was a wired and rubber-banded Cox .049 with part of a plastic engine mount from an unidentifiable ready-built helping to hold it in place; it was what could be classed as an empirical design, assembled from the junk piles of neighborhood friends.
I asked if I could experiment with his plane with him. He joyfully agreed when a bribe of a new prop for an .049 was pulled out of my flight box to replace the bent, kicked .020 prop that he was using. We also got into the fresh rubber-band box and I pulled out a few chunks of balsa that I carry for shimming. We switched props, slid the rubber-band-mount wing to where the center of gravity was about 30%, took out the negative incidence and added about three degrees. We test-glided and achieved something flying a little better than a brick; somehow he had managed to put in some downthrust when he mounted the engine.
So I bravely said, "Start it up, go over to the edge of the slope and toss it straight out and slightly down." It flew about fifty feet in a wide downward circle, and he was so elated with his magnificent flight I couldn't bear to tell him I hadn't helped him much — that I had just taken advantage of the hill and allowed a little more time for gravity to take over. We made a few more adjustments, like hotter fuel, more incidence and rudder trim. We flew; we achieved two large circles on one flight before we blessed the knoll with another ding. I invited him to my home with one of his parents, figuring I would never see him again, and drove off realizing I had really had as much fun with him as I did with the flying buddies.
He did call, came over and looked at the shop (my family has nicknamed it "the hole"), I gave him a Midwest Sniffer (the plane that will fly even with great builder abuse) and his dad agreed to help. The lad called and told me it flew great. I am sure that is a relative statement, but it was a good feeling.
The Taylorcrafts
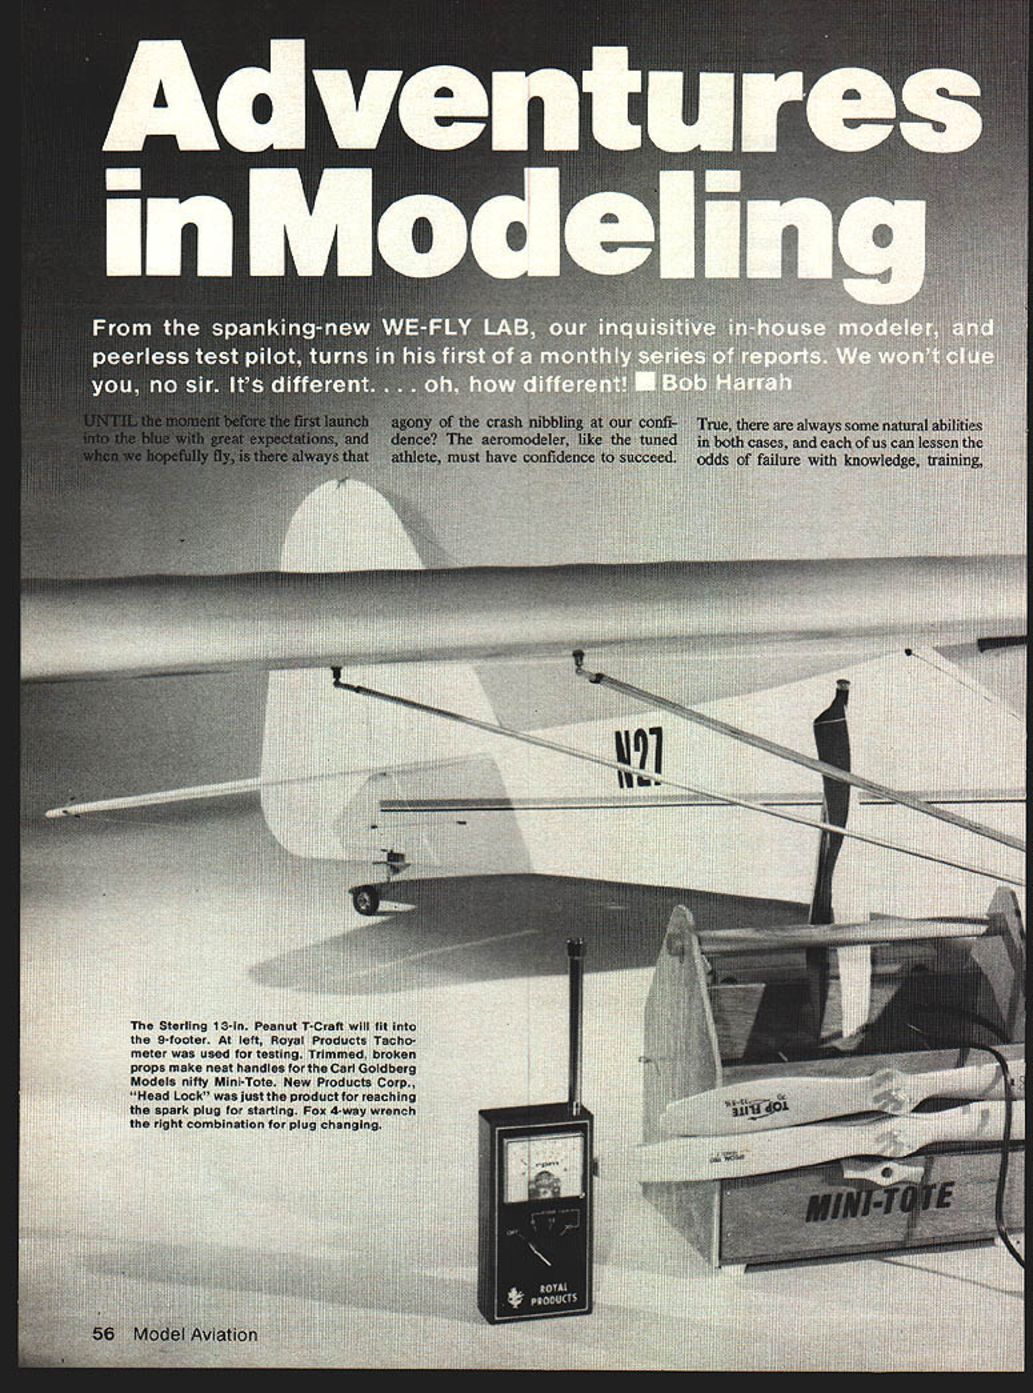
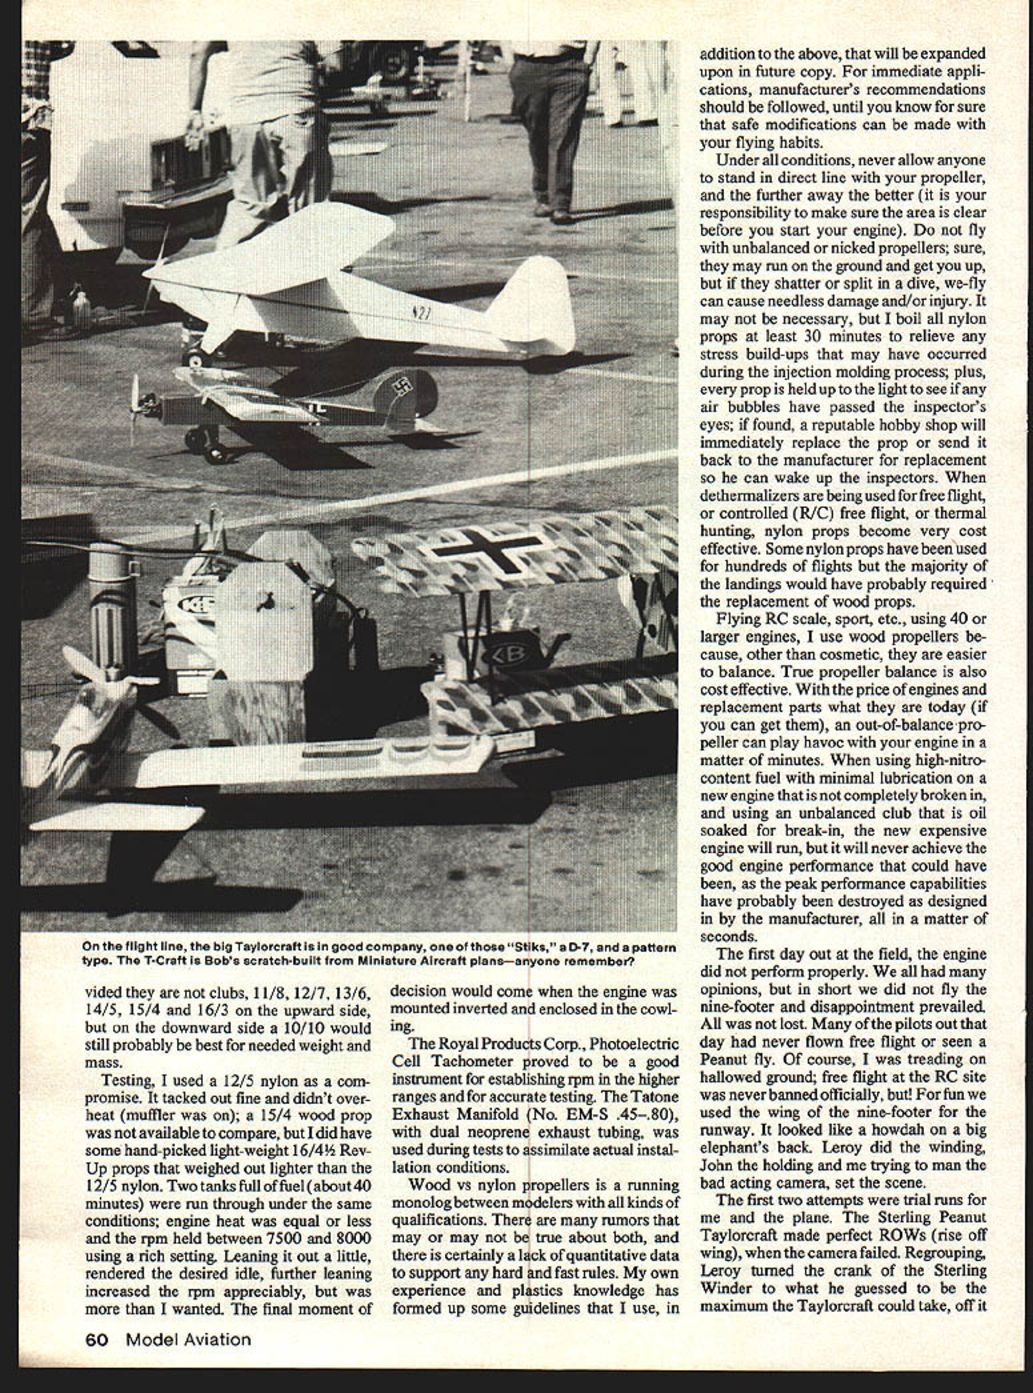
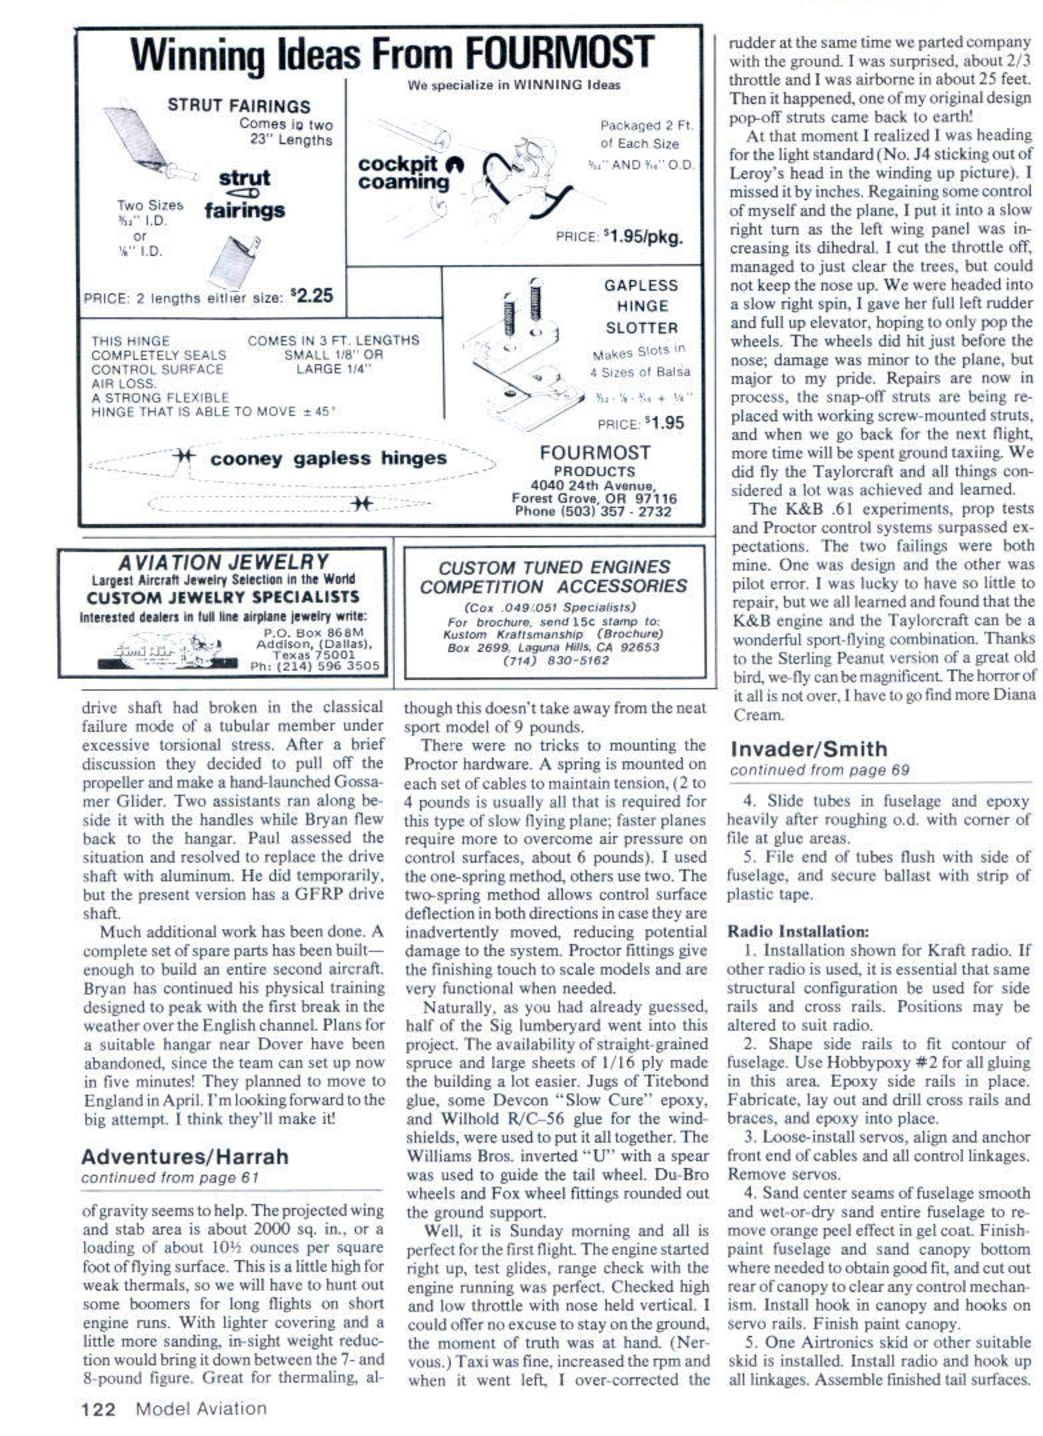
Flying the two Taylorcrafts shown in the pictures is a partial exemplification of we-fly potentials being offered with products from the aeromodeling industry. The nine-foot span Taylorcraft is scratch-built from Miniature Aircraft Corp., Staten Island, NY plans, copyright 1942 (designer's name not given, though I questionably relate this plane to the San Francisco area; it would be interesting to find out). The Peanut scale version is from one of the new Sterling Models Inc. dual kits.
The nine-foot Taylorcraft was built for many reasons. Sentimentally, it was an old-timer that was designed to fly either the Brown Jr. or Forster 99, free flight or with Escapement, which meant others had pioneered the weight problems to give me some assurance of success at the flight line. It was a semi-scale version that, to some, appeared to be a Piper. The design exhibited good thermal potentials, especially the Grant "X"-ish Clark Y airfoil, and the well-engineered lightweight structure. Probably the use of spruce and 1/16-inch ply attracted me most to the unknown designer's expertise. But most of all, it was an opportunity to apply many new products with the old and see what could happen.
Covering and Finish
Preconception in substitution followed pretty much from the start, but proved to be my nemesis at the flight line. Someplace along the line I fell in love with Diana Cream, supplied by Sig — one of their many Supercoat butyrate dopes — reminiscent of the times, and no clears were to be applied so as not to take away from the warm hue. Super Coverite was to be the textured covering to further accentuate the matte finish of the real plane. Super Coverite presented no problems when their instructions were followed, and that includes the application of Balsarite. The overlap edges did leave a distinct line, and where the material ended on the ply was quite noticeable. This was handled by applying Dap Vinyl Paste along the edge, sanding, then coating with Sig Sanding Sealer, and resanding before the application of the color coat.
Walking into your favorite hobby shop and asking for three quarts of Diana Cream, no matter how pretty she is, can be a shock, especially when my abandoned color combination required Tennessee Red as the trim color. Even Sig had none in supply. Either there was a run on Diana Cream or it was a loser, but between the hobby shops I ended up with 32-, 16- and 8-ounce cans, plus eight 4-ounce jars. One of the cans still had smoke stains on it from a store fire about six years ago, and the owner had tried for almost a year to get rid of it in a fire sale.
Not to be discouraged by the color taste of other modelers, I dumped all of it into one container to make sure that I at least had a batch match before starting to spray with my Paasche airbrush, model AUTF. Many airbrushes and spray guns will do just as well, but this one has been a favorite for years. It has a minimal amount of parts, especially gaskets around the mixing nozzle, that makes it easy to clean and use with two-part finishes; with the dope family this is not a problem. Three coats of the Sig dope over Super Coverite was sufficient to put any scale model in the winner's circle.
Engines, Props and Power Choices
What did I do wrong? I am not anxious to tell. The power in the nose was preplanned. One of my Veco .61s with a Perry carburetor was to be the power source, inverted behind the 8-inch-wide nose cowling, carrying an estimated 9-pound model. The K&B .61 with the Perry regulated pump was tested, but as usual, Perry Aeromotive was 100% correct in its recommendation that it not be used inverted (vertical or horizontal mounting is fine).
Manufacturer's guidelines call for an 11x8 propeller and a 12x6 for larger, heavier models. The smaller size would have allowed only 1½ inches of tip beyond the cowl; the larger just 2 inches — not that this is bad, but it just didn't look scale and I knew I wouldn't need all those rpm to fly scale-like.
As a rule of thumb, I try never to overwork an engine, using balanced propellers with fuels like K&B 100, or equal, for lubrication when sport flying. Some propeller substitutions I use in practice:
- Recommended: 11x8 or 12x6.
- For nylon: next choice would be 14x4, or down to 10x10 for high-speed flying.
- For wood: use appropriately sized wood props and balance them carefully.
In addition to the above — which will be expanded upon in future copy — manufacturer's recommendations should be followed until you know for sure that safe modifications can be made with your flying habits.
Under all conditions:
- Never allow anyone to stand in direct line with your propeller; the further away the better. It is your responsibility to make sure the area is clear before you start your engine.
- Do not fly with unbalanced or nicked propellers. They may run on the ground and get you airborne, but if they shatter or split in a dive, needless damage and/or injury can result.
- I boil all nylon props at least 30 minutes to relieve stress build-ups that may have occurred during injection molding. Every prop is held up to the light to see if any air bubbles have passed the inspector's eyes; if found, a reputable hobby shop will replace the prop or send it back to the manufacturer.
- For free flight, controlled (R/C) free flight, or thermal hunting, nylon props often become very cost effective. Some nylon props have been used for hundreds of flights, whereas wood props usually require more frequent replacement after rough landings.
When flying R/C scale or sport models using .40 or larger engines, I prefer wood propellers because, other than cosmetic reasons, they are easier to balance. True propeller balance is cost effective. With the price of engines and replacement parts what they are today (if you can get them), an out-of-balance propeller can play havoc with your engine in a matter of minutes. Using high-nitro-content fuel with minimal lubrication on a new engine that is not completely broken in, and using an unbalanced prop for break-in, will allow the engine to run but will likely destroy peak performance capability in seconds.
First-Day Flight Trials
The first day out at the field the engine did not perform properly. We all had many opinions, but in short we did not fly the nine-footer and disappointment prevailed. All was not lost. Many of the pilots out that day had never flown free flight or seen a Peanut fly. Of course, I was treading on hallowed ground; free flight at the R/C site was never banned officially, but still!
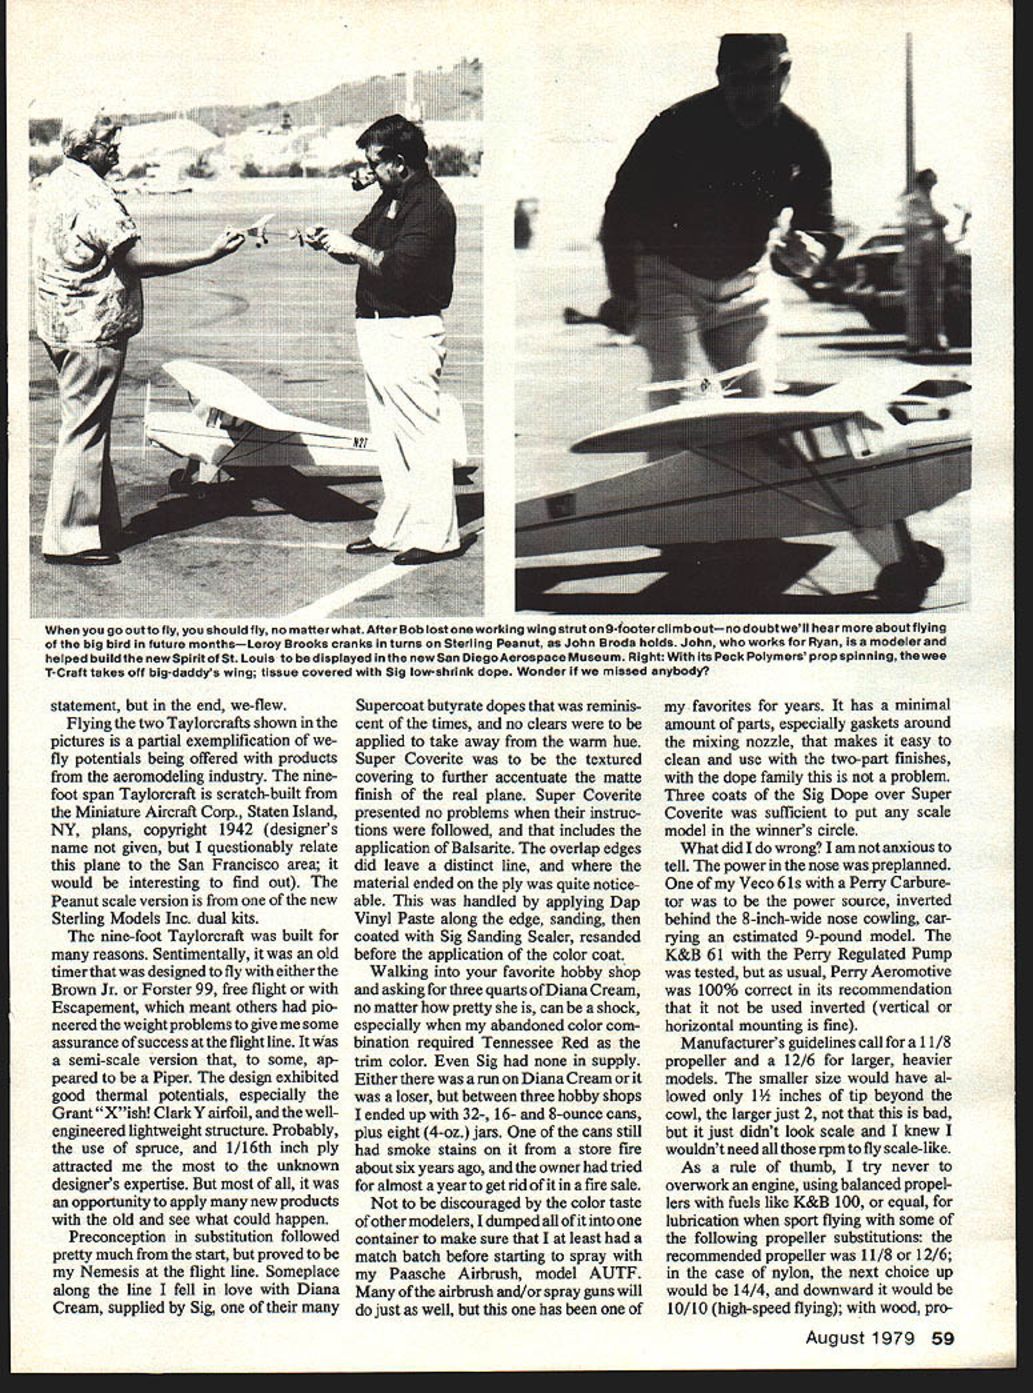
For fun we used the wing of the nine-footer for the runway. It looked like a howdah on a big elephant's back. Leroy did the winding, John the holding, and me trying to man the camera — set the scene.
The first two attempts were trial runs for me and the plane. The Sterling Peanut Taylorcraft made perfect ROWs (rise off wing), when the camera failed. Regrouping, Leroy turned the crank of the Sterling winder to what he guessed to be the maximum the Taylorcraft could take; off it went, climbed and flew down the field and there was mutual achievement all around. As I lowered the camera to watch the flight, it was nifty to see — until banking left toward a friend's car, when I exclaimed loud and clear, "Don't worry, I'm insured with AMA," just moments before impact. No damage to car or plane and we flew that day with much humor and fun. I was happy that I could go home with that plane intact.
When I was packing that morning my wife offered good luck (knowing I would need it), but I was given strict orders to bring that plane home in one piece. She wanted it for decoration. I tried to explain that I had others that were really better for show, and I gave her an exhausting list of reasons, but no — that was the one she wanted. She won, and she was right. It's a neat little plane and it flew.
After arriving home and giving her the plane, I tore into the nine-footer. There was an air leak in the fuel line and the Kraft fuel filter had become partially blocked. I ran through two tanks full of K&B 100, rechecked the rpm, idle and engine heat. All was go, so I put the battery on charge and was ready for tomorrow, the next attempt.
Weight, Balance and Hardware
Keeping this one light in weight was not all that easy. Ending up at a little over 9 pounds was within the power range of the K&B/Veco .61. The use of Proctor hardware probably saved me close to a pound. The nose moment compared to the tail moment, measured from the center of gravity recommended, was a little over three-to-one — that is, an ounce in the tail section would require three ounces of ballast in the nose. Also, if weight had to be added for the radio, controls, etc., I wanted it as close to the center of gravity as practical. This would aid in flying, especially in takeoffs and landings.
Light wing loading, such as this, can be tricky in crosswind takeoffs with taildraggers. Concentrating the weight at the center of gravity seems to help. The projected wing and stab area is about 2,000 sq. in., giving a loading of about 10.5 ounces per square foot of flying surface. This is a little high for weak thermals, so we will have to hunt out some boomers for long flights on short engine runs. With lighter covering and a little more sanding, in-sight weight reduction would bring it down between the 7- and 8-pound figure — great for thermalling — although this doesn't take away from the neat sport model at 9 pounds.
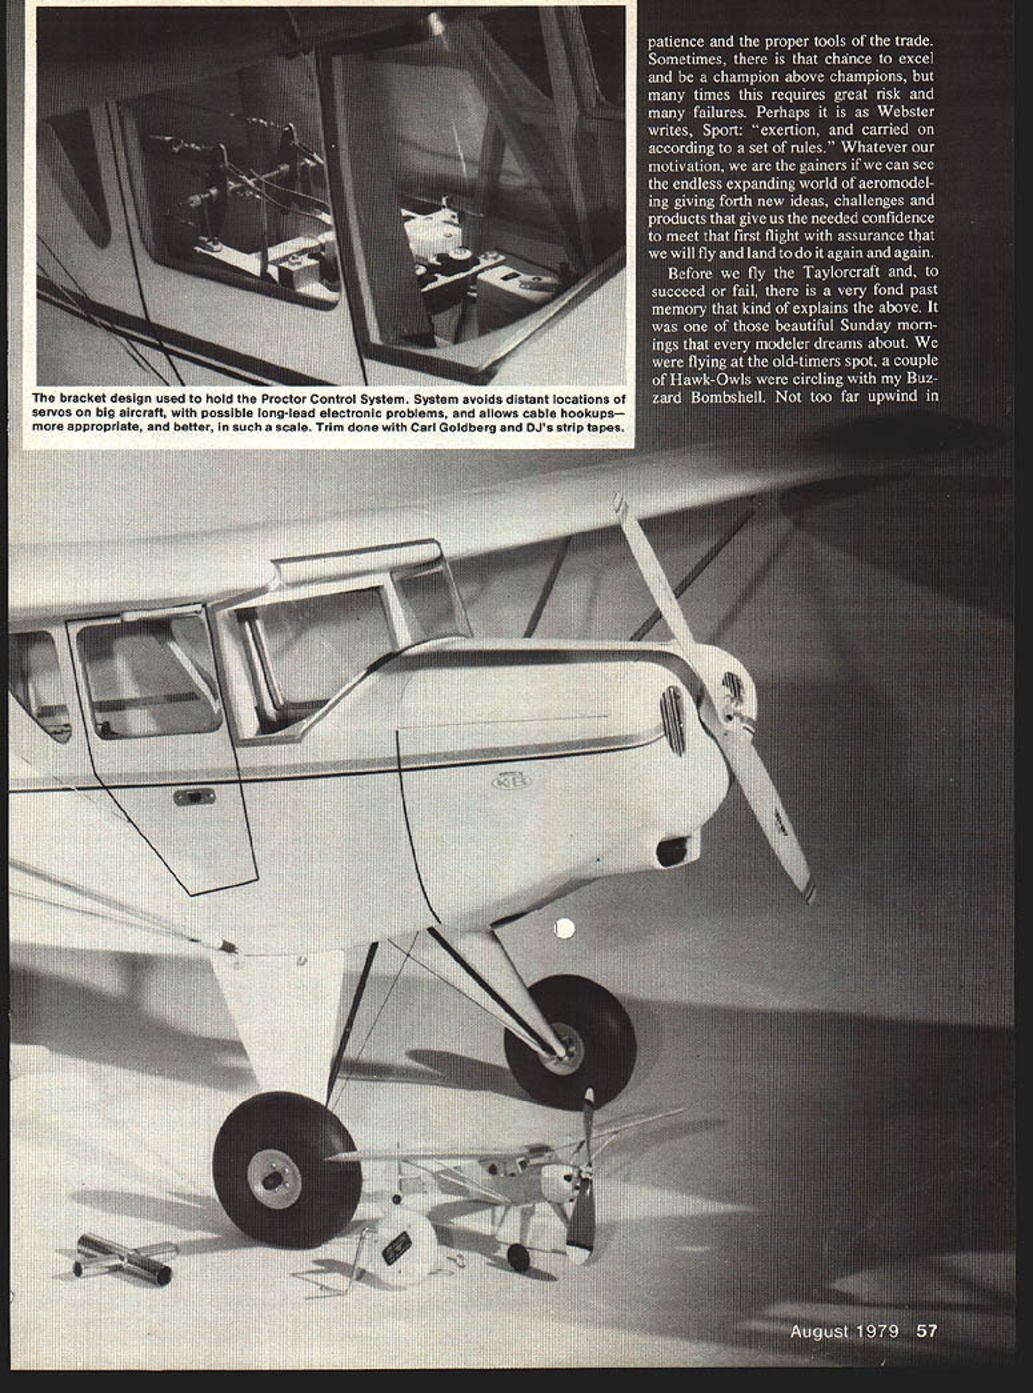
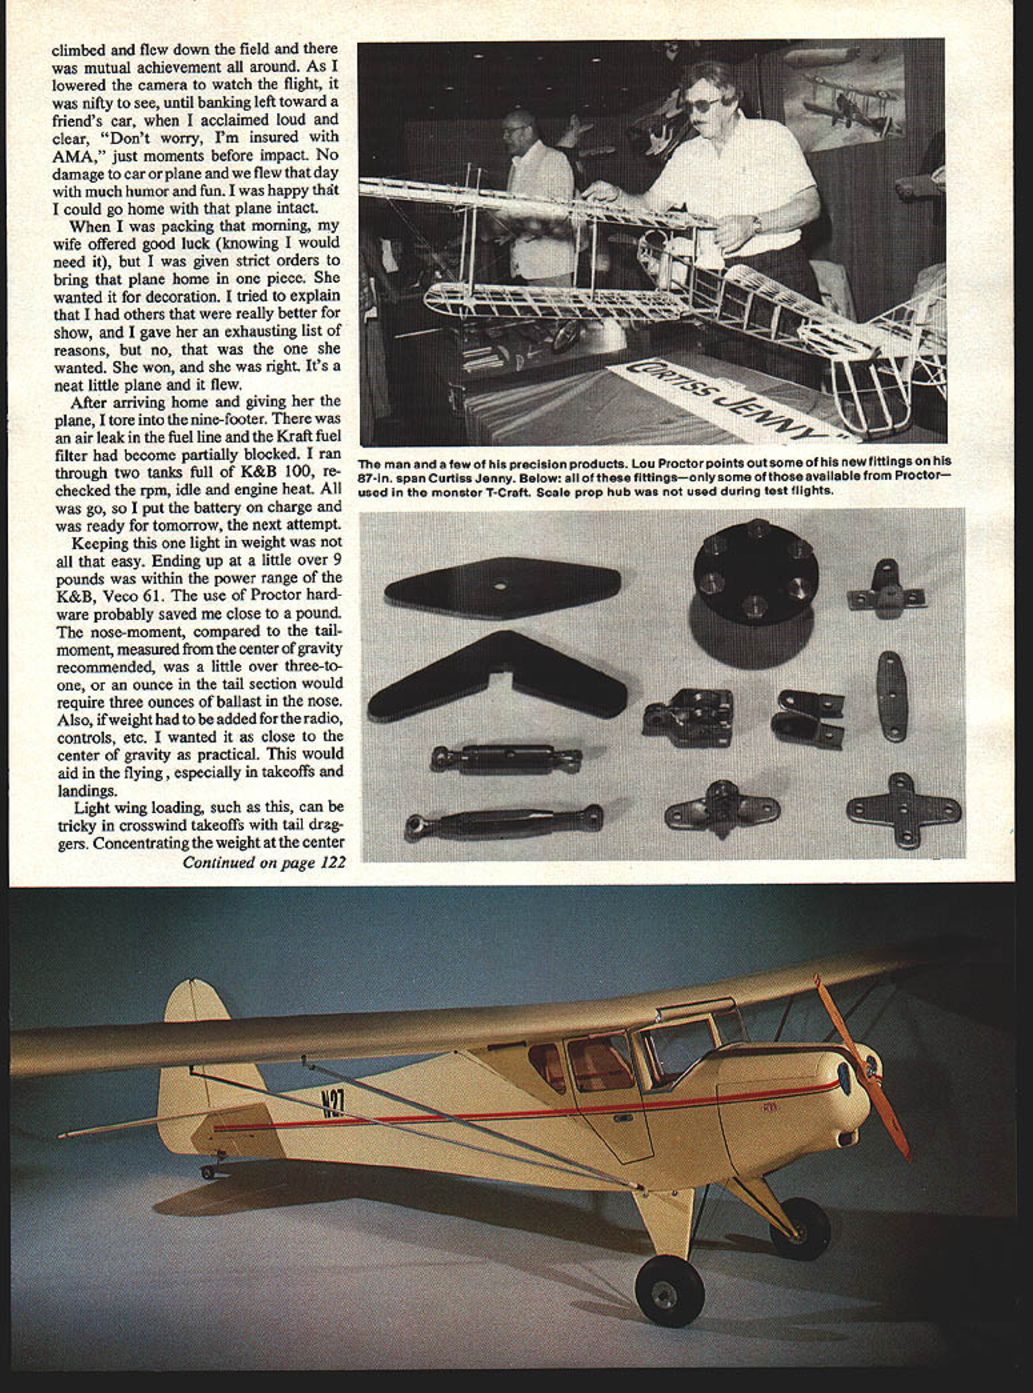
There were no tricks to mounting the Proctor hardware. A spring is mounted on each set of cables to maintain tension (2 to 4 pounds is usually all that is required for this type of slow flying plane; faster planes require more to overcome air pressure on control surfaces, about 6 pounds). I used the one-spring method; others use two. The two-spring method allows control surface deflection in both directions in case they are inadvertently moved, reducing potential damage to the system. Proctor fittings give the finishing touch to scale models and are very functional when needed.
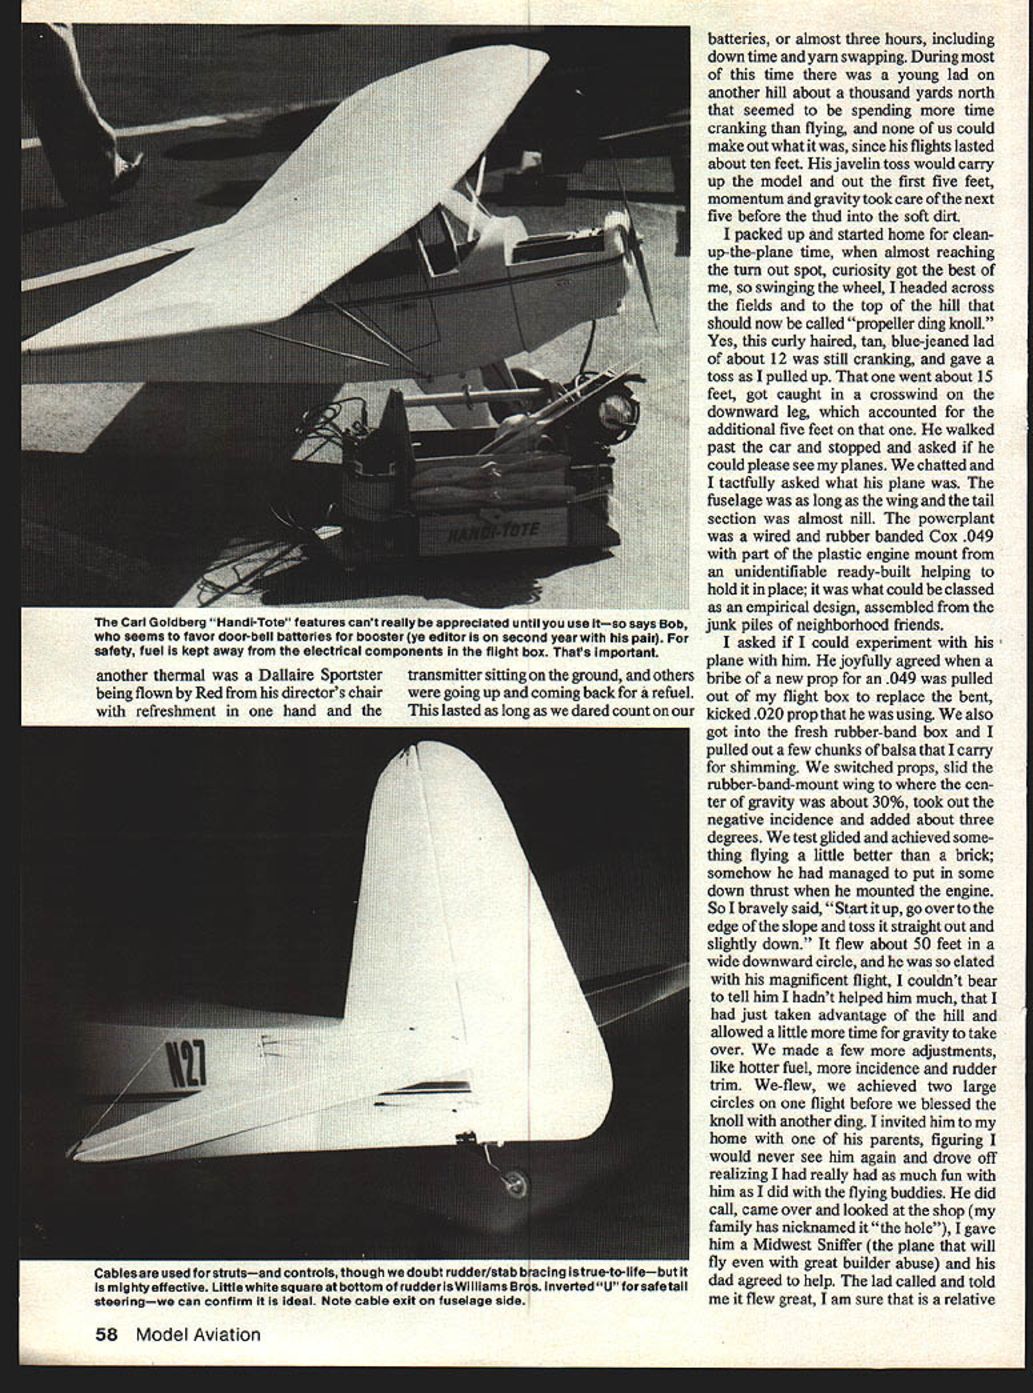
Naturally, as you had already guessed, half of the Sig lumberyard went into this project. The availability of straight-grained spruce and large sheets of 1/16-inch ply made the building a lot easier. Jugs of Titebond glue, some Devcon "Slow Cure" epoxy, and Wilhold R/C-56 glue for the windshields were used to put it all together. The Williams Bros. inverted "U" with a spear was used to guide the tail wheel. Du-Bro wheels and Fox wheel fittings rounded out the ground support.
The First Flight
Well, it is Sunday morning and all is perfect for the first flight. The engine started right up, set glides, range check with the engine running was perfect. Checked high and low throttle with nose held vertical. I could offer no excuse to stay on the ground; the moment of truth was at hand. (Nervous.) Taxi was fine; I increased the rpm and when it went left I over-corrected the rudder at the same time we parted company with the ground. I was surprised — about two-thirds throttle and I was airborne in about 25 feet. Then it happened: one of my original design pop-off struts came back to earth!
At that moment I realized I was heading for the light standard (No. J4 sticking out of Leroy's head in the winding-up picture). I missed it by inches. Regaining some control of myself and the plane, I put it into a slow right turn as the left wing panel was increasing its dihedral. I cut the throttle off, managed to just clear the trees, but could not keep the nose up. We were headed into a slow right spin. I gave her full left rudder and full up elevator, hoping to only pop the wheels. The wheels did hit just before her nose; damage was minor to the plane, but major to my pride. Repairs are now in process; the snap-off struts are being replaced with working screw-mounted struts, and when we go back for the next flight, more time will be spent ground-taxiing. We did fly the Taylorcraft and, all things considered, a lot was achieved and learned.
Conclusions and Notes
The K&B .61 experiments, prop tests and Proctor control systems surpassed expectations. The two fairings were both mine — one by design and the other by pilot error. I was lucky to have so little to repair, but we all learned and found that the K&B engine and the Taylorcraft can be a wonderful sport-flying combination. Thanks to the Sterling Peanut version of a great old bird, we who fly can have magnificent days. The horror of it all is not over — I have to go find more Diana Cream.
Transcribed from original scans by AI. Minor OCR errors may remain.

