
Aerodactyl
Bill Warner
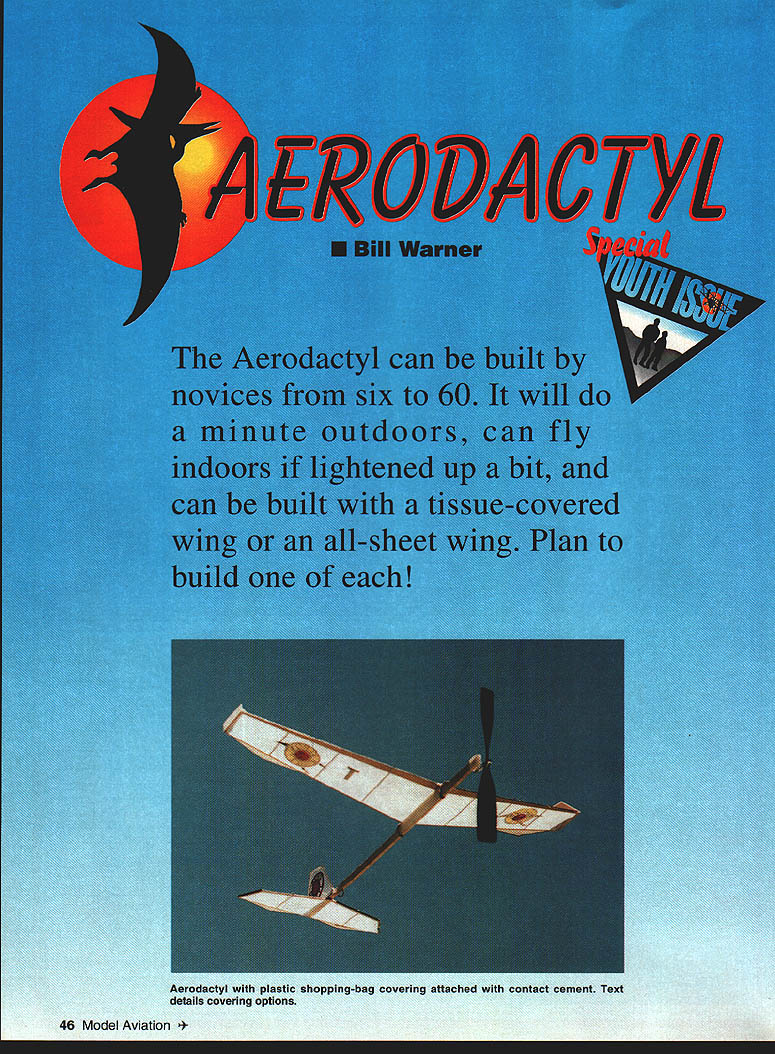
The Aerodactyl can be built by novices from six to 60. It will do a minute outdoors, can fly indoors if lightened up a bit, and can be built with a tissue-covered wing or an all-sheet wing. Plan to build one of each!
CONSTRUCTION
Tissue-Covered Version
Build on a flat surface you can stick pins into, such as Celotex "building board" from a lumber yard. Get a couple of photocopies of the plan—one to build on and one to cut up for patterns. Tape one copy of the plan to the board and then tape a wrinkle-free layer of clear plastic wrap over it to prevent glued parts from sticking.
Using a Model Knife
Use care with your model knife. Always check where the blade will go if you slip, and make sure your fingers or thumb are not in the way. Always cut away from your fingers—never cut toward flesh. Retract the blade when you lay the knife down. A piece of cardboard or an old phone book makes a good cutting surface.
Pay special attention to how you slant the knife from side to side, or you may not get a square (90° to the table) cut. It is always better to make several light cuts along a line than to try to cut all the way through in one swipe, especially when cutting across the grain.
Pin Your Parts Down
Pin the 1/16" tapered leading edges (LEs) down on top of the plan. It is OK to stick pins through them, as they are wide. Doing the pins at an angle will help keep the parts down. Then pin down the 1/16" square trailing edge (TE). The 1/16" square will split if you try to stick pins through it, so "X" them in pairs over the top of the stick so the angles formed by the pins hold the wood down snugly.
Double Gluing
I recommend Testors #3506 "Green Tube" cement for wood models. Wood is porous, so give it one coat and let it soak in. Assemble the parts with a second coat for strength. Wipe off excess with a piece of scrap.
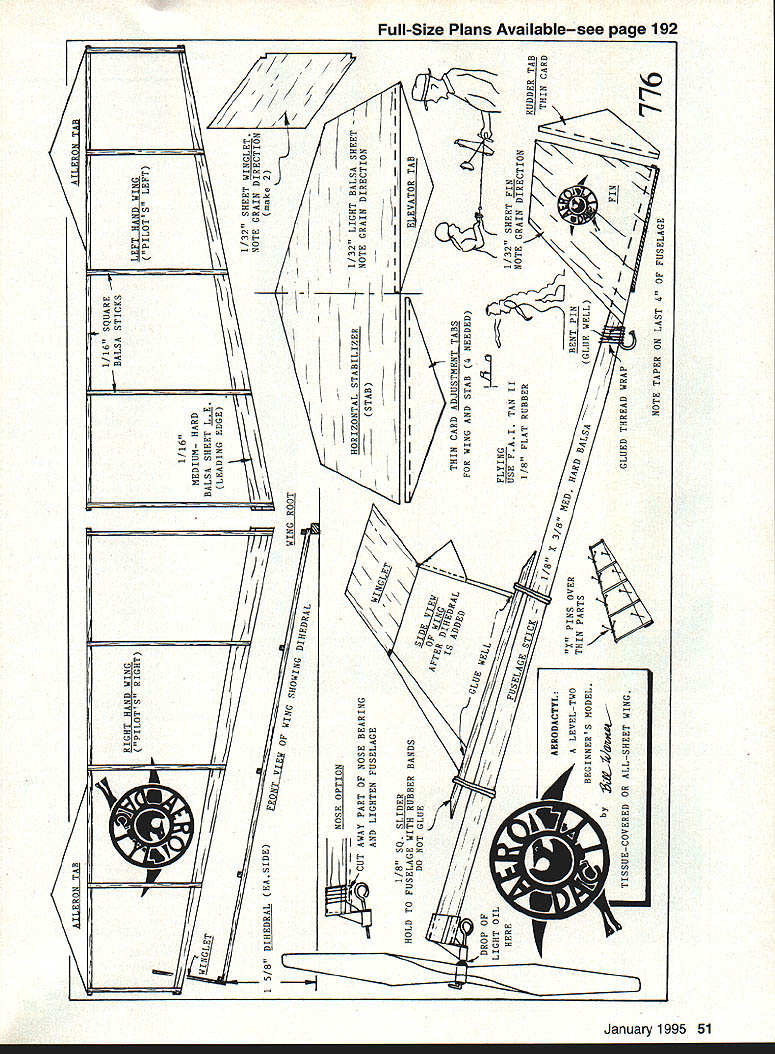
Glue on the 1/16" square balsa "ribs" that connect the LE and TE. They are shown on top; this adds strength and does not seem to affect performance much.
Cut the winglets (which reduce wingtip drag) from 1/32" sheet, paying attention to grain direction (shown on the plan by little wavy lines), and glue them to the wingtips.
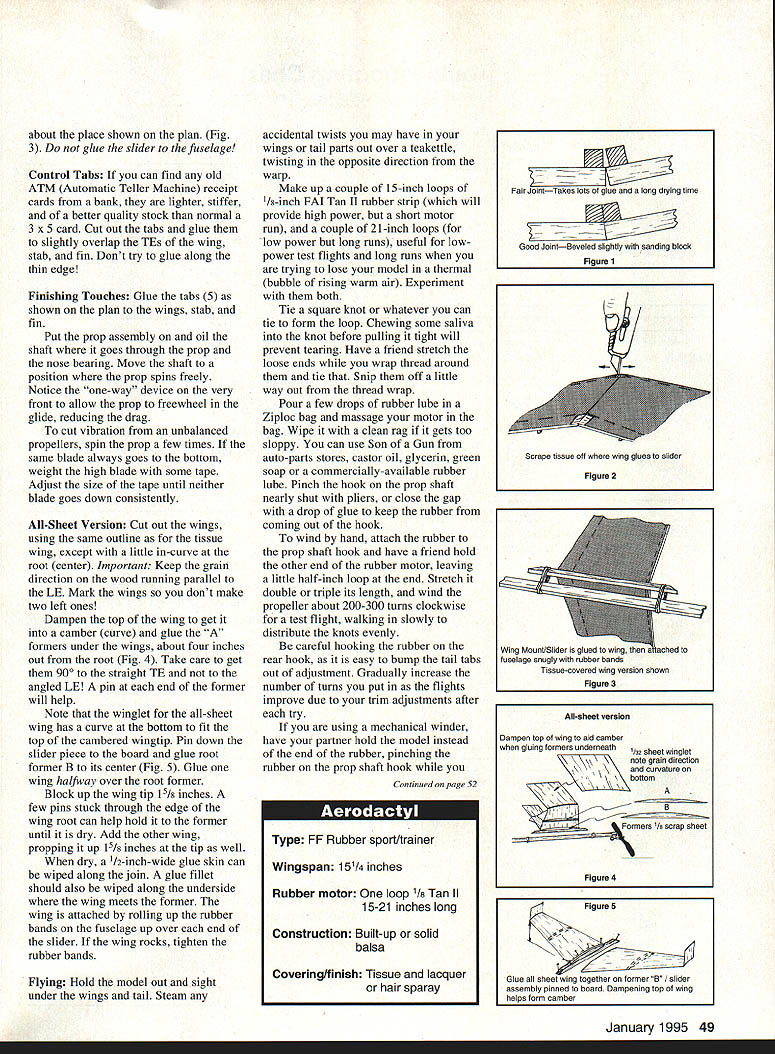
When the wings are dry, sand a very slight bevel on the LE and TE of each so they match up when the dihedral (the "vee" of the wings designed to level the model automatically in flight) is glued in. With one wing flat on the board, raise the tip of the other about three inches and glue the center together. Sand any rough places and parts that stick up past where they belong with your sanding block, and reglue any weak spots.
Fuselage
The last four inches of the fuselage is tapered—the 3/8" height diminishes to 1/8". This gives the stab (horizontal stabilizer) a negative angle, which controls the angle of the wing. No angle, no lift.
Bend a sewing pin with needle-nose pliers to form the rear motor hook and install as shown on the plan. Glue it well, wrap with thread, and rub glue into the thread.
The plastic nose piece of the propeller assembly should fit snugly without glue on the front of the fuselage.
Control Tabs
You can find old ATM (Automatic Teller Machine) receipt cards—bank card stock is lighter, stiffer, and better quality than normal 3 x 5 card. Cut out tabs and glue them slightly overlapping the TEs on the wing, stab, and fin. Don't try to glue along the thin edge.
Finishing Touches
Glue the tabs (five) shown on the plan to the wings, stab, and fin. Put the prop assembly on and oil the shaft that goes through the prop nose bearing. Move the shaft position until the prop spins freely. Note the one-way device at the very front which allows the prop to freewheel on the glide, reducing drag and cutting vibration.
Unbalanced propellers: spin the prop a few times; if the same blade always goes to the bottom, weight the high blade with some tape. Adjust the tape until neither blade consistently goes down.
ALL-SHEET VERSION
Cut out wings using the same outline as the tissue wing except for a little in-curve at the root center. Important: keep the grain direction of the wood running parallel to the LE. Mark the wings—don't make two left ones.
Dampen the top wing to get the camber curve and glue formers under the wings about four inches out from the root (see plan Fig. 4). Take care to get a 90° straight TE and the angled LE; pin the end former—this will help. Note the winglet on the all-sheet wing has a curved bottom to fit the top cambered wingtip.
Pin down the slider piece on the board and glue root former B at its center (see plan Fig. 5). Glue the wing halfway over the root former. Block up the wing tip 1–1/2 inches. A few pins stuck through the edge of the wing root can help hold the former until dry. Add the other wing, propping up 1–1/2 inches at the tip. When well dry, a 1/2"-wide glue skin can be wiped along the join; the glue fillet should also be wiped along the underside where the wing meets the former.
With the wing attached, roll up rubber bands and pull the fuselage up over the end slider. If the wing rocks, tighten the rubber bands.
EMPENNAGE (Tail Feathers)
Cut the stab and fin out of light 1/32" balsa sheet, paying strict attention to the grain direction shown. Glue the fin to the side of the fuselage. When dry, use your sanding block to even up the angle you cut on the rear of the fuselage to provide a square seat for the stab. Glue the stab on the taper as shown; make sure it is 90° to the fin and not tilted.
COVERING (Wing)
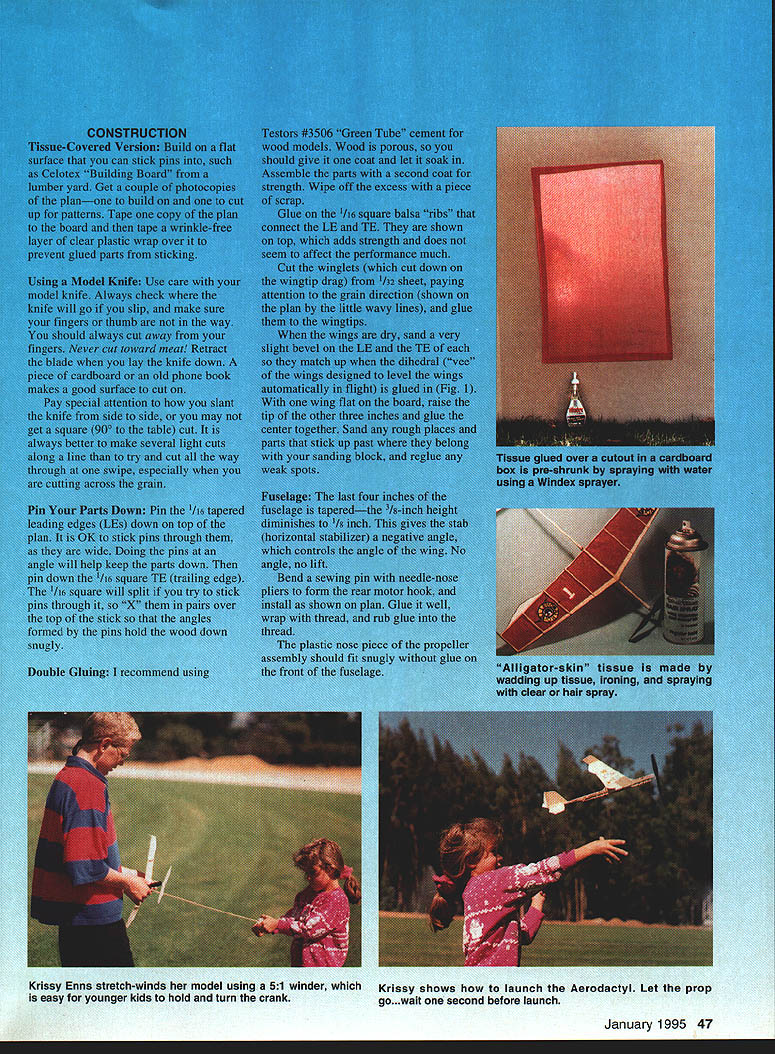
Tissue must be pre-shrunk or "pre-wrinkled" to prevent it shrinking and warping your wing.
- Alligator-skin (wrinkled) tissue: wad the tissue into a ball a few times and then iron it flat. The little wrinkles let some shrinkage occur without transmitting the pull to the light balsa structure.
- Preshrunk tissue (preferred): cut a hole in the side of a big cardboard box about an inch smaller all the way around than your tissue. Glue the tissue over the hole, pulling out wrinkles as best you can. Spray it with water (an old Windex sprayer works well). When dry, spray a coat of clear lacquer or lacquer hair spray to help make it airtight and water resistant.
You can spray alligator-skin covering too, but skip the water-shrinking step if you do.
Prepare a piece of tissue about an inch larger all around than the wing and glue it to the bottom of the wing only, using a UHU glue stick or similar on the LE, TE, and winglet bottoms (but not the "rib" sticks). Thinned white glue (60% glue, 40% water) brushed on works well, too.
Pull the wrinkles out with your thumbs before the tissue is stuck down permanently. Trim the excess with light strokes of your sanding block held at an angle to cut the tissue along the sharp edge of the wing—don't weaken the balsa by sanding off wood. Scissors can be used in a pinch.
Carefully scrape away the tissue right at the center of the wing at the LE and TE and glue wood-to-wood onto the wing mount stick or "slider" (see plan Fig. 2). As it dries, make sure the wing is level and straight in relation to the mount.
Pull off the nose assembly and roll a couple of small rubber bands onto the fuselage, leaving a space between them to set the slider down on top of the fuselage. If they are too loose, wrap them around the fuselage another turn or two. You may have to make your own small rubber bands by tying off the end of a larger one and snipping off the extra. Roll them up over the ends of the slider to hold the wing at the correct position.
FLYING
Hold the model out in sight under the wings and tail. If you have wings or tail parts out of alignment, steam them over a teakettle and twist in the opposite direction to correct the warp. Make trim adjustments as needed.
Rubber motors:
- Make up a couple of 15" loops of 1/8" FAI Tan II rubber strip for high power but short motor runs, and a couple of 21" loops for lower power but longer runs. Experiment with both.
- Tie a square knot (or whatever knot you can tie) to form the loop. Chew some saliva into the knot before pulling tight to prevent tearing. Have a friend stretch the loops while you wrap thread around them and tie that. Snip them off a little way out from the thread wrap.
- Pour a few drops of rubber lube (e.g., Son of a Gun, castor oil, glycerin, green soap) into a Ziploc bag and massage your motor in the bag. Wipe it with a clean rag if it gets too sloppy.
- Pinch the hook on the prop shaft nearly shut with pliers, or close the gap with a drop of glue to keep the rubber from coming out of the hook.
Winding and hooking:
- To wind by hand, attach the rubber to the prop shaft hook and have a friend hold the other end of the rubber motor, leaving a small loop at the end. Stretch it double or triple its length and wind the propeller about 200–300 turns clockwise for a test flight, walking in slowly to distribute the knots evenly.
- If you are using a mechanical winder, have your partner hold the model instead of the end of the rubber. Pinch the rubber on the prop shaft hook while you wind from the rear. Have the partner hold the tail out of the way so that if the motor snaps it will not harm the control surfaces.
- To hook up the wound motor, grip the rubber about an inch from the winder hook and let the winder dangle, letting a loop unwind to make it easier to hook on the model. Give the winder to your partner instead of dropping it on the ground.
Launching:
- Bend the left-hand aileron tab down about as far as a nickel, and bend the rear of the rudder the same amount to the left. This should give a left-hand climb under power, with the "down" aileron keeping the left wing from dropping too much.
- Hold the model under the wing, not behind it, using your writing hand. The other hand holds the propeller.
- Check the prop hook area and pull any knots backward away from the hook so they won't bind and stop the prop from turning.
- Release the prop, count one second, then toss the model lightly forward to get up to flying speed with the nose just a little above the horizon. Never throw the model hard or aim it too high, as it will stall.
Observe carefully what the model does (dive, climb steeply then dive, roll right, spiral dive left, etc.). If you are not sure exactly what the plane did, you will not know what to change to fix it. Refer to your trouble-shooting references for suggested remedies.
Cautions:
- No model is worth getting hurt for. Never run into a street to save a model when a car is coming, and never take risky climbs into strange trees. Throwing a weight on a string over the branch and yanking sometimes works.
- When chasing models in tall grass, be careful of hazards and wear suitable clothing.
SPECIFICATIONS
- Type: FF rubber sport/trainer
- Wingspan: 15-1/4"
- Rubber motor: One loop 1/8" Tan II, 15–21" long
- Construction: Built-up or solid balsa
- Covering/finish: Tissue and lacquer or hair spray
MATERIALS NEEDED TO MAKE BOTH MODELS
- Four sheets 1/32" x 3" x 18" light balsa
- Two 5-1/2" to 7" plastic propeller assemblies
- Two 1/8" x 3" x 18" tough "B" grain balsa, medium hard
- Four 1/16" square x 18" hard balsa sticks
- One 1/16" x 3" x 18" medium-hard balsa sheet
- One sheet of model tissue
- One tube Testors Green Tube Cement for Wood Models (#3506)
- 25 feet of FAI Tan 1/8" flat rubber
The above materials, which will allow you to build and fly both the tissue- and all-sheet-covered models, may be obtained from Peck-Polymers, Box 710399, Santee CA 92072; Tel.: (619) 448-1818; fax (619) 448-1833, for only $10 including postage. Mention that you want the "materials kit for the Aerodactyls" mentioned in Model Aviation.
Sandy Peck may also include a free catalog listing many useful beginner items.
WHERE TO GET STUFF / MORE INFORMATION
If your local hobby shop doesn't have what you need, write Peck-Polymers, Box 710399, Santee CA 92072, or call the number above about the materials package Sandy Peck has put together for the two Aerodactyl models.
There are a few fine beginner's books available, plus many excellent plans and good sources of supplies, clubs, and information. I keep a list of over 200 listings with comments. To get a copy, send $1 (to cover printing) and a legal-sized envelope with 52 cents postage to: Bill Warner, 1370 Monarch Ave., Porterville CA 93257.
SUPPLIES YOU CAN FIND LOCALLY
- About 3 x 5" thin card stock
- Rubber lube such as glycerin and green soap (mixed), castor oil, or Son of a Gun (auto-parts store)
- Spray can of clear lacquer or lacquer hair spray
- Glue stick: UHU or equivalent; white glue for covering
- Dressmaker pins
- An X-Acto or similar retractable model knife (single-edge razor blade in a pinch)
- Light oil, such as 3-In-One
USEFUL (BUT NOT ESSENTIAL) STUFF
- Scotch tape
- Sanding block, approx. 1/4" x 1" x 6" with 100-grit and 220-grit paper
- Mechanical rubber motor winder (can be purchased or made from a Fiskars hand drill using a bent-nail hook with the nail head behind the chuck jaws for safety)
Transcribed from original scans by AI. Minor OCR errors may remain.

