
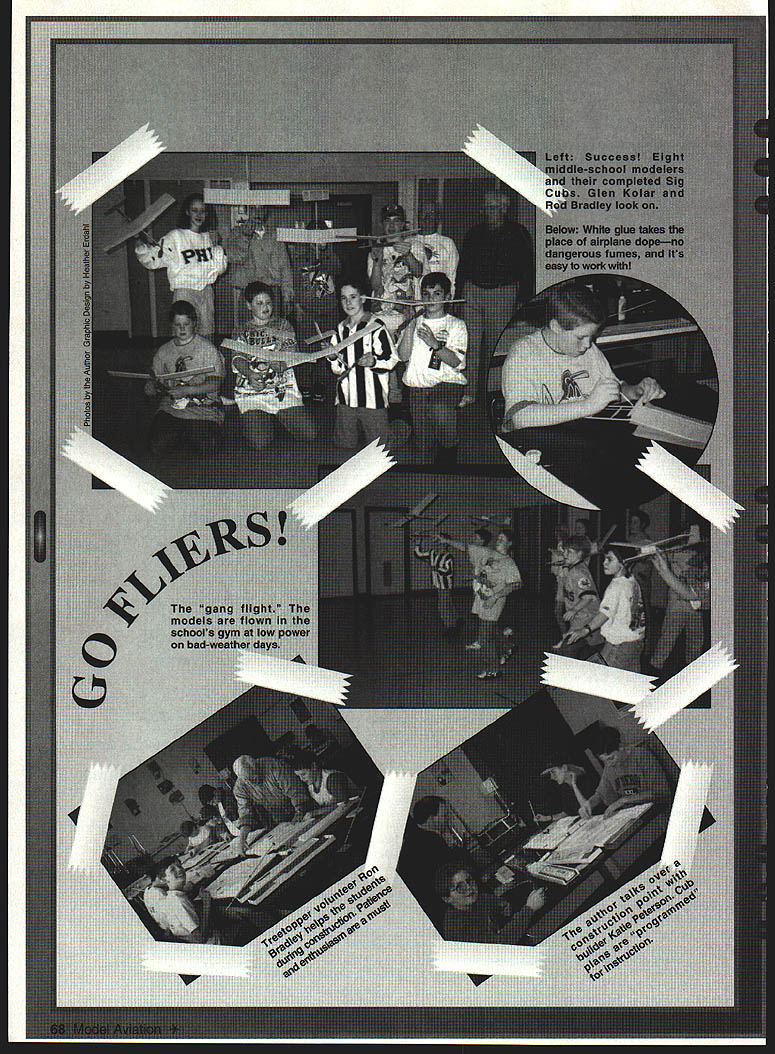
GO FLIERS!
- Left: Success! Eight middle-school modelers and their completed Sig Cubs. Glen Kolar and Rod Bradley look on.
- Below: White glue takes the place of airplane dope—no dangerous fumes, and it's easy to work with!
- The "gang flight." The models are flown in the school's gym at low power on bad-weather days.
- Treetopper volunteer Ron Bradley shows the students during construction. Patience and enthusiasm are a must!
- The author talks over a construction point with Cub builder Kyle Peterson. Cub plans are enlarged for instruction.
AEROMODELING MIDDLE SCHOOL
Michael Quaine
There is a new idea in education about how to operate—“that school after elementary and before high school”—in education circles it’s often called the middle-school concept. Many middle schools are looking for a wide variety of after-school activities to offer their students. Ideas for clubs and enrichment classes are in great demand, as are volunteers to help. The implications are good for clubs interested in youth programs.
The Port Huron (MI) Treetoppers is a club that shows a great interest in aeromodeling as a hobby and its future. The opportunity to take advantage of the middle-school philosophy presented itself, and several members of the Treetoppers were ready and willing to provide their expertise and time.
The opportunity presented itself at Fort Gratiot Middle School in Port Huron, Michigan. A conversation with Prudence Liberty, the school librarian, led to a subscription to Model Aviation, to a Treetoppers flying demonstration, and to a program to teach students how to build model airplanes.
I was enthusiastic about the idea, and immediately contacted several members to check on their availability for this project. Once I had their commitment, I met with Mitzi Manis, a coordinating teacher at the school. We put together a sign-up sheet to place in the office, and the after-school class was announced on the public-address system.
During a two-week period 13 students signed up; we were pleased with the number. This let us know that there was some interest, and the group was small enough that the volunteers could work at length with each student.
We would meet after school on Thursdays for an hour and fifteen minutes. The program was to last six weeks. We found out that 7 1/2 hours of building instruction was just a little less than enough time. In all, the program had eight weeks of building sessions.
On the first day I had a plan of action ready. I planned to do a lot of different things—half of which I didn’t get to. That was no disappointment to me, though; it’s better to be overprepared at the first meeting. It’s important to motivate the students at the first meeting—if you don’t, you won’t have students. If you fail to show them that there is something to gain, they’ll find somewhere else to go. You don’t want to be sitting around staring at each other while waiting for their parents to arrive.
I started by introducing the instructors and myself. Helping me were Walt Levine and Bob Burns, both retired engineers. I talked a little about their experience and abilities as modelers. I also talked about how their hobby related to their jobs as engineers. Two other volunteers, Glen Kolar and Ron Bradley, joined us at later meetings.
After the introduction, I collected money. The students paid a small fee to cover the price of the airplane kit and glue. Opinions vary on this, but we felt that the small amount that the students paid would help them appreciate their own models a little more. As it was, no one complained about paying $5.50 for a six-week model-building program. All of the materials we used were either donated or borrowed.
Next, we passed out the kits and did an inventory of the parts, identifying them and explaining their use. The inventory included a quick look at the plans and an introduction to aeromodeling terms.
The model we used was the Sig Cub, a rubber-powered free-flight airplane. It is a simple design with a built-up, semi-airfoil wing and a simple stick fuselage. This combination enabled us to concentrate on the dynamics of flight without losing the point of explaining how to build a cabin-style (full-fuselage) model.
The plans that come with the Cub are “programmed” for instruction. The instructions are printed on the plans, with checkboxes next to each task. The plans show critical views of assemblies. Some views require interpretation; instructors and students gain experience, and the plans become easier to follow as the program progresses.
In our program we started with the checkboxes. The students showed the instructors that they had performed a step, and the instructor would check off that task. As the students learned more about how to read the plans and apply the directions, we dropped the check-off requirement. This allowed the students who grasped the building techniques to move ahead and eventually join the instructors in helping other students. We found that the students enjoyed helping each other. A feeling of competency and the opportunity to rethink what they've already done is good for these kids.
Eventually the two other volunteers, Ron and Glen, joined the program. They brought their own experience and approaches to model building. Every one of the gentlemen showed an enthusiasm and patience that really ingratiated them to the students.
During the three years that the club has been sponsoring the Cub building program, many of the problems associated with building airplanes have been solved. For example, using airplane dope to cover the wing with tissue is prohibitive. Dope is highly volatile and causes dangerous fumes; it's not recommended for use with teenagers in a closed classroom. Our solution is to use white glue thinned with water. First, a panel of tissue is cut to size. Then a bead of unthinned white glue is run around the wing framework and spread out with a fingertip. The covering can then be laid over the framework and rubbed lightly where it contacts the white glue. When the glue dries (which is quickly), the covering is bonded to the framework.
After all the panels are glued down, the tissue paper is lightly brushed with a glue/water mixture. As the mixture dries, the paper tightens, and the glue seals the tissue. This procedure is also used for the stabilizer and fin assemblies. Another approach, applying the mixture with a spray bottle, might also be tried. This method sounds promising, but we've never gotten around to trying it.
We have found that the procedure works well—and it is safe and easy. The simplicity of this method has outweighed any problems we've had with it.
Another problem that we faced with the Cub was bending wire. The kit comes with two gauges of wire—one for the landing gear, and a lighter length for various fuselage fittings. We found that bending the wire is one of the most difficult tasks to get the students through.
With a little instruction on how to grip the pliers, and matching shapes with small bends, the students were able to get through the task with some trouble. My frequent statement was, "Do your best, but accept what you do." For the most part the fittings did the job that they were designed to do. As always, there were students who did a perfect job, and the instructors to shame!
Still another issue we had to contend with was using sharp cutting tools. We used single-edge straight-back razor blades. The expense of providing a hobby knife for all of the kids was too great.
Safety with the razor blades was the biggest issue. Most schools today have a weapons policy. Our approach to controlling the issue was: "These blades are weapons when they're not in use on models." Therefore, they must be collected at the end of each building session. We didn't have any difficulties with this motivated group of kids.
It is important that care be taken in any program when assessing the level of trust given to students on this issue. Don't set them up for trouble. Be firm with your control of the "sharps," and explain your reasoning.
Whether or not to use cyanoacrylate (CYA) accelerator is up to you. We have found that it helps at critical times to speed the glue's curing time. Quite often a student would unwind an assembly too early and it would fall apart on the board, setting him back several steps. In this case CYA accelerator is a helpful thing to have around. Besides, it gives you a chance to teach about catalysts and how they work.
After all the problems are solved and everyone has their airplane built, we take a day to trim the airplanes for flight. A free-flight model is supposed to be built true enough to fly in a regular pattern—straight for distance, or curved for time. Since the airplanes are a first attempt for most of these students, the question of flightworthiness is a matter of some stress. We try to keep things simple and have had good success. The students learn to adjust control surfaces, add ballast where necessary, and wind the motors to safe limits. The flying day is always a highlight, and the pride that the students show in their accomplishment is well worth the effort.
Take the time to "glide-test" the models and teach the basics of control. The model is equipped with a rudder for yaw control. Pitch is controlled by shifting the center of gravity, and lateral control is achieved by adding weight to one of the wingtips.
Finally, we fly. If weather permits, we go outside. You must have a calm day to fly these. Most of the time we fly with the wind. Little compares to the excitement on this day. Once the students have the techniques figured out, it's difficult to rein them in for pictures.
On the flight day in the pictures, the weather dictated that we fly indoors. We didn't hold a contest. The students were content to wind their airplane motors to low settings and watch the models glide straight and true from one side of the cafeteria to the other. There were a few mishaps and repairs, but the students were well-satisfied with their creations.
This project is intended to introduce model airplane building to middle-school students. Also, we hope to expose the kids to the theories behind aerodynamics and the principles of flight. I've included a list of goals that I set for the program when we started. The results of this kind of project are not easily predicted, nor are they always tangible.
The memories of my youth include those of a number of "old guys" who would talk to me and share their experiences and advice. They talked and I listened. Most of them were neighbors who hired me to do odd jobs. I feel lucky to have had that experience; they taught me things that I would have missed otherwise. By their example and friendship I became a better person than I would have otherwise.
It occurred to me about three weeks into the program that model building is only part of what the program offers. In a world with fewer and fewer good examples, these volunteers may be the most important part of this program. Model airplanes provide the fun, but the volunteers show the wisdom that can be gained from them. Showing their enthusiasm for applying math, science, and problem-solving skills to a fun hobby was the most important thing they could do.
Many thanks to the following people:
- Jim Dunn, Fort Gratiot Middle School principal
- Mitzi Manis, Fort Gratiot Middle School science teacher
- Pru Liberty, Fort Gratiot Middle School librarian
- Glen Kolar, president, Port Huron R/C Treetoppers
- Bob Burns, volunteer
- Walt Levine, volunteer
- Ron Bradley, volunteer
- The aeromodeling students of Fort Gratiot Middle School
- The friendly, helpful, and patient custodial staff of Fort Gratiot Middle School
Model Aviation Goals
Knowledge and Comprehension
- Arrangement of plans
- Symbols and terminology on building plans
- Aviation terminology
Application
- Following plans and directions
- Comparing and reproducing shapes
- Using understanding of stability and balance to adjust wing position
Synthesis
- Using understanding of the building process to create solutions to problems
Analysis
- Use of test flights and adjustments to trim and balance the airplane for improved flight
Transcribed from original scans by AI. Minor OCR errors may remain.

