
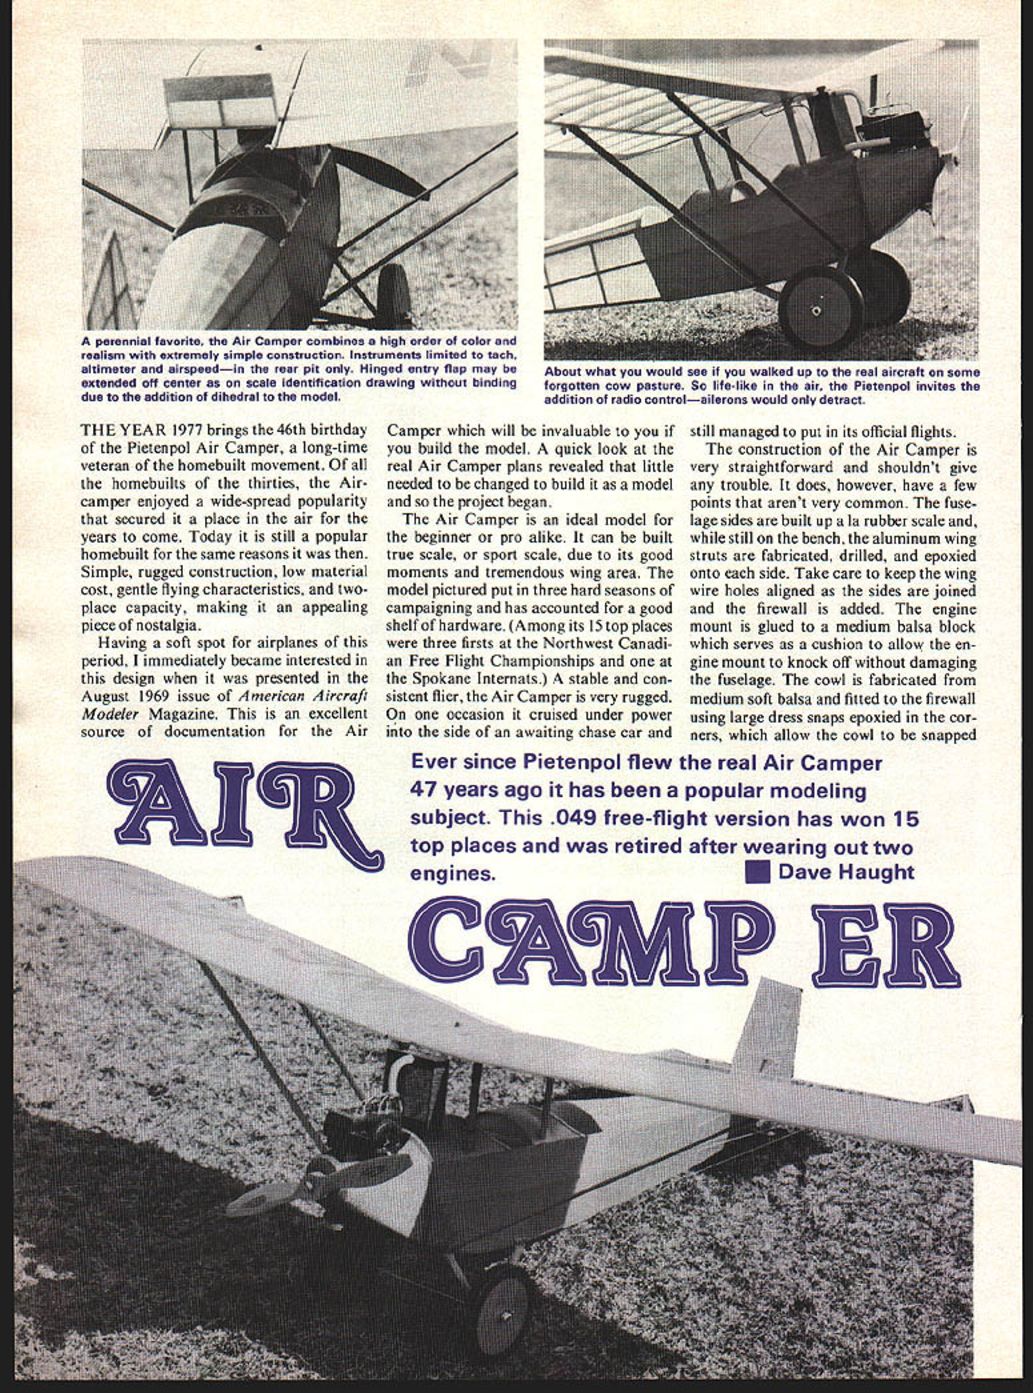

Air Camper
THE YEAR 1977 brings the 46th birthday of the Pietenpol Air Camper, a long-time veteran of the homebuilt movement. Of all the homebuilts of the thirties, the Air Camper enjoyed a wide-spread popularity that secured it a place in the air for the years to come. Today it is still a popular homebuilt for the same reasons it was then. Simple, rugged construction, low material cost, gentle flying characteristics, and two-place capacity, making it an appealing piece of nostalgia.
Having a soft spot for airplanes of this period, I immediately became interested in this design when it was presented in the August 1969 issue of American Aircraft Modeler Magazine. This is an excellent source of documentation for the Air Camper which will be invaluable to you if you build the model. A quick look at the real Air Camper plans revealed that little needed to be changed to build it as a model and so the project began.
The Air Camper is an ideal model for the beginner or pro alike. It can be built true scale, or sport scale, due to its good manners and tremendous wing area. The model pictured put in three hard seasons of campaigning and has accounted for a good shelf of hardware. (Among its 15 top places were three firsts at the Northwest Canadian Free Flight Championships and one at the Spokane Internats.) A stable and consistent flier, the Air Camper is very rugged. On one occasion it cruised under power into the side of an awaiting chase car and still managed to put in its official flights.
The construction of the Air Camper is very straightforward and shouldn't give any trouble. It does, however, have a few points that aren't very common. The fuselage sides are built up as a rubber scale and, while still on the bench, the aluminum wing struts are fabricated, drilled, and epoxied onto each side. Take care to keep the wing wire holes aligned as the sides are joined and the firewall is added. The engine mount is glued to a medium balsa block which serves as a cushion to allow the engine mount to knock off without damaging the fuselage. The cowl is fabricated from medium soft balsa and fitted to the firewall using large dress snaps epoxied in the corners, which allow the cowl to be snapped off for engine access.
Ever since Pietenpol flew the real Air Camper 47 years ago it has been a popular modeling subject. This .049 free-flight version has won 15 top places and was retired after wearing out two engines.
Dave Haught on and off. The engine should be fitted next. A length of 1/16" music wire is soldered onto the head of the needle valve as an extension and an oil drain hole should be cut into the bottom rear of the cowling.
The landing gear is bent up from 1/16" wire and sewn onto the plywood formers and installed into the fuselage. The landing gear fairings are carved and fitted from spruce stock and epoxied in place. The axle is shock absorbing, just like the real one, by wrapping elastic bands around the gear legs and axle. This is a neat feature that is good for scale points and those hard landings. The tail skid is bent from a strip of soft aluminum and sewn and epoxied to a spruce or plywood brace and glued in place.
The tail surfaces are scale size and are quite adequate for flying scale. The construction here is basic but watch your weight. Small strips of tin shim stock serve as hinges which are epoxied in place. Be careful to make them easy to bend but not too flimsy as to flap in the breeze!
Cockpit details should be added now, before covering the fuselage. Nearly all the cockpit furnishings were made of wood and should be built with lightness in mind. Be sure to anchor everything well! The seats are fabricated from 1/32" sheet balsa and the rudder bar and pedals are made from 3/32" balsa doweling. Use black or silver thread to connect the controls together. The sticks were made from 1/8" dowels with the small fittings cut from tin shim stock. Small pulleys can be made from the brass grommets off hobby item packets and then glued in place. The instruments can be commercial or made by laminating together photographs and clear plastic discs. The Air Camper had minimal instrumentation which usually consisted of No primary article prose appears on this page — it is a full-page plan drawing with part labels and specifications. There is no continuing article text to extract.
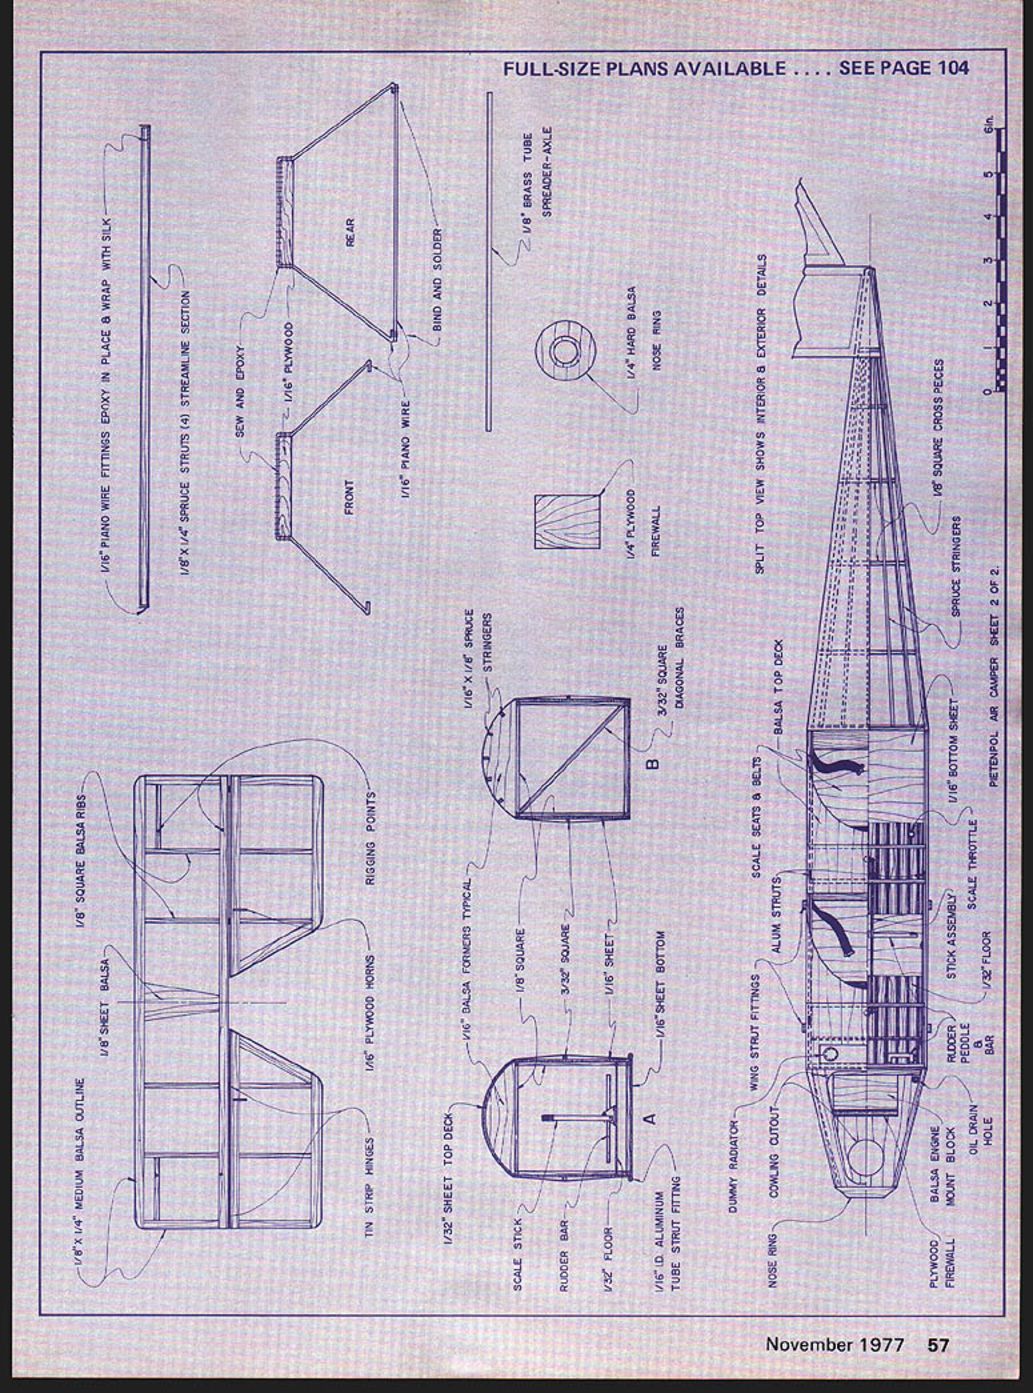
FULL-SIZE PLANS AVAILABLE .... SEE PAGE 104
PIETENPOL AIR CAMPER
- 1/16" piano wire fittings epoxy in place & wrap with silk
- 1/8" x 1/4" spruce struts (4) streamline section
- sew and epoxy
- bind and solder
- 1/16" piano wire
- front
- rear
- 1/8" brass tube shrouded axle
- 1/4" hard balsa nose ring
- 1/4" plywood firewall
- Split top view shows interior & exterior details
- 1/8" square cross pieces
- spruce stringers
- Pietenpol Air Camper — sheet 2 of 2
- 1/16" bottom sheet
- 1/32" floor
- scale throttle
- scale seats & belts
- alum. struts
- 1/16" aluminum tube strut fitting
- nose ring
- dummy radiator
- cowling cutout
- scale rudder pedals
- balsa block engine mount
- oil drain hole
- plywood firewall
- Tin strip hinges
- 1/32" sheet top deck
- 1/16" sheet bottom
- 1/8" square
- 3/32" square diagonal braces
- 1/16" balsa formers (typical)
- 1/8" x 1/4" medium balsa outline
- 1/8" sheet balsa
- 1/8" square balsa ribs
(Plan drawings and detailed part labels shown — full-size plans available as noted above.)
Air Camper/Haught continued from page 55
an air-speed indicator, tachometer, and an altimeter in the rear cockpit only. The switches and throttle knobs are simulated by hat pins and round-head sewing pins of matching sizes.
The engine and radiator are built from balsa scrap and are finished in flat black. Carve the engine block to shape and add the exhaust and intake pipes. These are cut from the appropriate sized plastic tubing as are the radiator hoses. The latter are left to be removable to allow access to the engine. The water pump pulley is added after the engine is painted and a small plastic band serves as a belt. The spark plugs are simulated by cutting small lengths of 1/16" and 3/32" aluminum tubes, which are slipped over the bare ends of the fine copper wires and inserted into their respective positions on the engine block. The individual wires are then bound together to form the ignition harness with small strips of black electrical tape. Refer to the plans and add the remaining details such as the carburetor, oil filler and dip stick. Then mount the engine onto the plywood floor and secure it to the cowl with dress snaps. The radiator is built up around a balsa frame and a fine plastic screen mesh from a discarded screen door.
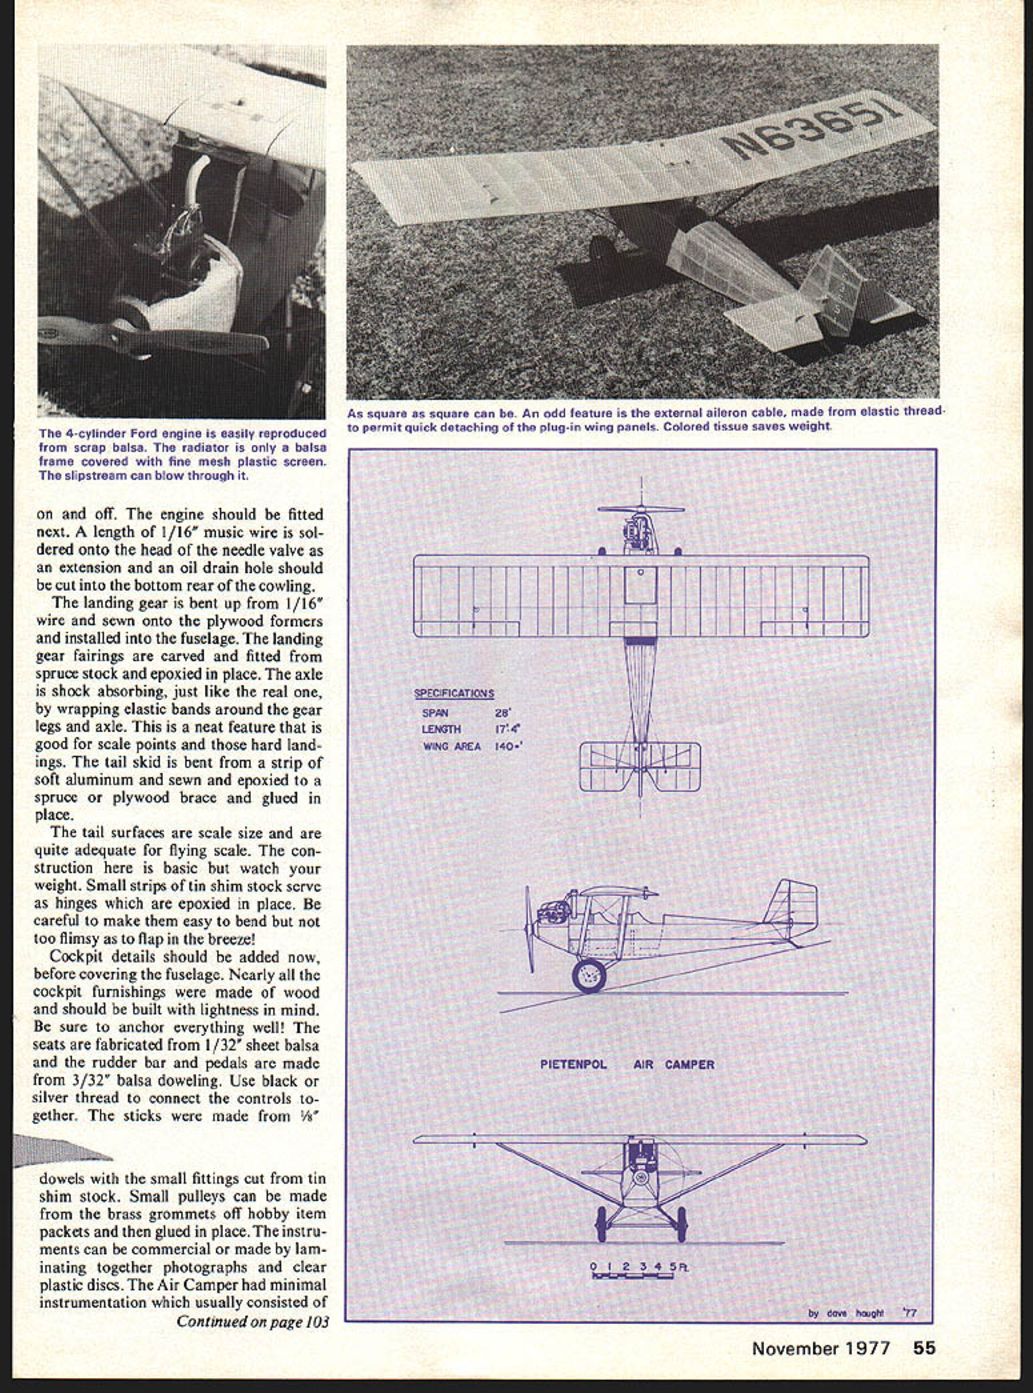
Now for the wing. You'll notice that the airfoil is conveniently undercambered so as not to complicate the wing construction. Don't feel guilty—it's scale. The wing is also basic except for the plug-in feature. The main spars are spruce as is the leading edge; the remaining wing structure is balsa. Use hard balsa in and around the ailerons and take care to ensure they fit well when hinged. Two 1/16" inside diameter aluminum tubes are bound with thread to the main spars at the roots like a Nordic, and they should align and slide easily onto the 1/16" music wire wing joiners. The center section is anchored to the aluminum wing struts and then the top and bottom are planked. The off-center hinged flap at the trailing edge is hinged with two straight pins as indicated on the plans.
The wing struts are functional and must be rigid. Cut them from an 1/8" x 1/4" spruce strip and sand to an airfoil section. Adjust the length of the struts to give the wing dihedral and compensate for any warps. The wire fittings can then be made and sewn onto the ends of the struts.
The model is now ready to finish. I used colored Japanese tissue to keep the weight down on the original, but weight is not really a big problem on this model. Finish the model in your favorite method and trim it to match the Air Camper you are modeling. The wing tank is drawn on using a technical pen, or strips of black tissue can be used. The control horns and rigging cables now can be fabricated and added. I used elastic thread for the aileron cables so I could disconnect them to plug in the wings. The wheels can either be made from plywood discs and black rubber tubing or commercial vintage wheels can be fitted.
Check the model for alignment, warps and balance, taking care of each as needed. With the surfaces at zero-zero, test glide the model over the lawn you've neglected for this very purpose. When you are satisfied with the glide trim, secure the trim weight and head for the flying site.
After flying free flight scale a few years One either becomes a neurotic or learns a few tricks to preserve their sanity and models. One trick I've learned is to keep a thorough flight log on each model. Get a small notebook and begin it by registering each flying surface and recording its slightest characteristics. Then as you begin to trim your model, record each trim change and its effect on the flight. In this way you will always know the proper trim of your model in case it develops a new warp or the settings are damaged by a roll-over landing. It is also helpful in predicting your model's behavior in wind and other adverse conditions.
Put a washer of right thrust in your Air Camper and begin short-run tests. I suggest using an 8-4 wood propeller to begin with and, as soon as it looks safe, up the power by clipping the diameter of the propeller in 1/8" increments. Once a nice wide right-hand spiral climb is achieved, add 1/16" wash-in to the inboard aileron and then retrim your turn. This will keep the model from tightening up and spinning in windy conditions. Be sure to become used to the model and fly it under various conditions. More contests seem to be won in the wind by models that are well trimmed.
When you are confident of your trim, fill the tank half full and let it go. The Air Camper should climb out in lazy slow circles to the right with its wings near level. One needs to be careful of overfilling the tank because the Air Camper will tend to enchant you as it flies away over the hills. The original Air Camper now has its well-earned retirement in a hobby shop in Edmonton, Alberta.
Transcribed from original scans by AI. Minor OCR errors may remain.

