
Amazing Rubber Hinges
Harley Michaelis
Innovation is the name of the game in building better and simpler aircraft. These hinges, made from surgical rubber, automatically create a sealed hinge line that will benefit any model.
OVER THE PAST FEW years, my experiments with the use of flat surgical rubber for hinging ailerons, flaps, elevator, and rudder on model sailplanes have proven highly successful. The aircraft, a dozen or so in number, have ranged from competition thermal ships to racing birds flown in 50 mph winds. Working out the proper steps for installing the hinges has involved considerable trial and error. With these years of field experience now behind me, I'm convinced that this superior-quality rubber makes a most practical and fine-working hinge offering a wide range of RC application.
Advantages of the material
- Surfaces can butt fit, face to face, flush with each other. There is no need to bevel, round off, or provide space for deflection, as the hinges stretch to allow pivoting at surface edges.
- The hinge line is sealed by the simple butt fit.
- The hinges can be installed under tension. This keeps the surfaces in contact, assists a return to the neutral position, and helps eliminate flutter caused by slop.
- The method of installation ensures that, while the hinges are under tension, some rubber is free to stretch during deflection. This avoids excessive current drain.
- The hinges can be installed in surfaces from about 1/16 in. thickness upwards, and are adaptable to structure size.
- They work equally well in beveled or tapered surfaces as in structures of uniform thickness.
- They're suitable for open-frame, sheeted-frame, and skinned-foam structures.
- The hinges are durable. They're inherently tough, and in addition will not be exposed to the elements when properly installed.
- Because the stretch during deflection permits spacing of surfaces, covering and painting may be completed after installation. Appearance compares favorably with hinging done after covering and painting as per conventional practice.
- They are the most flexible of any known type of one-piece hinge.
Source and material
As a source for the surgical rubber, I have been using the strapping on a urinary leg bag, a medical supply item. A package of two, selling for about $4.50, makes 48 hinges approximately 1-1/4 in. long by 3/8 in. wide. The rubber is a bit over 1/64 in. thick.
Note that there are different grades of rubber used for the strapping. Be sure you get the dark amber colored material as used for high-quality hi-starts. The lighter colored stuff quickly deteriorates.
I have approached a prominent U.S. RC manufacturer about packaging the material in a form best suited to our use. With any luck Harley's Hinges may be available at hobby outlets close to the time this article sees print.
Installation concept
The installation concept for these hinges is simple. One side of the hinge is attached to the first surface, the other side to the second surface under a little tension so there is sufficient relaxation and some rubber free stretch during deflection. Paste wax is used to avoid unwanted bonding.
With a little practice you can quickly become an expert.
Tools, practice, and techniques
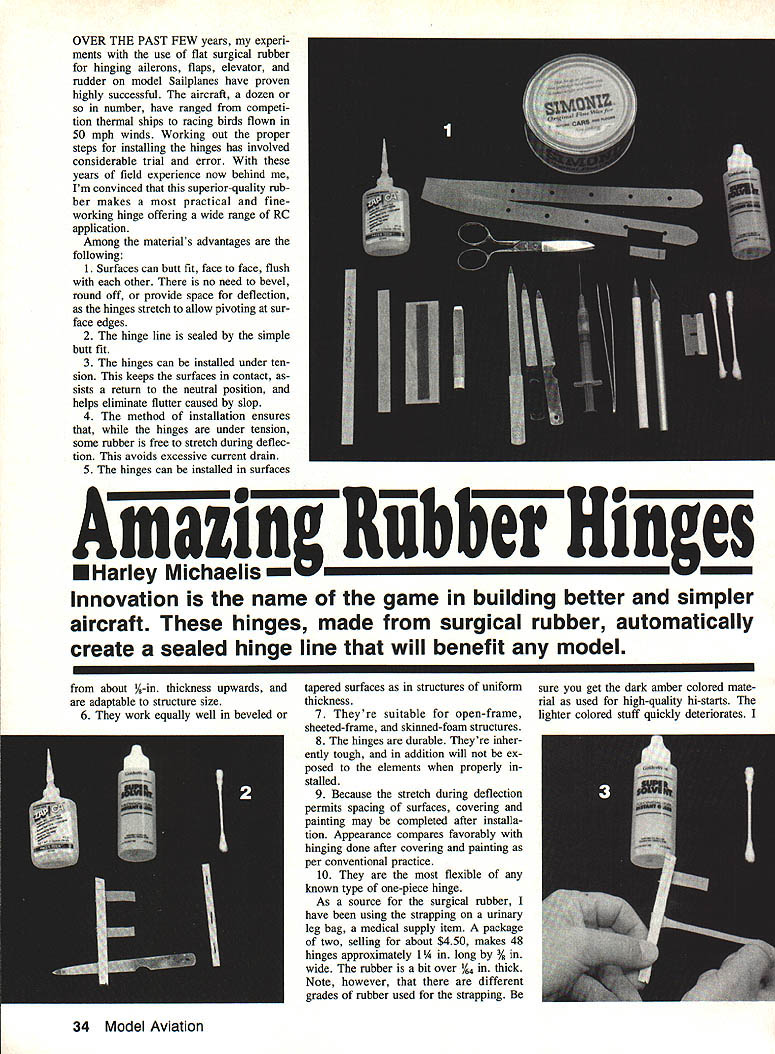
#### Photo 1 — Tools and preparation This shows a strap and various common items used to install the hinges. On the left is a waxed stick of 1/8-in. ply, a strip of 1/64 ply, a block with sandpaper strip, and a smoothed piece of .030 aluminum in a dowel handle. It is essential for the Zap cyanoacrylate (CyA) to have a tiny spout for controlled application. The hinges must be cut with clean, non-ragged edges, and sharp scissors seem best for this.
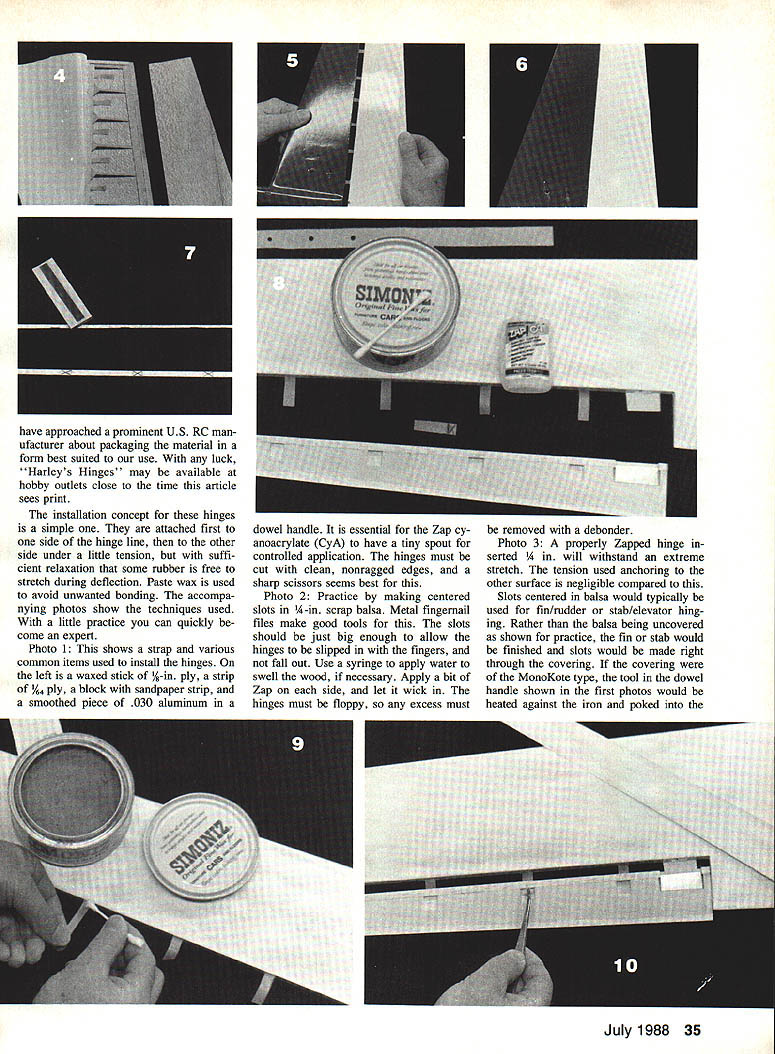
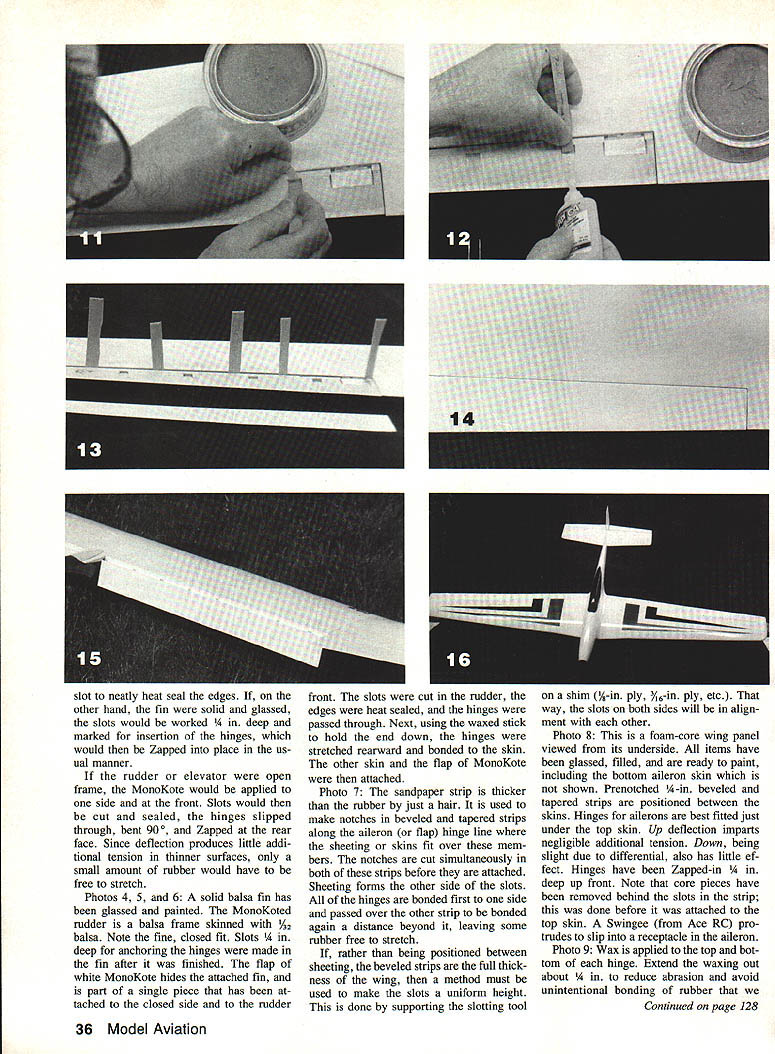
#### Photo 2 — Practice slots Practice by making centered slots in 1/4-in. scrap balsa. Metal fingernail files make good tools for this. The slots should be just big enough to allow the hinges to be slipped in with the fingers, and not fall out. Use a syringe to apply water to swell the wood, if necessary. Apply a bit of Zap on each side, and let it wick in. The hinges must be floppy, so any excess must be removed with a debonder.
#### Photo 3 — Zapped hinge and insertion depth A properly Zapped hinge inserted 1/4 in. will withstand an extreme stretch. The tension used anchoring to the other surface is negligible compared to this. Slots centered in balsa would typically be used for fin/rudder or stab/elevator hinging. Rather than the balsa being uncovered as shown for practice, the fin or stab would be finished and slots would be made right through the covering. If the covering were of the MonoKote type, the tool in the dowel handle shown in the first photos would be heated against the iron and poked into the slot to neatly heat-seal the edges. On the other hand, in a solid, glassed fin the slots would be worked deep and the insertion hinges Zapped in place in the usual manner.
Rudder/elevator and open-frame installations
If the rudder/elevator are open-frame: MonoKote would be applied to the front side. Slots would be cut and sealed, hinges slipped through and bent 90° on the rear face. Since deflection produces little additional tension on thinner surfaces, a small amount of rubber would have free stretch.
If the rudder or elevator were open frame, the MonoKote would be applied to one side and at the front. Slots would then be cut and sealed, the hinges slipped through, bent 90°, and Zapped at the rear face. Since deflection produces little additional tension in thinner surfaces, only a small amount of rubber would have to be free to stretch.
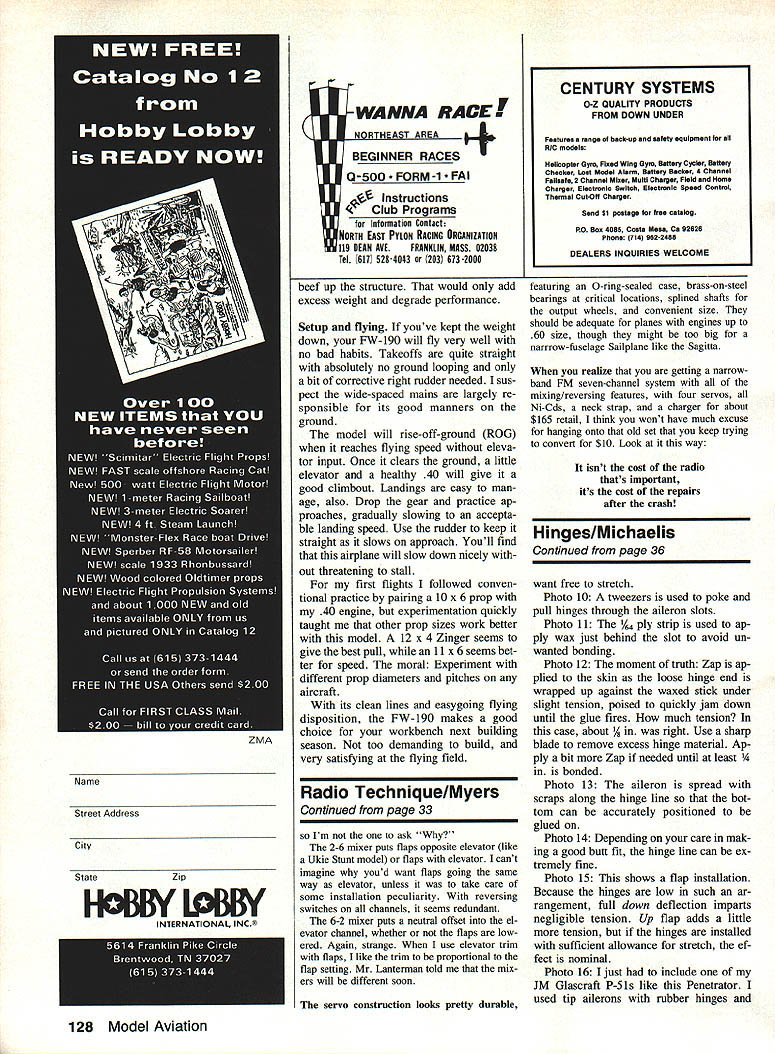
A solid balsa fin has been glassed and painted. The MonoKoted rudder is a balsa frame skinned with .032 balsa. Note the fine, closed fit. Slots 1/4 in. deep for anchoring the hinges were made in the fin after it was finished. The flap of white MonoKote hides the attached fin and is part of a single piece that has been attached to the closed side and to the rudder front. The slots were cut in the rudder, the edges were heat sealed, and the hinges were passed through. Next, using the waxed stick to hold the end down, the hinges were stretched rearward and bonded to the skin. The other skin and the flap of MonoKote were then attached.
Notching and beveled/tapered strips
The sandpaper strip is thicker than the rubber by just a hair. It is used to make notches in beveled and tapered strips along the aileron (or flap) hinge line where the sheeting or skins fit over these members. The notches are cut simultaneously in both of these strips before they are attached. Sheeting forms the other side of the slots. All of the hinges are bonded first to one side and passed over the other strip to be bonded again a distance beyond it, leaving some rubber free to stretch.
If, rather than being positioned between sheeting, the beveled strips are the full thickness of the skin, then a method must be used to make the slots a uniform height. This is done by supporting the slotting tool on a shim (1/16-in. ply, 3/16-in. ply, etc.). That way, the slots on both sides will be in alignment with each other.
Foam-core wing panels and aileron installation
This is a foam-core wing panel moved from its underside. All items have been glassed, filled, and are ready to paint, including the bottom aileron skin which is not shown. Prenotched 1/8-in. beveled and tapered strips are positioned between the skins. Hinges for ailerons are best fitted just under the top skin. Up deflection imparts negligible additional tension. Down, being slight due to differential, also has little effect. Hinges have been Zapped-in 1/4 in. deep up front. Note that core pieces have been removed behind the slots in the strip; this was done before it was attached to the top skin. A Swinger (from Ace RC) protrudes to slip into a receptacle in the aileron.
Wax is applied to the top and bottom of each hinge. Extend the wax about 3/16 in. to reduce abrasion and avoid unintentional bonding of rubber that we want to remain free to stretch.
If both wing surfaces are solid, holes would have to be routed out partially on one side so that the hinges could be pulled through and attached. Use MonoKote or its equivalent to hide the holes.
Be sure the notches are neat, clean, and properly sized so that the hinges can be slipped in by hand and not fall out.
Note that in the case of flaps and ailerons, the initial attachment of the hinges may be done at either side of the hinge line. The decision is a fairly arbitrary one, though it may be determined by observing what can best be left open to attach the loose end.
The photos show the aileron bottom skin being laid on after the hinges are in. Similarly, a flap top skin might be attached last.
Fully top-sheeted and partially sheeted wings
In a fully top-sheeted frame structure, with the only leading edge bottom sheeting, the hinges could first be anchored in the moving surface. With the bottom covering still unsealed, hinge loose ends would be secured to the underside top sheeting. Aileron hinges could go directly onto the sheet. If using flap hinges, which are low, you could put the ends on little blocks glued to the sheeting to keep them in better alignment with the slots. For a foam wing which is fully sheeted on top but partially so on the bottom, pieces may be cut out in advance where the hinges attach.
The more rubber that is free to stretch, the easier it will be for the flap to reflex upward or for the aileron to go downward.
Generally, a 3/16-in. hinge width is practical. The sandpaper notching tool should be 1/16 in. wider so that the hinges don't rub against the slot edges. On large aircraft, the hinges could be wider.
Surgical rubber hinges are strong and durable, and installation as described will partially shield them from the elements. Still, it's probably a good idea to keep the strip in the shade when possible, to protect the rubber from ultraviolet light.
If you are attaching hinges to painted surfaces, be sure that the solvents you select for cleaning up the Zap are ones that won't mar the paint. The Golden West Super Solvent supplied by Satellite City seems harmless, but test it first on painted scrap.
Swingers, Swingees, and hardware
Swingees/Swingers are a natural for use with rubber hinges for ailerons, but need modification to do the job best. Don't judge by the early, discontinued model. Find the newer opposing-set model in black or white (Delrin). Treat these with WD-40 to loosen them up.
To get enough deflection, the pushrod must attach close in. Remove the threads on the arm, and flatten the exposed part to a 5/32-in. width between pieces of flat, hard steel. From 9/16-in.-sq.-I.D. brass tubing, make a gauge with an .055 (No. 54) bit centered 1/8 in. in from the end. Use this to guide the drill bit through the Swingee arm. This matches the stock K & S .055 wire, which makes a good size for the pushrod end. Just bend the wire at a right angle, and slip it into the hole in the Swingee arm. A wing skin will act as a retainer if the bent end is inserted pointed away from it. In a thin wing, the angled pin ends should be filed down and the raised letters filed off. The vertical stops on the moving part interfere with seating into the aileron, and hence should be rounded.
The front of the Swingee can lie in a tray made with a ply bottom and blocks against either of the Swingee ends. After gluing the tray to the skin or other structural member, adhere the Swingee to the tray with Zap. The rear part slips into a receptacle built in the aileron, but is not glued into it. As the aileron deflects, the Swingee works in and out of the slot slightly. A good receptacle is formed from 1/2 x 1/4-in. pieces of sheet aluminum bent without slop or bind to a thin "V" 1/2 in. wide. Plug the ends, and glue between the sheeting, shimmed so as to push the arms nearly straight forward with the aileron in neutral. Sealing entirely internal, this arrangement eliminates the action of hardware that causes slop.
Final notes
I hope these ideas prove as valuable for you as they have for me. Your observations would be of interest.
Harley Michaelis 26 S. Roosevelt Walla Walla, WA 99362
Editor: As we go to press we were just informed that Ace RC is researching sources for a properly formulated rubber to be packaged and sold as "Harley's Hinges."
Transcribed from original scans by AI. Minor OCR errors may remain.

