
Dee B. Mathews
AMBIVALENT
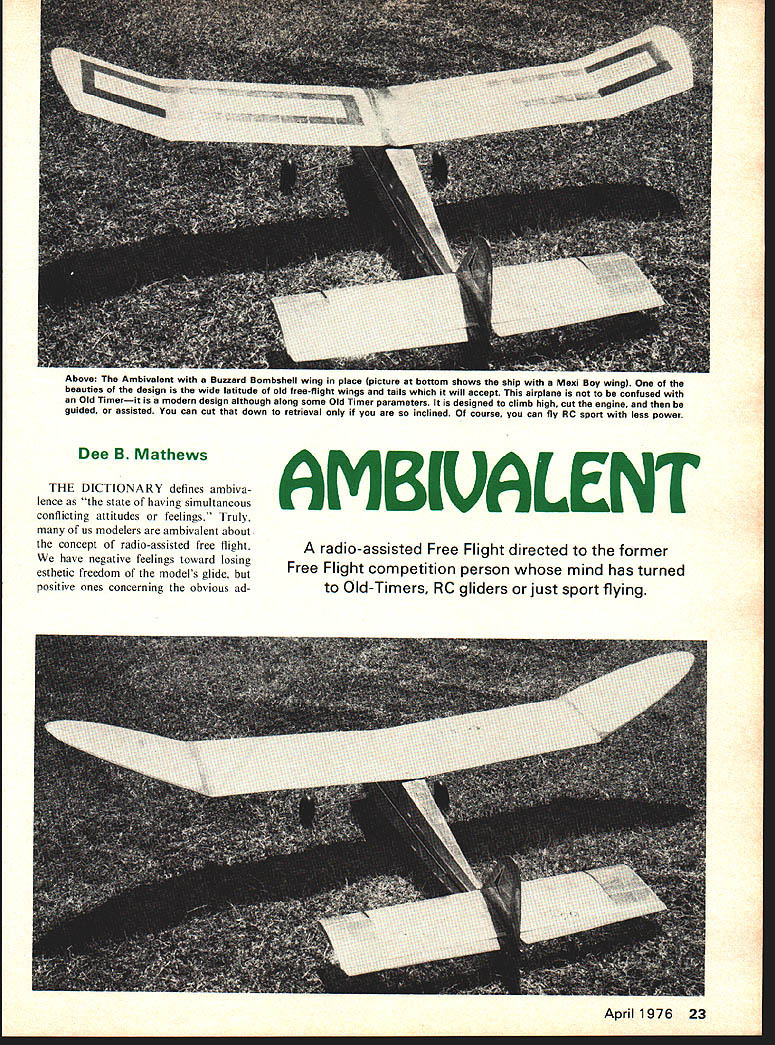
A radio-assisted Free Flight directed to the former Free Flight competition person whose mind has turned to Old-Timers, RC gliders or just sport flying.
THE DICTIONARY defines ambivalence as "the state of having simultaneous conflicting attitudes or feelings." Truly, many of us modelers are ambivalent about the concept of radio-assisted free flight. We have negative feelings toward losing esthetic freedom of the model's glide, but positive ones concerning the obvious advantages. No continuing article text found on this page — the scanned page contains only the model plan/diagram, captions, and labels (no article paragraphs to extract). No continuing article text found on this page. advantages of small field use and a decomplication of retrieving procedures.
The remarkable upsurge of interest in RCOFF in the last two or three years is but a ripple in the surface of the muddled puddle the future direction of free flight is.
These slow flying, structurally marginal, senior citizens are great fun, simple to fly, and often terribly difficult to build. Nonetheless, they are attracting more and more interest from modelers who are seeking the beauty of free flight without the hassle. These stately old ladies are but the grandmas of the future generation of radio-assisted free flight, just as their non-radio controlled sisters gave birth to our current generation of hot climbing free flight machines.
The concept of radio assisted free flight is not new. Dick Mathis presented a pioneering adaptation of the Hysteria-Rambunctious series at the National Free Flight Society Symposium in Chicago during the 1972 Nationals. His presentation met with little enthusiasm and he has indicated to me and others his confusion at being almost laughed at. In my opinion Dick presented the concept to the wrong people at the wrong time. After all is it not reasonable that the contest-active free flighter is satisfied with his hobby as it is, that he has an adequate flying site, and enjoys retrieving? I direct his article at the former free flighter who has turned to Old Timer or RC Gliders or sport flying, the guy who has a set of wings or a stabilizer left over and has been thinking about RAFF (the A is for assisted), the guy who is ambivalent about the whole thing.
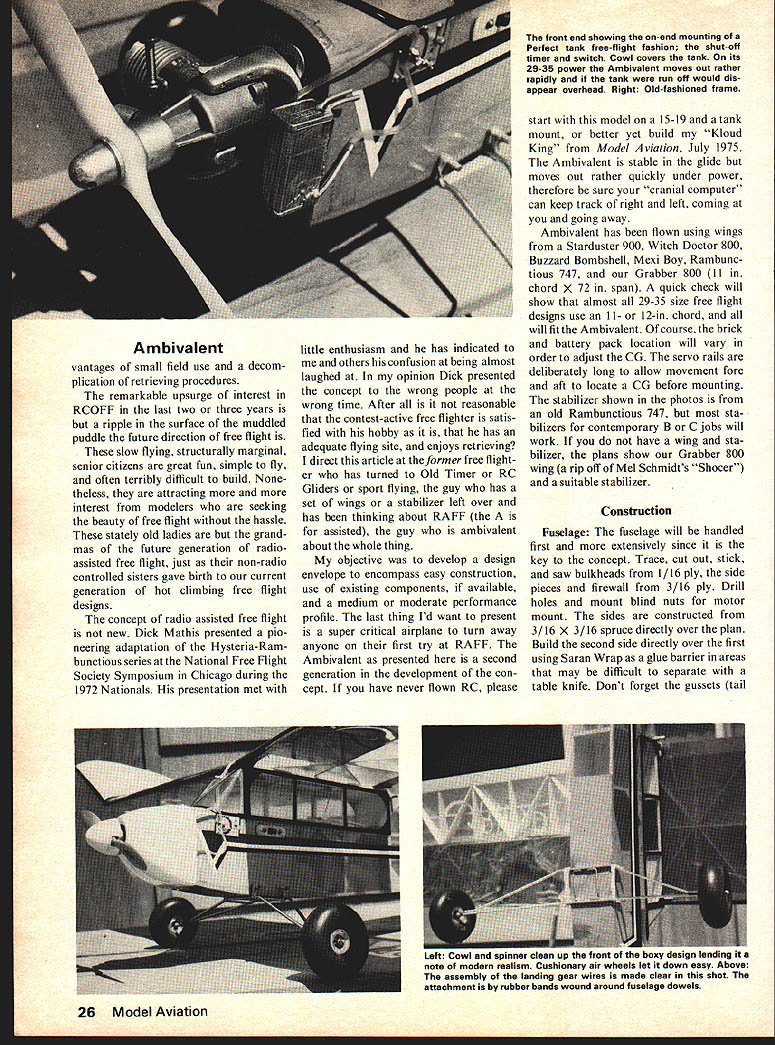
My objective was to develop a design envelope to encompass easy construction, use of existing components, if available, and a medium or moderate performance profile. The last thing I'd want to present is a super critical airplane to turn away anyone on their first try at RAFF. The Ambivalent as presented here is a second generation in the development of the concept. If you have never flown RC, please start with this model on a 15-19 and a tank mount, or better yet build my "Kloud King" from Model Aviation, July 1975. The Ambivalent is stable in the glide but moves out rather quickly under power, therefore be sure your "cranial computer" can keep track of right and left, coming at you and going away.
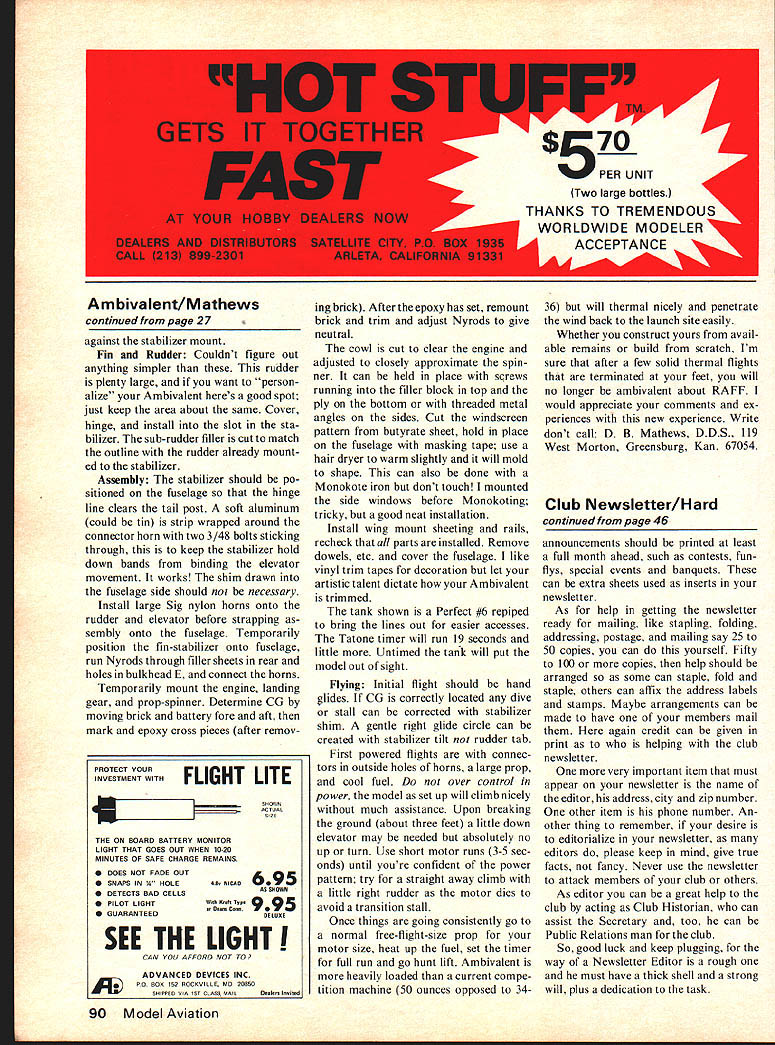
Ambivalent has been flown using wings from a Starduster 900, Witch Doctor 800, Buzzard Bombshell, Mexi Boy, Rambunctious 747, and our Grabber 800 (11 in. chord x 72 in. span). A quick check will show that almost all 29-35 size free flight designs use an 11- or 12-in. chord, and will fit the Ambivalent. Of course, the brick and battery pack location will vary in order to adjust the CG. The servo rails are deliberately long to allow movement fore and aft to locate a CG before mounting. The stabilizer shown in the photos is from an old Rambunctious 747 but most stabilizers for contemporary B or C jobs will work. If you do not have a wing and stabilizer, the plans show our Grabber 800 wing (a rip off of Mel Schmidt's "Shocer") and a suitable stabilizer.
Construction
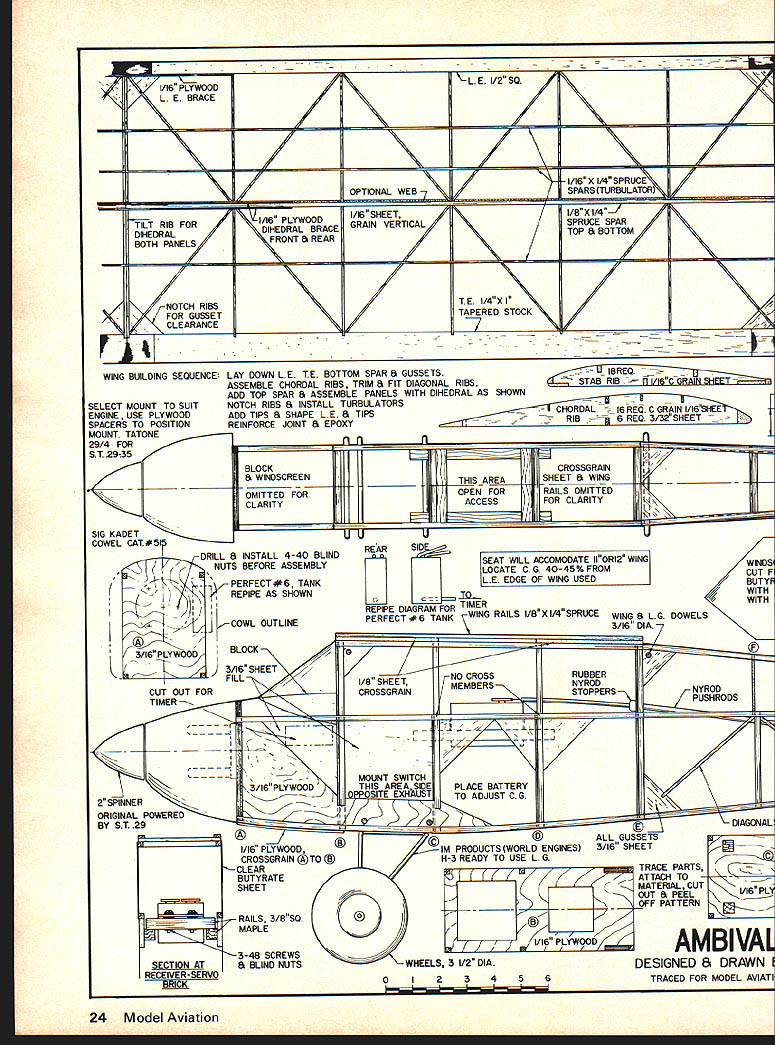
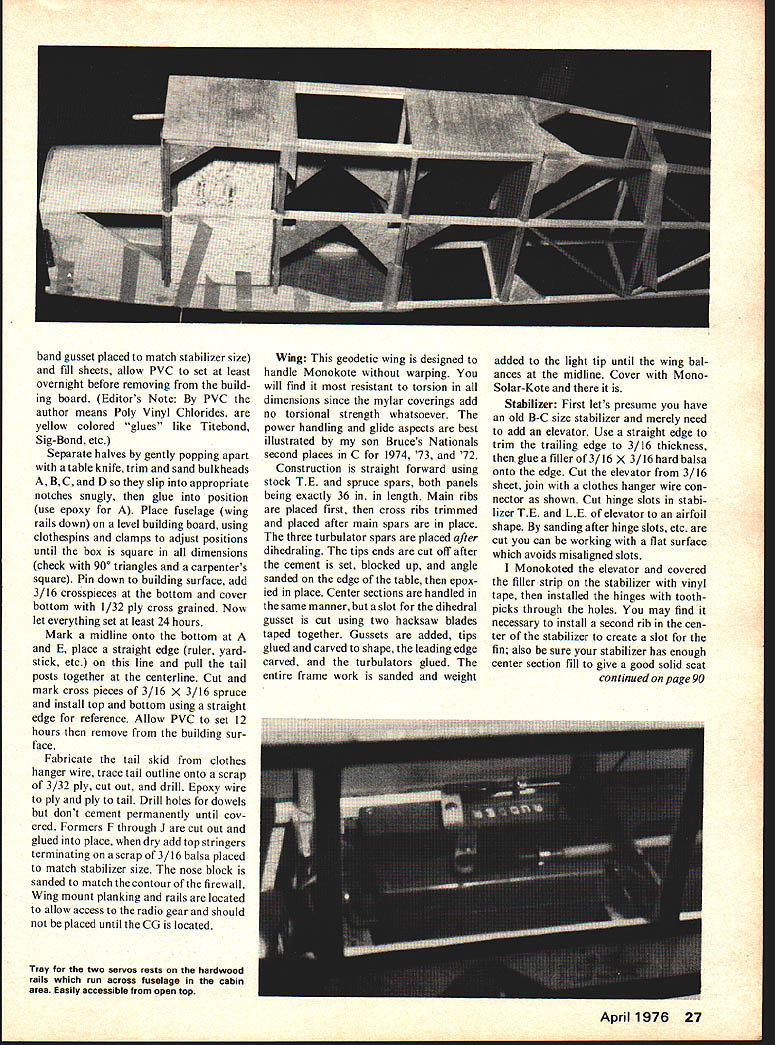
Fuselage: The fuselage will be handled first and more extensively since it is the key to the concept. Trace, cut out, stick, and saw bulkheads from 1/16 ply, the side pieces and firewall from 3/16 ply. Drill holes and mount blind nuts for motor mount. The sides are constructed from 3/16 x 3/16 spruce directly over the plan. Build the second side directly over the first using Saran Wrap as a glue barrier in areas that may be difficult to separate with a table knife. Don't forget the gussets (tail) band gusset placed to match stabilizer size) and fill sheets, allow PVC to set at least overnight before removing from the building board. (Editor's Note: By PVC the author means Poly Vinyl Chlorides, and yellow colored "glues" like Titebond, Sig-Bond, etc.)
Separate halves by gently popping apart with a table knife, trim and sand bulkheads A, B, C, and D so they slip into appropriate notches snugly, then glue into position (use epoxy for A). Place fuselage (wing rails down) on a level building board, using clothespins and clamps to adjust positions until the box is square in all dimensions (check with 90° triangles and a carpenter's square). Pin down to building surface, add 3/16 crosspieces at the bottom and cover bottom with 1/32 ply cross grained. Now let everything set at least 24 hours.
Mark a midline onto the bottom at A and E, place a straight edge (ruler, yardstick, etc.) on this line and pull the tail posts together at the centerline. Cut and mark cross pieces of 3/16 x 3/16 spruce and install top and bottom using a straight edge for reference. Allow PVC to set 12 hours then remove from the building surface.
Fabricate the tail skid from clothes hanger wire, trace tail outline onto a scrap of 3/32 ply, cut out, and drill. Epoxy wire to ply and ply to tail. Drill holes for dowels but don't cement permanently until covered. Formers F through J are cut out and glued into place, when dry add top stringers terminating on a scrap of 3/16 balsa placed to match stabilizer size. The nose block is sanded to match the contour of the firewall. Wing mount planking and rails are located to allow access to the radio gear and should not be placed until the CG is located.
Wing
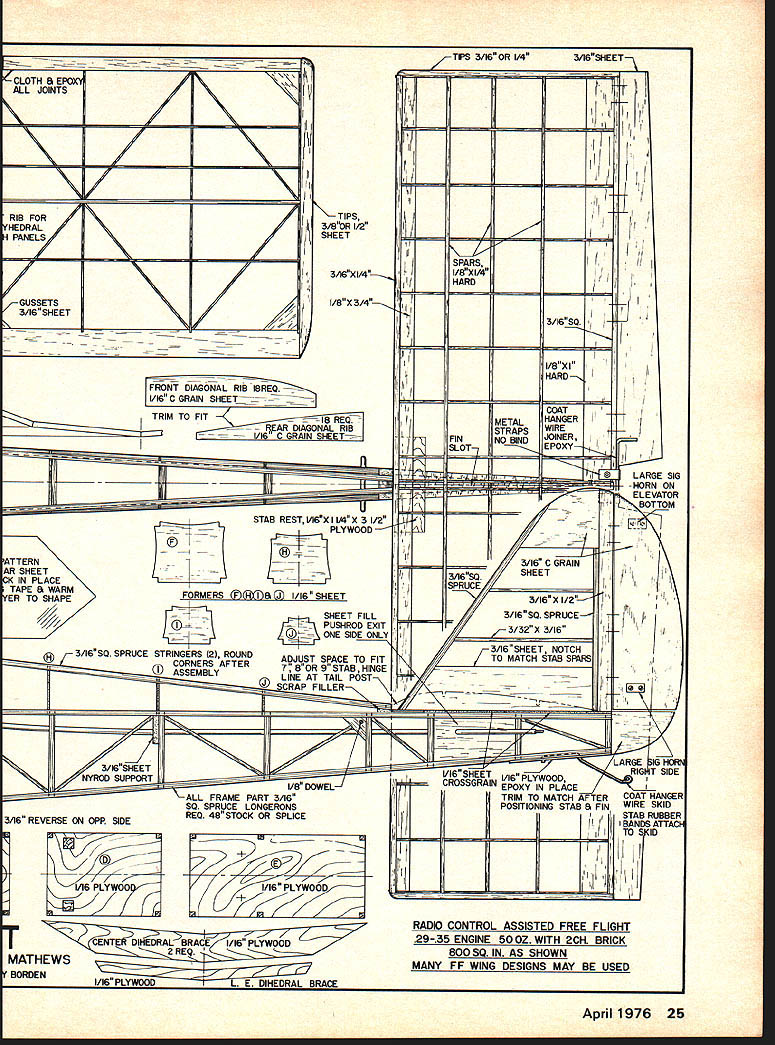
This geodetic wing is designed to handle Monokote without warping. You will find it most resistant to torsion in all dimensions since the mylar coverings add no torsional strength whatsoever. The power handling and glide aspects are best illustrated by my son Bruce's Nationals second places in C for 1974, '73, and '72.
Construction is straight forward using stock T.E. and spruce spars, both panels being exactly 36 in. in length. Main ribs are placed first, then cross ribs trimmed and placed after main spars are in place. The three turbulator spars are placed after dihedraling. The tips ends are cut off after the center is set, blocked up, and angle sanded on the edge of the table, then epoxied in place. Center sections are handled in the same manner, but a slot for the dihedral gusset is cut using two hacksaw blades taped together. Gussets are added, tips glued and carved to shape, the leading edge carved, and the turbulators glued. The entire frame work is sanded and weight added to the light tip until the wing balances at the midline. Cover with Mono-Solar-Kote and there it is.
Stabilizer
Stabilizer: First let's presume you have an old B-C size stabilizer and merely need to add an elevator. Use a straight edge to trim the trailing edge to a 3/16 thickness, then glue a filler of 3/16 x 3/16 hard balsa onto the edge. Cut the elevator from 3/16 sheet, join with a clothes hanger wire connector as shown. Cut hinge slots in stabilizer T.E. and L.E. of elevator to an airfoil shape. By sanding after hinge slots, etc. are cut you can be working with a flat surface which avoids misaligned slots.
I Monokoted the elevator and covered the filler strip on the stabilizer with vinyl type, then installed the hinges with toothpicks through the holes. You may find it necessary to install a second rib in the center of the stabilizer to create a slot for the fin; also be sure your stabilizer has enough center section fill to give a good solid seat.
Ambivalent/Mathews
continued from page 27
against the stabilizer mount.
Fin and Rudder: Couldn't figure out anything simpler than these. This rudder is plenty large, and if you want to "personalize" your Ambivalent here's a good spot; just keep the area about the same. Cover, hinge, and install into the slot in the stabilizer. The sub-rudder filler is cut to match the outline with the rudder already mounted to the stabilizer.
Assembly: The stabilizer should be positioned on the fuselage so that the hinge line clears the tail post. A soft aluminum (could be tin) strip wrapped around the connector horn with two 3/48 bolts sticking through, this is to keep the stabilizer hold down bands from binding the elevator movement. It works! The shim drawn into the fuselage side should not be necessary.
Install large Sig nylon horns onto the rudder and elevator before strapping assembly onto the fuselage. Temporarily position the fin-stabilizer onto fuselage, run Nyrods through filler sheets in rear and holes in bulkhead A, and connect the horns.
Temporarily mount the engine, landing gear, and prop-spinner. Determine C.G. by moving brick and battery fore and aft, then mark and epoxy cross pieces (after removing brick). After the epoxy has set, remount brick and trim and adjust Nyrods to give neutral.
The cowl is cut to clear the engine and adjusted to closely approximate the spinner. It can be held in place with screws running into the filler block in top and the ply on the bottom or with threaded metal plates on the sides. Cut the windscreen pattern from butyrate sheet, hold in place on the fuselage with masking tape; use a hair dryer to warm slightly and it will mold to shape. This can also be done with a Monokote iron but don't touch! I mounted side windows before Monokoting; tricky, but a good neat installation.
Install wing mount sheeting and rails, re-check that all parts are installed. Remove dollies, etc. and cover the fuselage. I like vinyl trim tapes for decoration but let your artistic talent dictate how your Ambivalent is trimmed.
The tank shown is a Perfect #6 repiped to bring the lines out for easier access. The Tano timer will run 19 seconds and more. Untimed the tank will put the model out of sight.
Flying: Initial flight should be hand glides. If C.G. is correctly located any dive or stall can be corrected with stabilizer shim. A gentle right glide circle can be created with stabilizer tilt, not rudder tab.
First powered flights are with connectors in outside holes of horns, a large prop, and cool fuel. Do not over control in power, the model as set up will climb nicely without much assistance. Upon breaking the ground (about three feet) a little down elevator may be needed but absolutely no up or turn. Use short motor runs (3-5 seconds) until you're confident of the pattern; try for a straight away climb with a little right rudder as the motor dies to avoid a transition stall.
Once things are going consistently go to normal free-flight-size prop for your motor size, heat up the fuel, set the timer for full run and go hunt lift. Ambivalent is more heavily loaded than a current competition machine (50 ounces opposed to 34-36) but will thermal nicely and penetrate the wind back to the launch site easily.
Whether you construct yours from available remains or build from scratch, I'm sure that after a few solid thermal flights that are terminated at your feet, you will no longer be ambivalent about RAFF. I would appreciate your comments and experiences with this new experience. Write don't call: D. B. Mathews, D.D.S., 119 West Morton, Greensburg, Kan. 67054.
Transcribed from original scans by AI. Minor OCR errors may remain.

