
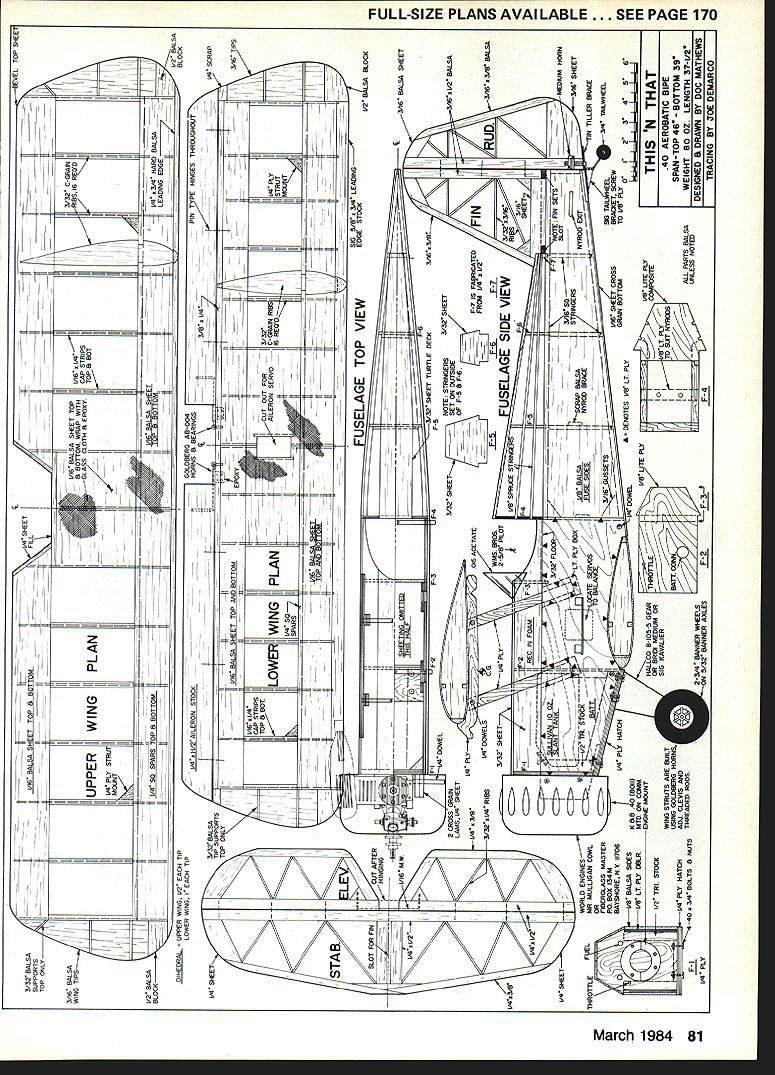

This and That
D. B. Mathews
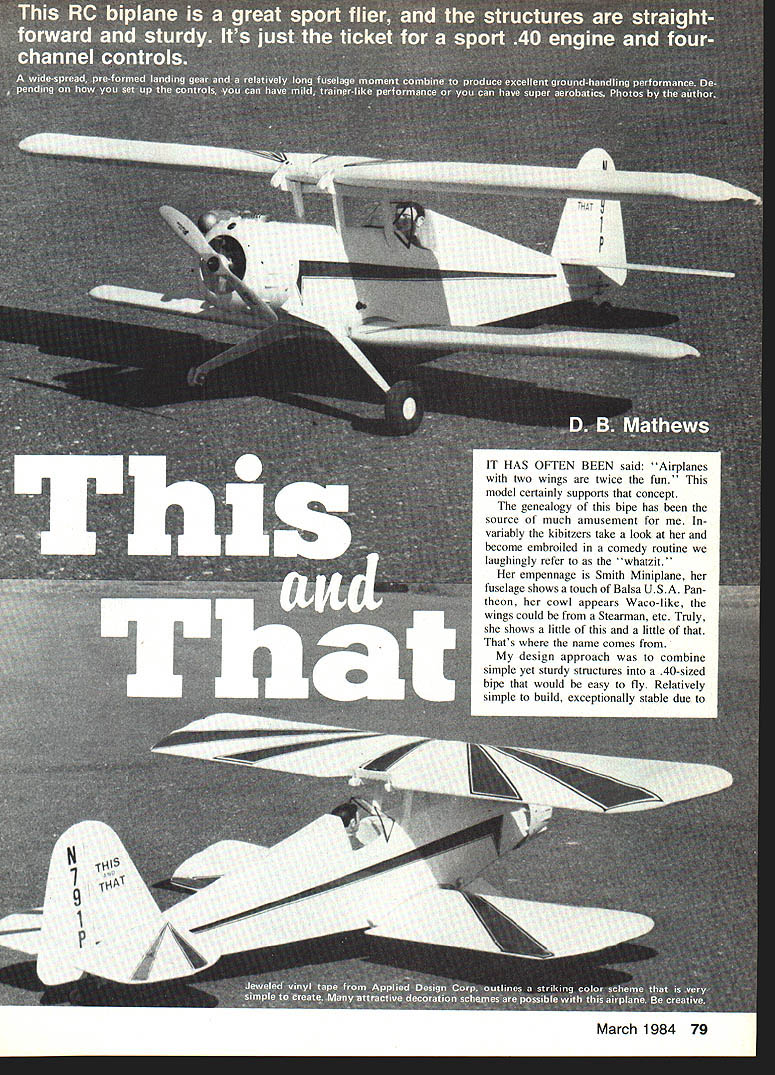
IT HAS OFTEN BEEN said: "Airplanes with two wings are twice the fun." This model certainly supports that concept.
The genealogy of this biplane has been the source of much amusement for me. Invariably the kibitzers take a look at her and become embroiled in a comedy routine we laughingly refer to as the "whatzit."
Her empennage is Smith Miniplane, her fuselage shows a touch of Balsa U.S.A. Panthon, her cowl appears Waco-like, the wings could be from a Stearman, etc. Truly, she shows a little of this and a little of that. That's where the name comes from.
My design approach was to combine simple yet sturdy structures into a .40-sized biplane that would be easy to fly. Relatively simple to build and exceptionally stable due to its long moments (yet highly aerobatic), this plane may well be just the ticket for your entry into the wonderful world of bipes.
Construction
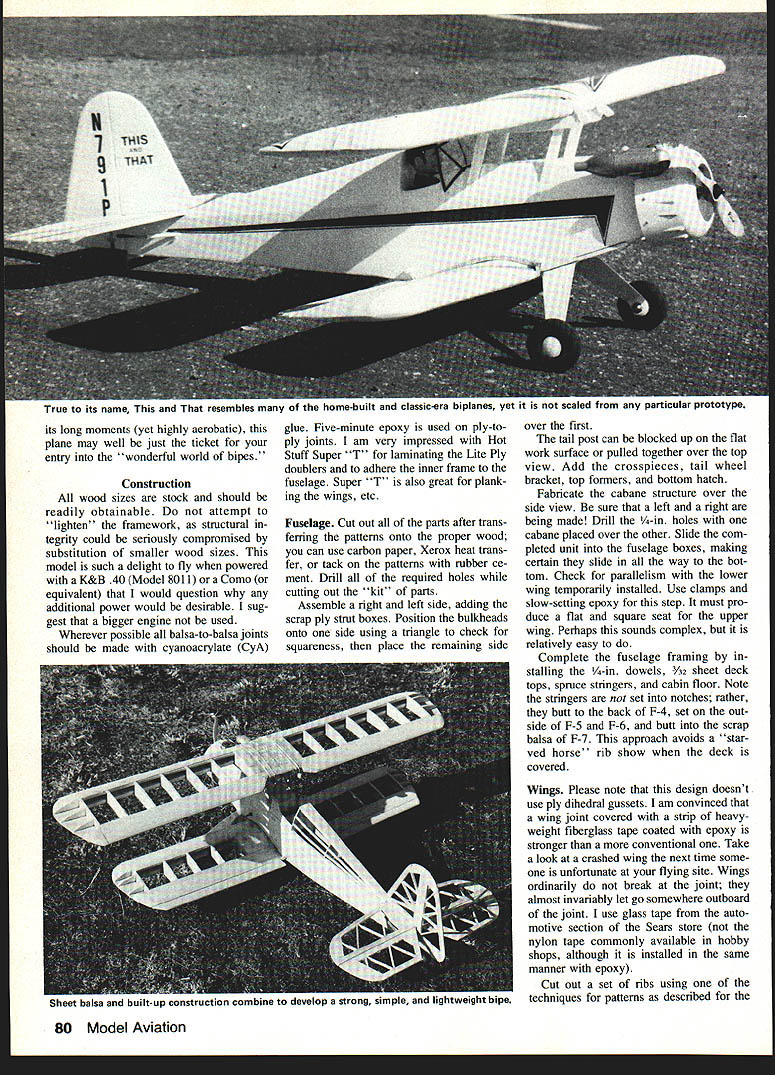
All wood sizes are stock and should be readily obtainable. Do not attempt to "lighten" the framework, as structural integrity could be seriously compromised by substituting smaller wood sizes. The model is such a delight to fly when powered with a K&B .40 (Model 8011) or a Comet (or equivalent) that I would question why any additional power would be desirable. I suggest that a bigger engine not be used.
Wherever possible all balsa-to-balsa joints should be made with cyanoacrylate (CyA) glue. Five-minute epoxy is used on ply-to-ply joints. I am very impressed with Hot Stuff Super "T" for laminating the Lite Ply doublers and for adhering the inner frame to the fuselage. Super "T" is also great for planking the wings.
Fuselage
Cut out all of the parts after transferring the patterns onto the proper wood; you can use carbon paper, Xerox heat transfer, or tack on the patterns with rubber cement. Drill all required holes while cutting out the kit of parts.
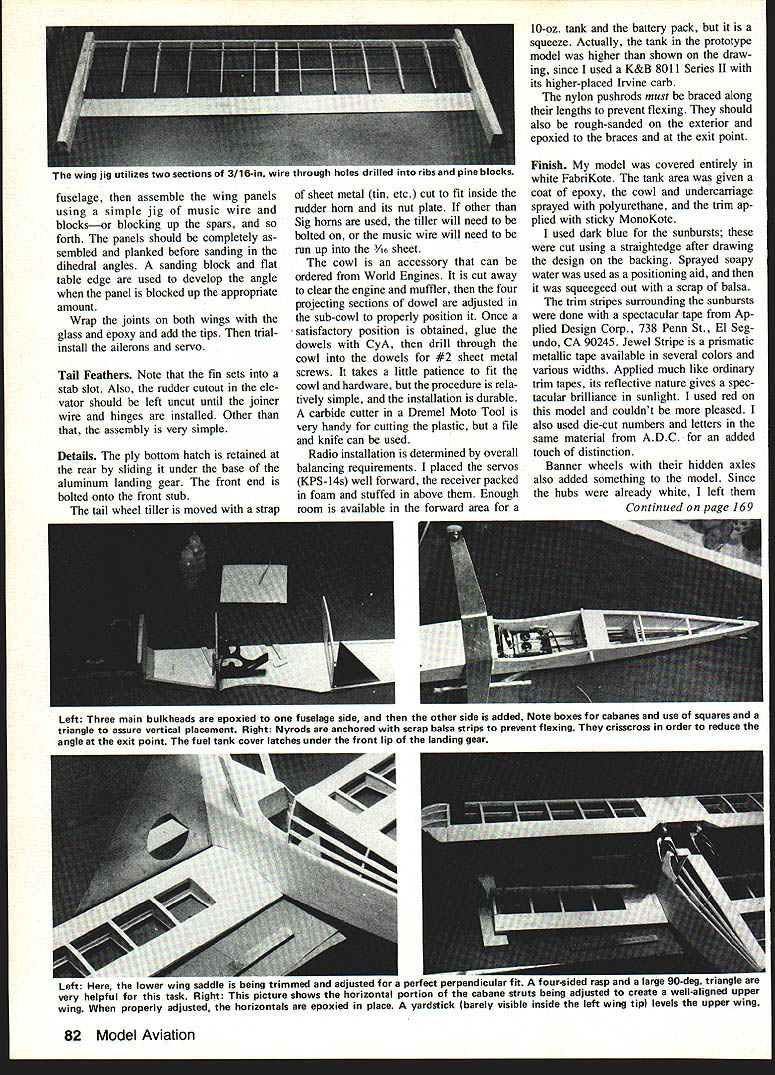
Assemble a right and left side, adding the scrap ply strut boxes. Position the bulkheads onto one side using a triangle to check for squareness, then place the remaining side over the first. The tail post can be blocked up on the flat work surface or pulled together over the top. Add the crosspieces, tail wheel bracket, top formers, and bottom hatch.
Fabricate the cabane structure using the side-view pattern. Be sure that a left and a right are being made. Drill the 1/4-in. holes with one cabane placed over the other. Slide the completed unit into the fuselage boxes, making certain it seats all the way to the bottom. Check for parallelism with the lower wing temporarily installed. Use clamps and slow-setting epoxy for this step. It must produce a flat and square seat for the upper wing. Perhaps this sounds complex, but it is relatively easy to do.
Complete the fuselage framing by installing the 1/4-in. dowels, 3/32-in. sheet deck tops, spruce stringers, and cabin floor. Note the stringers are set into notches: they butt to the back of F-4, set on the outside of F-5 and F-6, and butt into the scrap balsa of F-7. This approach avoids a "starved horse" rib show when the deck is covered.
Wings
Please note that this design doesn't use ply dihedral gussets. I am convinced that a wing joint covered with a strip of heavyweight fiberglass tape coated with epoxy is stronger than a more conventional one. Take a look at a crashed wing the next time someone is unfortunate at your flying site. Wings ordinarily do not break at the joint; they almost invariably let go somewhere outboard of the joint. I use glass tape from the automotive section of the Sears store (not the nylon tape commonly available in hobby shops, although it is installed in the same manner with epoxy).
Cut out a set of ribs using one of the techniques for patterns as described for the fuselage, then assemble the wing panels using a simple jig of music wire and blocks—or by blocking up the spars. The panels should be completely assembled and planked before sanding in the dihedral angles. A sanding block and flat table edge are used to develop the angle when the panel is blocked up the appropriate amount.
Wrap the joints on both wings with the glass and epoxy and add the tips. Then trial-install the ailerons and servo.
Tail Feathers
Note that the fin sets into a stab slot. Also, the rudder cutout in the elevator should be left uncut until the joiner wire and hinges are installed. Other than that, the assembly is very simple.
Details
The ply bottom hatch is retained at the rear by sliding it under the base of the aluminum landing gear. The front end is bolted onto the front stub.
The tail wheel tiller is moved with a strap of sheet metal (tin, etc.) cut to fit inside the rudder horn and its nut plate. If horns other than Sig are used, the tiller will need to be bolted on, or the music wire will need to be run up into the 1/16-in. sheet.
The cowl is an accessory that can be ordered from World Engines. It is cut away to clear the engine and muffler, then the four projecting sections of dowel are adjusted in the sub-cowl to properly position it. Once a satisfactory position is obtained, glue the dowels with CyA, then drill through the cowl into the dowels for #2 sheet metal screws. It takes a little patience to fit the cowl and hardware, but the procedure is relatively simple and the installation is durable. A carbide cutter in a Dremel Moto-Tool is very handy for cutting the plastic, but a file and knife can be used.
Radio installation is determined by overall balancing requirements. I placed the servos (KPS-14s) well forward, the receiver packed in foam and stuffed in above them. Enough room is available in the forward area for a 10-oz. tank and the battery pack, but it is a squeeze. Actually, the tank in the prototype model was higher than shown on the drawing, since I used a K&B 8011 Series II with its higher-placed Irvine carb.
The nylon pushrods must be braced along their lengths to prevent flexing. They should also be rough-sanded on the exterior and epoxied to the braces and at the exit point.
Finish
My model was covered entirely in white FaborKote. The tank area was given a coat of epoxy, the cowl and undercarriage sprayed with polyurethane, and the trim applied with sticky MonoKote.
I used dark blue for the sunbursts; these were cut using a straightedge after drawing the design on the backing. Sprayed soapy water was used as a positioning aid, and then it was squeegeed out with a scrap of balsa.
The trim stripes surrounding the sunbursts were done with a spectacular tape from Applied Design Corp., 738 Penn St., El Segundo, CA 90245. Jewel Stripe is a prismatic metallic tape available in several colors and various widths. Applied much like ordinary trim tapes, its reflective nature gives a spectacular brilliance in sunlight. I used red on this model and couldn't be more pleased. I also used die-cut numbers and letters in the same material from A.D.C. for an added touch of distinction.
Banner wheels with their hidden axles also added something to the model. Since the hubs were already white, I left them white.
Flying
Start with the clevises in the outer holes of medium Sig horns. The ailerons should also be placed at the top of the threaded portion. These settings give "mild" responses and can be sensitized by moving the clevises inward one hole when you have the feel, once the first-flight jitters are over.
The balance point shown is also a "mild" one. For more violent rolls and outside turns, add an ounce or two of tail weight. In general, I strongly recommend using the outboard wing wire braces.
Set up as drawn, this model is remarkably gentle and easy to fly. She verges on trainer-like behavior at slow speeds. She is also nice to fly in that she doesn't settle like a rock when brought to low throttle; as a matter of fact, my first two or three approaches were way long in anticipation of a landing—her behavior more like the average monoplane. She wants to float much in the manner of a Cub, Falcon, or other lightly loaded, semi-symmetrical-airfoiled trainers.
Dead-stick situations are equally impressive. Takeoffs and landings are greatly simplified by the wide-spread undercarriage. A bit of right rudder as the throttle is advanced is all that is needed to keep it tracking straight. Landings are great. Just get the main wheels under the ground; she'll take care of the rest.
Aerobatics are a joy to behold. Vertical maneuvers require a little more speed than with a heavily loaded biplane, but once energy is established she performs loops, rolls, hammerheads, and snaps with authority. The sight of This and That on end is a thrill not soon forgotten. She's everything you could want in a sport biplane of this size—and more. Build yourself one; let the flying field be the judge, and you'll find yourself conjuring on her lineage while you simply fly and enjoy it.
Transcribed from original scans by AI. Minor OCR errors may remain.

