

Apiary
John Hunton
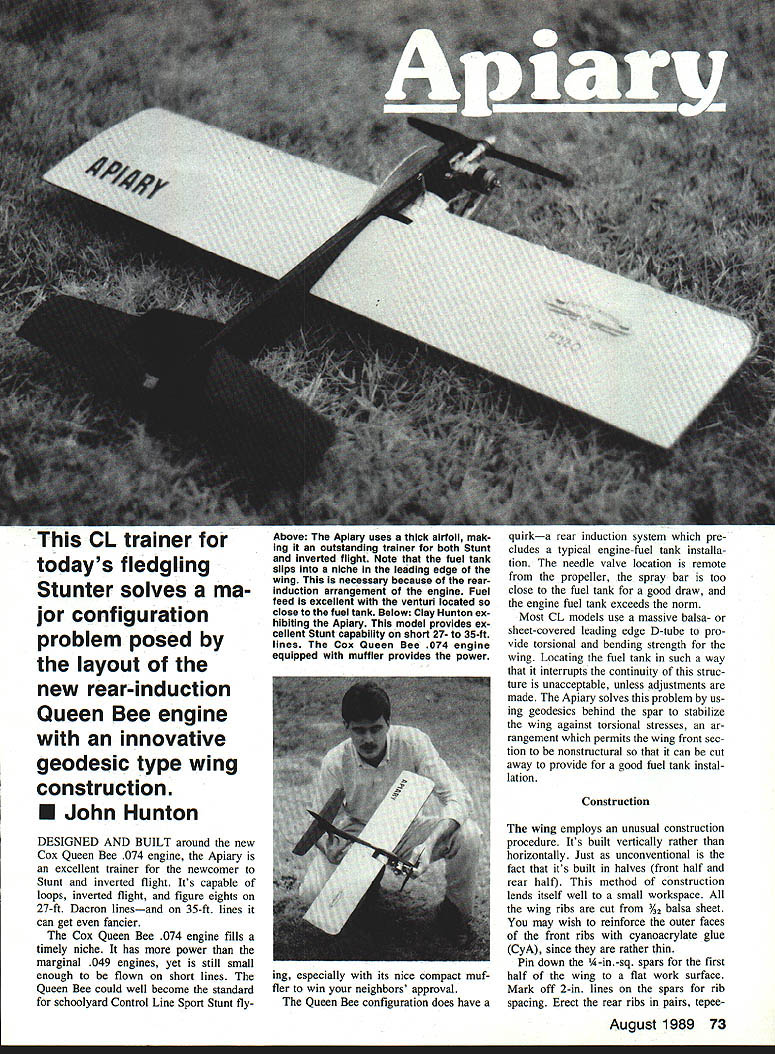
This CL trainer for today's fledgling Stunter solves a major configuration problem posed by the layout of the new rear-induction Cox Queen Bee .074 engine with an innovative geodesic-type wing construction.
Designed and built around the Cox Queen Bee .074 engine, the Apiary is an excellent trainer for the newcomer to Stunt and inverted flight. It's capable of loops, inverted flight, and figure eights on 27-ft. Dacron lines—and on 35-ft. lines can get even fancier.
The Cox Queen Bee .074 fills a timely niche. It has more power than the marginal .049 engines, yet is still small enough to be flown on short lines. The Queen Bee could well become the standard for schoolyard Control Line Sport Stunt flying, especially with its compact muffler to win your neighbors' approval.
The Queen Bee configuration does have a quirk — a rear-induction system that precludes a typical engine–fuel tank installation. The needle valve location is remote from the propeller, the spray bar is too close to the prop for a good draw, and the engine fuel tank is larger than the norm.
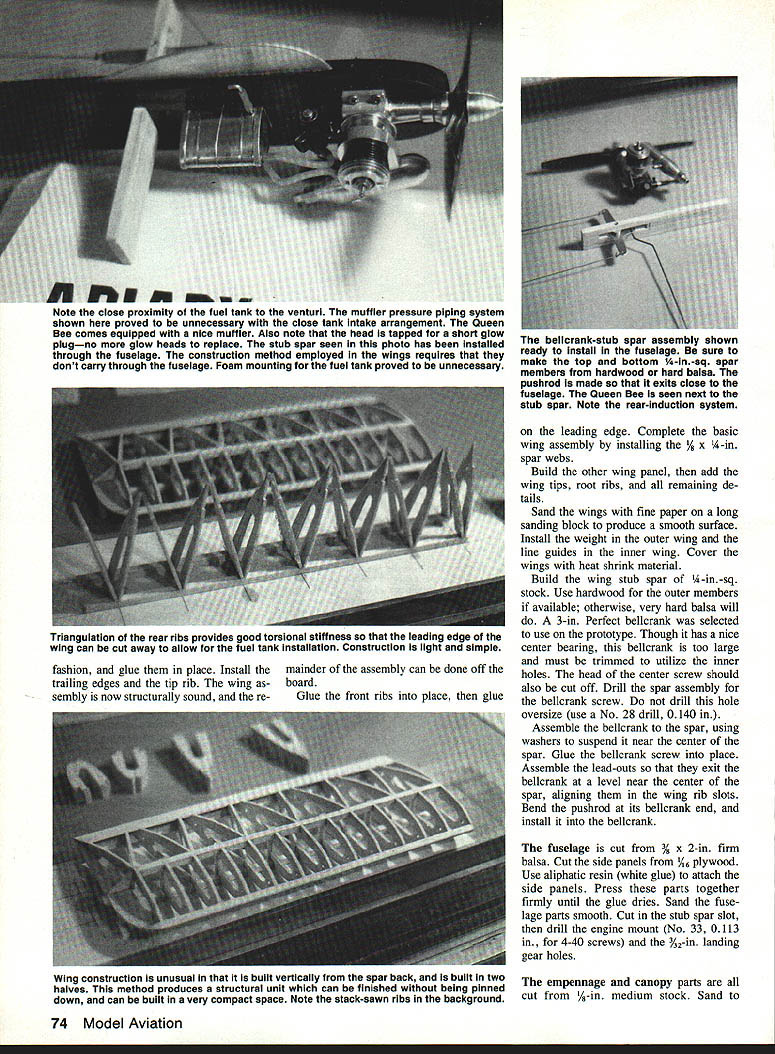
Most CL models use a massive balsa- or sheet-covered leading-edge D-tube to provide torsional and bending strength for the wing. Locating the fuel tank so that it interrupts the continuity of this structure is unacceptable unless adjustments are made. The Apiary solves this problem by using geodesics behind the spar to stabilize the wing against torsional stresses. This arrangement permits the wing front section to be nonstructural so it can be cut away to provide for a good fuel tank installation.
Construction
The wing employs an unusual construction procedure. It's built vertically rather than horizontally, and it's built in halves (front half and rear half). This method of construction lends itself well to a small workspace.
Materials and preliminary notes:
- All wing ribs are cut from 3/32-in. balsa sheet. You may wish to reinforce the outer faces of the front ribs with cyanoacrylate (CyA) since they are rather thin.
- Use 1/4-in.-sq. spars and 1/4 x 1/4-in. spar webs as specified below.
Wing assembly (recommended sequence):
- Pin down the 1/4-in.-sq. spars for the first half of the wing to a flat work surface. Mark off 2-in. lines on the spars for rib spacing.
- Erect the rear ribs in pairs, teepee-fashion, and glue in place.
- Install trailing edges and tip rib. At this point the wing assembly is structurally sound and the remainder of the assembly can be done off the board.
- Glue the front ribs into place, then glue the leading edge.
- Complete the basic wing assembly by installing the 1/4 x 1/4-in. spar webs.
- Build the other wing panel, then add the wing tips, root ribs, and all remaining details.
- Sand the wings with fine paper on a long sanding block to produce a smooth surface.
- Install the weight in the outer wing panel and the line guides in the inner wing panel.
- Cover the wings with heat-shrink material.
Wing stub and bellcrank:
- Build the wing stub spar from 1/4-in.-sq. stock. Use hardwood for the outer members if available; otherwise, very hard balsa will do.
- A 3-in. perfect bellcrank was selected for the prototype. Though it has a nice center bearing, this bellcrank is too large and must be trimmed to utilize the inner holes. Trim the bellcrank as needed and cut off the head of the center screw.
- Drill the spar assembly for the bellcrank screw. Do not drill this hole oversize — use a No. 28 drill (0.140 in.).
- Assemble the bellcrank to the spar, using washers to suspend it near the center of the spar. Glue the bellcrank screw into place.
- Assemble the lead-outs so they exit the bellcrank at a level near the center of the spar, aligning them in the wing rib slots.
- Bend the pushrod at its bellcrank end, and install it into the bellcrank.
Fuselage:
- Cut the fuselage from 3/8 x 2-in. firm balsa.
- Cut the side panels from 1/16-in. plywood.
- Use aliphatic resin (white glue) to attach the side panels. Press these parts together firmly until the glue dries.
- Sand the fuselage parts smooth.
- Cut in the stub spar slot, then drill the engine-mount holes (No. 33, 0.113 in., for 4-40 screws) and the 3/32-in. landing-gear holes.
Empennage and canopy:
- Cut empennage and canopy parts from 1/8-in. medium balsa stock.
- Sand to round off the leading edges, then sand all parts smooth.
- Drafting Mylar makes great hinges: cut a slot with a knife, slip the hinges in, and apply a drop of CyA.
Finishing
- Use an appropriate primer to prefinish the model. Apply two coats to all surfaces except the wing.
- Sand with fine paper between coats.
- Scrape all primer from the mating surfaces, then assemble the empennage and stub spar to the fuselage with CyA.
- Use baking soda and CyA to form nice, strong fillets.
- Form the top loop of the landing gear, push it into place, and cement.
- Install the canopy and the tail skid.
- Finish the model by applying two coats of color to the fuselage and empennage. Trim as desired when dry.
Final assembly
- Inserting the lead-outs into the tip guides is deceptively easy. If you're using 3/32-in. guides, slip a 12-in. length of 1/8-in. tubing into the wing through the guides.
- Slip the lead-outs into the 1/8-in. tubing, and push the wing assembly into place. Remove the 1/8-in. tubing, epoxy the ends of the wing panels, and press them into place.
- Make the elevator pushrod end, and install the elevator horn.
- Make the bottom leg of the landing gear, and install the wheel.
- Make the lead-out ends.
- Install the fuel tank and engine. Use a 7 x 4 or 7 x 6 propeller.
- While the prototype uses a tapped muffler to provide pressure to the fuel system, this isn't really necessary. The model has been flown without the muffler and without pressure, and the fuel tank feeds just fine.
Flying
- With the elevator in neutral, the Apiary will take off by itself. Maintain control.
- Line tension (needed for the controls to operate) is minimal when the plane is flying slowly, so don't rush the takeoff. Use gentle control input to keep the airspeed up.
- Once you're familiar with the model's flight characteristics, start practicing maneuvers. Begin with wingovers, then progress to loops.
The beginner in Stunt or inverted flight can't go wrong when the Queen Bee is in the Apiary. It's a nifty, up-to-date choice for a Sport Stunt CL trainer.
Transcribed from original scans by AI. Minor OCR errors may remain.

