

Application of Windshields
By Bob and Dolly Wischer
Introduction
Applying the windshield and windows is one of the factors that most emphasizes craftsmanship in our hobby. No matter how well the plane is finished, the windshield gets more than its share of attention from everyone who sees the model. Producing the correct shape is only part of the problem — fastening methods and finishing techniques also need consideration. A windshield that pops off during the first hard landing can be a real disappointment, especially after a long drive to the flying field.
Most kits and plans give a windshield shape pattern on the drawing. However, the exact shape needed for your particular model may differ because of individual building choices, so it is best to know a reliable method for determining shape.
Determining the Correct Shape
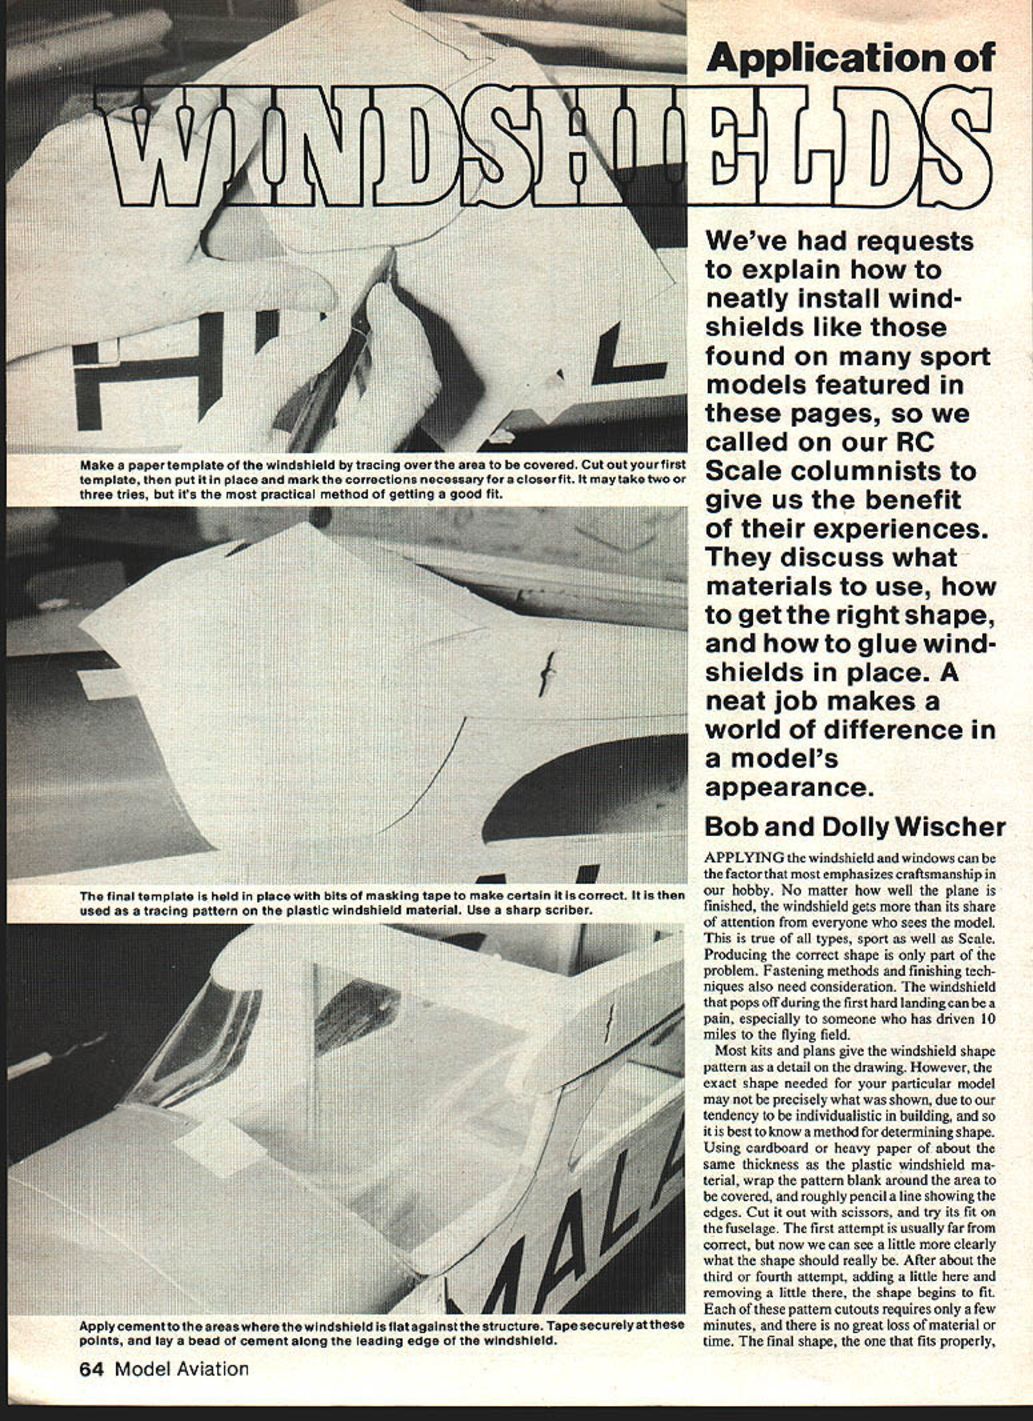
- Use cardboard or heavy paper about the same thickness as the plastic windshield material and wrap the pattern blank around the area to be covered.
- Roughly pencil a line showing the edges, cut it out with scissors, and try its fit on the fuselage.
- Expect several attempts. After about the third or fourth trial—adding a little here and removing a little there—the pattern will begin to fit.
- When the final shape fits properly, hold it in place with bits of masking tape and use it as a tracing pattern on the plastic windshield material.
Tracing and Cutting
- Trace the paper pattern onto the plastic with a very sharp metal point such as a scriber or a large stickpin. A usable trace line is usually accompanied by a scratchy sound. If no line is being made, the plastic may be too hard to scribe and you can cut it with scissors.
- Be careful on inside radius curves — do not cut too deep; it is better to finish these with a half-round or fine Swiss needle file.
- After cutting, check the final fit on the fuselage before proceeding.
Fitting and Preparing for Adhesion
- Roughen those portions of the plastic that contact any flat area of the model structure with sandpaper for better adhesion.
- Use masking tape to avoid unwanted scratches and to hold rearmost edges in tight fit while the adhesive hardens.
- Cement only the areas where the windshield is flat against the structure. Do not attempt to cement edges where the plastic merely conforms to shape.
- To apply a small bead of cement along an edge, use a pointed tool such as 0.031-in. music wire or a pin. Be careful not to spread excess adhesive.
Adhesives
- Epoxy
- Will bond well but can be brittle when dry.
- Excess epoxy is fairly easy to remove when wet, but visible when dry.
- Wilhold R/C-56
- Remains flexible when set.
- Excess can be removed with water and tissue if done immediately; when hard it is waterproof.
- Often preferred when the windshield material is springy.
- Very thin cyanoacrylate (CA)
- Use sparingly — CA can cause white discoloration on the plastic that cannot be removed.
- Double-sided foam tape
- A convenient mechanical alternative in some applications.
When using any adhesive, tape the rearmost edges for a tight fit while the adhesive hardens. Cement areas that have wide contact between the plastic and fuselage frame; avoid trying to cement merely conforming edges.
Materials and Heat Forming
- Common materials:
- Cellulose butyrate sheet (hobby-shop supply): pliable and easily worked.
- Plexiglas (acrylic) sheet, e.g. .031 in.: desirable for clarity but difficult to curve without heat and tends to crack if cut with scissors.
- Some cellulose acetate sheets: too hard or brittle, may shatter instead of cutting smoothly; suitable only for flat side windows.
- Butyrate sheet is available in thicknesses: .008, .016, .030, and .040 in.
- Use thinner material for small models with narrow fuselages; heavier materials will cold-form better on wider fuselages.
- Heat forming heavier butyrate or acrylic:
- Compound curves require stretching over a form with heat and considerable force.
- For simple curves (most cabin-type models), drape-forming over an aluminum sheet bent to approximate shape works well. Place the aluminum form in an oven at 250°–300°F, balance the plastic blank at the crest of the form, and let it drape and cool. Then use the paper pattern to transfer the final shape and cut as described.
- It is always a surprise how the material behaves when laid out flat.
Framing and Finishing
- Thin styrene sheet overlay:
- Use the same paper pattern, allowing a little extra length because it is formed over the outside of the windshield.
- Cut out the interior, leaving a narrow frame to be painted before application.
- Epoxolite framing:
- Cover the windshield and fuselage with masking tape, leaving only the frame area exposed.
- Fill the exposed space with Epoxolite and smooth with a wet finger for a finish that often requires no sanding. After hardening, paint the frame and remove the masking.
- For best appearance, consider recessing the fuselage framework to the depth of the windshield and frame thickness so the outside surface around the windshield is flush rather than below it.
Flat-Plate Windshields and Scale Details
- Some scale airplanes use a succession of flat plates with angular frame changes instead of curved windshields.
- Use a paper pattern to make a windshield blank, then bend it sharply over a block to the desired shape.
- Make an overlaid frame from the same pattern, bend to fit, and remove the interior to leave the frame.
- Side windows on cabin models:
- Can be applied to the outside surface with or without a frame, or inset for a smooth outer surface.
- An alternate method uses a thin plywood or styrene frame with cutouts for the windows; the clear plastic windows are glued to the inner surface of each opening for a more scale appearance.
Alternative Framing: Plastic Adhesive Tape
- Use stretchy waterproof plastic adhesive tape available in many widths and colors.
- To get an odd shape or width:
- Stick a length of tape down on a hard surface (styrene works well).
- Cut the exact shape with a sharp-pointed blade.
- Lift the tape piece off and transfer it to the model; it can be shifted for exact fit.
- It is best to paint the tape after it is applied to the model.
- Like Epoxolite, this tape can form compound curves and fillets.
Transcribed from original scans by AI. Minor OCR errors may remain.

