
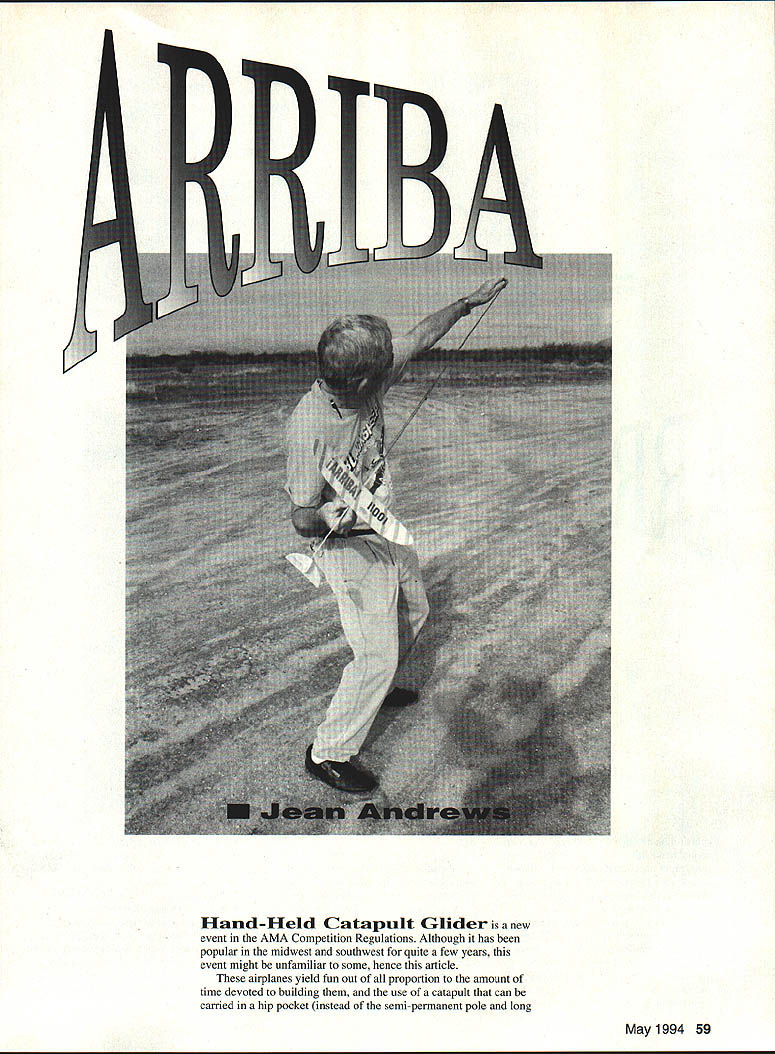

ARRIBA
Hand-Held Catapult Glider is a new event in the AMA Competition Regulations. Although it has been popular in the Midwest and Southwest for quite a few years, this event might be unfamiliar to some, hence this article.
These airplanes yield fun out of all proportion to the amount of time devoted to building them, and the use of a catapult that can be carried in a hip pocket (instead of the semi-permanent pole and long rubber motor mandated by the previous rules) should make this a much more popular event throughout the country. Once you've flown one of these gliders, you'll be intrigued at the subtle challenges presented by this simple-appearing category.
Arriba began as a result of the Central Indiana Aeromodellers' Catapult Glider event, flown at Wright-Patterson Air Force Base in 1988. The event looked like so much fun that we started building gliders to their rules on our return to Southern California, even though the event hadn't caught on out there at that time.
We quickly learned that there is a lot more to these little airplanes than first meets the eye, and Arriba is the culmination of four years of experimenting and refining the idea.
Design features
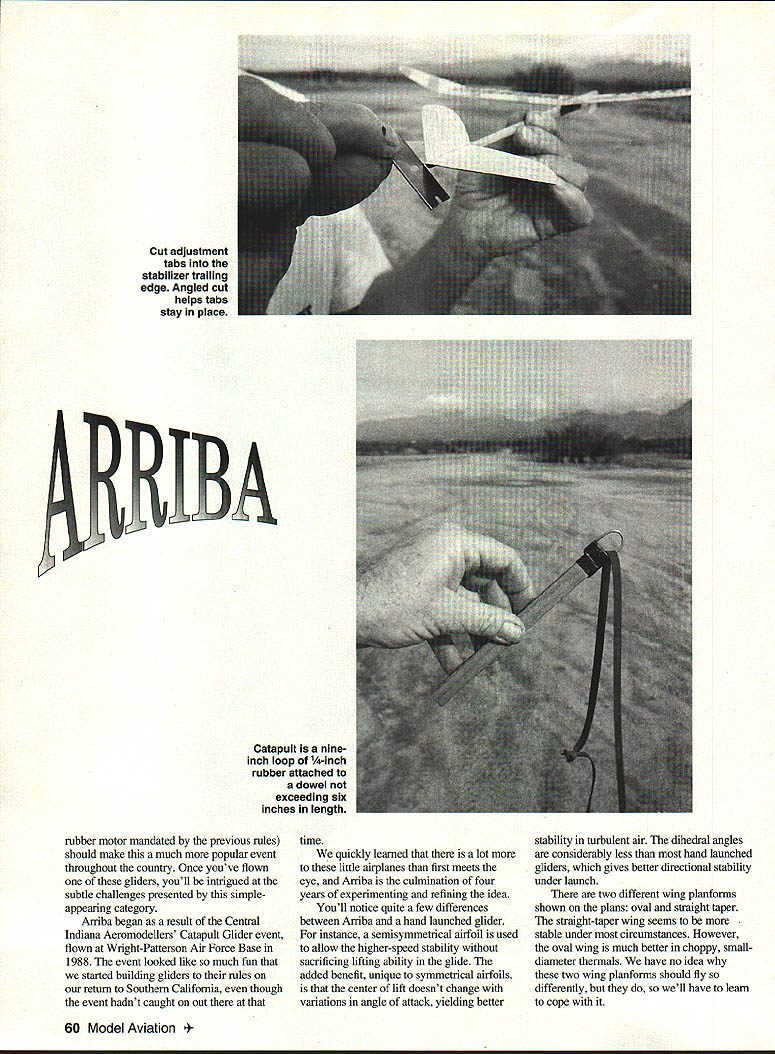
- Semisymmetrical airfoil: used to allow higher-speed stability without sacrificing lifting ability in the glide. A semisymmetrical airfoil has the added benefit that the center of lift doesn't change much with variations in angle of attack, yielding better stability in turbulent air.
- Reduced dihedral: dihedral angles are considerably less than most hand-launched gliders, which gives better directional stability under launch.
- Two wing planforms: oval and straight-taper. The straight-taper wing seems more stable under most circumstances; the oval wing performs better in choppy, small-diameter thermals. The two planforms fly differently, for reasons not fully understood.
Specifications
- Type: FF Catapult Glider
- Wingspan: 16 inches
- Construction: Sheet balsa
- Covering/finish: Butyrate dope / tissue
Materials, tools and shop tips
- Get a piece of scrap glass about 12–16 inches long and at least 3/8 inch thick to use as a building surface. It helps in accurately shaping flying surfaces and has many other shop uses.
- Use a sharp #2 lead pencil for marking.
- I recommend a face-mask-type respirator if you are sensitive to balsa dust.
- Typical sandpaper grits used: #150, #400, #600.
- Keep the glass dust-free while sanding to avoid indenting opposing surfaces.
- I usually build three gliders at a time. Gliders go together fast; don't rush the building process. Make sure surfaces are shaped properly and final assembly alignment is correct — you'll be rewarded with a fine-flying fleet.
Wing construction
- Choose enough sheet wood for the number of wing sets the plan will build. Use fairly straight-grained, medium-weight wood; weight is important because some extra weight gives the glider inertia for the launch and higher climbs.
- Cut the wing outline carefully.
- Mark the dihedral cuts on both the top and bottom of the wing blanks with a sharp #2 pencil. Accurately mark 0.050" upsweep for the leading and trailing edges of the wings.
- Use an old piece of 0.045" aluminum spacing to mark around the perimeter of the wing blank very carefully.
- Sand the bottom of the wing surface on both the leading and trailing edge sections up to the 0.050" mark with #150 sandpaper.
- Use the dihedral marks on the top of the wing as guides to redraw the cut lines on the bottom of the wing.
- Sand in the top contour of the wing, using the glass as support for the wood. Dust the glass often to avoid having a cloth of balsa dust under the wood, which can cause an indent in the opposing surface.
- Smooth the surfaces with #400 sandpaper, being careful not to erase the dihedral-cut lines on the wing blanks.
- Use a single-bulb desk light to examine the wings for high or low spots and to confirm an accurate airfoil shape before making the dihedral cuts.
- Note that the center cut is angled 0.070 to give a small amount of washout in the outboard sections of the wing.
- Sand the tips and the outboard halves of the center sections to yield an exact butt joint at the angles shown on the drawings, and glue them with any good cyanoacrylate (CyA) glue. Then angle the center halves the same way and join them.
- Lightly coat the leading edge of the finished wing with CyA, then set the wing aside while the fuselage assembly is readied.
Stabilizer and fin
- Stabilizer: Cut from light quarter-grained 1/16" balsa. Sand on the glass to about 1/32" thickness, then gently sand in a lifting airfoil section using #400 paper.
- Vertical fin: Cut from quarter-grained 1/32" sheet, and sand to a streamlined section.
Fuselage
- Use fairly heavy, springy, straight-grained wood for the fuselage. This is the heart of the airplane; almost anything can fall off and be glued back in correct alignment, but if the fuselage breaks it's almost impossible to reassemble to previous alignment.
- Cut the fuselage to length and glue the catapult hook to the front with CyA before tapering and shaping.
Assembly
- Assemble the fin and horizontal stabilizer to the fuselage using cellulose cement (such as Testors or Ambroid), since you may need to replace these components as they become battle-weary.
- Be sure the stabilizer is slightly misaligned (about 5°) as viewed from the rear, with the high side being the side to which you want the finished glider to turn. A left glide circle is normal for right-handed fliers, although a right-hand glide circle can be used.
- Because of the semisymmetrical airfoil, the wing must be recessed into the fuselage. This is the most critical stage of construction — mount the wing as close to 0° incidence as possible.
Finishing
- Apply two coats of thinned butyrate dope, sanding lightly with #600 sandpaper between coats.
- Paint the underside black for better visibility from the ground.
- Trim the top of the wing in a contrasting tissue pattern. This is practical as well as decorative — unique top patterns help locate the glider after landing.
Flight trimming
- Use modeling clay to set the balance point at about 50% of the wing chord. When forming the clay around the nose, let some of it stick out in front of the fuselage to act as a shock absorber for inevitable hard landings.
- Hand glides haven't proven very useful for trimming; go straight to the launcher.
- For the first flight, point the nose about 10° above the horizon, with a slight right bank, and use about 3/4 power. The glider should climb to the right and then attempt to recover to a glide before leveling out.
- If it goes straight out and dives into the ground, or in extreme cases flies inverted, make a couple of thin slits in the trailing edge of the stabilizer and angle these cuts so the trailing edge is bent up; this corrects a down-tilt.
- If the glider gets loops as power is increased, back off on the tabs and kick a little turn into the rudder if needed for recovery at the top of the climb.
- If the glider seems to climb well under full power but gradually picks up speed in the glide until it tumbles and dives, try trimming a little area off the trailing edge of the horizontal stabilizer.
Launching
- Our gliders are set up to be launched under low power with a 4-inch hook and about 10 feet of 3/32" rubber.
- At launch, place the catapult loop over the hook, hold the glider with the nose up and the wing level, and give a smooth, firm release. A good launch will result in a steep climb that converts to a gentle glide.
Final adjustments and maintenance
- Once the desired power and glide pattern is achieved, use a touch of cellulose glue to hold the settings on the tabs. These settings may need to be changed slightly for each flying session, so don't use too much glue.
- Expect to replace or repair stabilizer and fin components from wear; having them glued with cellulose cement makes replacements easier.
Gliders are fun in competition. Careful building, accurate shaping, and careful trimming will reward you with a fine-flying fleet.
Transcribed from original scans by AI. Minor OCR errors may remain.

