

AURORA
Michael Saponara
Overview
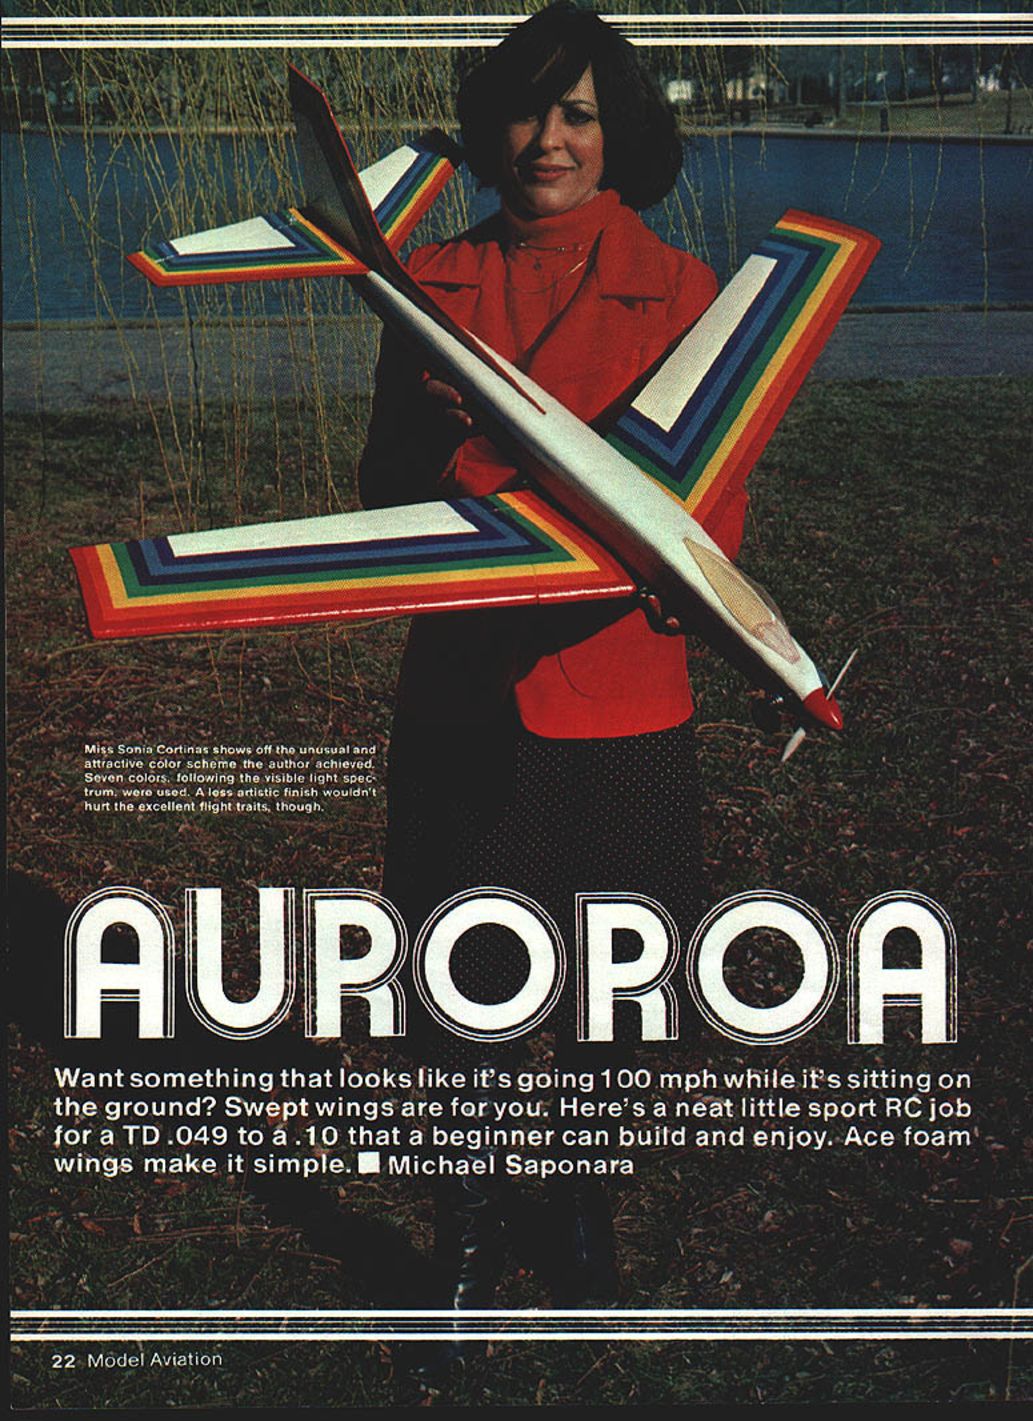
Want something that looks like it's going 100 mph while it's sitting on the ground? Swept wings are for you. Here's a neat little sport RC job for a TD .049 to a .10 that a beginner can build and enjoy. Ace foam wings make it simple.
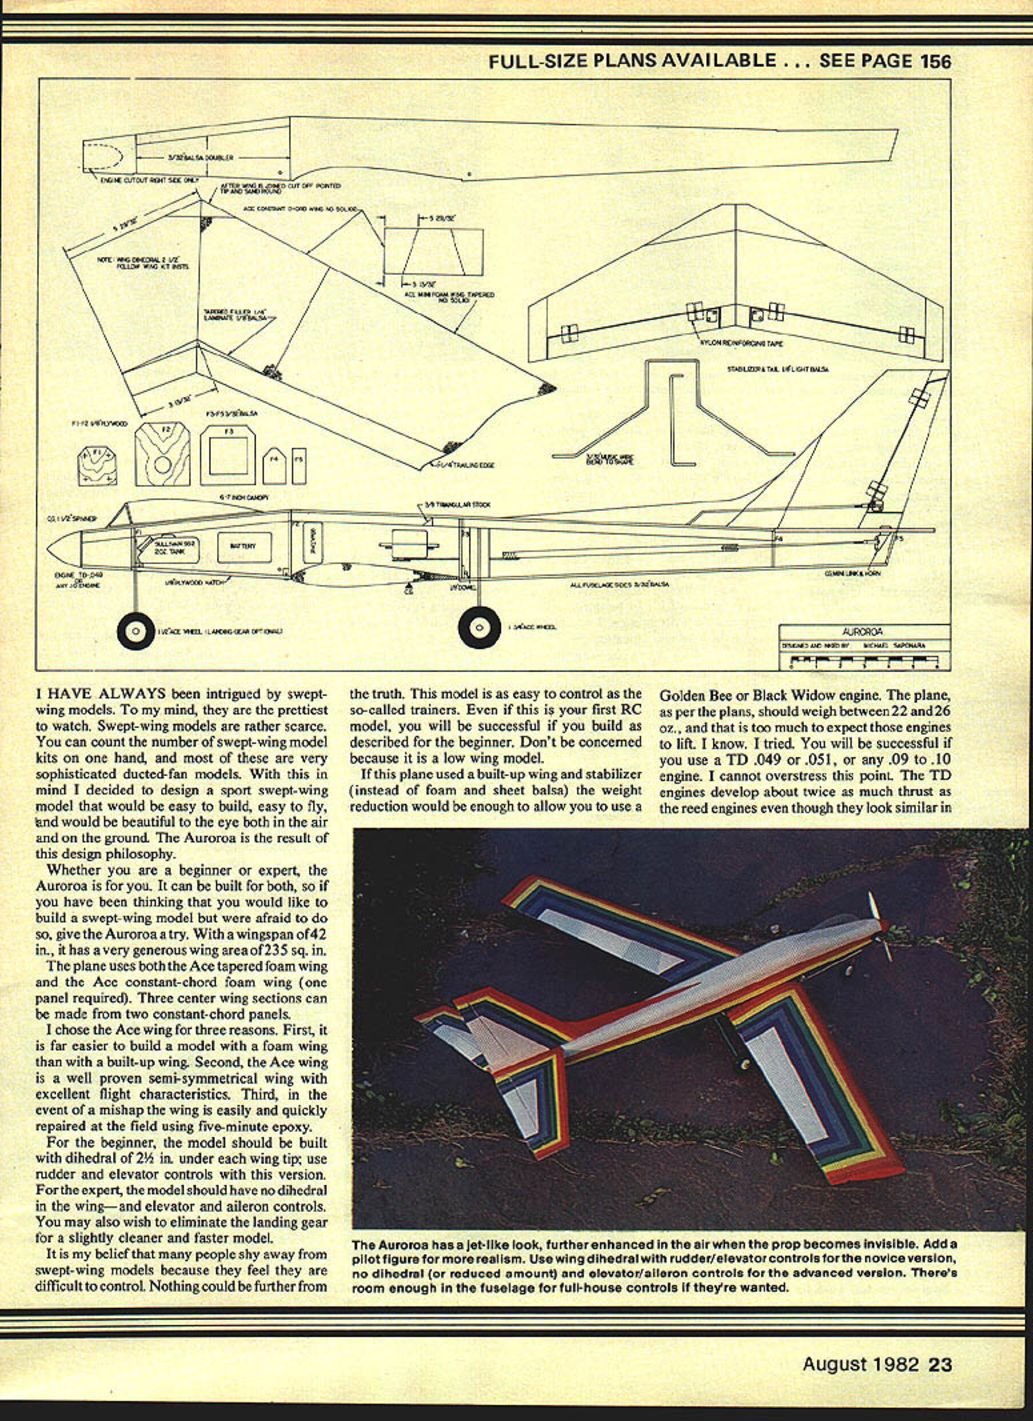
I have always been intrigued by swept-wing models. To my mind, they are the prettiest to watch. Swept-wing models are rather scarce. You can count the number of swept-wing model kits on one hand, and most of these are very sophisticated ducted-fan models. With this in mind I decided to design a sport swept-wing model that would be easy to build, easy to fly, and would be beautiful to the eye both in the air and on the ground. The Aurora is the result of this design philosophy.
Whether you are a beginner or expert, the Aurora is for you. It can be built for both, so if you have been thinking that you would like to build a swept-wing model but were afraid to do so, give the Aurora a try. With a wingspan of 42 in., it has a very generous wing area of 235 sq. in.
The plane uses both the Ace tapered foam wing and the Ace constant-chord foam wing (one panel required). Three center wing sections can be made from two constant-chord panels.
I chose the Ace wing for three reasons:
- It is far easier to build a model with a foam wing than with a built-up wing.
- The Ace wing is a well-proven semi-symmetrical wing with excellent flight characteristics.
- In the event of a mishap the wing is easily and quickly repaired at the field using five-minute epoxy.
For the beginner, the model should be built with 2-1/2 in. of dihedral under each wing tip; use rudder and elevator controls with this version. For the expert, the model should have no dihedral in the wing — and elevator and aileron controls. You may also wish to eliminate the landing gear for a slightly cleaner and faster model.
It is my belief that many people shy away from swept-wing models because they feel they are difficult to control. Nothing could be further from the truth. This model is as easy to control as the so-called trainers. Even if this is your first RC model, you will be successful if you build as described for the beginner. Don't be concerned because it is a low-wing model.
If this plane used a built-up wing and stabilizer (instead of foam and sheet balsa) the weight reduction would be enough to allow you to use a Golden Bee or Black Widow engine. The plane, as per the plans, should weigh between 22 and 26 oz., and that is too much to expect those engines to lift. I know. I tried. You will be successful if you use a TD .049 or .051, or any .09 to .10 engine. I cannot overstress this point. The TD engines develop about twice as much thrust as the reed engines even though they look similar in appearance.
The simple version uses a modern two-channel radio. However, there is room enough in the fuselage for four servos if you might want to add throttle control.
Construction
#### Fuselage
- Cut out two fuselage sides from 3/32 in. balsa. Make sure you make left and right fuselage sides.
- Glue triangular stock to the top of the fuselage sides. Use white glue such as Weldwood.
- Cut out formers F1 through F5. Note: F3 has doublers for strength; doublers are shown on the fuselage profile plans.
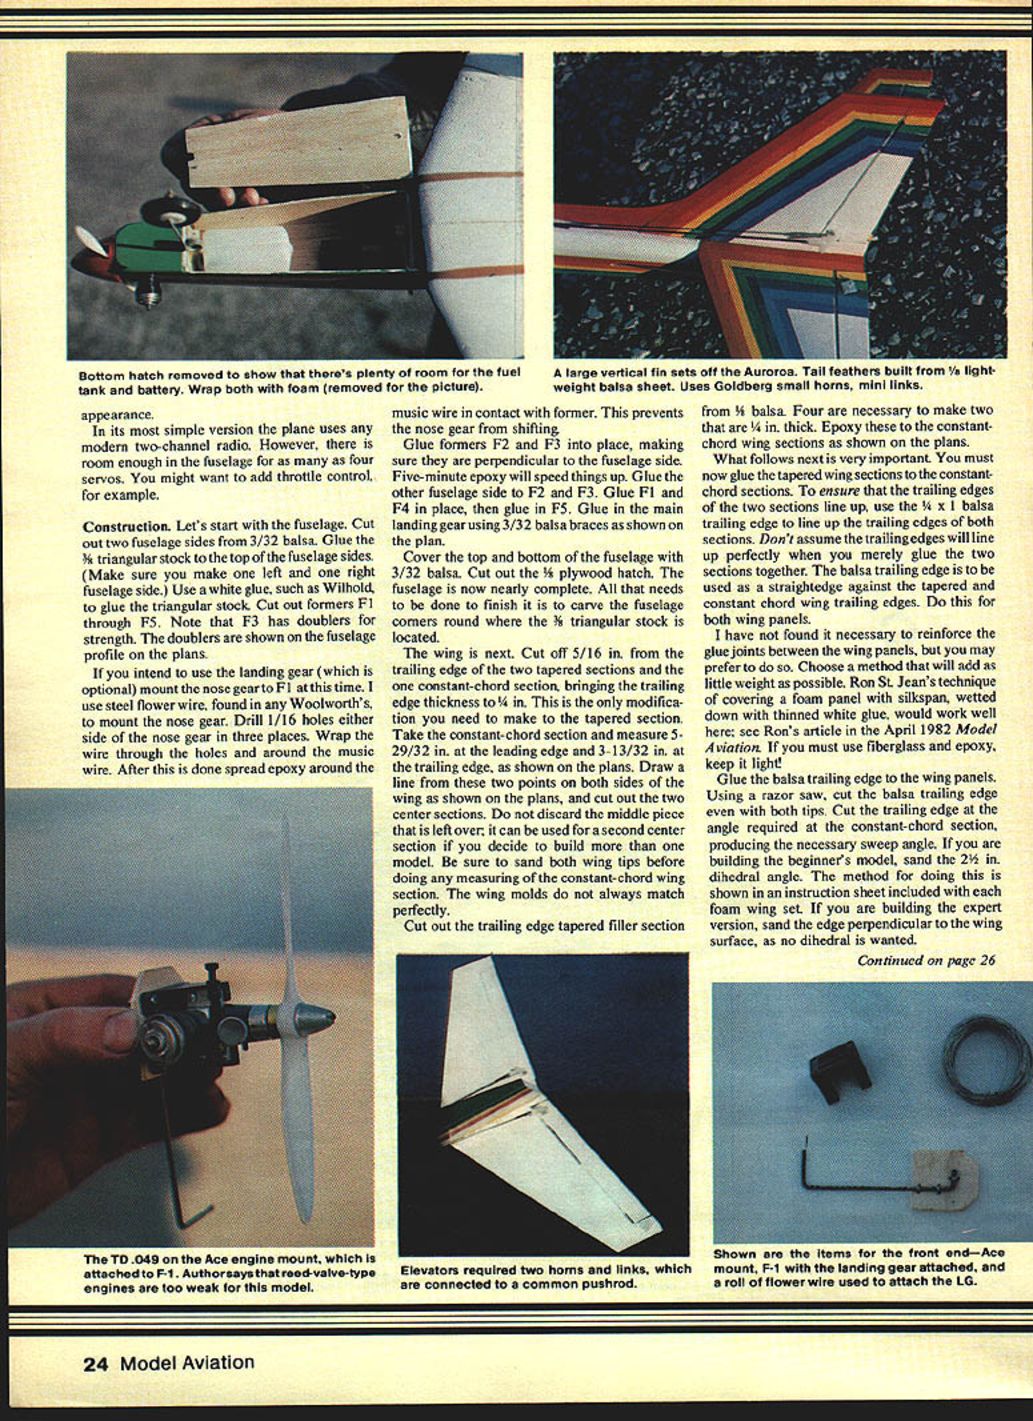
- If you intend to use landing gear, mount the nose gear at F1. To mount the nose gear the author used steel flower wire. Drill 1/16 in. holes on either side of the nose gear in three places. Wrap wire through the holes around the music wire. After done, spread epoxy around the music wire at the contact with the former to prevent nose gear shifting.
- Glue formers F2 and F3 in place making sure they are perpendicular to the fuselage sides. Five-minute epoxy will speed things up. Glue the other fuselage side, then glue F1 and F4 in place, followed by F5.
- Glue the main landing gear using 3/32 in. balsa braces shown on the plan.
- Cover the top and bottom of the fuselage with 3/32 in. balsa. Cut out the wood hatch.
- Sand and finish the fuselage. Carve the fuselage corners and round the triangular stock.
#### Wings
- Cut off 5/16 in. from the trailing edge of the two tapered sections and the constant-chord section, bringing the trailing-edge thickness to the dimension required to make the tapered section.
- Take the constant-chord section and measure 5-29/32 in. to the leading edge and 3-1/32 in. to the trailing edge as shown on the plans. Draw a line between the two points on both sides of the wing and cut out the two center sections. Discard the middle piece; the leftover can be used for a second center section if you decide to build a second model. Be sure to sand both wing tips before doing the measuring. Constant-chord wing sections from Ace molds always match perfectly.
- Cut out the trailing-edge tapered filler sections from 1/8 in. balsa. Four are necessary to make two that are 1/4 in. thick. Epoxy these to the constant-chord wing sections as shown on the plans.
- This next step is very important: glue the tapered wing sections to the constant-chord sections. To ensure that the trailing edges of the two sections line up, use a 1/4 in. x 1/8 in. balsa trailing edge to line up the trailing edges of both sections. Don't assume the trailing edges will line up perfectly when you merely glue the two sections together. The balsa trailing edge is to be used as a straightedge against the tapered and constant-chord wing trailing edges. Do this for both wing panels.
- I have not found it necessary to reinforce the glue joints between the wing panels, but you may prefer to do so. Choose a method that will add as little weight as possible. Ron St. Jean's technique of covering a foam panel with silkspan, wetted down with thinned white glue, would work well here (see Ron's article in the April 1982 Model Aviation). If you must use fiberglass and epoxy, keep it light!
- Glue the balsa trailing edge to the wing panels. Using a razor saw, cut the balsa trailing edge even with both tips. Cut the trailing edge at the angle required at the constant-chord section, producing the necessary sweep angle.
- If you are building the beginner's model, sand the 2-1/2 in. dihedral angle. The method for doing this is shown on an instruction sheet included with each foam wing set. Glue the two wing halves together.
- If you are building the expert model (no dihedral), sand the trailing edge perpendicular to the wing surface. For the expert model, the first step in making the strip ailerons is to cut the balsa trailing edge 1/8 in. from the foam trailing edge along the length of the wing up to 1-1/2 in. from the tip, leaving a 1/8 in. strip of balsa on the wing trailing edge. Install strip aileron horns and linkages, and sand half-round the forward edge of the former balsa trailing edge. Cut slots for hinges, and install the trailing edge (now the aileron). If you plan to cover the wing with plastic film, you might opt for a film hinge.
- Note: the wing tips are set at an angle in the plans. You may leave them angled (the author flew the plane this way and felt it looked good), or you may cut them straight for better tracking and to install 1/16 in. plywood tip plates (recommended for the advanced version). Tip plates aren't needed for the beginner's version.
#### Tail surfaces
- Cut out the stabilizer/elevator and fin/rudder from 1/8 in. light balsa.
- Hinge the elevator and rudder with nylon reinforcing tape.
Finishing
The method used started with giving all balsa surfaces two coats of Aerogloss clear dope. Sand between coats using #400 wet-or-dry paper. The foam wing was lightly sanded to remove the glaze with #400 paper.
The author painted the model with one coat of Perfect white paint, then added colors over the white. Painting takes time — the paint used takes about six hours to dry, so plan on about a week to apply all the colors. If you want a really impressive model and are not in a rush, paint the model as shown in the plans and photos. You may, of course, use any method of covering you wish.
After painting, glue the fin and stabilizer to the fuselage. Now you are ready to install the radio, tank, and engine. The author highly recommends the use of the Ace V4-A engine mount. The holes shown on F1 are for this mount.
Wheels: the author uses Ace 1-1/4 in. and 1-3/8 in. wheels on his model. If you are a beginner, it is recommended that you use the larger wheels.
Radio installation
- Mount the servos on 1/4 in. x 3/4 in. plywood rails epoxied in place. The servos are mounted next to each other but not touching.
- Cut pushrod exit holes in the fuselage for the elevator and rudder. Two holes opposite each other are required for the elevator; the pushrod holes are actually 7/16 in. slits 1 in. long.
- Mount the control horns on the rudder and elevator as shown on the plans.
Two pushrods are required — one for the rudder and one for the elevator. The elevator uses two rods connected together. Attach the pushrod wire and link to the 1/4 in. square balsa pushrod by making a 1/4 in., 90-degree bend in the wire and inserting it in a hole drilled in the 1/4 in. square. Firmly attach the wires to the balsa pushrod by wrapping string around the wire and balsa and then epoxying the wrap. The other end of the balsa pushrod has a 1/16 in. wire attached in the same manner. Make a 90-degree bend on the end of the 1/16 in. wire so it can be inserted into the servo wheel.
Mount the servos in the fuselage. Connect the pushrods to them and to the elevator and rudder control horns. Make sure the pushrods don't bind so that the servos always will return to the same neutral position when run back and forth. Wrap the battery and receiver with foam, and install as shown on the plans. The battery should be wrapped in a plastic bag to prevent any fuel from getting to it.
Flying
The model required about 3/32 in. of up trim. Although you can rise off the ground (R.O.G.), the author prefers to hand-launch. Once the model is in the air it rapidly gains altitude. You can then trim for straight and level flight. If you are a beginner you will appreciate the fact that the model is easy to fly and forgiving.
The model flies moderately fast on a 6 x 3 prop. With a 5-1/2 x 3 prop the Aurora will really move. If you choose to fly with ailerons, lots of stunts are possible depending on your flying skills.
Recommendations:
- Do your first flights on a calm day.
- Avoid flying in winds of 12 mph or more — this is a small plane and can easily fly away in poor weather.
I hope you enjoy your Aurora.
Transcribed from original scans by AI. Minor OCR errors may remain.

