
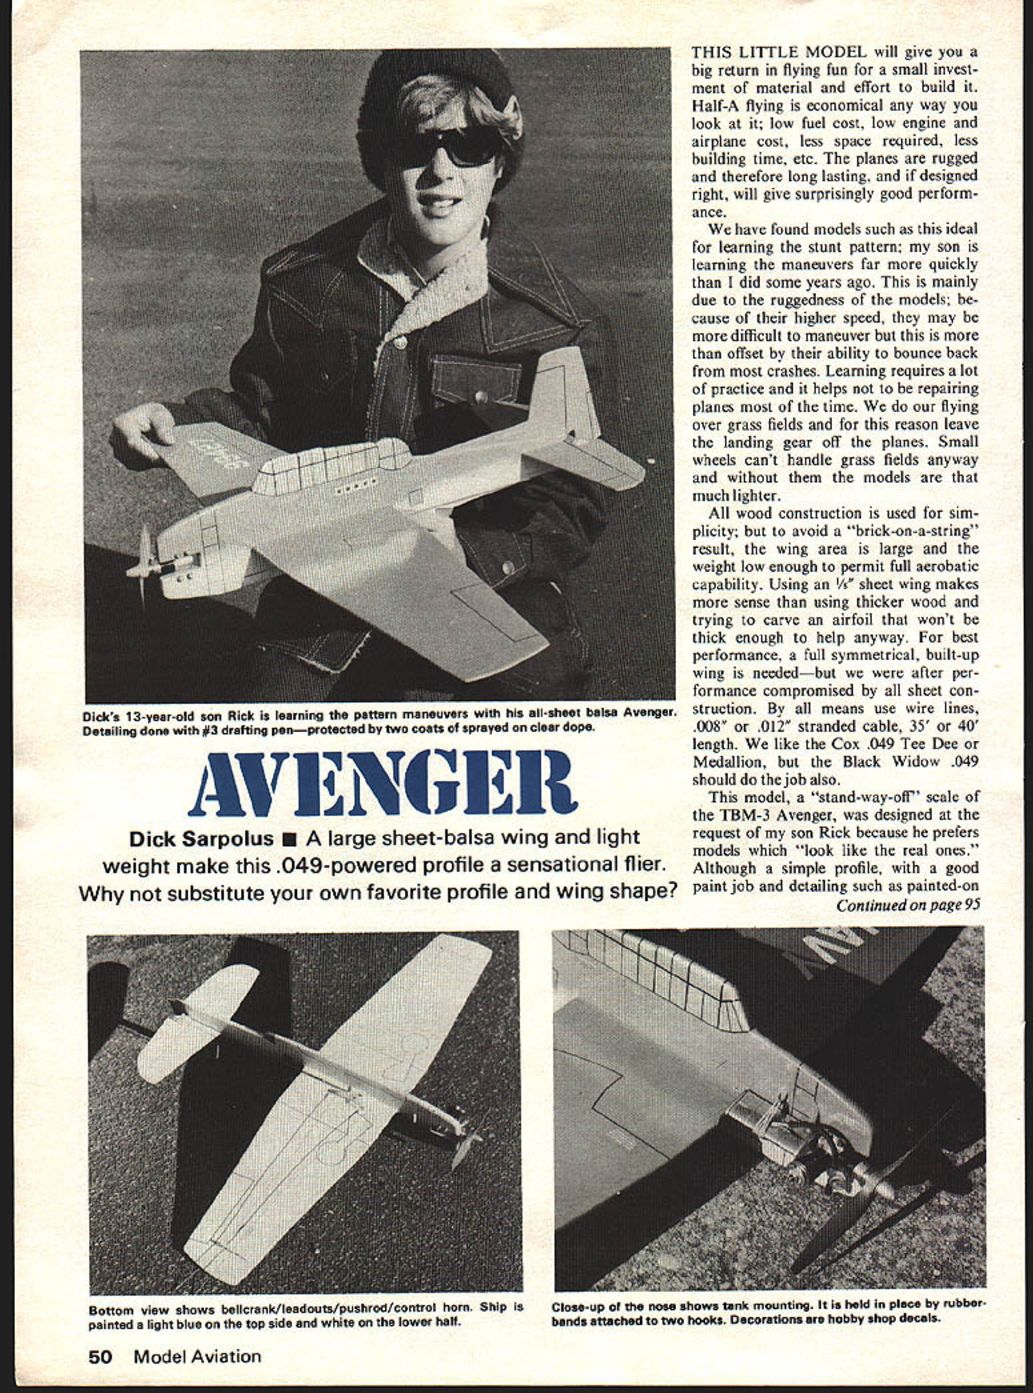
AVENGER
Dick Sarpolus ■ A large sheet-balsa wing and light weight make this .049-powered profile a sensational flier. Why not substitute your own favorite profile and wing shape?
THIS LITTLE MODEL will give you a big return in flying fun for a small investment of material and effort to build it. Half-A flying is economical any way you look at it: low fuel cost, low engine and airplane cost, less space required, less building time, etc. The planes are rugged and therefore long lasting, and if designed right, will give surprisingly good performance.
We have found models such as this ideal for learning the stunt pattern; my son is learning the maneuvers far more quickly than I did some years ago. This is mainly due to the ruggedness of the models; because of their higher speed, they may be more difficult to maneuver but this is more than offset by their ability to bounce back from most crashes. Learning requires a lot of practice and it helps not to be repairing planes most of the time. We do our flying over grass fields and for this reason leave the landing gear off the planes. Small wheels can't handle grass fields anyway and without them the models are that much lighter.
All wood construction is used for simplicity; but to avoid a "brick-on-a-string" result, the wing area is large and the weight low enough to permit full acrobatic capability. Using an 1/8" sheet wing makes more sense than using thicker wood and trying to carve an airfoil that won't be thick enough to help anyway. For best performance, a full symmetrical, built-up wing is needed — but we were after performance compromised by all sheet construction. By all means use wire lines, .008" or .012" stranded cable, 35' or 40' length. We like the Cox .049 Tee Dee or Medallion, but the Black Widow .049 should do the job also.
This model, a "stand-way-off" scale of the TBM-3 Avenger, was designed at the request of my son Rick because he prefers models which "look like the real ones." Although a simple profile, with a good paint job and detailing such as painted-on second coat of clear dope.
Flying
Your glider will probably need a small amount of weight on the nose to make the ship balance at the 50% point of the wing chord. If you are right-handed, the glide circle should be definitely to the left. To rough trim, pick a calm day and a field with foot-high soft grass, and proceed to launch with a left bank inclination, and with enough force to gain about 30 feet of height. The ship should go over the top and into its 40-ft. diameter glide circle with little or no dip and descend without diving or stalling. Compensating adjustments should be made to the stabilizer by shimming, 1/64" at a time.
Next, slip a fuse in the nose tube and light it, using another piece of burning fuse. Never use a burning match for lighting, or you may end up with the whole nose section afire. After taking a few steps into the wind, launch the ship with the nose up at about a 60° angle and banked to the right. The glider should climb in a right pattern and as it slows should go over the top into a left-hand glide. A hard throw is necessary to realize the full potential, and a half-hard launch could be disastrous if enough speed is not attained to take the ship through the top transition portion. Only repeated trial and not too many errors will give you the experience to know.
Remember, no hand launch will do the two-minute max without thermal help, but a well adjusted and thrown Roll-Out will get you about halfway there in neutral air. So if you want to win contests, you must look for the tell-tale signs of lift before making your officials. The dethermalizer permits test flights to be made and to determine what these signs are for that particular day as well as to limber up and just fly for the fun of it, without risk of losing the ship.
cockpit area, panel lines, machine guns, insignia, etc., its realistic appearance is rewarding. The characteristic lines of the Avenger cannot be mistaken.
Some comments about the original Avenger, which entered combat in 1942, during the Battle of Midway. It was designed in 1941 to replace the Douglas TBD Devastator torpedo-bomber. Grumman did a quick job getting the Avenger into production and in all almost 10,000 were built. Many different versions came along; the TBF carried one torpedo or 2000 lbs. of bombs in its large bomb bay, also had a .50" machine gun firing forward, a .50" gun in its dorsal turret, and a .30" gun in the ventral "step" which surprised many opponents. Other versions had two .50" guns in the wings, radar in some, reconnaissance versions with special cameras, anti-submarine models, and even a transport version which carried up to seven passengers out to aircraft carriers at sea. It was produced until 1944; Grumman built about 2300 planes designated TBF, and General Motors made approximately 7600 designated TBM. Some went to the British Royal Navy and a few to the Royal New Zealand Air Force.
Construction
To build our model, only two thicknesses of balsa are needed; 1/8" and 1/4". Also some 1/32" plywood, a few scraps of 1/8" plywood, and the usual hardware consisting of a bellcrank, control horn, pushrod, leadouts, etc. We suggest you cut out all the necessary parts, make your own kit, that is, before beginning assembly.
Starting with the wing, to get the necessary 6" width we edge glue two pieces of 3" x 24" stock together (cut from standard 3" x 36" pieces). Sand the joining edges to get a good fit, use a piece of masking tape to hold the two pieces tightly together, and open the joint from the opposite side to apply the glue. Close the joint and wipe off the excess glue. The wing tip pieces added with the grain going at right angles to the main wing panel help the wing resist warping. Block sand the entire wing and round all the edges; no airfoiling is needed.
The tail surfaces, fin, rudder, stabilizer and elevator, are cut from the remaining 1/8" x 3" balsa. Sand all pieces and bevel the edge of the rudder so it can be glued to the fin with 1/8" offset toward the outside of the flying circle. Commercially packaged nylon cloth tape is used for the hinges, applied in the usual over-and-under manner, glued on with model airplane cement. We use five-minute epoxy for all other assembly work for its strength and speed of assembly. It is not hard to assemble this entire model in one evening.
The fuselage is the most complicated part. The necessary width is obtained by edge gluing 1/4" x 3" stock together as was done for the wing. Cutting the fuselage outline to shape is most easily done with a jig or band saw, but it can be done with an X-acto knife. Make the notches for the motor mounts carefully so the spacing is correct for the engine you will be using. Glue the mounts in place before adding the 1/32" plywood nose doublers. When gluing the nose doublers in place either lay the assembly on your workbench and use heavy weights to hold the doublers on until dry, or hold them in place with clothespins and/or small C-clamps. All edges of the fuselage should be well rounded, as shown on the plans. Time spent in sanding now will really pay off in a good looking model.
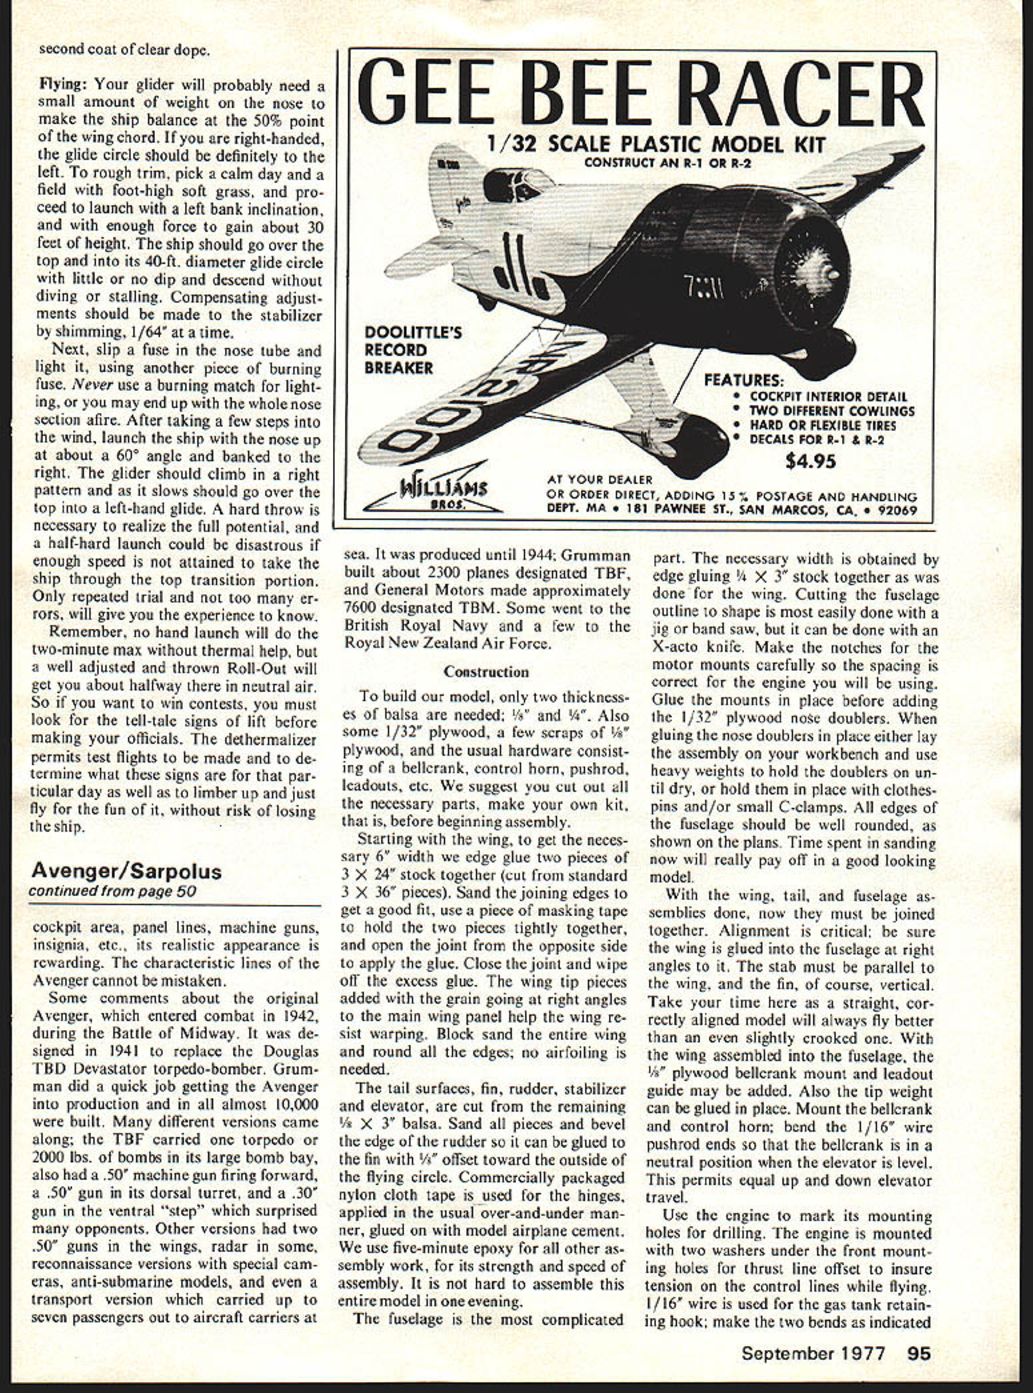
With the wing, tail, and fuselage assemblies done, now they must be joined together. Alignment is critical: be sure the wing is glued into the fuselage at right angles to it. The stab must be parallel to the wing, and the fin, of course, vertical. Take your time here as a straight, correctly aligned model will always fly better than an even slightly crooked one. With the wing assembled into the fuselage, the 1/8" plywood bellcrank mount and leadout guide may be added. Also the tip weight can be glued in place. Mount the bellcrank and control horn; bend the 1/16" wire pushrod ends so that the bellcrank is in a neutral position when the elevator is level. This permits equal up and down elevator travel.
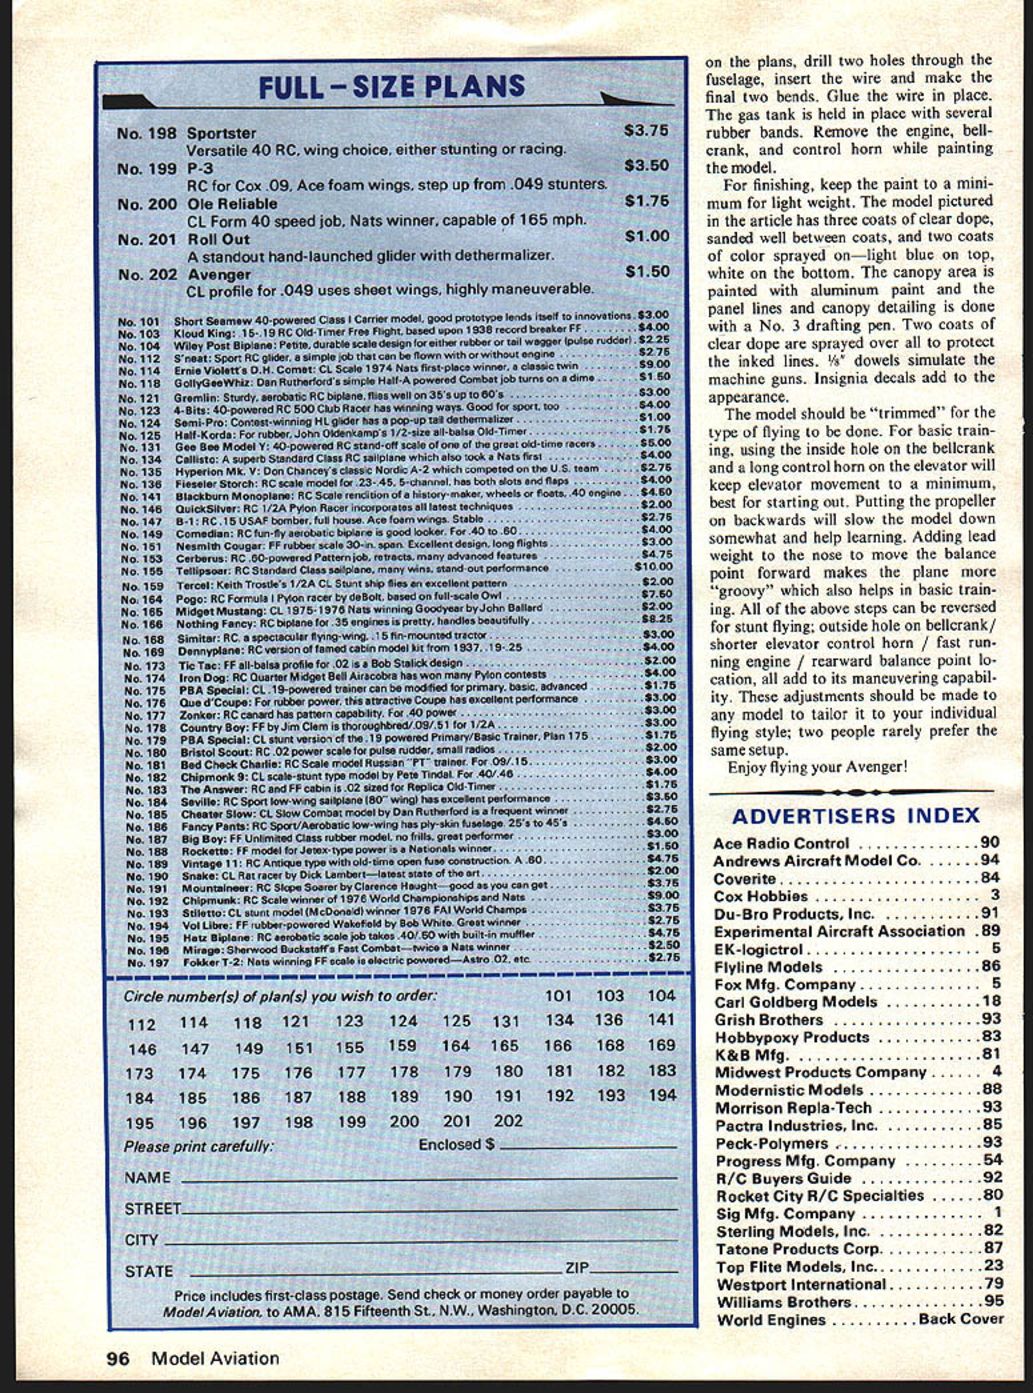
Use the engine to mark its mounting holes for drilling. The engine is mounted with two washers under the front mounting holes for thrust line offset to insure tension on the control lines while flying. 1/16" wire is used for the gas tank retaining hook; make the two bends as indicated On the plans, drill two holes through the fuselage, insert the wire and make the final two bends. Glue the wire in place. The gas tank is held in place with several rubber bands. Remove the engine, bellcrank, and control horn while painting the model.
For finishing, keep the paint to a minimum for light weight. The model pictured in the article has three coats of clear dope, sanded well between coats, and two coats of color sprayed on—light blue on top, white on the bottom. The canopy area is painted with aluminum paint and the panel lines and canopy detailing is done with a No. 3 drafting pen. Two coats of clear dope are sprayed over all to protect the inked lines. 1/8" dowels simulate the machine guns. Insignia decals add to the appearance.
The model should be "trimmed" for the type of flying to be done. For basic training, using the inside hole on the bellcrank and a long control horn on the elevator will keep elevator movement to a minimum, best for starting out. Putting the propeller on backwards will slow the model down somewhat and help learning. Adding lead weight to the nose to move the balance point forward makes the plane more "groovy" which also helps in basic training. All of the above steps can be reversed for stunt flying: outside hole on bellcrank / shorter elevator control horn / fast running engine / rearward balance point location, all add to its maneuvering capability. These adjustments should be made to any model to tailor it to your individual flying style. Two people rarely prefer the same setup.
Enjoy flying your Avenger!
Some comments about the original Avenger — entered combat in 1942 during the Battle of Midway. Designed in 1941 to replace the Douglas TBD Devastator torpedo bomber, Grumman did a quick job getting the Avenger into production. Almost 10,000 were built and different versions came along. The TBF carried a torpedo or 2,000-lb bombs in its large bomb bay, a .50 machine gun firing forward, a .50 gun in its dorsal turret and a .30 gun in the ventral step to surprise opponents. Other versions had two .50 guns in the wings, radar, some reconnaissance versions with special cameras, anti-submarine models, and a transport version that carried up to seven passengers. Operated from aircraft carriers at sea, production continued until 1944. Grumman built about 2,300 planes designated TBF; General Motors made approximately 7,600 designated TBM.
Transcribed from original scans by AI. Minor OCR errors may remain.

