
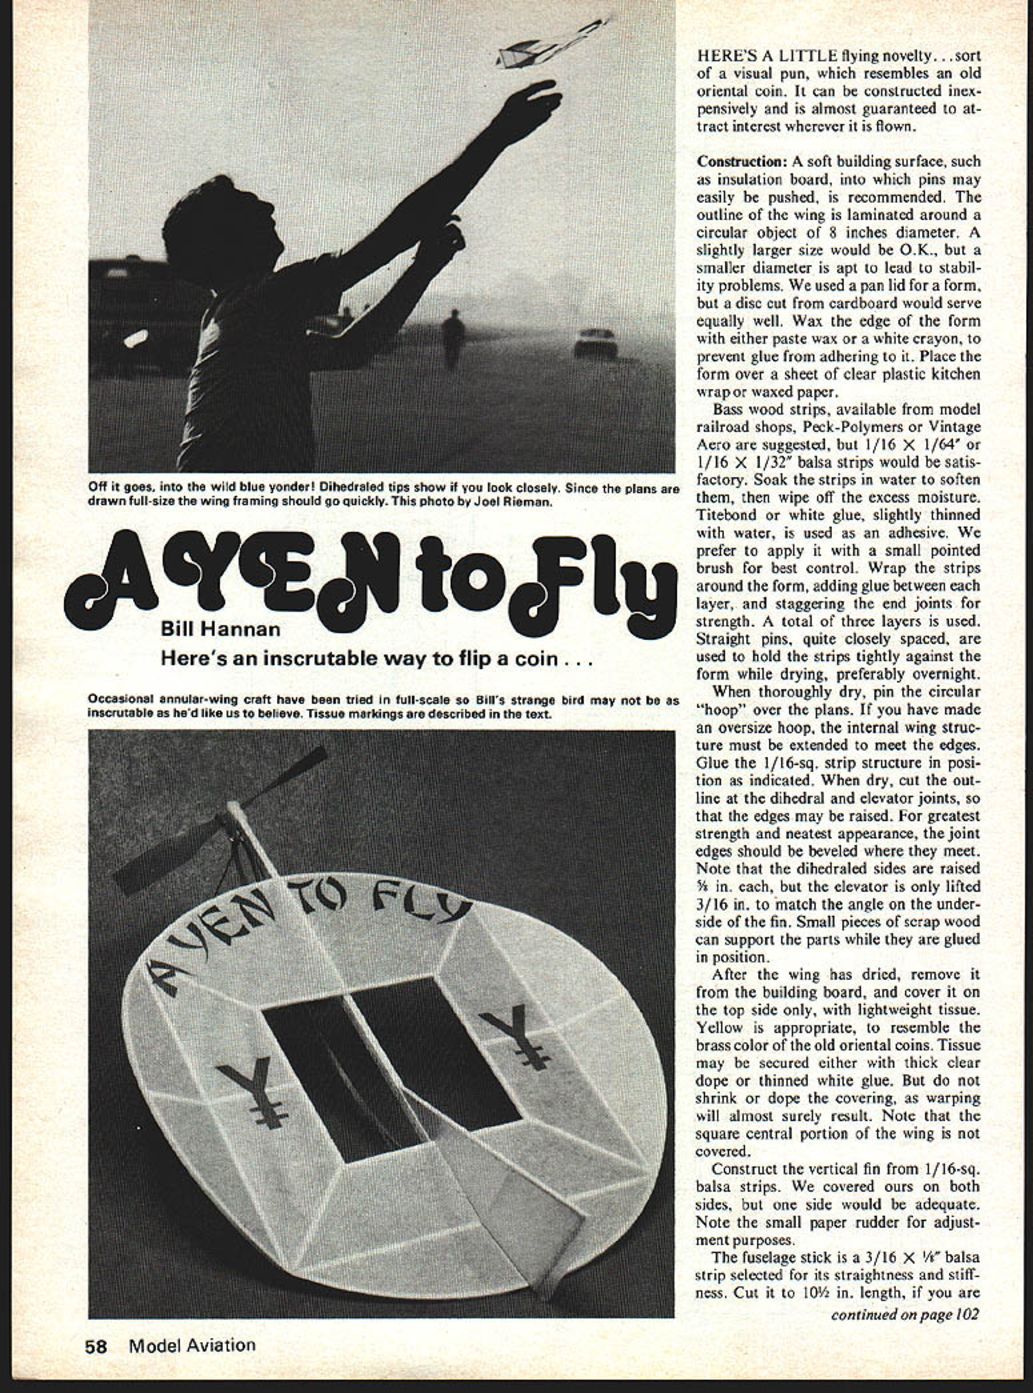
A YEN to Fly
Bill Hannan
HERE'S A LITTLE flying novelty... sort of a visual pun, which resembles an old oriental coin. It can be constructed inexpensively and is almost guaranteed to attract interest wherever it is flown.
Construction:
A soft building surface, such as insulation board, into which pins may easily be pushed, is recommended. The outline of the wing is laminated around a circular object of 8 inches diameter. A slightly larger size would be O.K., but a smaller diameter is apt to lead to stability problems. We used a pan lid for a form, but a disc cut from cardboard would serve equally well. Wax the edge of the form with either paste wax or a white crayon, to prevent glue from adhering to it. Place the form over a sheet of clear plastic kitchen wrap or waxed paper.
Bass wood strips, available from model railroad shops, Peck-Polymers or Vintage Aero are suggested, but 1/16 X 1/64" or 1/16 X 1/32" balsa strips would be satisfactory. Soak the strips in water to soften them, then wipe off the excess moisture. Titebond or white glue, slightly thinned with water, is used as an adhesive. We prefer to apply it with a small pointed brush for best control. Wrap the strips around the form, adding glue between each layer, and staggering the end joints, for strength. A total of three layers is used. Straight pins, quite closely spaced, are used to hold the strips tightly against the form while drying, preferably overnight.
When thoroughly dry, pin the circular "hoop" over the plans. If you have made an oversize hoop, the internal wing structure must be extended to meet the edges. Glue the 1/16-sq. strip structure in position as indicated. When dry, cut the outline at the dihedral and elevator joints, so that the edges may be raised. For greatest strength and neatest appearance, the joint edges should be beveled where they meet. Note that the dihedraled sides are raised 5/8 in. each, but the elevator is only lifted 3/16 in. to match the angle on the underside of the fin. Small pieces of scrap wood can support the parts while they are glued in position.
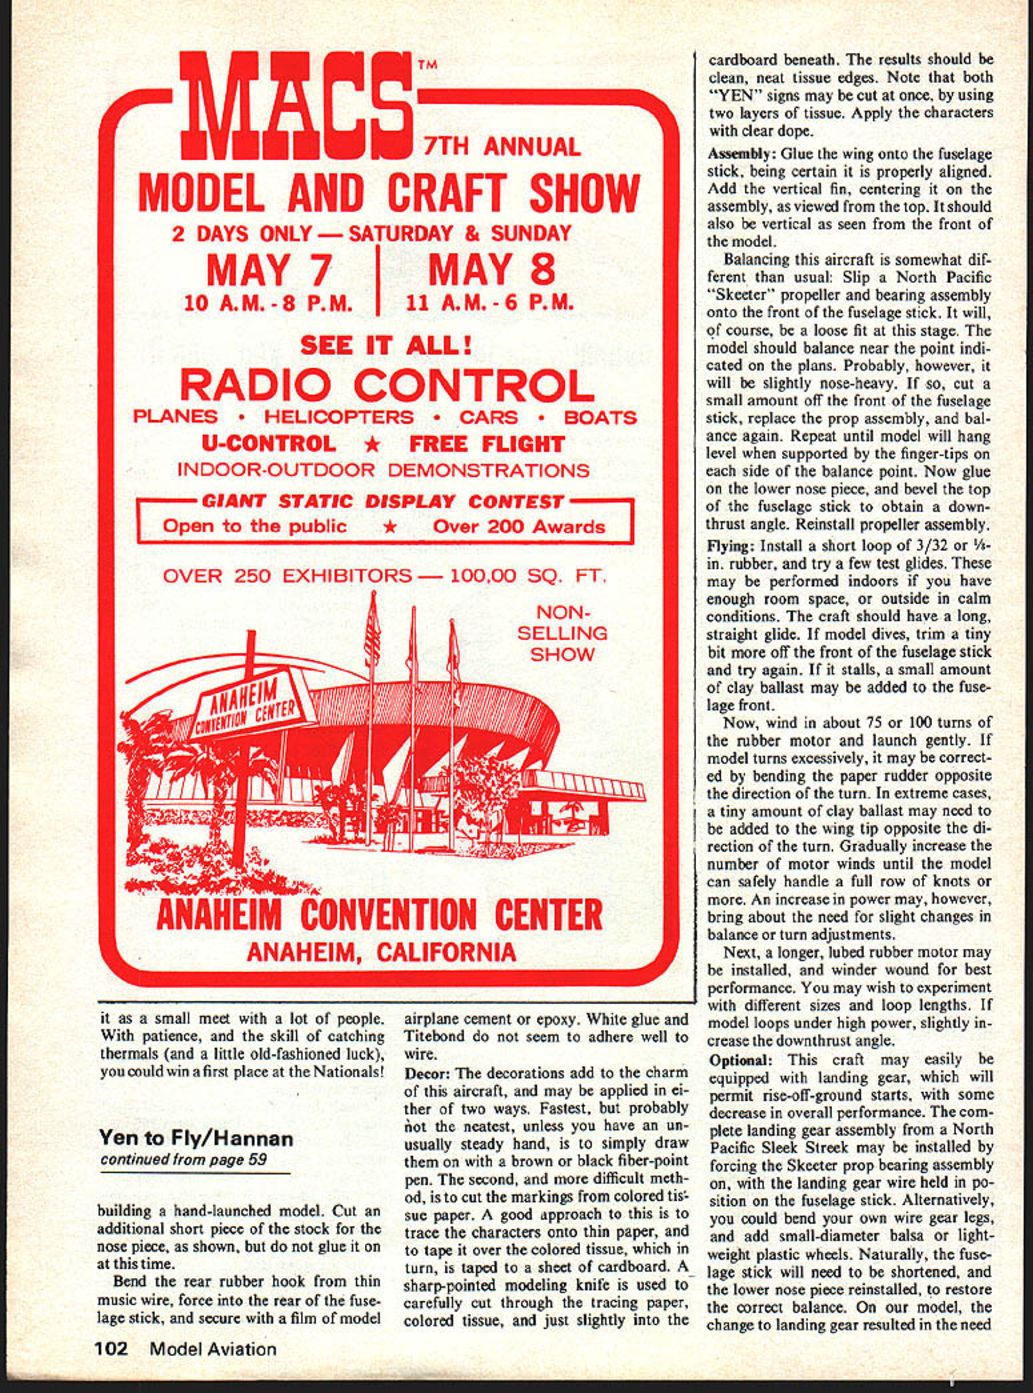
After the wing has dried, remove it from the building board, and cover it on the top side only, with lightweight tissue. Yellow is appropriate, to resemble the brass color of the old oriental coins. Tissue may be secured either with thick clear dope or thinned white glue. But do not shrink or dope the covering, as warping will almost surely result. Note that the square central portion of the wing is not covered.
Construct the vertical fin from 1/16-sq. balsa strips. We covered ours on both sides, but one side would be adequate. Note the small paper rudder for adjustment purposes.
The fuselage stick is a 3/16 X 1/8" balsa strip selected for its straightness and stiffness. Cut it to 10 1/2 in. length, if you are
Yen to Fly/Hannan
building a hand-launched model. Cut an additional short piece of the stock for the nose piece, as shown, but do not glue it on at this time.
Bend the rear rubber hook from thin music wire, force into the rear of the fuselage stick, and secure with a film of model airplane cement or epoxy. White glue and Titebond do not seem to adhere well to wire.
Decor: The decorations add to the charm of this aircraft, and may be applied in either of two ways. Fastest, but probably not the neatest, unless you have an unusually steady hand, is to simply draw them on with a brown or black fiber-point pen. The second, and more difficult method, is to cut the markings from colored tissue paper. A good approach to this is to trace the characters onto thin paper, and to tape it over the colored tissue, which in turn, is taped to a sheet of cardboard. A sharp-pointed modeling knife is used to carefully cut through the tracing paper, colored tissue, and just slightly into the cardboard beneath. The results should be clean, neat tissue edges. Note that both "YEN" signs may be cut at once, by using two layers of tissue. Apply the characters with clear dope.
Assembly: Glue the wing onto the fuselage stick, being certain it is properly aligned. Add the vertical fin, centering it on the assembly, as viewed from the top. It should also be vertical as seen from the front of the model.
Balancing: This aircraft is somewhat different than usual. Slip a North Pacific "Skeeter" propeller and bearing assembly onto the front of the fuselage stick. It will, of course, be a loose fit at this stage. The model should balance near the point indicated on the plans. Probably, however, it will be slightly nose-heavy. If so, cut a small amount off the front of the fuselage stick, replace the prop assembly, and balance again. Repeat until model will hang level when supported by the finger-tips on each side of the balance point. Now glue on the lower nose piece, and bevel the top of the fuselage stick to obtain a down-thrust angle. Reinstall propeller assembly.
Flying: Install a short loop of 3/32 or 1/8-in. rubber, and try a few test glides. These may be performed indoors if you have enough room space, or outside in calm conditions. The craft should have a long, straight glide. If model dives, trim a tiny bit more off the front of the fuselage stick and try again. If it stalls, a small amount of clay ballast may be added to the fuselage front.
Now, wind in about 75 or 100 turns of the rubber motor and launch gently. If model turns excessively, it may be corrected by bending the paper rudder opposite the direction of the turn. In extreme cases, a tiny amount of clay ballast may need to be added to the wing tip opposite the direction of the turn. Gradually increase the number of motor winds until the model can safely handle a full row of knots or more. An increase in power may, however, bring about the need for slight changes in balance or trim adjustments.
Next, a longer, lubed rubber motor may be installed, and a winder wound for best performance. You may wish to experiment with different sizes and loop lengths. If model loops under high power, slightly increase the downthrust angle.
Optional: This craft may easily be equipped with landing gear, which will permit rise-off-ground starts, with some decrease in overall performance. The complete landing gear assembly from a North Pacific Sleek Skeek may be installed by forcing the Skeeter prop bearing assembly on, with the landing gear wire held in position on the fuselage stick. Alternatively, you could bend your own wire gear legs, and add small-diameter balsa or lightweight plastic wheels. Naturally, the fuselage stick will need to be shortened, to restore the correct balance. On our model, the change to landing gear resulted in the need to shorten the fuselage stick to 8¾ in. length.
building hand-launched model. Cut additional short piece of stock for nose piece shown; glue in place. Bend rear rubber hook from thin music wire, force into rear fuselage stick; secure with film model airplane cement or epoxy. White glue (Titebond) seems to adhere well to wire.
Decor. The decorations add charm. They may be applied either of two ways. Fastest — probably neatest unless you have an unusually steady hand — is simply to draw brown or black markings with a fiber-point pen. Second, more difficult method, is to cut markings from colored tissue paper. A good approach is to trace characters onto thin paper, tape over the colored tissue, turn the taped sheet over onto cardboard and, with a sharp-pointed modeling knife, carefully cut through the tracing paper and colored tissue just slightly into the cardboard beneath. Results should be clean, neat tissue edges. Note: both YEN signs may be cut at once using two layers of tissue. Apply characters with clear dope.
Assembly. Glue wing onto fuselage stick, being certain it is properly aligned. Add vertical fin, centering it; assembly viewed from the top should also be vertical when seen from the front of the model.
Balancing the aircraft is somewhat different than usual. Slip North Pacific Skeeter propeller bearing assembly onto the front fuselage stick — it will, of course, be a loose fit. At this stage the model should balance near the point indicated on the plans. Probably, however, it will be slightly nose-heavy. Cut a small amount off the front fuselage stick, replace the prop assembly and balance again. Repeat until the model will hang level supported on fingertip side balance point. Now glue on the lower nose piece and bevel the top of the fuselage stick to obtain the downthrust angle. Reinstall the propeller assembly.
Flying. Install short loop 3/32"
Transcribed from original scans by AI. Minor OCR errors may remain.

