
Balloon Wheels for Large Models
by Lawrence Klingberg
Skip the wheel search and "roll" your own
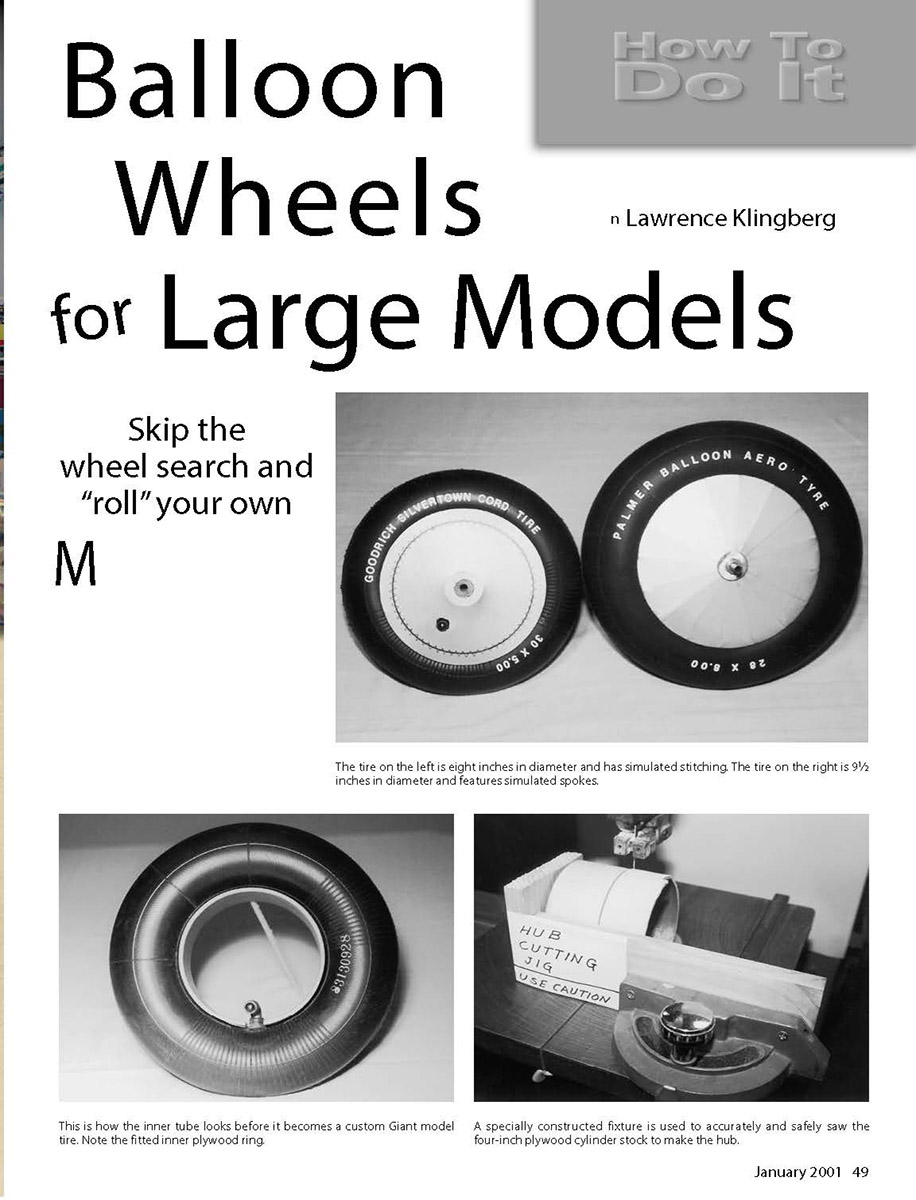
Many times, those who build large models run into the problem of not being able to purchase wheels that are large enough for their airplanes. When a builder decides to make a 1/4- or 1/3-scale airplane, he or she will probably find nothing commercially available. Faced with this problem a few years ago, I thought it might be possible to make some wheels similar to the Trexler "balloon" variety that have been popular throughout the years. I decided to see what I could make in an 8- to 9-1/2-inch-diameter wheel-and-tire arrangement, using industrial- and wheelbarrow-size inner tubes.
If you need a pair of balloon wheels for that large "Golden Age" giant-scale airplane, please read on and build some.
Materials and Tools
Materials
- Two 8-inch-diameter industrial wheels and/or wheelbarrow inner tubes (or 9-1/2-inch if desired)
- One piece of 4-inch OD plywood laminated-core tubing with a 1/8-inch wall (or heavy-duty mailing tube), 12 inches long
- One piece of 1/8-inch plywood sheet stock, 3 x 3 feet
- One 5/8-inch wood dowel, 12 inches long
- 1/4-inch white pine (scrap for small discs)
- Scrap balsa
- One sheet of Presto vinyl letters (white)
- 1/4-roll Olive Drab Solartex (or a portion thereof)
- One can of Sig Silver butyrate spray dope
- One can of five-minute epoxy
- Miscellaneous pieces of K&S brass tubing
- 1-inch washers and a Du-Bro wheel collar (optional for axle attachment)
Tools
- Band saw (use with caution)
- Lathe (recommended for drilling dowels)
- Sander
- Drill with 5/8-inch and 7/8-inch bits
- Glue/epoxy applicators
- Lacquer thinner
- Varnish and brush
- Marker (black) for simulated stitching
Wheel Sizes and Hub Dimensions
- For 8-inch wheels: hub width = 2-1/2 inches.
- For 9-1/2-inch wheels: hub width = 2-5/8 inches.
Hubs are made from 4-inch OD plywood laminated-core tubing or heavy-duty mailing tube (both with a 1/8-inch wall). This tubing is often available at well-stocked lumber yards or building-supply stores. If you can't find the tubing locally, contact Anderson International Trading, 1171 N. Tustin Ave., Anaheim CA 92807-1736; Tel.: (714) 666-8183 for a catalog.
Cutting and Preparing Parts
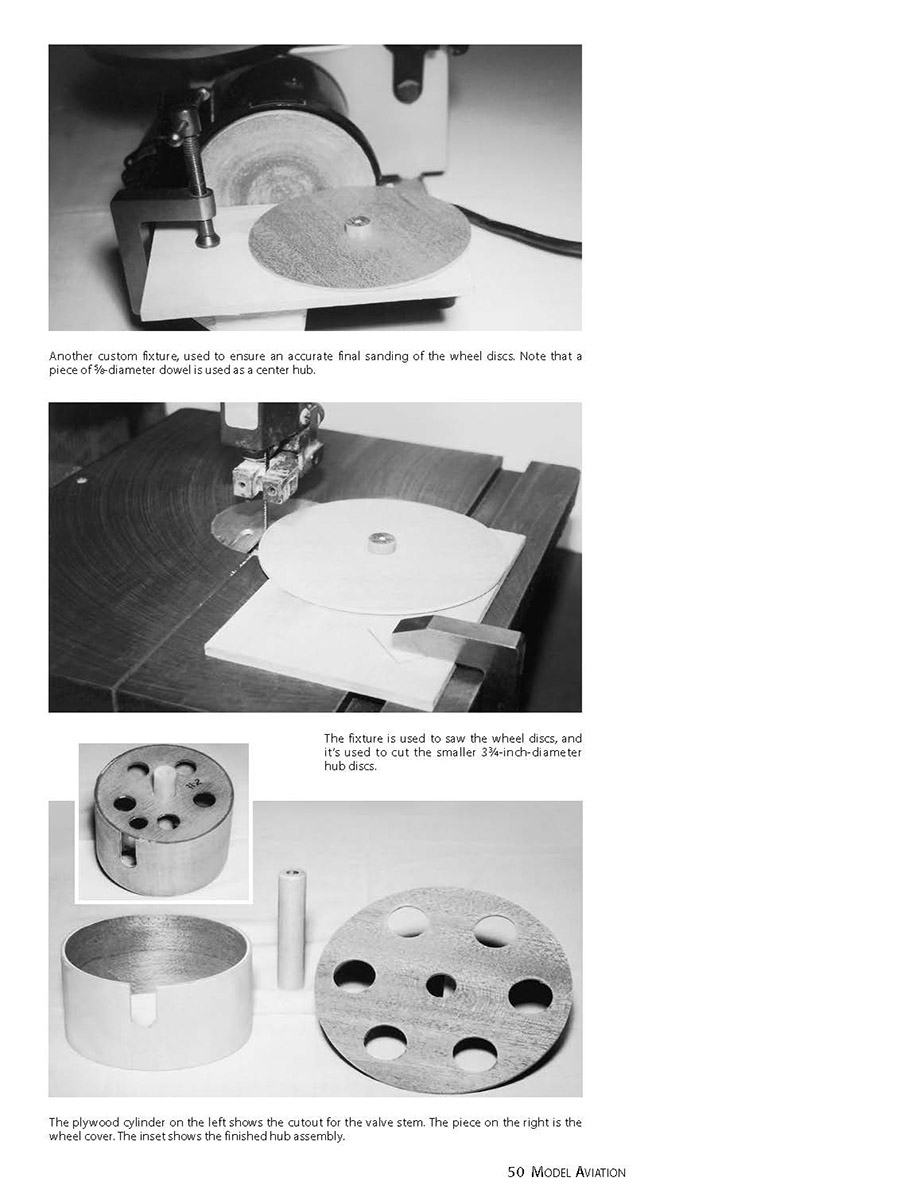
- Disassemble the 8-inch industrial wheels by removing the four bolts and remove the inner tubes; the tubes are the only parts you need from the purchased wheels.
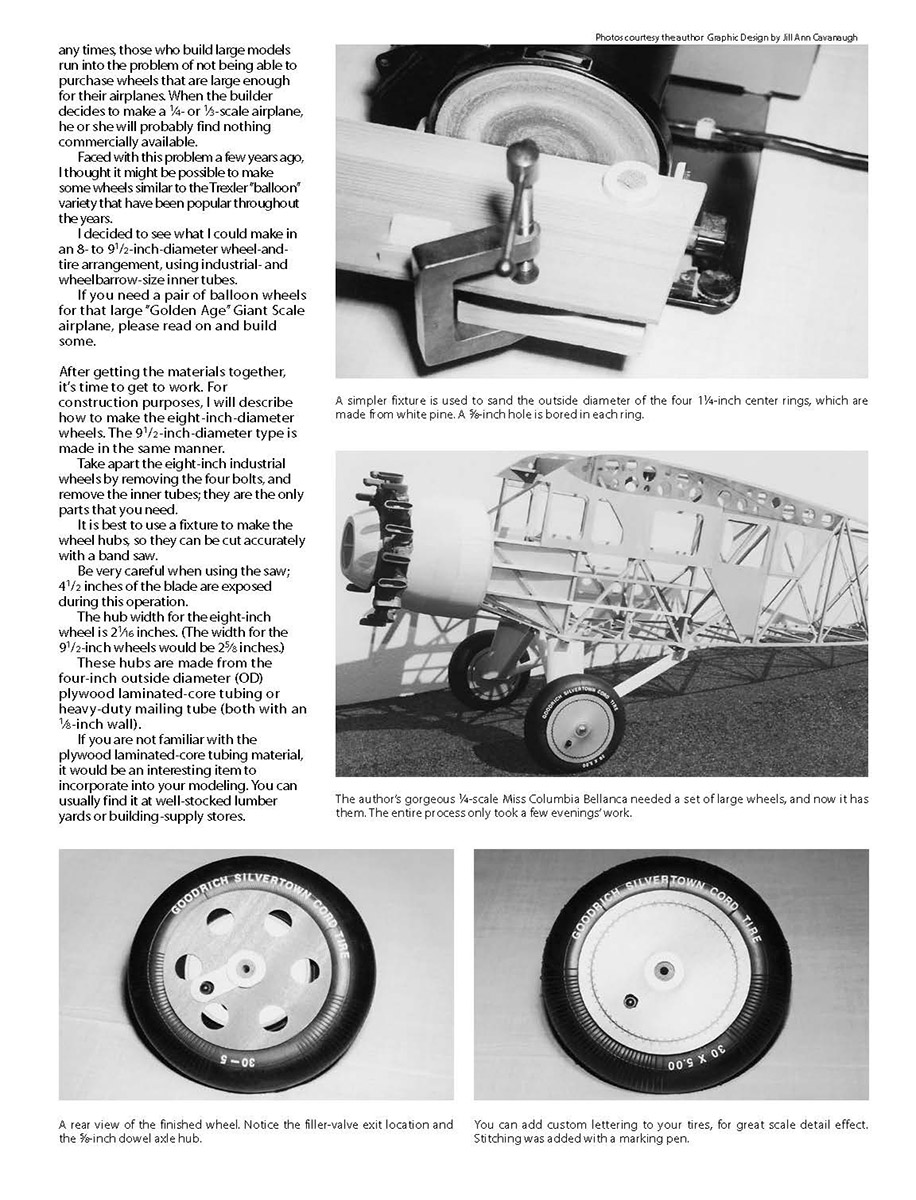
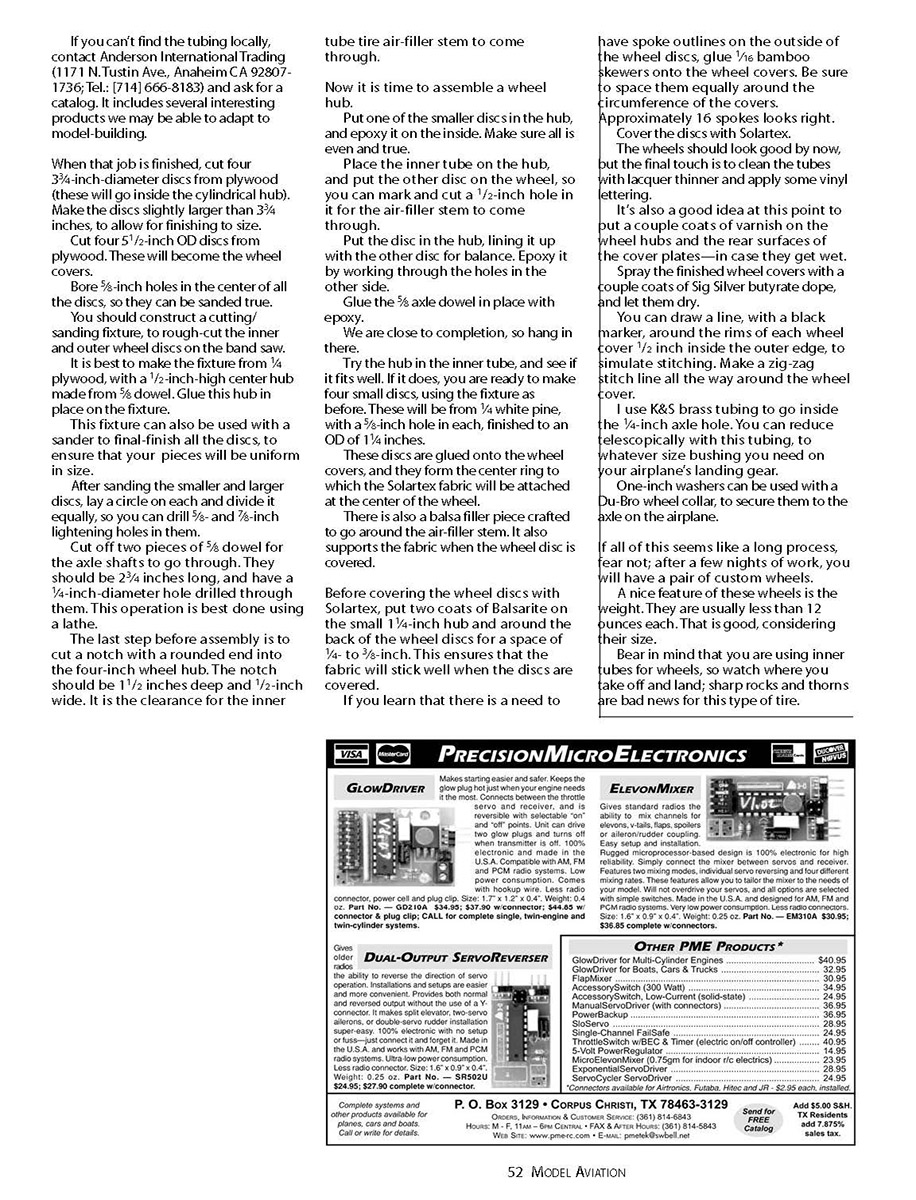
- Construct a cutting/sanding fixture to make and finish the wheel hubs and discs accurately. Make the fixture from 1/4-inch plywood with a 1/2-inch-high center hub made from 5/8-inch dowel; glue the hub in place. This fixture can also be used with a sander to final-finish all the discs for uniformity.
- Cut the cylindrical hubs (from the 4-inch OD tubing) to the hub width (2-1/2 inches for 8-inch wheels).
- Be very careful when using the band saw; about 4-1/2 inches of the blade are exposed during this operation.
- Cut four 3/4-inch-thick plywood discs to go inside the cylindrical hub. Make the discs slightly larger than 3-3/4 inches to allow for finishing to size; final OD should match the hub interior.
- Cut four 5-1/2-inch OD plywood discs to become the wheel covers.
- Bore a 5/8-inch hole in the center of all the discs so they can be sanded true on the fixture.
- After sanding the smaller and larger discs, lay out a circle on each and divide it equally to drill lightening holes (5/8-inch and 7/8-inch) as desired.
Axles, Notches, and Small Parts
- Cut off two pieces of 5/8-inch dowel for the axle shafts; they should be 2-3/4 inches long and have a 1/4-inch-diameter hole drilled through them. This operation is best done using a lathe.
- Cut a notch with a rounded end into the 4-inch wheel hub. The notch should be 1-1/2 inches deep and 1/2 inch wide to provide clearance for the inner tube tire air-filler stem to come through.
- Make four small discs from 1/4-inch white pine, each with a 5/8-inch hole and a finished OD of 1-1/4 inches. These discs glue onto the wheel covers to form the center ring to which the Solartex fabric will be attached.
- Craft a balsa filler piece to go around the air-filler stem; it also supports the fabric when the wheel disc is covered.
Assembly
- Put one of the smaller plywood discs into the cylindrical hub and epoxy it on the inside. Ensure it is even and true.
- Place the inner tube over the hub. Put the other disc on the wheel; you may mark and cut a 1/2-inch hole in it for the air-filler stem to come through if desired.
- Line up the second disc with the first for balance and epoxy it by working through the holes on the other side of the hub.
- Glue the 5/8-inch axle dowel in place with epoxy.
- Try the hub in the inner tube to check the fit. If it fits well, proceed to glue the 1-1/4-inch white pine center rings onto the wheel covers.
- If you want spoke outlines on the outside of the wheel discs, glue 1/16-inch bamboo skewers onto the wheel covers, spaced equally around the circumference. Approximately 16 spokes looks right.
Covering and Finishing
- Before covering the wheel discs with Solartex, apply two coats of Balsarite on the small 1-1/4-inch hub and around the back of the wheel discs for a space of 1/4 to 3/8 inch. This ensures good adhesion of the fabric.
- Cover the discs with Solartex.
- Clean the tubes with lacquer thinner and apply vinyl lettering as desired.
- Put a couple coats of varnish on the wheel hubs and the rear surfaces of the cover plates to protect them in case they get wet.
- Spray the finished wheel covers with a couple coats of Sig Silver butyrate dope and allow them to dry.
- Draw a line with a black marker around the rim of each wheel cover, 1/2 inch inside the outer edge, to simulate stitching. Make a zig-zag stitch line all the way around the wheel cover.
Axle Bushings and Attachment
- I use K&S brass tubing inside the 1/4-inch axle hole. You can reduce telescopically with this tubing to whatever size bushing you need on your airplane's landing gear.
- One-inch washers can be used with a Du-Bro wheel collar to secure the wheels to the axle on the airplane.
Tips, Weight, and Cautions
- After a few nights of work you'll have a pair of custom wheels; the process is not as long as it first seems.
- A nice feature of these wheels is the weight: they are usually less than 12 ounces each, which is good considering their size.
- These wheels use inner tubes, so watch where you take off and land—sharp rocks and thorns can puncture them. They are low-pressure tires and should be inflated only enough to make them firm. Do not overinflate!
Parts List
Happy landings and keep 'em flying.
Lawrence Klingberg 8111 Dartmoor Dr. Huntington Beach CA 92646
Transcribed from original scans by AI. Minor OCR errors may remain.

