
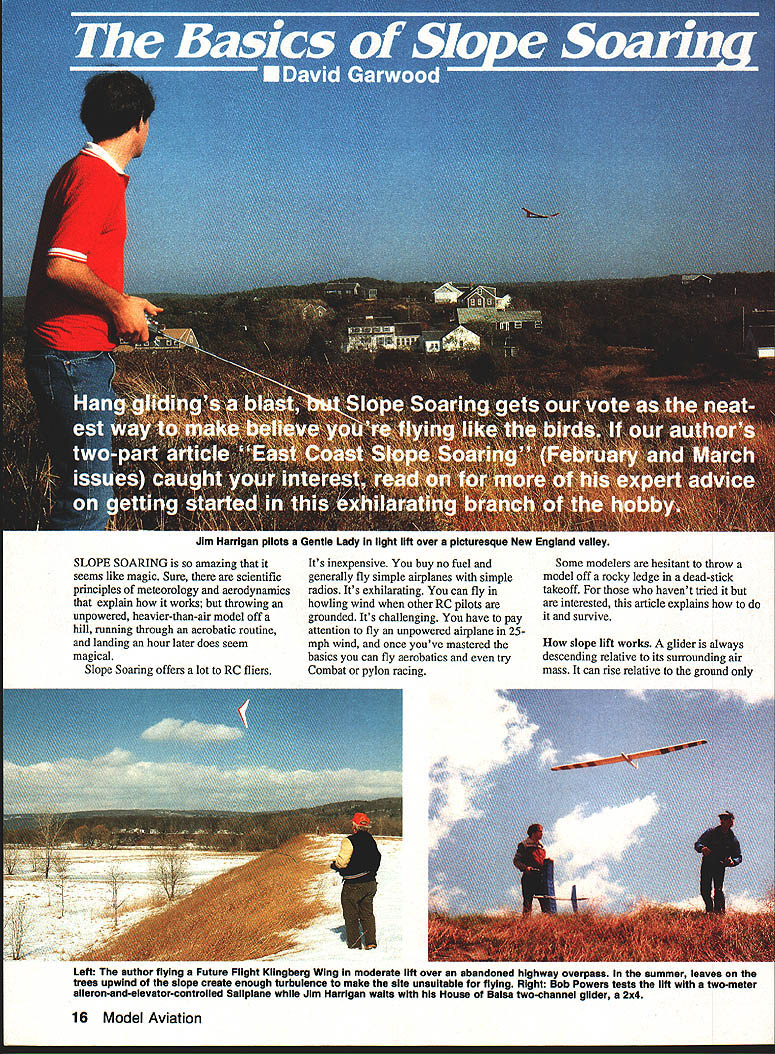

The Basics of Slope Soaring
David Garwood
SLOPE SOARING is so amazing it seems like magic. There are scientific principles of meteorology and aerodynamics that explain how it works, but throwing an unpowered, heavier‑than‑air model off a hill, running through an aerobatic routine, and landing an hour later still feels magical.
Slope soaring offers a lot to RC fliers. It's inexpensive (no fuel) and usually uses simple airplanes and radios. It's exhilarating — you can fly in howling wind when other RC pilots are grounded. It's challenging — you must pay attention to fly an unpowered airplane in strong wind, and once you've mastered the basics you can fly aerobatics or try Combat or pylon racing.
Some modelers are hesitant to toss a model off a rocky ledge. For those who haven't tried it but are interested, this article explains how to do it and survive.
How slope lift works
A glider is always descending relative to the surrounding air mass. It can rise relative to the ground only when the air mass is rising. When the air mass is rising faster than the glider is falling, lift exists. Thermals and slope lift are the two main sources of rising air.
Slope lift occurs when wind blows against a slope and the airflow is forced upward. The uphill flow creates rising air that supports birds and sailplanes. Gulls can fly miles along a seacoast dune with a single wingbeat; slope soarers can do the same. Wind that is the enemy of the thermal glider pilot is the friend of the slope glider pilot.
Starters / Test lift
- You generally need about an 8 mph (or faster) wind blowing straight, or almost straight, at the hillside.
- Adequate lift depends on wind speed, slope shape, and wind direction. The more directly the wind strikes the slope, the greater the lift.
- You can fly in a slight crosswind (perhaps up to 20° either way), but lift will be reduced and more skill will be required.
The best way to determine if there is enough lift is to watch other sailplanes. The second best way is to watch gulls or hawks soaring over the slope. If no other fliers or birds are working the slope, test the lift by firmly holding the model out in front of the slope. If the plane wants to rise out of your hand, you can fly.
Aircraft selection
Select a model suited to the wind conditions. Slope soaring is between power flying and thermal gliding.
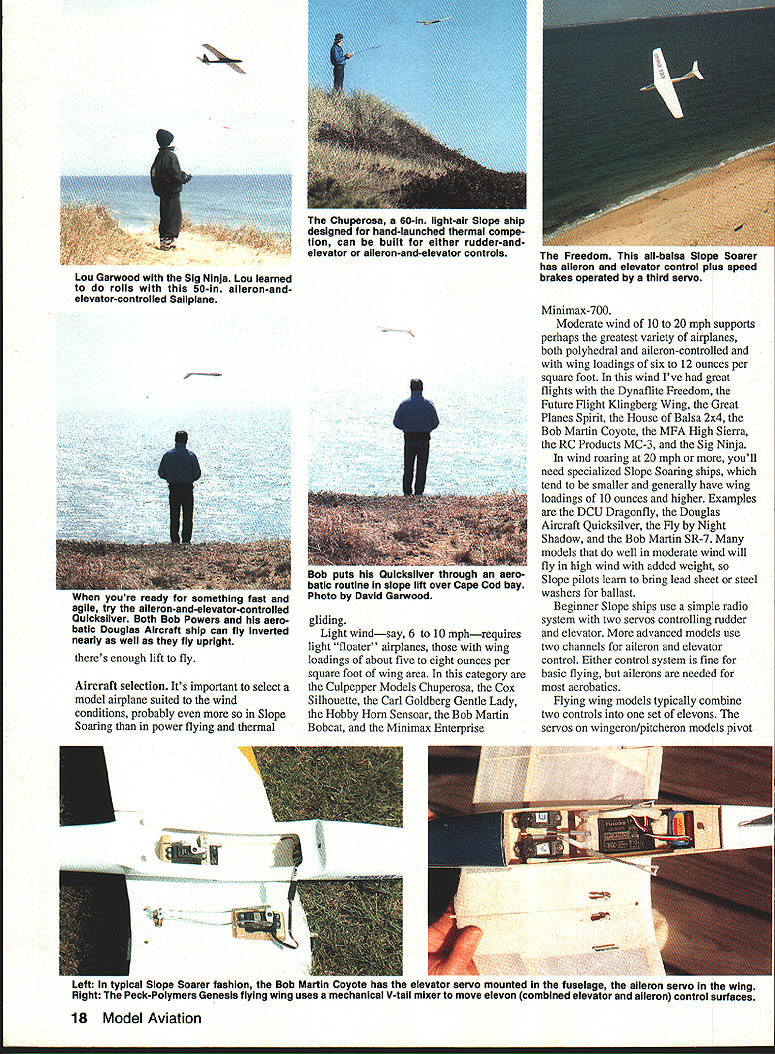
- Light winds (6–10 mph): light floater airplanes, wing loadings about 5–8 oz/ft². Examples: Culpepper Models Chuparosa, Cox Silhouette, Carl Goldberg Gentle Lady, Hobby Hornet Sensoar, Bob Martin Bobcat, Minimax Enterprise, Minimax‑700.
- Moderate winds (10–20 mph): a wide variety of designs — polyhedral and aileron‑controlled — wing loadings about 6–12 oz/ft². Examples: Dynaflite Freedom, Future Flight Klingberg Wing, Great Planes Spirit, House of Balsa 2x4, Bob Martin Coyote, MFA High Sierra, RC Products MC‑3, Sig Ninja.
- Strong winds (20+ mph): specialized slope ships that tend to be smaller and have wing loadings of 10 oz/ft² and higher. Examples: DUC Dragonfly, Douglas Quicksilver, Fly By Night Shadow, Bob Martin SR‑7. Many models that do well in moderate wind will fly in high wind with added ballast (lead sheet or steel washers).
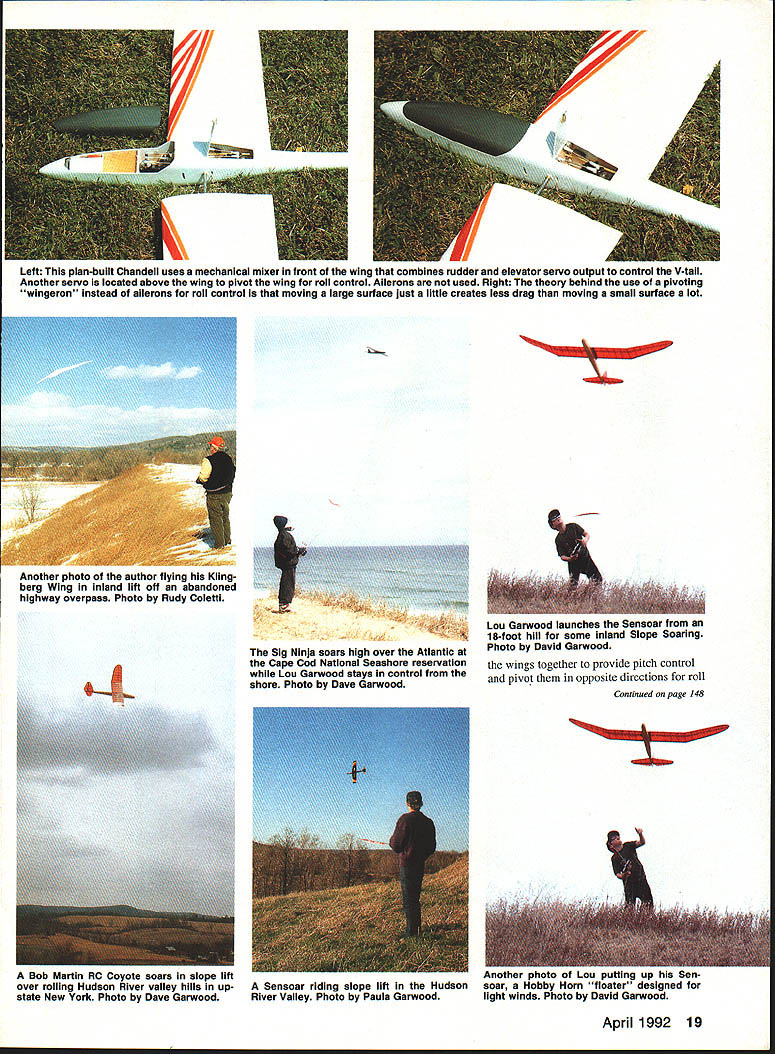
Beginner slope ships usually use a simple radio with two servos for rudder and elevator. More advanced models use ailerons plus elevator (and rudder) for aerobatics. Either system is fine for basic flying, but ailerons are needed for most aerobatic maneuvers.
Launching and pattern flying
With the landing area selected and the radio checked, step confidently to the edge of the hill and give the model a firm toss in a slightly downward direction. Yes — slightly downward: you need airspeed more than altitude at this point. The model may balloon upward suddenly, so be prepared to push the elevator stick forward (down elevator) to prevent a stall. If there is lift, the model will soon be back above the hill; if you don't have enough airspeed for solid control, it can crash.
After a few seconds to build speed, turn the airplane 90° so it flies parallel to the slope. The model will continue to gain altitude and fly above and out in front of the hill. Before it becomes too small to see, make a 180° turn away from the hill and pass in front of the launch position. At the other end of the circuit, make another 180° turn away from the hill.
You're now flying the basic slope pattern. Seen from above, it's a figure‑eight, always turning into the wind. Turn into the wind to keep airspeed up and ground speed down in the turns and to avoid being blown back over the hill. Being blown back over the hill is among the worst things that can happen: lift decreases rapidly and turbulence increases sharply above the crest.
After final radio check, launch straight out and build speed; as the glider climbs, use a little forward elevator as needed to prevent a stall.
Flying in slope lift
- Lift is strongest just above and slightly out in front of the hill. It tapers off as you go higher and as you go farther out.
- Usable lift can range from a few feet to three times the height of the hill, and extend 200 feet or more out in front.
- To find the limit, fly out until you begin to settle, then bring the model back into stronger lift.
- Stay out in front of the hill; flying behind it is hazardous.
Gain altitude by turning smoothly and staying in the strongest lift. In strong lift you can get up to twice the height of the hill in one or two passes; in weak lift it may take many passes to gain altitude. You reduce altitude by flying into weaker lift or by raising the nose slightly to increase angle of attack (but don't overdo it or you'll stall).
Once comfortable with straight‑and‑level flight, try aerobatics. Loops are a good first maneuver for thermal glider pilots; pilots experienced with powered models may try rolls first. Before any aerobatic maneuver, gain altitude and begin a shallow dive to build up speed. Inverted passes, Immelmann turns, split‑S maneuvers, and Cuban‑eights are well within the performance of fast aileron‑and‑elevator‑controlled slope ships.
Landing
Most model damage occurs on landing, so select a landing area before launch. The three basic landing locations are the bottom, the slope face, and the top.
- Bottom (first choice for beginners): safest if there's enough flat space. Start by flying out away from the hill to leave strong lift. The model will gradually lose height; when ready, land parallel to the hill or turn into the wind and make a wide, shallow turn down the slope. Avoid heading back over the crest if possible — it's better to land downwind than be blown over the top.
- On the slope: more hazardous but sometimes necessary. Approach along the slope with minimum sink and touch down briskly to avoid sudden downdrafts. If landing on the slope face, fly low into an area of reduced lift so the model slows and loses altitude; then fly close to the hill and let the model drift upward with the rising air. As it climbs and loses airspeed, when it's slightly above the desired spot and a foot or two from the ground, nose down and grease it in.
- Top of the hill: last choice. You may encounter severe turbulence and rapidly changing conditions (the rotor). If you must land on top, come in into the wind, stay low and fast enough to maintain positive control, and be prepared to go around and try again if conditions deteriorate. A compensating advantage of the top is the ability to go around and re‑enter slope lift. Practice high approaches and progressively lower passes before committing to a top‑of‑hill landing.
Rotor turbulence behind the hill is limited and tapers off with distance from the edge. If there's a truly large flat area on top, you can fly over the rotor and land behind it like a thermal glider landing.
The choice of landing area depends on personal preference, experience, and topography. All three types can be used successfully by experienced pilots.
Parting thought and warning
Bring a repair kit (CA glue, five‑minute epoxy, fiberglass cloth). Slope flying is hard on models, and field repairs can get you back in the air. Don't be afraid to take beat‑up models to the slope — they will receive more punishment and good looks don't count in your first year.
When the lift is good, you'll want to be flying instead of watching. Slope soaring is a participant sport and highly addictive — once you try it you may never again be satisfied with ordinary RC flying.
References for further reading
- Dave Thornberg, Old Buzzard's Soaring Book (Pony X Press). Two chapters on slope soaring; great writing style.
- Dave Jones, Radio Controlled Gliders (Argus Books). Two excellent chapters by Keith Thomas on slope soaring.
- Dave Hughes, Radio Controlled Slope Soaring (Chart Hobby Distributors). Definitive work: 17 chapters and five appendices.
- Stan Eames and Sal DeFrancesco, "Slope Soaring at Inland Sites with NSP," 1991 Northeast Sailplane Products catalog (Northeast Sailplane Products, Williston, VT).
Note: The British publications listed are available from U.S. booksellers.
And yes — if you want to write about slope soaring, it helps if your name is Dave.
Transcribed from original scans by AI. Minor OCR errors may remain.

