
BCM: The Aftermuffler
John Hunton
Overview
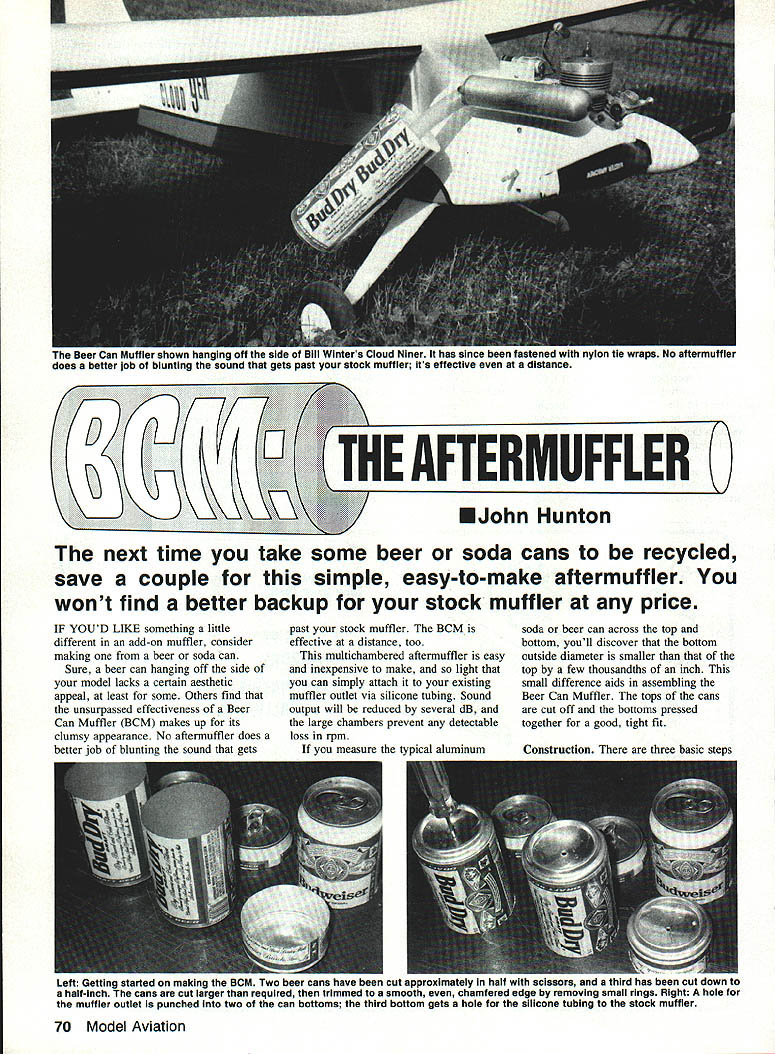
The next time you take some beer or soda cans to be recycled, save a couple for this simple, easy-to-make aftermuffler. You won't find a better backup for your stock muffler at any price.
If you'd like something a little different in an add-on muffler, consider making one from a beer or soda can.
A beer can hanging off the side of your model may lack a certain aesthetic appeal for some, but many find that the unsurpassed effectiveness of a Beer Can Muffler (BCM) makes up for its clumsy appearance. No aftermuffler does a better job of blunting the sound that gets past your stock muffler. The BCM is effective at a distance, too.
This multichambered aftermuffler is easy and inexpensive to make, and so light that you can simply attach it to your existing muffler outlet via silicone tubing. Sound output will be reduced by several dB, and the large chambers prevent any detectable loss in rpm.
If you measure the typical aluminum soda or beer can across the top and bottom, you'll discover that the bottom outside diameter is smaller than that of the top by a few thousandths of an inch. This small difference aids in assembling the Beer Can Muffler. The tops of the cans are cut off and the bottoms pressed together for a good, tight fit.
Construction
There are three basic steps in making a two-chambered aftermuffler:
- Cutting the cans
- Punching the holes
- Assembling the can bottoms
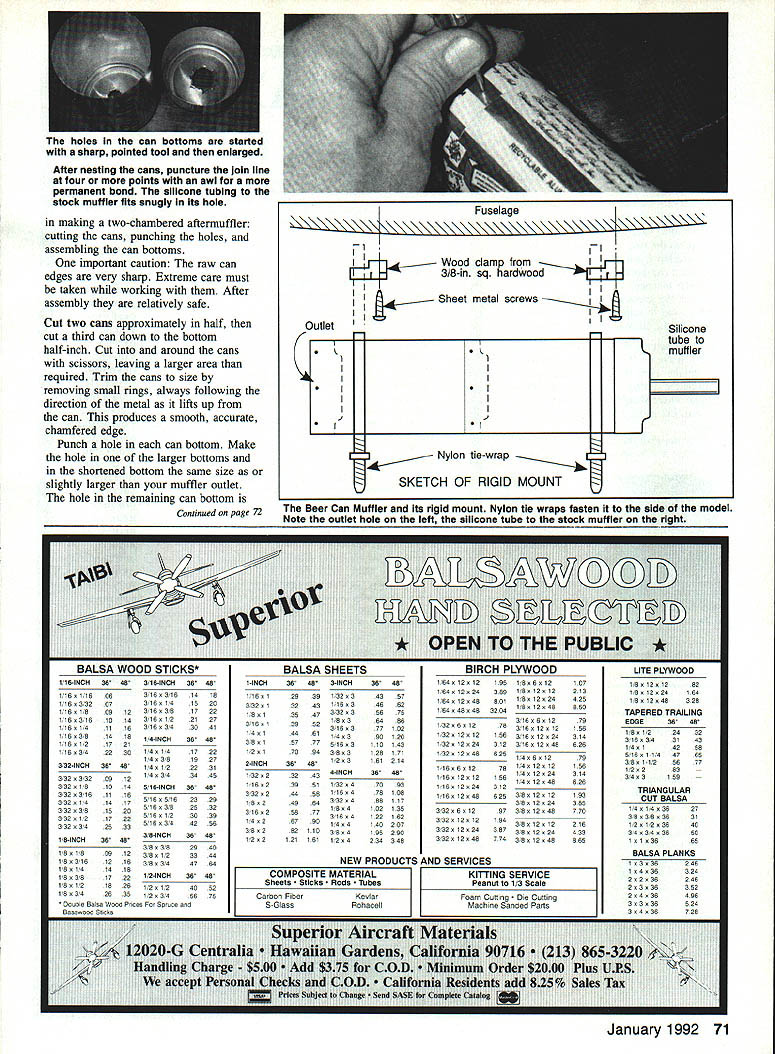
Important caution: the raw can edges are very sharp. Extreme care must be taken while working with them. After assembly they are relatively safe.
- Cutting the cans
- Cut two cans approximately in half, then cut a third can down to the bottom half-inch.
- Cut into and around the cans with scissors, leaving a larger area than required.
- Trim the cans to size by removing small rings, always following the direction of the metal as it lifts up from the can. This produces a smooth, accurate, chamfered edge.
- Punching the holes
- Punch a hole in each can bottom. Make the hole in one of the larger bottoms and in the shortened bottom the same size as, or slightly larger than, your muffler outlet.
- The hole in the remaining can bottom is cut to fit a piece of silicone tubing sized to slip onto the rear of your stock muffler.
- Place the raw edges of the can bottoms on the bench, and start the holes using a sharp, pointed tool. Work them larger with a tapered tool.
- Enlarge the hole for the silicone tubing by just enough to make the tubing a force fit.
- Assembling the can bottoms
- Place on the workbench the large can bottom in which you have cut the larger hole. Fit the other large can bottom on top. Be very careful of the raw can edge.
- Slip a WD-40 can, or a similar but smaller steel can, into the top can, and use it to press the two cans together so that they overlap at least a half-inch.
- Slip the shortened can bottom into the assembly in a similar manner.
- Punch the joints at four or more places with an awl to achieve a more permanent bond.
- Fit the silicone tube into its hole.
Testing
To demonstrate the effectiveness of your BCM, leave it off the first time you fire up the engine. Note the dB level and rpm. Slip on the muffler, then note the drop in sound. There should be no detectable loss in rpm, but make a record of any that occurs.
Why not give the beer can muffler a try? It works, it's cheap—and it's recyclable.
Transcribed from original scans by AI. Minor OCR errors may remain.

