

BD-4
By Don DeLoach
THE YEARS after the Second World War were, without a doubt, a time of rediscovery. The late Forties and early Fifties saw the rebirth of many old American classics that the war had dampened. Aviation, too, enjoyed a rebirth at this time. More people were flying than ever before, and more were catching on to a new aviation craze: homebuilts.
Homebuilts and homebuilders haven't changed much since those years. The founding of the Experimental Aircraft Association (EAA), now the governing body for homebuilders and sport-aviation enthusiasts in the U.S., gave aspiring designers and builders a firm footing from which to start. One such designer was Jim Bede.
Bede hit the homebuilt scene in the early Sixties when sport aviation was in a state of extreme growth and prosperity. In late 1967 he set out to design an entirely new airplane, one that he hoped would surpass all others in every aspect of performance.
He wanted, first off, an economical ship, both in construction and cost of operation. Furthermore, Bede was turned off by draggy, old-crate designs that were small and slow. He wanted to design a classy airplane that wouldn't look like just any old homebuilt.
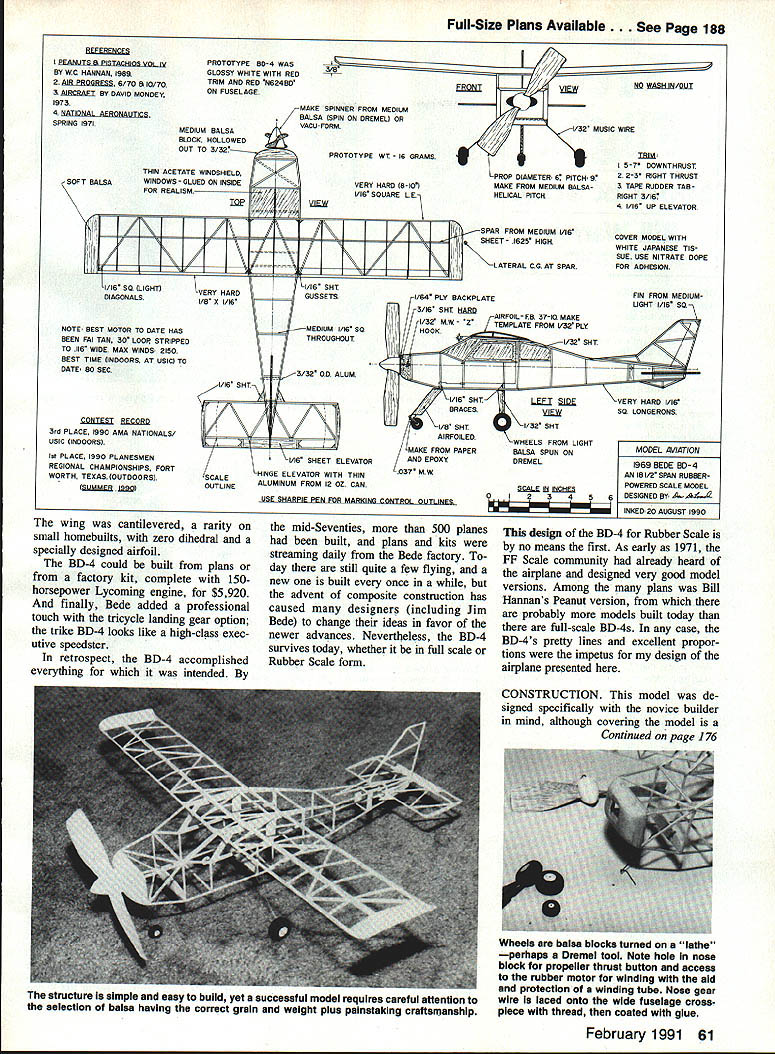
The resulting airplane was everything he expected—and more. Dubbed the New Generation Homebuilt, the four-place BD-4 was a homebuilder's dream. Construction was simple and clean, with bolt-together steel-tube structure and lightweight plywood covering for maximum streamlining. The wing was cantilevered, a rarity on small homebuilts, with zero dihedral and a specially designed airfoil.
The BD-4 could be built from plans or from a factory kit, complete with a 150-horsepower Lycoming engine, for $5,920. Bede also created a professional touch with the tricycle-gear option; the trike BD-4 looks like a high-class executive speedster.
In retrospect, the BD-4 accomplished everything for which it was intended. By the mid-Seventies, more than 500 planes had been built, and plans and kits were streaming daily from the Bede factory. Today there are still quite a few flying, and a new one is built every once in a while, but the advent of composite construction has caused many designers (including Jim Bede) to change their ideas in favor of newer advances. Nevertheless, the BD-4 survives today, whether full scale or in Rubber Scale form.
This Rubber Scale design of the BD-4 is by no means the first. As early as 1971, the FF Scale community had already heard of the airplane and designed very good model versions. Among the many plans was Bill Hannan's Peanut version, from which there are probably more models built today than there are full-scale BD-4s. In any case, the BD-4's pretty lines and excellent proportions were the impetus for my design presented here.
Construction
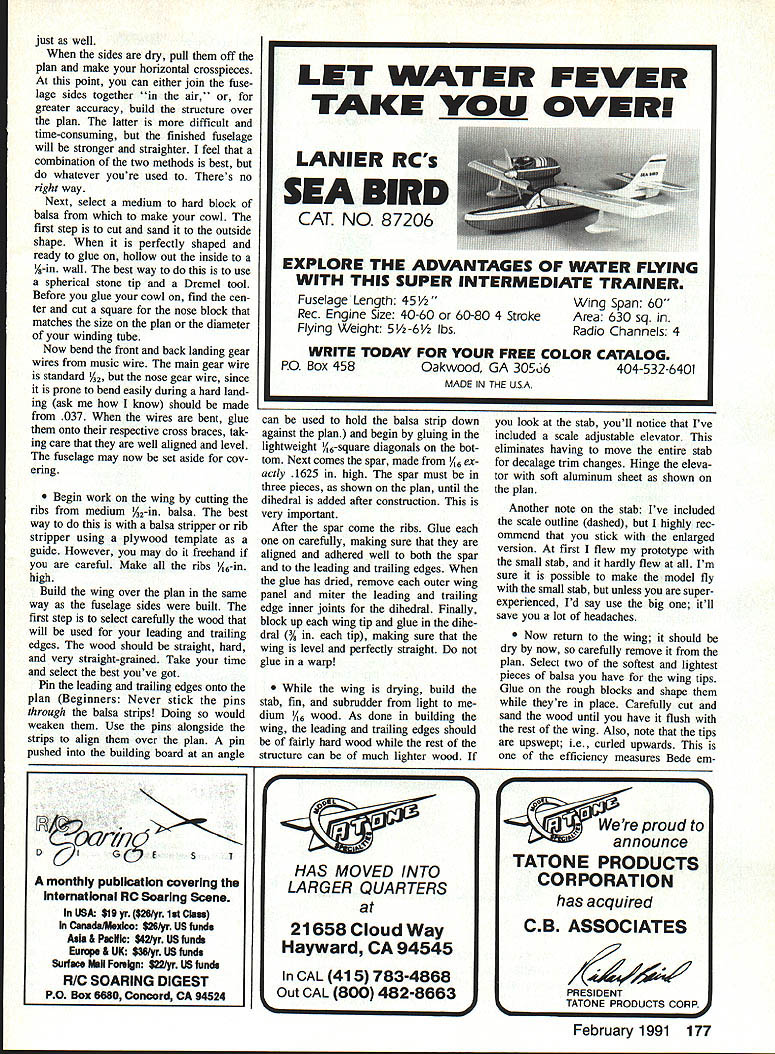
This model was designed with the novice builder in mind, although covering the model is a sufficiently challenging task to preclude using it as your very first model. The BD-4's boxy nature makes it naturally easy to build. It has been scaled directly from Bill Hannan's three-view, so you can be sure it is a true scale model that can be competitive at any contest, indoors or out.
General tips
- Begin construction by building two identical fuselage sides directly over the plan. Beginners: layer the plan with waxed paper first to prevent glue from sticking the structure to the plan.
- Choose your glue wisely. For almost all of this model's construction the lightest, strongest selection that has given me great success is Titebond (or Elmer's) wood glue. Ambroid or Duco would also work for many joints.
- When the sides are dry, pull them off the plan and make your horizontal crosspieces.
At this point you can either join the fuselage sides together "in the air," or, for greater accuracy, build the structure over the plan. The latter is more difficult and time-consuming, but the finished fuselage will be stronger and straighter. A combination of the two methods works well, but do whatever you're used to—there's no single right way.
Cowl and nose block
- Select a medium to hard block of balsa for the cowl. Cut and sand it to the outside shape.
- When perfectly shaped and ready to glue on, hollow out the inside to a 1/8-in. wall. The easiest way is to use a spherical stone tip and a Dremel tool.
- Before gluing the cowl on, find the center and cut a square for the nose block that matches the size on the plan or the diameter of your winding tube.
Landing gear
- Bend the front and rear landing-gear wires from music wire. The main gear wire is standard 1/32 in., but the nose gear wire—prone to bending on hard landings—should be made from .037 in. wire.
- When the wires are bent, glue them onto their respective cross braces, making sure they are well aligned and level.
- The fuselage may now be set aside for covering.
Wing
- Cut the ribs from medium 1/32-in. balsa. The best way is with a balsa stripper or rib stripper using a plywood template as a guide; freehand cutting is possible if you are careful. Make all ribs 1/16 in. high.
- Build the wing over the plan as you did the fuselage sides. Select the wood for the leading and trailing edges carefully: it should be straight, hard, and straight-grained.
- Pin the leading and trailing edges onto the plan. Beginners: never stick pins through the balsa strips—use the pins alongside the strips to align them. A pin pushed into the building board at an angle can hold a strip down.
- Glue in the lightweight 1/16-in. square diagonals on the bottom first. Next comes the spar, made from the pieces shown on the plan. The spar must be in three pieces, as shown, until the dihedral is added after construction—this is very important.
- Glue the ribs in carefully, ensuring good alignment and adhesion to both spar and leading/trailing edges. When the glue has dried, remove each outer wing panel and miter the leading and trailing-edge inner joints for the dihedral.
- Block up each wing tip and glue in the dihedral (3/16 in. each tip), making sure the wing is level and perfectly straight. Do not glue in a warp!
Tips, tips, and shaping
- Select two of the softest, lightest balsa pieces for wing tips. Glue on tip blocks and shape them while in place. Sand flush with the wing. Note the tips are upswept (curled upwards)—one of Bede's efficiency measures.
- After all components have been carefully sanded, proceed to covering.
Stab, fin, and control surfaces
- Build the stab, fin, and subrudder from light to medium 1/16-in. wood. As with the wing, leading and trailing edges should be fairly hard wood while the remainder can be lighter.
- The plan includes a scale adjustable elevator. This avoids moving the entire stab for decalage trim changes. Hinge the elevator with soft aluminum sheet as shown on the plan.
- I recommend using the enlarged stab outline rather than the small, scale stab. I first flew my prototype with the small stab and it hardly flew at all. Unless you are very experienced, use the larger stab to save headaches.
Covering
- For this model the best covering is Japanese tissue. For adhering the tissue I use nitrate dope, though butyrate dope will also work.
- Covering is highly individual. Work slowly and carefully—don't rush. It usually takes three to four days to cover a model of this size properly.
- Apply the covering one panel at a time: bottom of one wing panel, then the top; left fuselage side, then the right; etc.
Shrinking and finishing the tissue
- After all surfaces are covered, shrink the tissue with water or alcohol. Be careful: dampening is the most common cause of warps. The fuselage is the only segment that may be safely soaked; it rarely warps.
- For wing and empennage use a light misting of alcohol with an airbrush. If you don't have an airbrush, apply carefully with fingers. Either method usually works without warping the wing.
- I often avoid shrinking the stab and rudder; attempts to shrink these can produce distorted, prop-blade-like surfaces. Some builders pre-shrink tissue before applying it.
- For finish, one or two coats of thinned (at least 50/50) and plasticized nitrate dope works well.
- Painting (airbrushed colored butyrate, for example) was used on my BD-4 photos, but painting adds weight and is time-consuming—plan an extra week or two. An alternative is to use strips of colored tissue doped on top of the basic covering.
Scale details and final assembly
- Add scale features and details before final assembly. The most important are the windows and windshield, both installed from the inside—unlike most FF scale ships.
- Cut out the tissue from the top of the fuselage where the wing will be glued on so you have space to work inside.
- Cut each window to precise size and adhere from the inside with Ambroid or R/C 56. Take your time—the realistic effect is worth the effort.
- Mark all control surfaces and panel lines with a fine permanent marker (for example, a Fine Sharpie).
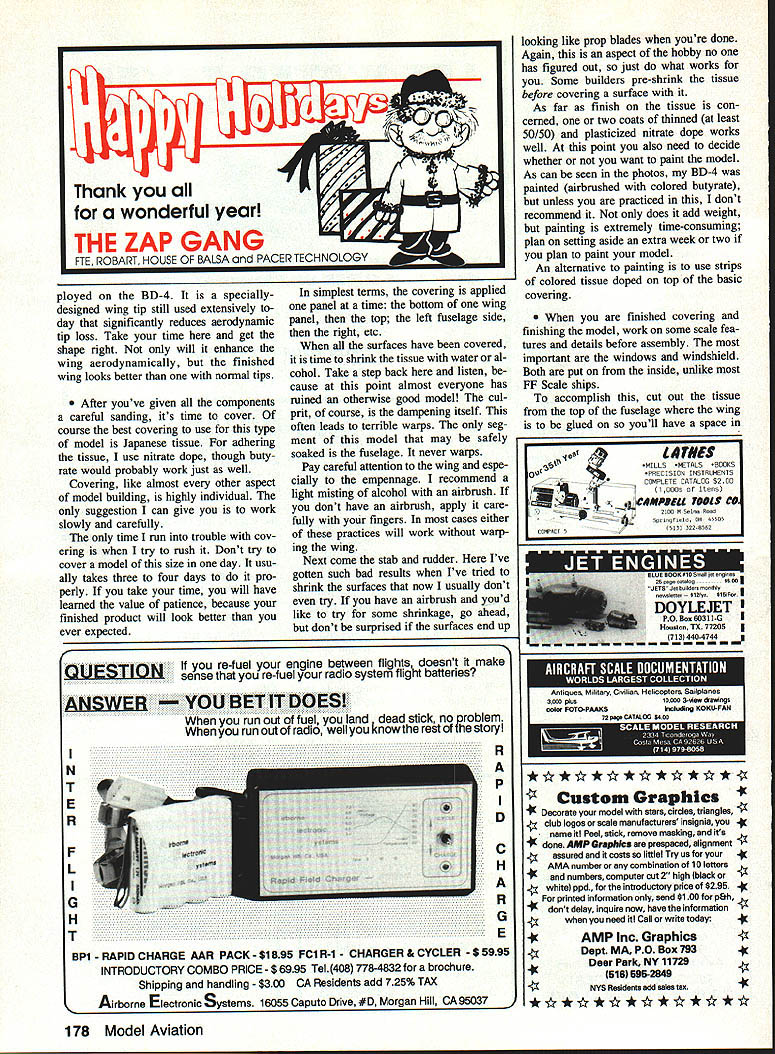
- Spin the spinner and wheels from light balsa on a Dremel tool. Hollow out the spinner and attach it to the nose-block assembly. Fit prop and nose block with bushings (bearings) made from 1/16-in. O.D. aluminum tubing. The prop shaft is 1/32-in. music wire.
- Add the cowl intake and landing-gear fairings.
- Final assembly: use slow-drying wood glue. Glue surfaces together, making absolutely sure they are aligned and level, and let the finished model dry overnight.
The rubber motor
I estimate the motor required by most models built from this plan will be between 3/8 in. and 3/4 in. wide, depending on the model's weight. My best motor so far has been a very long motor (30 in.) that is 1/16 in. wide; however, my model is fairly heavy at 17 grams. If your model is about 13 grams, 3/8 in. ought to do it. Conversely, a model of 19–20 grams will probably require around 1/2 in. Install a motor close to those figures and go out to the field for test flights.
Initial flights
With the center of gravity approximately where I have it on the plan, make short test glides until the model settles into a nice, floating descent. You will probably have to add a small amount of up elevator (as I did) and at least a bit of nose weight.
When the model is gliding consistently, begin making short powered flights with the motor wound 100–200 turns. My BD-4 was not as easy to trim as I expected, but I had it flying well in a fairly short period.
When it's at its best, this model really performs—indoors and out. I got 80 seconds at the USIC when the model was still new and not finely tuned. At a later contest I achieved two consecutive maxes in the same flights, the first being over four minutes from an ROG (rise-off-ground takeoff). A model of 14–15 grams will easily do 90–100 seconds indoors. Outdoors, watch out for thermals.
Good luck and good flying.
Transcribed from original scans by AI. Minor OCR errors may remain.

