

Be A Skywriter!
Hal deBolt
Getting good smoke presentation without affecting engine performance is the trick — this system works to perfection.
IF YOU HAVE observed full-scale aerobatic flying, you probably enjoyed the presentation even more when smoke was used to emphasize the maneuvers. Most assuredly, smoke adds class to any aerobatic show! I am certain you will be interested in this article, for it explains how you can add class to your model airplanes with the use of smoke.
Typical modeler that I am, reproducing something outstandingly good in full scale for use with models is a challenge and a must! It has been a long-time desire of mine to perfect the use of smoke in my stunt model airplanes. A few past attempts failed, but my most recent endeavor explained in this article really works!
At a meet some years ago I watched John Lenahan of Utica, N.Y., fly his cute little bipe very well with the use of smoke. Likewise, I recently observed Bob Noll of Endicott, N.Y., fly his model excellently with a similar system. Both served as an inspiration to me.
SMOKE SYSTEM ASSEMBLY
Smoke systems may appear simple but unless done properly, either the smoke will not look good or engine performance can suffer. My smoke design not only has proven itself presentation-wise, but the engine keeps working like a charm. In addition, smoke can be turned on and off at will and very little maintenance is needed.
Not much is required to construct a smoke system other than some extra space in the model, an engine with a pressure tap, a normal fuel tank for the engine, another pressure tank to carry the smoke oil, an expansion chamber-style muffler and a pressure control valve. Also, in order to possess the ability to turn smoke on and off at will, a fifth servo is needed. A second best way is to use high throttle trim to operate the pressure valve. All of the above items may either be purchased, made by yourself or by a friendly machinist. The following information will help you whatever your decision:
First, the engine needs a pressure tap, a fitting which transmits crankcase pressure of about 3 lbs. P.S.I. to the pressure tank. Most sport and stunt engines do not have pressure fittings, however, they are simple to install. Fox and K&B have pressure fittings for purchase. The most convenient way to install a pressure fitting is to replace one of the engine's crankcase screws with the fitting itself. In doing so, be certain the screw hole opens into the crankcase on the inside. If it fails to do so, simply deepen the original hole or drill another one from the inside of the crankcase to meet with the present screw hole.
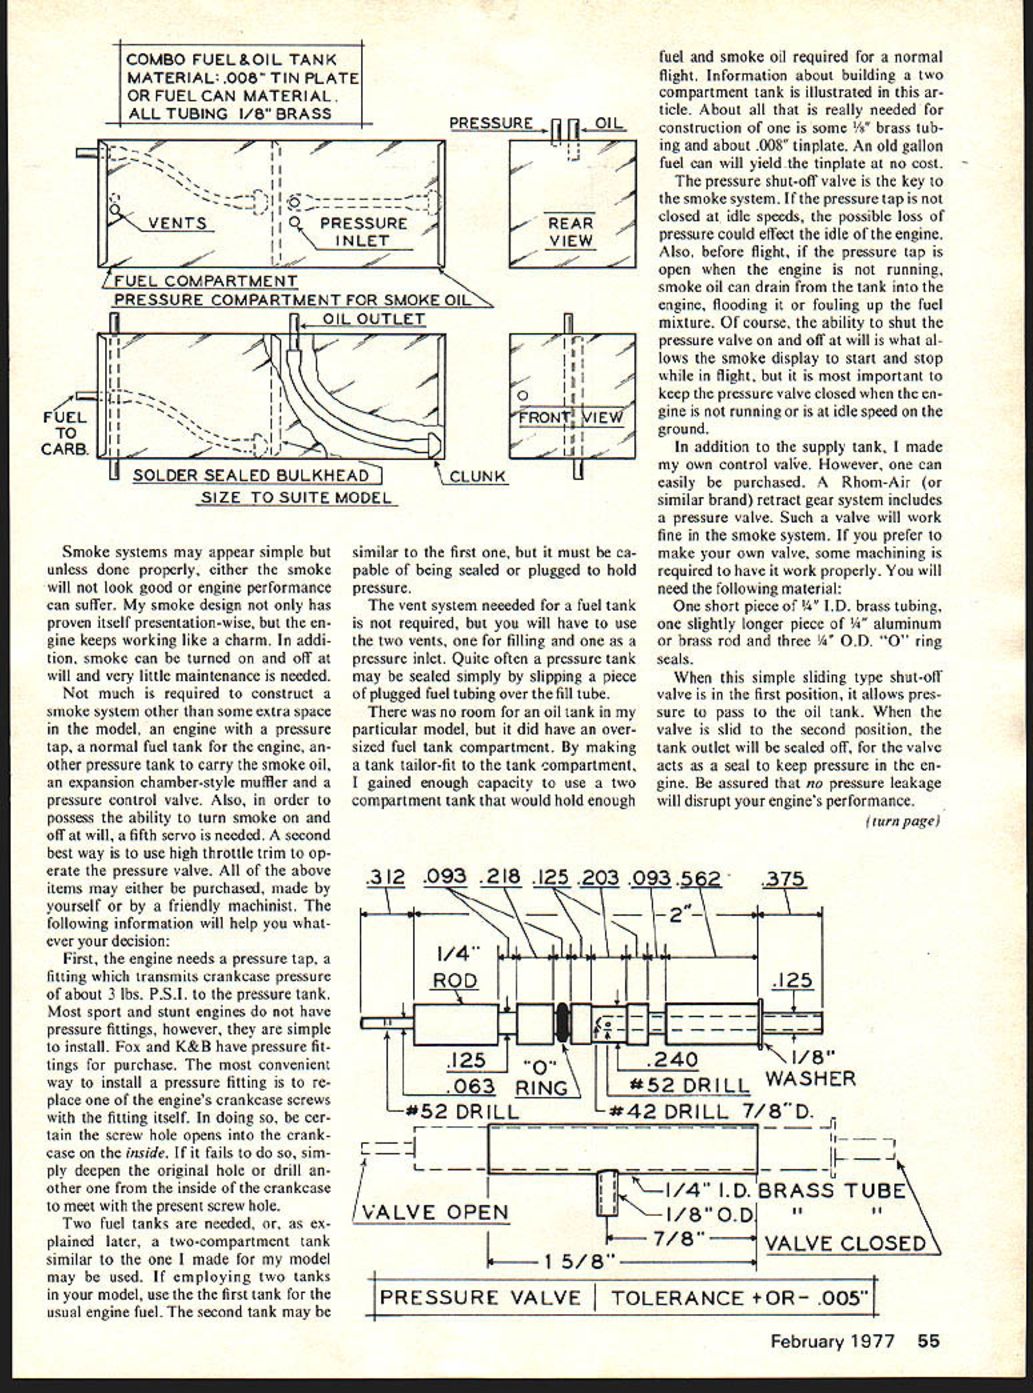
Two fuel tanks are needed, or, as explained later, a two-compartment tank similar to the one I made for my model may be used. If employing two tanks in your model, use the first tank for the usual engine fuel. The second tank may be similar to the first one, but it must be capable of being sealed or plugged to hold pressure.
The vent system needed for a fuel tank is not required, but you will have to use the two vents, one for filling and one as a pressure inlet. Quite often a pressure tank may be sealed simply by slipping a piece of plugged fuel tubing over the fill tube.
There was no room for an oil tank in my particular model, but it did have an oversized fuel tank compartment. By making a tank tailor-fit to the tank compartment, I gained enough capacity to use a two compartment tank that would hold enough fuel and smoke oil required for a normal flight. Information about building a two compartment tank is illustrated in this article. About all that is really needed for construction of one is some 1/8" brass tubing and about .008" tinplate. An old gallon fuel can will yield the tinplate at no cost.
The pressure shut-off valve is the key to the smoke system. If the pressure tap is not closed at idle speeds, the possible loss of pressure could effect the idle of the engine. Also, before flight, if the pressure tap is open when the engine is not running, smoke oil can drain from the tank into the engine, flooding it or fouling up the fuel mixture. Of course, the ability to shut the pressure valve on and off at will is what allows the smoke display to start and stop while in flight, but it is most important to keep the pressure valve closed when the engine is not running or is at idle speed on the ground.
In addition to the supply tank, I made my own control valve. However, one can easily be purchased. A Rhom-Air (or similar brand) retract gear system includes a pressure valve. Such a valve will work fine in the smoke system. If you prefer to make your own valve, some machining is required to have it work properly. You will need the following material:
One short piece of 1/4" I.D. brass tubing, one slightly longer piece of 1/4" aluminum or brass rod and three 3/32" O-ring seals.
When this simple sliding type shut-off valve is in the first position, it allows pressure to pass to the oil tank. When the valve is slid to the second position, the tank outlet will be sealed off, for the valve acts as a seal to keep pressure in the engine. Be assured that no pressure leakage will disrupt your engine's performance.
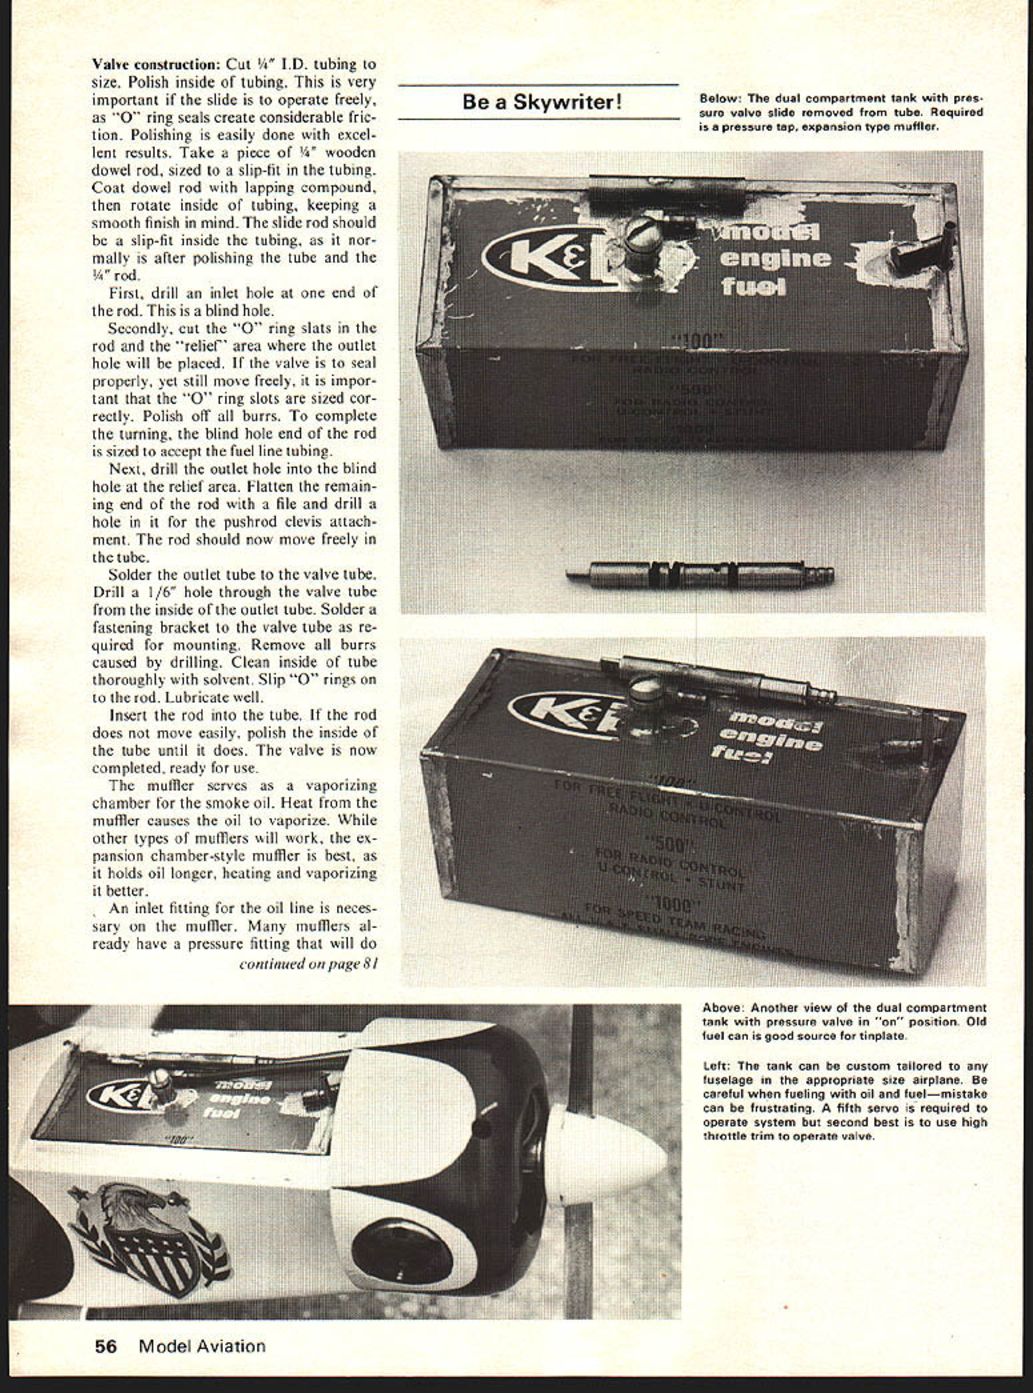
Valve construction:
Cut 1/4" I.D. tubing to size. Polish inside of tubing. This is very important if the slide is to operate freely, as "O" ring seals create considerable friction. Polishing is easily done with excellent results. Take a piece of 1/4" wooden dowel rod, sized to a slip-fit in the tubing. Coat dowel rod with lapping compound, then rotate inside of tubing, keeping a smooth finish in mind. The slide rod should be a slip-fit inside the tubing, as it normally is after polishing the tube and the 1/4" rod.
First, drill an inlet hole at one end of the rod. This is a blind hole.
Secondly, cut the "O" ring slats in the rod and the "relief" area where the outlet hole will be placed. If the valve is to seal properly, yet still move freely, it is important that the "O" ring slots are sized correctly. Polish off all burrs. To complete the turning, the blind hole end of the rod is sized to accept the fuel line tubing.
Next, drill the outlet hole into the blind hole at the relief area. Flatten the remaining end of the rod with a file and drill a hole in it for the pushrod clevis attachment. The rod should now move freely in the tube.
Solder the outlet tube to the valve tube. Drill a 1/16" hole through the valve tube from the inside of the outlet tube. Solder a fastening bracket to the valve tube as required for mounting. Remove all burrs caused by drilling. Clean inside of tube thoroughly with solvent. Slip "O" rings on to the rod. Lubricate well.
Insert the rod into the tube. If the rod does not move easily, polish the inside of the tube until it does. The valve is now completed, ready for use.
The muffler serves as a vaporizing chamber for the smoke oil. Heat from the muffler causes the oil to vaporize. While other types of mufflers will work, the expansion chamber-style muffler is best, as it holds oil longer, heating and vaporizing it better.
An inlet fitting for the oil line is necessary on the muffler. Many mufflers already have a pressure fitting that will do Fine. If there is none, install one of the crankcase pressure fittings. The best location for the fitting is as close to the engine exhaust as possible, where the greatest amount of heat is.
Plumbing procedure:
Connect the fuel tank as usual. Run fuel tubing from the shut-off valve to the pressure tap on the engine. All tubing must be plastic, not surgical rubber. Mineral oil affects pure rubber tubing. Connect another piece of tubing from the oil tank outlet to the muffler fitting. Be certain all tubing fits tightly, as pressure could blow them off. Most any combustible oil will do for smoke. Normal hobby fuel oil, automotive diesel fuel, or even kerosene will work, whatever is readily available. It is most important to always
fill oil in the oil tank and fuel in the fuel tank! Speaking from experience, a mix-up can be extremely frustrating!
Skywriting Procedure:
First, make sure the pressure valve is in closed position or you may get a false engine setting, then start the engine, tune it and check its operation. Once the engine is operating correctly, smoke can be used at will.
Oil consumption is high, so it is best to conserve the smoke, using it only when display is desired. Smoke effect is more realistic when controlled and displayed only in dramatic maneuvers.
Creating a smoke system in your model aircraft is a very rewarding project, for you will become the proud recipient of countless hours of enjoyment. Skywriting possibilities are endless!
Aerobatics can be mastered more easily with the helpful aid of smoke! Paint yourself creative pictures in the sky! Do a bit of fancy writing! Play tic-tac-toe with a flier buddy! Send smoke signals to your wife that you may be a little late for dinner! Advertise your favorite club with huge smoke letters! Show your best pal how much you love her; draw her name encircled in a smoke heart!
In any instance, you will be the outstanding member of your club, for skywriting arouses awe and envy wherever it is demonstrated!
Transcribed from original scans by AI. Minor OCR errors may remain.

