
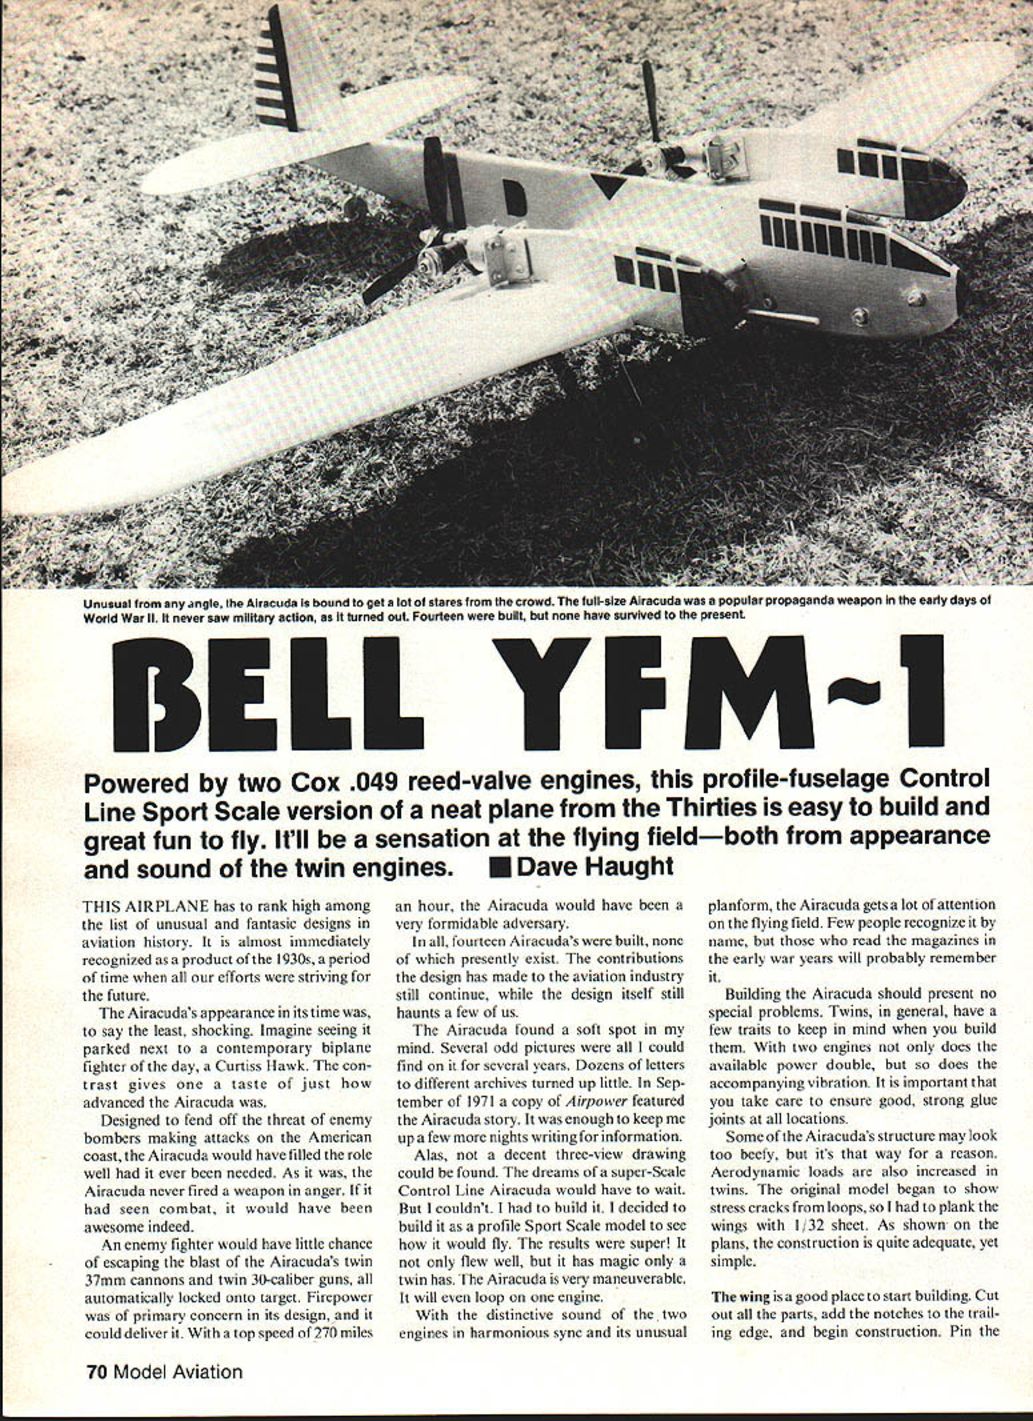
BELL YFM-1
Powered by two Cox .049 reed-valve engines, this profile-fuselage Control Line Sport Scale version of a neat plane from the Thirties is easy to build and great fun to fly. It'll be a sensation at the flying field—both from appearance and sound of the twin engines. —Dave Haught
Introduction / History
This airplane ranks high among unusual and fantastic designs in aviation history. It is almost immediately recognized as a product of the 1930s, a period when designers were striving for the future.
The Bell YFM-1 Airacuda's appearance in its time was, to say the least, shocking. Imagine seeing it parked next to a contemporary biplane fighter such as a Curtiss Hawk—the contrast shows just how advanced the Airacuda was.
Designed to fend off enemy bombers attacking the American coast, the Airacuda would have filled that role well had it ever been needed. It never fired a weapon in anger, but had it seen combat it would have been formidable: twin 37mm cannons and twin .30-caliber guns, all automatically locked onto the target, and a top speed of about 270 mph.
In all, fourteen Airacudas were built; none presently exist. The design’s contributions to aviation continue, and the aircraft still fascinates a few of us.
Personal background
The Airacuda found a soft spot in my mind. For several years I could find only odd pictures and few references. A 1971 issue of Airpower featured the Airacuda story, which rekindled my interest. Lacking decent three-view drawings, I decided to build a profile Sport Scale model to see how it would fly. The results were excellent: it flew well, had the magic of a twin, and was very maneuverable—even capable of looping on one engine.
With the distinctive two-engine sound and unusual planform, the Airacuda draws attention at the flying field. Few recognize it by name, but those who read magazines of the early war years may remember it.
Building the Model
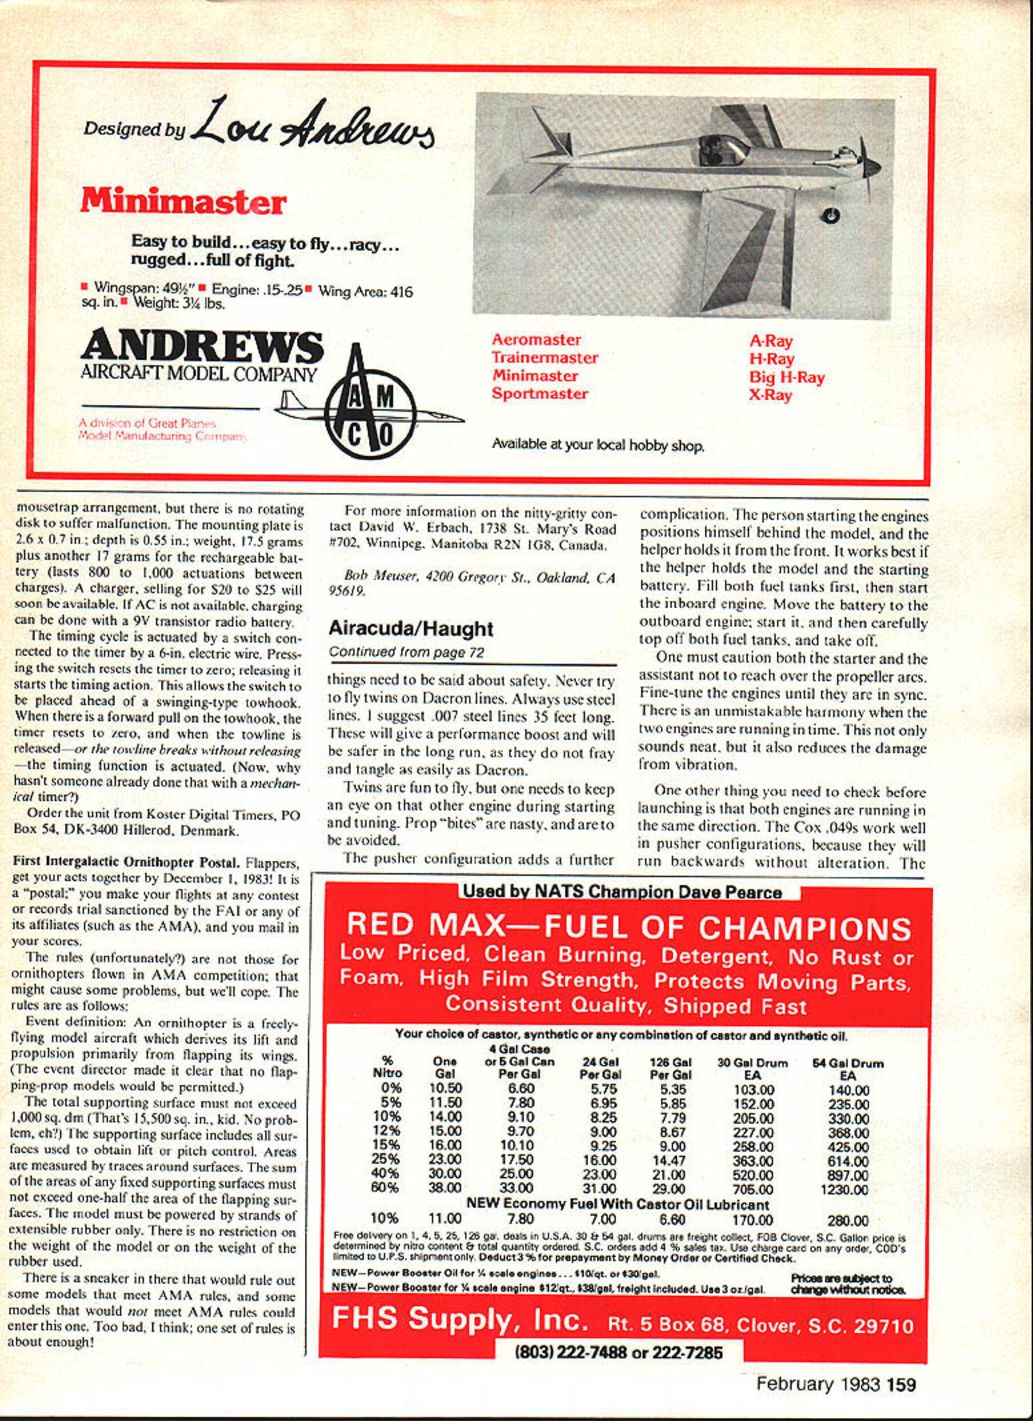
Building the Airacuda should present no special problems, but twins have a few traits to keep in mind. Two engines double the available power and the vibration, so ensure strong glue joints and secure mounting throughout the model. Some structure may look beefy, but it's required: aerodynamic loads increase in twins. The original model showed stress cracks from loops, so I planked the wings with 1/32" sheet. The construction shown on the plans is adequate and simple.
Wing (recommended starting point)
Steps:
- Cut out all wing parts and add the notches to the trailing edge.
- Pin the wing to the building board and assemble the bottom spar, leading edge and trailing edge.
- Fit the ribs and add sheeting between the spars as shown on the plans.
- Finish the wing by adding the top spar and planking. Be sure spaces for the nacelles are cut so the fuselage will fit square and snugly—this ensures good alignment at assembly time.
- When the wing is dry, give it a thorough sanding and cut the planking notches for the nacelles.
Notes:
- Because of extra vibration from twin engines, use extra care to assure strong glue joints.
- Planking the wing with 1/32" sheet reduces stress-cracking seen on the original.
Fuselage, Rudder and Stabilizer
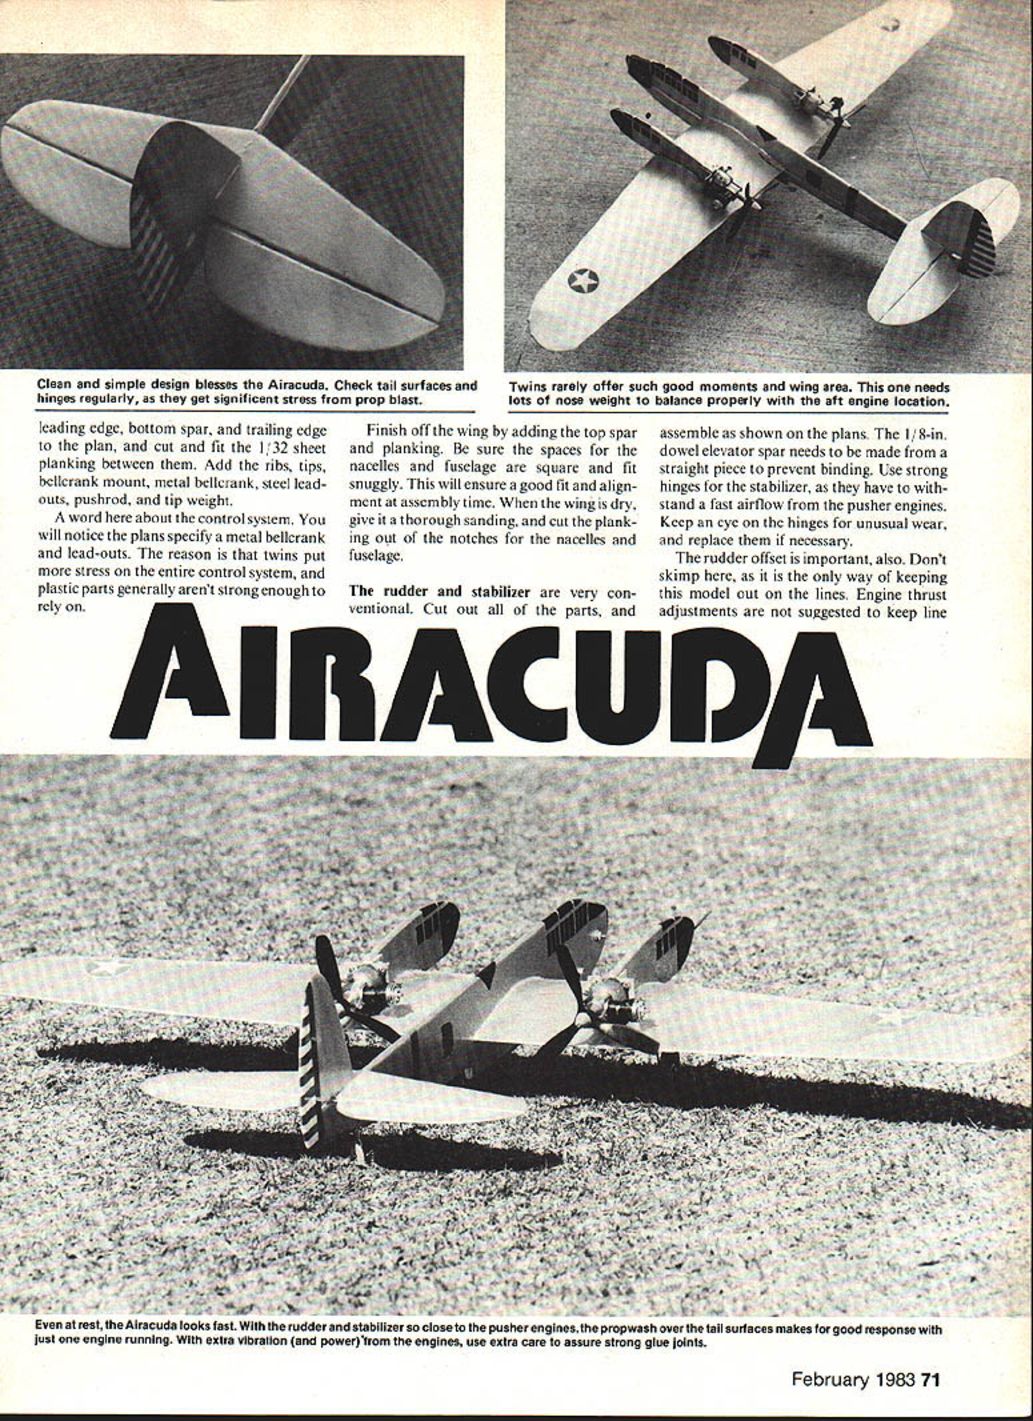
- The fuselage is made from two pieces of sheet. The upper half is notched to fit the leading edge, spars and trailing edge. Make sure the wing and fuselage line up squarely, then glue the bottom half in place. Use a strong glue and allow it to set before adding the tail wheel, stabilizer and rudder assemblies.
- Cut out the rudder and stabilizer parts and assemble as shown on the plans.
- The 1/8" dowel elevator spar must be made perfectly straight to prevent binding.
- Use strong hinges; the stabilizer must withstand the airstream from the pusher engines. Inspect hinges for unusual wear and replace when necessary.
- Rudder offset is important. Proper engine thrust adjustments and correct rudder offset are suggested to keep the model tracking straight on the lines.
- Don’t forget the notch in the fin for the dowel connecting the elevators.
Nacelles and Landing Gear
- Cut out nacelle parts and notch to fit the wing. Glue as shown on the plans.
- Ensure the firewalls have no unwanted offset; correct alignment problems before proceeding.
- Wrap the firewall areas with light glass cloth.
- Glue on the nacelles and sew the landing gear wires in place. Cover the attachment points with glass cloth and add the fairings on the bottom of the wing.
- When dry and sanded, hook up the pushrod and adjust the lead-outs.
Controls and Hardware
- The plans specify a metal bellcrank and metal lead-outs. Twins put more stress on the control system; plastic parts generally aren’t strong enough.
- Make sure the elevator pushrod and hinge installations are secure. With pusher engines, prop blast over control surfaces gives good response even with only one engine running.
Finishing
- Give the entire model a good sanding. Fill dents and rough spots.
- Finish with five coats of clear dope, sanding between coats.
- Overall color is silver; trim in red and blue as shown on the plan.
- While paint is curing, add guns, wheels and set up the engines.
Powerplants and Engine Preparation
- Power plants used: Cox .049 reed-valve engines. They are easy-starting—important for a twin.
- Larger tanks give longer flight time, but either tank size will work.
Engine modification steps:
- Remove the engine backplate and move the fuel-line pickup tube to the front of the tank.
- Remember the engines face the rear of the model, so set the fuel pickup tubes to the outside corner of each tank.
- Set both engines identically so they draw fuel the same way.
- Reinstall tanks and tighten screws to prevent leaks.
- Mount engines checking for 0-0 thrust (zero degrees thrust horizontally and vertically as shown on the plan).
- Confirm both engines run in the same direction (Cox .049s will run backwards without alteration, making them suitable for pusher applications).
Notes:
- Fine-tune the engines until they are in sync. Running in harmony not only sounds better but reduces vibration damage.
- Ensure both engines turn the same direction; if not, the model will not taxi or fly correctly and that is dangerous.
Balance and Trim
- Balance the Airacuda as shown on the plan. It is a very responsive model and tends to be overly sensitive if not balanced correctly.
- Don’t worry about the amount of weight required for balance—the added power and large wing area will carry it.
Safety and Operating Procedures
- Never use Dacron lines with twins. Always use steel lines—.007 steel lines, 35 feet long, are recommended. They give better performance and are safer (they don’t fray or tangle like Dacron).
- Take great care during starting and tuning—prop "bites" are nasty and must be avoided.
- Starting procedure (recommended):
- The starter positions himself behind the model; the helper holds it from the front and also holds the starting battery.
- Fill both fuel tanks first.
- Start the inboard engine.
- Move the battery to the outboard engine and start it.
- Carefully top off both fuel tanks, then prepare for takeoff.
- Caution both starter and helper not to reach over prop arcs.
- Keep an eye on engine direction and synchronization before launching.
- Be extra safety-conscious when flying twins; they are exciting but require more attention.
Final Notes
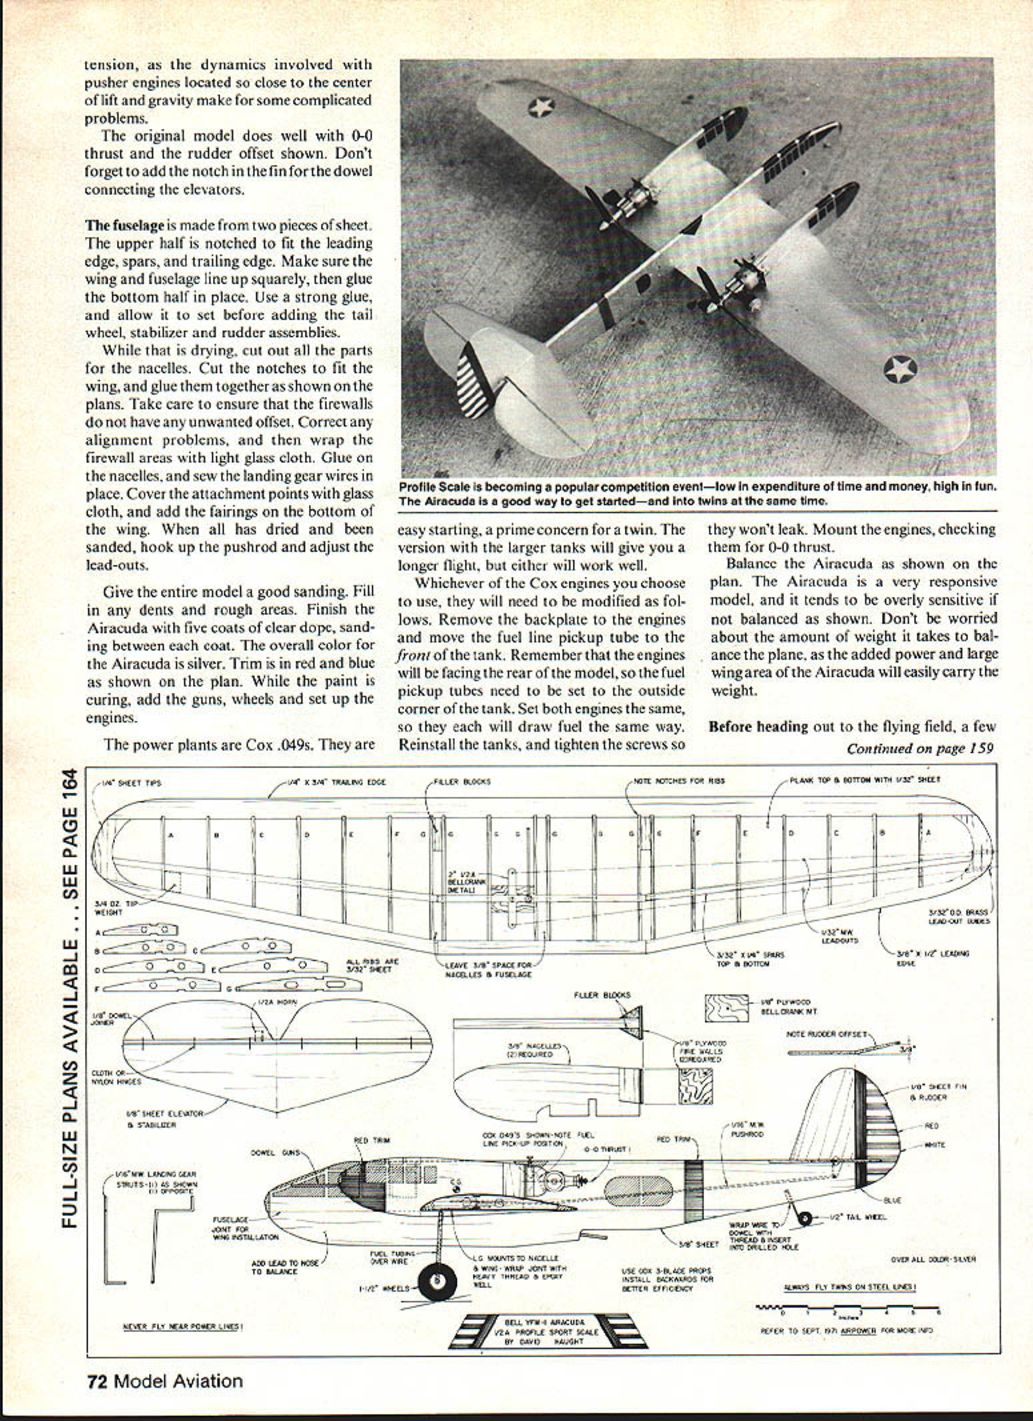
Profile models are a fun way to get into twins and Scale. Many clubs add Profile Scale to contest events—an excellent low-cost way for beginners to enter Scale competition. Twins add to the fun. Try the Airacuda and expect lots of questions at the flying field.
If anyone finds a set of three-view drawings, I’ve got a pair of K&B .40s waiting for a large Airacuda home.
Transcribed from original scans by AI. Minor OCR errors may remain.

