

Bird of Prey
By Barry Baxter
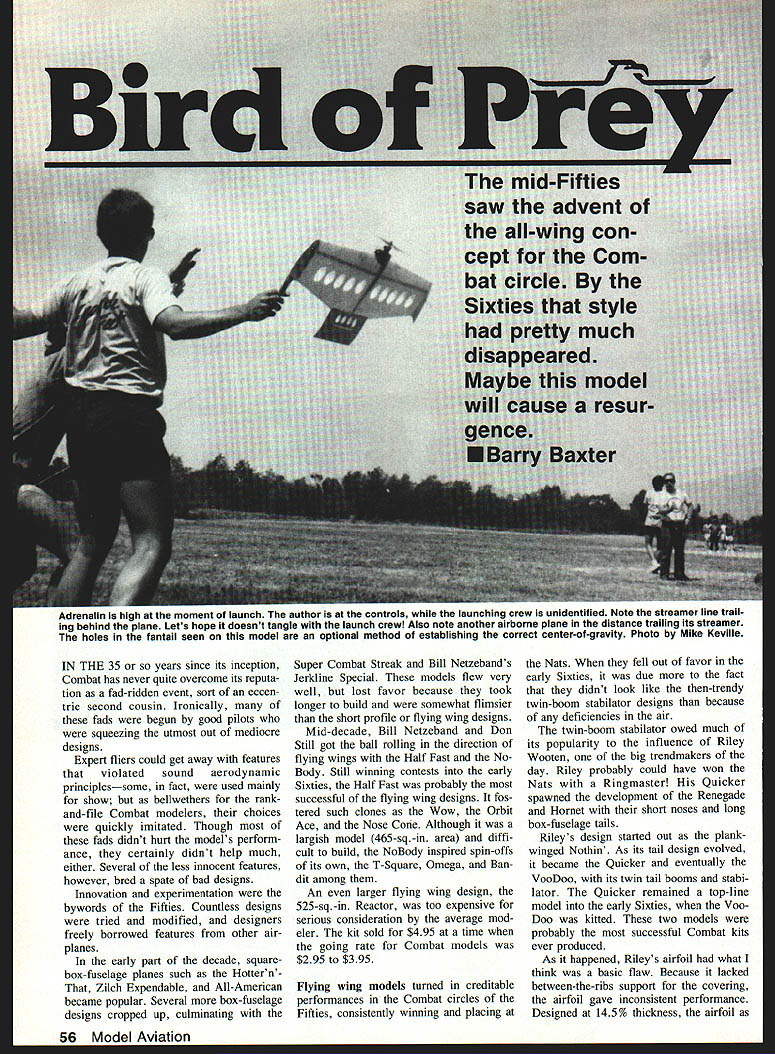
The mid-Fifties saw the advent of the all-wing concept for the Combat circle. By the Sixties that style had pretty much disappeared. Maybe this model will cause a resurgence.
In the 35 or so years since its inception, Combat has never quite overcome its reputation as a fad-ridden event, sort of an eccentric second cousin. Ironically, many of these fads were begun by good pilots who were squeezing the utmost out of mediocre designs.
Expert fliers could get away with features that violated sound aerodynamic principles—some, in fact, were used mainly for show. As bellwethers for the rank-and-file Combat modelers, their choices were quickly imitated. Though most of these fads didn't hurt a model's performance, they certainly didn't help much, either. Several of the less innocent features, however, bred a spate of bad designs.
Innovation and experimentation were the bywords of the Fifties. Countless designs were tried and modified, and designers freely borrowed features from other airplanes.
In the early part of the decade, square-box-fuselage planes such as the Hottern's, That, Zilch, Expendable, and All-American became popular. Several more box-fuselage designs cropped up, culminating with the Nats. Other successful designs included the Super Combat Streak and Bill Netzeband's Jerkline Special. These models flew very well but lost favor because they took longer to build and were somewhat flimsier than the short-profile or flying wing designs.
Mid-decade, Bill Netzeband and Don Still got the ball rolling toward flying wings with the Half Fast and the No-Body. Still winning contests into the early Sixties, the Half Fast was probably the most successful of the flying wing designs. It fostered such clones as the Wow, the Orbit Ace, and the Nose Cone. Although the No-Body was a largish model (465 sq. in.) and difficult to build, it inspired spin-offs of its own—the T-Square, Omega, and Bandit, among others.
An even larger flying wing, the 525-sq.-in. Reactor, was too expensive for serious consideration by the average modeler; the kit sold for $4.95 at a time when the going rate for Combat models was $2.95 to $3.95.
Flying wing models turned in creditable performances in the Combat circles of the Fifties, consistently winning and placing at the Nats. When they fell out of favor in the early Sixties, it was due more to fashion—the then-trendy twin-boom stabilator designs—than because of any deficiencies in the air.
The twin-boom stabilator owed much of its popularity to Riley Wooten, one of the big trendmakers of the day. Riley probably could have won the Nats with a Ringmaster. His Quicker spawned the development of the Renegade and Hornet with their short noses and long box-fuselage tails.
Riley's design started out as the plank-winged Nothin'. As its tail design evolved it became the Quicker and eventually the Voo-Doo, with its twin tail booms and stabilator. The Quicker remained a top-line model into the early Sixties, when the Voo-Doo was kitted. These two models were probably the most successful Combat kits ever produced.
As it happened, Riley's airfoil had what I think was a basic flaw. Because it lacked between-the-ribs support for the covering, the airfoil gave inconsistent performance. Designed at 14.5% thickness, the airfoil as produced often seemed closer to 10%; it probably averaged about 12%. Despite this shortcoming, Riley's design was very successful in many different fliers' hands.
Plans for most of the above-mentioned models are available through the author. Send an SASE to Barry Baxter, 6490 Sonora Way, Cypress, CA 90630 for a complete listing.
After the Voo-Doo's success, designs with two booms and a stabilator became the fad of the hour. Then Bill Carpenter used three booms on his Swoop—and anything with two booms was suddenly passé. By supporting the center of the stabilator where the pushrod was attached, thereby removing some of the flex from the control system, the triple boom offered an obvious structural advantage.
But when the monoboom came along, the triple boom in turn was quickly eclipsed. Though it offered no particular aerodynamic advantage, the single-boom structure did shorten building time. Those outboard booms had always been a nuisance to cover.
The monoboom's popularity has held strong since the late Sixties, and with the advent of foam and Fas-Cal, Combat ships have come to look basically alike. Though their flight characteristics vary with different wing planforms and airfoil sections, for the casual observer these differences are hard to detect. The spectator at a contest today can easily become confused as to who's flying what—even the judges have been fooled.
Not all of Riley Wooten's designs were worthy of imitation. Riley's superb flying skills, however, transformed even a few of his more mediocre designs into contest winners. This started fads in some very questionable directions.
One of Riley's more uninspired designs, I think, was the Guided Missile. Its diamond airfoil was without a doubt the worst such design ever foisted on the Combat community. The Exterminator, the Demon, and the Diamond were just a few of the models that adopted this misbegotten airfoil. Incredibly, a few fliers managed to rack up wins with these ships—one wonders what they could've done with a good airplane!
Though the diamond airfoil has the advantage of being easy to build straight, aerodynamically it's a disaster. The center of pressure of the wing jumps from the high point of the camber to the leading edge and back, making a smooth transition impossible. Models equipped with diamond airfoils with sharp leading edges, such as the Dunamis Diamond, were particularly awkward fliers. With their poor stalling characteristics, these planes required approximately 50° of the circle to perform a loop. When an airfoil on this design begins to turn and the angle of attack increases, it's little better than a flat-plate airfoil.
Airfoils on today's designs range from very good to rather bad. One of the more commonly used poorer shapes has a very blunt, almost round leading edge with the apex at about the 15–20% chord mark. Though these airfoils will turn well, they'll also slow down more in the process. They have a higher stall angle, but drag increases at a much higher rate. In fact, the very high drag that such airfoils induce will slow a plane down several miles an hour in level flight.
With a drag coefficient of approximately 0.0020, the blunt, flat "English" airfoil suffers from this disadvantage. By contrast, an elliptical leading edge with a 30% high point can have a drag coefficient as low as 0.00012. Since the coefficient of lift is almost identical on the three shapes, fliers looking for speed with no loss of maneuverability would benefit from using the elliptical leading-edge airfoil. The NACA 0009, 0012, and 0015 airfoils are outstanding examples of this type of section.
After experimenting with different airfoil thicknesses, I've determined that anything over 15% produces too much drag. Although stunt models use thicker airfoils, these airplanes differ from Combat models in two significant respects: speed and wing loading. Stunt models are typically designed with a wing loading of approximately 12 oz./sq. ft. for stability and wind performance.
Design Considerations and Construction
Wing cores and bladder installation
Install the bladder tube and the outboard panel. Contrary to common practice, I put the breather hole at the end of the tube on the top of the wing, instead of on the bottom. That way, should a bladder blow, I can retrieve four ounces of fuel if I want to; I don't have to dump it on the ground.
Cut the form on the inboard panel to clear the control servo arm and doubler. If using a commercial core, you'll need to widen the servo slot; be sure to widen it toward the rear. Cut the lightening holes before you install the panels. Since this is a tough job with the lead-out wires in the way, I heat up an appropriately sized tin can and melt the holes out of the wing cores.
Cut the outboard wing an inch shorter than the inboard one. This makes the outboard wing faster than the inboard one, which keeps the model light on the lines. The extra lift on the longer inboard wing will tend to turn the model toward the outside of the circle. Symmetrical wings, being neutrally stable, will continue straight on the last heading established. This modification should be used on any control-line model—symmetrical wing panels are not made to be flown in circles.
If no outside forces are encountered, the extra tension afforded by the asymmetrical wing arrangement will hold the model on course. Cutting a streamer with the inboard panel, however, can cause the plane to swerve into the circle.
Spars, mounting, and assembly
I cut the spar holes through the engine mounts slightly oversized. That way, the spars can be removed and replaced fairly easily should the wings need to be repaired.
Push the spars through the holes in the center rib, then slide on the wing panels while guiding the lead-out wires through the holes. Since the wing will instantly fold if the spars should come loose, make sure they're securely glued to the cores. Add the strapping tape to the trailing edge.
Glue on the engine mounts, doubler, bellcrank mount, and dowels. Install the control assembly, and don't forget to install the engine restraint cable. I use CyA (cyanoacrylate) on all wood parts and Titebond on the foam cores.
A number of designs feature engine mounts that butt against the spars. Since that concentrates stress at the spar/engine-mount junction, it causes countless breakages. By continuing the mounts behind the spars, I've eliminated that problem with the Bird of Prey. Though it's a slightly heavier arrangement, it's also considerably stronger.
Fantail, elevator, and finishing
The fantail can now be assembled and the elevator hinged using your favorite hinging method. Slide the fantail over the trailing edge of the wing, then glue it securely. Install the control horn and attach the pushrod. Adjust the pushrod controls for 30° of total travel.
Roll the leading edge away to clear the engine and add the ply firewall. Add the wing tips, ribs, braces, and lead-out guide tubes. Resist the temptation to run the lead-outs through the tips to make the model look neater. Instead, simply run the lead-out tubes to the bottom of the tip. If you have to replace a wing panel, the lead-outs can easily be removed from the wing tip to facilitate sliding a new panel over the lead-out wires.
For a smooth airfoil, fill any dents or depressions in the spar/foam junction with Magic Model Filler or light spackling compound. Cover the entire plane with Fas-Cal or your favorite low-temperature covering.
Adjust the center of gravity to coincide with the center of the spar by sliding the engine back and forth as necessary. Install the engine—and, again, don't forget to attach the restraint cable.
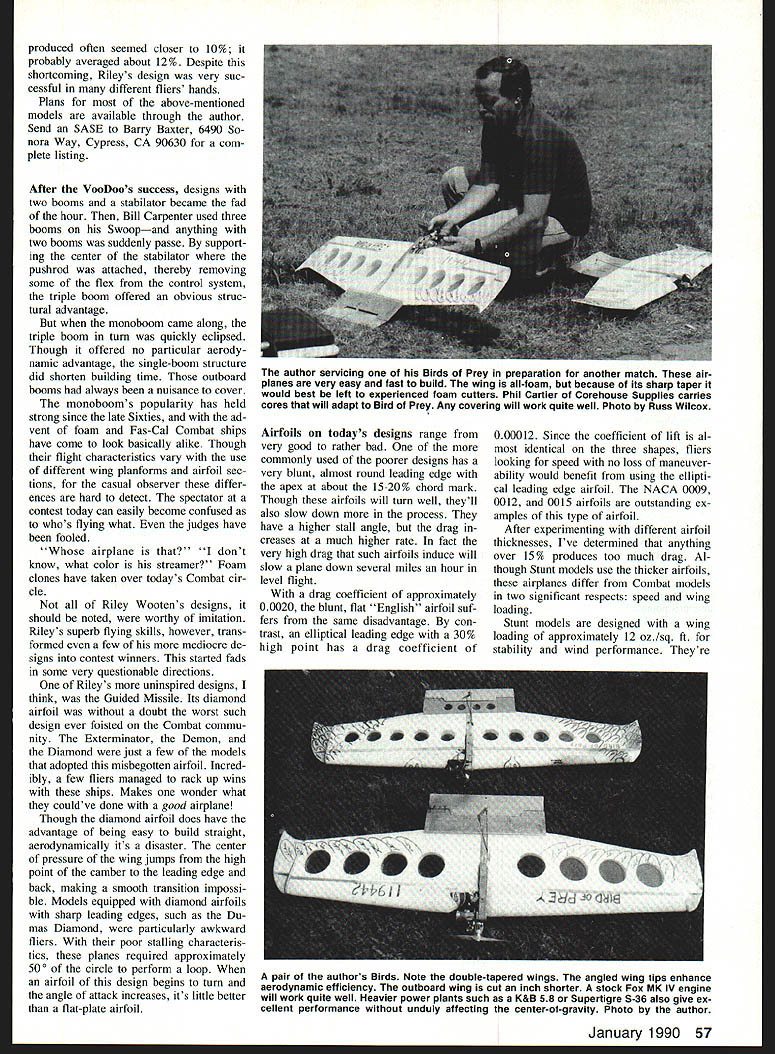
If you're into foam cutting, cut the wing panels using the templates on the plans. If you lack experience in cutting foam cores, this isn't the one to start with—its sharp taper makes it more difficult to cut than the average core.
The Model
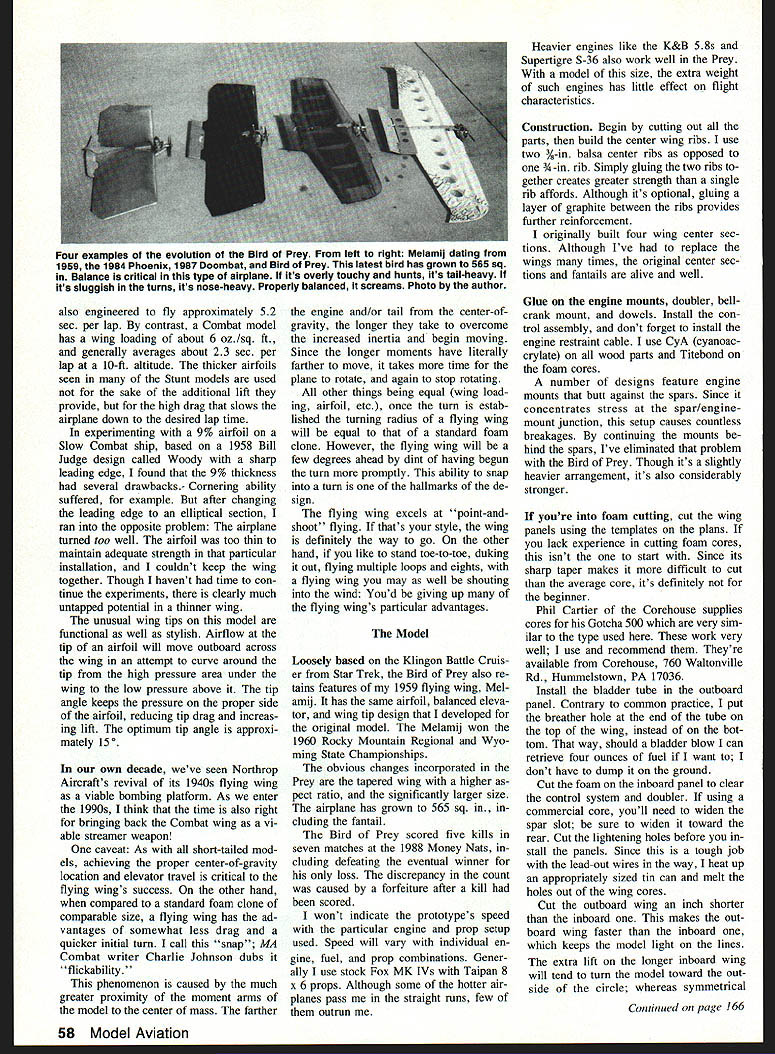
Loosely based on the Klingon battle cruiser from Star Trek, the Bird of Prey also retains features of my 1959 flying wing, Melamij. It has the same airfoil, balanced elevator, and wingtip design that I developed for the original model. The Melamij won the 1960 Rocky Mountain Regional and Wyoming State championships.
The obvious changes incorporated in the Prey are the tapered wing with a higher aspect ratio and the significantly larger size. The airplane has grown to 565 sq. in., including the fantail.
The Bird of Prey scored five kills in seven matches at the 1988 Money Nats, including defeating the eventual winner for his only loss. The discrepancy in the count was caused by a forfeiture after a kill had been scored.
I won't indicate the prototype's exact speed with the particular engine and prop setup used—speed will vary with individual engine, fuel, and prop combinations. Generally I use stock Fox MK IVs with Taipan 8 x 6 props. Although some of the hotter airplanes pass me in the straight runs, few of them outrun me.
Heavier engines like the K&B .5s and Super Tigre S-36 also work well in the Prey. With a model of this size, the extra weight of such engines has little effect on flight characteristics.
Construction summary
- Cut out all parts and build the center wing ribs. I use two 3/16-in. balsa center ribs instead of one 3/8-in. rib—gluing the two ribs together creates greater strength than a single rib. Gluing a layer of graphite between the ribs provides further reinforcement (optional).
- Glue on engine mounts, doubler, bellcrank mount, and dowels. Install the control assembly and engine restraint cable.
- Install bladder tube and outboard panel; cut lightening holes and widen servo slot as needed.
- Assemble fantail, hinge elevator, install control horn and pushrod; set for 30° total travel.
- Add firewall, wing tips, ribs, braces, and lead-out guide tubes. Fill any dents and cover with Fas-Cal or low-temp covering.
- Adjust center-of-gravity by sliding the engine, then install and secure the engine.
Flying and trim
The Bird of Prey gives predictable and reliable handling, with no quirks to catch you off-guard. Properly balanced, this model is both stable and responsive. Like any well-designed flying wing, it'll instantly snap into a turn. Because of its larger size, the Bird probably won't be as fast as your previous models—but you'll be hard-pressed to find a ship that gives tighter turns.
Is the airplane overly touchy? Does it hunt? If yes, you know it's tail-heavy. Sluggish in the turns? It's nose heavy. Does it slow down or bounce when it turns? It has too much control travel. Adjust the trim accordingly—add nose or tail weight and adjust the control travel until it feels right for your flying style. Tail weight can be reduced by cutting four 1/2-in. lightening holes in the fantail.
Let's see if we can't spark a flying wing revival. Build and fly a Bird of Prey, and you should be in contention for some of those awesome purses that are becoming available in Combat matches around the country. The Combat fraternity will take note. Good luck, and happy hunting!
Transcribed from original scans by AI. Minor OCR errors may remain.

