
Biscayne Baby MiniStick
MINISTICK (or Living Room Stick, as it is known in England) is the revolutionary concept of indoor fliers Tom Vallee and Pete Staehling of the Goddard Space Flight Center Model Airplane Club (GSFC MAC) in Greenbelt, Maryland. Tom was inspired to build his Micron MiniStick after seeing how much fun could be had flying the Bud Tenny–designed Parlor Mite and Bill Bigge's tiny matchbox models.
In evaluating the rules, Pete saw the concept as a solution to finding indoor flying sites—everyone has one! The first informal contests were in Tom's living room, with the models doing about three minutes scrubbing the ceiling.
In early 1991, Burr Stanton of the Indoor Model Association of River City (INMARC) in Louisville, Kentucky, heard about these little devils from Vallee. He and his buddies had so much fun flying MiniStick at monthly National Guard hangar meets that they decided to sponsor the event at the 1991 U.S. Indoor Champs (USIC). They came armed with GSFC-supplied computer-generated advertising, free plans, GSFC awards, and a lot of enthusiasm. The event was an instant success—Vallee won with 9:07 under a 116-foot ceiling—and British indoor fliers carried the idea back to the UK. John O'Donnell joined publishing his design in Aeromodeller. It was one of 60 entrants from three nations that participated in Mike Collings's Living Room Stick postal contest in early spring 1991. In 1992, with 117 entries representing 11 nations, Gary Hunter of San Diego took the event. This is phenomenal enthusiasm!
Burr Stanton is now flying his models in heaven (where there is no ceiling), so his clubmates have organized the annual INMARC Stanton Memorial MiniStick event at the USIC. The perpetual trophy for this event is a beautiful leaded-glass replica of Stanton's design, the Ceiling Knocker. Joe Krush of Philadelphia won the 1992 event with an astounding 10-minute flight. Miraculous!
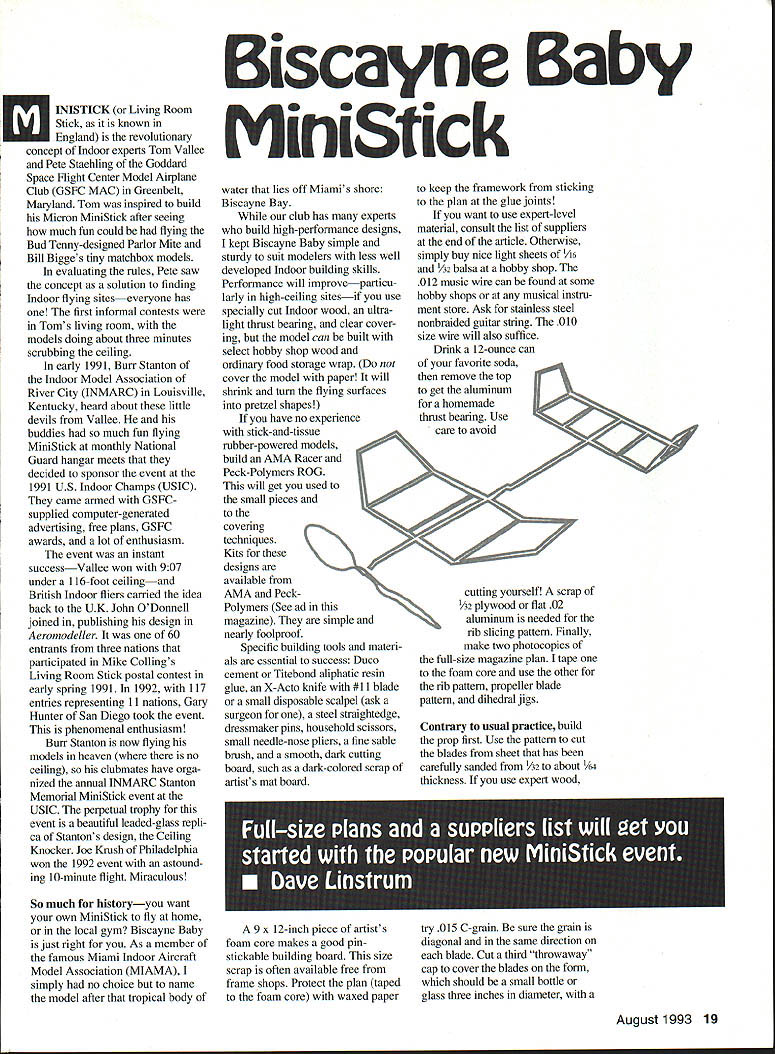
So much for history—you want your own MiniStick to fly at home, or in the local gym? Biscayne Baby is just right for you. As a member of the famous Miami Indoor Aircraft Model Association (MIAMA), I simply had no choice but to name the model after that tropical body of water that lies off Miami's shore: Biscayne Bay.
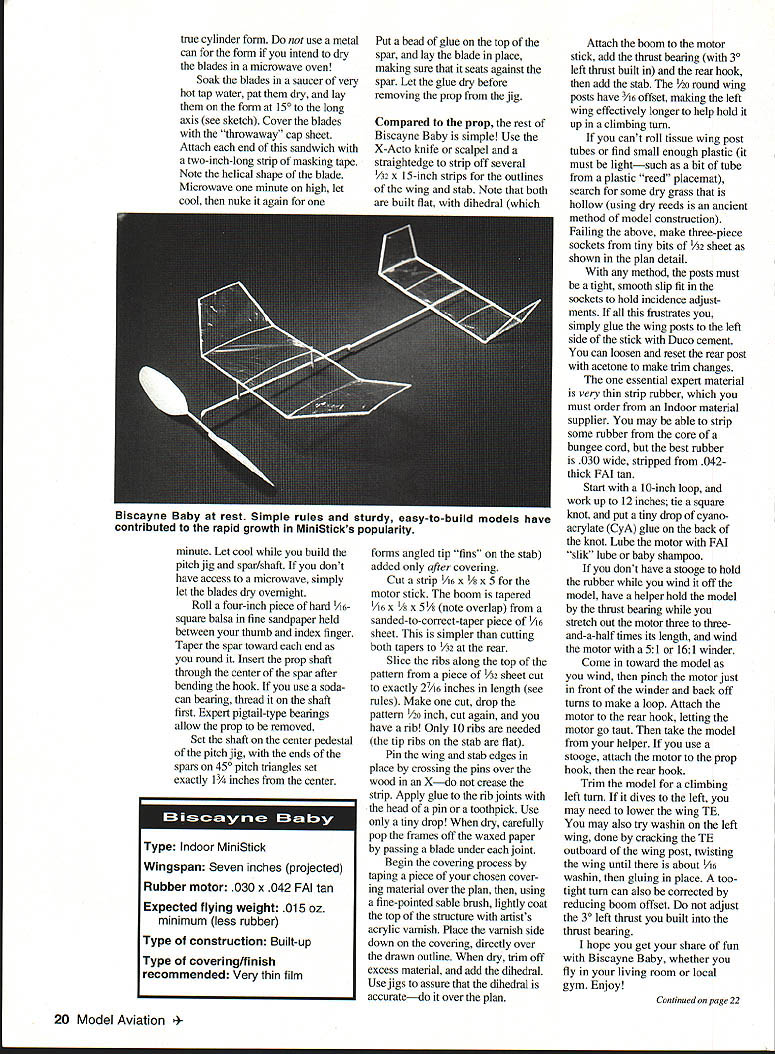
While our club has many experts who build high-performance designs, I kept Biscayne Baby simple and sturdy to suit modelers with less well-developed indoor building skills. Performance will improve—particularly in high-ceiling sites—if you use specially cut indoor wood, an ultralight thrust bearing, and clear covering, but the model can be built with select hobby shop wood and ordinary food storage wrap. (Do not cover the model with paper! It will shrink and turn the flying surfaces into pretzel shapes!)
If you have no experience with stick-and-tissue rubber-powered models, build an AMA Racer and Peck-Polymers ROG first. This will get you used to the small pieces and covering techniques. Kits for these designs are available from AMA and Peck-Polymers. They are simple and nearly foolproof.
Specific building tools and materials essential to success
- Duco cement or Titebond aliphatic resin glue
- X-Acto knife with #11 blade or a small disposable scalpel (ask a surgeon for one)
- Steel straightedge
- Dressmaker pins
- Household scissors
- Small needle-nose pliers
- Fine sable brush
- Smooth, dark cutting board (such as a dark-colored scrap of artist's mat board)
Otherwise, simply buy nice light sheets—1/32" balsa from a hobby shop. .012" music wire can be found at some hobby shops or at any musical instrument store; ask for stainless-steel non-braided guitar string. .010" wire will also suffice.
Drink a 12-ounce can of your favorite soda, then remove the top to get the aluminum for a homemade thrust bearing. Use care to avoid cutting yourself! A scrap of 1/32" plywood or flat .02" aluminum is needed for the rib-slicing pattern. Finally, make two photocopies of the full-size magazine plan. I tape one to the foam core and use the other for the rib pattern, propeller blade pattern, and dihedral jigs.
Contrary to usual practice, build the prop first.
- Use the pattern to cut the blades from sheet that has been carefully sanded from 1/32" to about 1/64" thickness. If you use expert wood, try .015" C-grain. Be sure the grain is diagonal and in the same direction on each blade.
- Cut a third "throwaway" cap to cover the blades on the form, which should be a small bottle or glass about three inches in diameter with a true cylindrical form (use a metal can if you intend to dry the blades in the microwave oven). Soak blades in very hot tap water, pat dry, and lay on the form with the long axis aligned. Cover blades with the throwaway cap sheet and attach the end sandwich with a two-inch-long strip of masking tape. Note the helical shape.
- Put a bead of glue on the top of the spar, and lay the blade in place, making sure that it seats against the spar. Let the glue dry before removing the prop from the jig.
Full-size plans and a suppliers list will get you started with the popular new MiniStick event. — Dave Linstrum
Compared to the prop, the rest of Biscayne Baby is simple!
- Use the X-Acto knife or scalpel and a straightedge to strip off several 1/32" x 15" strips for the outlines of the wing and stab. Note that both are built flat, with dihedral (which forms angled tip "fins" on the stab) added only after covering.
- Cut a strip 1/16" x 1/8" x 5" for the motor stick. The boom is tapered 1/16" x 1/8" x 5/16" (note overlap) from a sanded-to-correct-taper piece of 1/16" sheet. This is simpler than cutting both tapers to 1/32" at the rear.
- Slice the ribs along the top of the pattern from a piece of 1/32" sheet cut to exactly 2 7/16" in length (see rules). Make one cut, drop the pattern in, notch, cut again, and you have a rib! Only 10 ribs are needed (the rib tips on the stab are flat).
- Pin the wing and stab edges in place by crossing the pins over the wood in an X—do not crease the strips. Apply glue to the rib joints with the head of a pin or a toothpick. Use only a tiny drop! When dry, carefully pop the frames off the waxed paper by passing a blade under each joint.
Begin the covering process:
- Tape a piece of your chosen covering material over the plan.
- Using a fine-pointed sable brush, lightly coat the top of the structure with artist's acrylic varnish.
- Place the varnish side down on the covering, directly over the drawn outline. When dry, trim off excess material, and add the dihedral. Use jigs to assure that the dihedral is accurate—do it over the plan.
Attach the boom to the motor stick, add the thrust bearing (with 3° left thrust built in) and the rear hook, then add the stab. The 7/64" offset of the wing posts makes the left wing effectively longer to help hold it up in a climbing turn.
If you can't roll tissue wing posts or find small enough plastic (it must be light—such as a bit of tube from a plastic "reed" placemat), search for some dry grass that is hollow (using dry reeds is an ancient method of model construction). Failing the above, make three-piece sockets from tiny bits of 1/32" sheet as shown in the plan detail.
With any method, the posts must be a tight, smooth slip fit in the sockets to hold incidence adjustments. If all this frustrates you, simply glue the wing posts to the left side of the stick with Duco cement. You can loosen and reset the rear post with acetone to make trim changes.
The one essential expert material is very thin strip rubber, which you must order from an indoor material supplier. You may be able to strip some rubber from the core of a bungee cord, but the best rubber is .030" wide, stripped from .042"-thick FAI tan.
- Start with a 10" loop, and work up to 12"; tie a square knot, and put a tiny drop of cyanoacrylate (CYA) glue on the back of the knot.
- Lube the motor with FAI "slik" lube or baby shampoo.
If you don't have a stooge to hold the rubber while you wind it off the model, have a helper hold the model by the thrust bearing while you stretch out the motor three to three-and-a-half times its length, and wind the motor with a 5:1 or 16:1 winder. Come in toward the model as you wind, then pinch the motor just in front of the winder and back off turns to make a loop. Attach the motor to the rear hook, letting the motor go taut. Then take the model from your helper. If you use a stooge, attach the motor to the prop hook, then the rear hook.
Trim the model for a climbing left turn. If it dives to the left, you may need to lower the wing trailing edge (TE). You may also try warps on the left wing by cracking the TE outboard of the wing pivot, twisting the wing until there is about 1/8° wash-in, then gluing in place. A toothpick turn can also be corrected by reducing boom offset. Do not adjust the 3° left thrust you built into the thrust bearing.
I hope you get your share of fun with Biscayne Baby, whether you fly in your living room or local gym. Enjoy!
Biscayne Baby — Quick Specs
- Type: Indoor MiniStick
- Wingspan: 7 inches (projected)
- Rubber motor: .030" x .042" FAI tan
- Expected flying weight: .015 oz. minimum (less rubber)
- Type of construction: Built-up
- Recommended covering/finish: Very thin film
Biscayne Baby / Linstrum
Continued from page 2
Here is a list of mail-order indoor suppliers, if you wish to use expert materials for best performance. Order a catalog so you can get correct ordering info and shipping costs:
- Winders: Peck-Polymers 5:1; Peck-Polymers, Box 710389, Santee, CA 92072. Illustrated catalog is $3.
- A 16:1 winder is available from IMS or Micro-X or Sig Manufacturing Co., Inc., 401 South Front St., Montezuma, IA 50171; Tel. (515) 623-5154.
Other supplies:
- Indoor Model Supply, Box 5211, Salem, OR 97304; indoor supplies including thrust bearings, Teflon washers, rubber, and a MiniStick kit. Catalog is $1.
- Micro-X, Box 1063, Lorain, OH 44055; complete indoor supplies. Catalog is $1.50.
- Raymond B. Harlan, 15 Happy Hollow Rd., Wayland, MA 01778; indoor supplies including covering materials, thrust bearings, and a great rubber stripper.
- Wayne Trivin, 7408 West Hanna Ave., Tampa, FL 33615; very lightweight indoor film covering material. SASE for info.
Transcribed from original scans by AI. Minor OCR errors may remain.

