
Boxy Bipe
BY BILL HANNAN
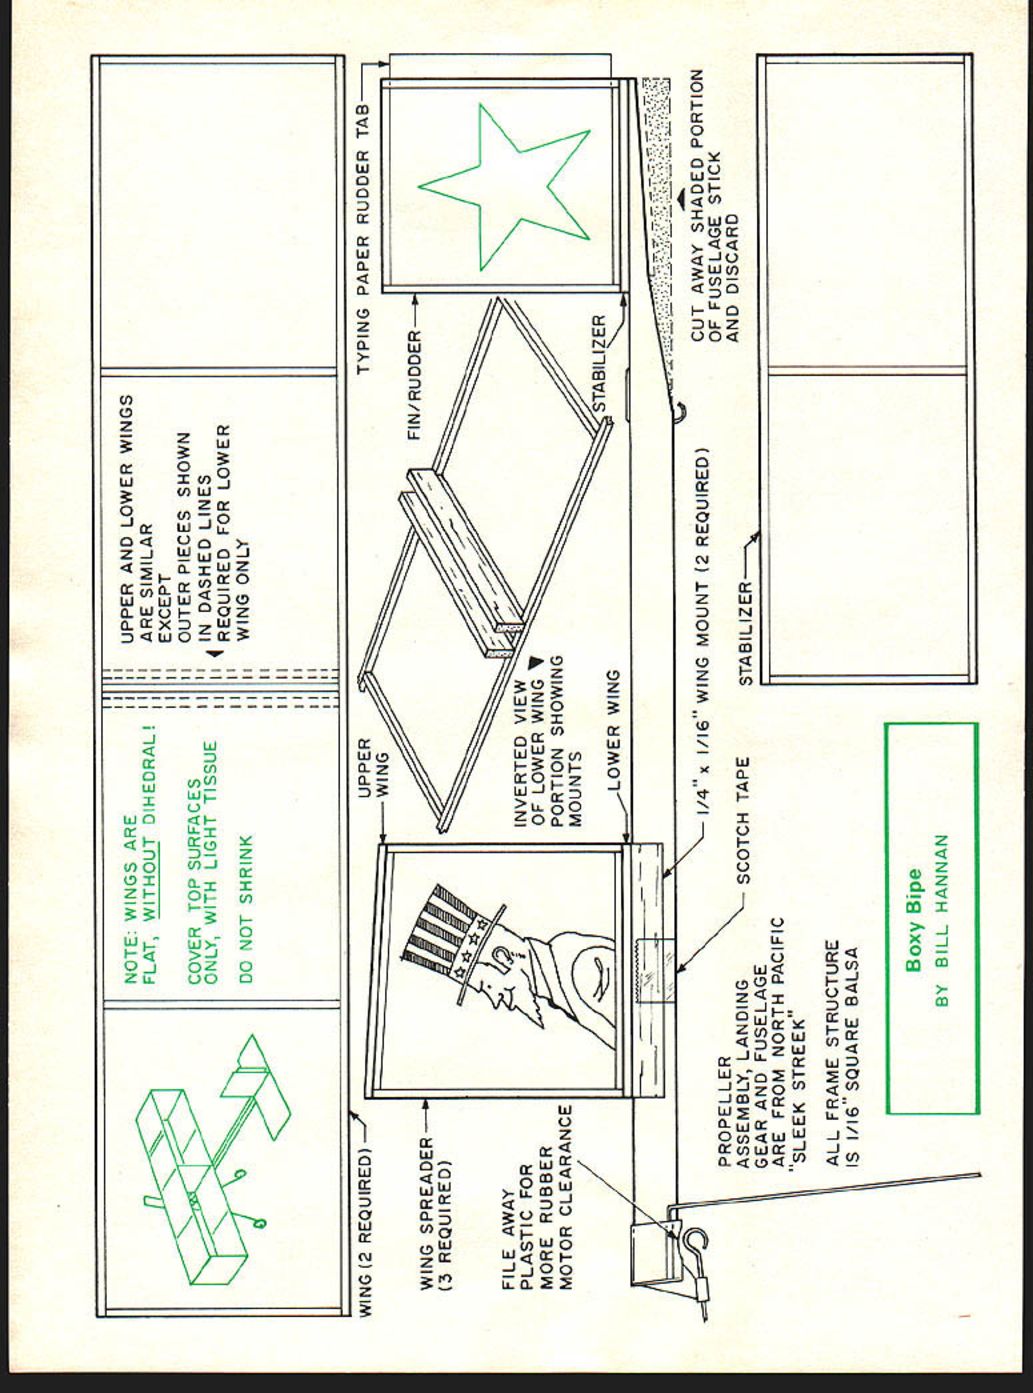
UPPER AND LOWER WINGS ARE SIMILAR EXCEPT OUTER PIECES SHOWN IN DASHED LINES REQUIRED FOR LOWER WING ONLY
NOTE: WINGS ARE FLAT, WITHOUT DIHEDRAL! COVER TOP SURFACES ONLY WITH LIGHT TISSUE DO NOT SHRINK
WING (2 REQUIRED)
WING SPREADER (3 REQUIRED)
FILE AWAY PLASTIC FOR MORE RUBBER MOTOR CLEARANCE
TYPING PAPER RUDDER TAB
FIN / RUDDER
STABILIZER
INVERTED VIEW OF LOWER WING PORTION SHOWING MOUNTS
1/4 x 1/16 WING MOUNT 2 REQUIRED
SCOTCH TAPE
CUT AWAY SHADED PORTION OF FUSELAGE STICK AND DISCARD
PROPELLER ASSEMBLY, LANDING GEAR AND FUSELAGE ARE FROM NORTH PACIFIC "SLEEK STREEK"
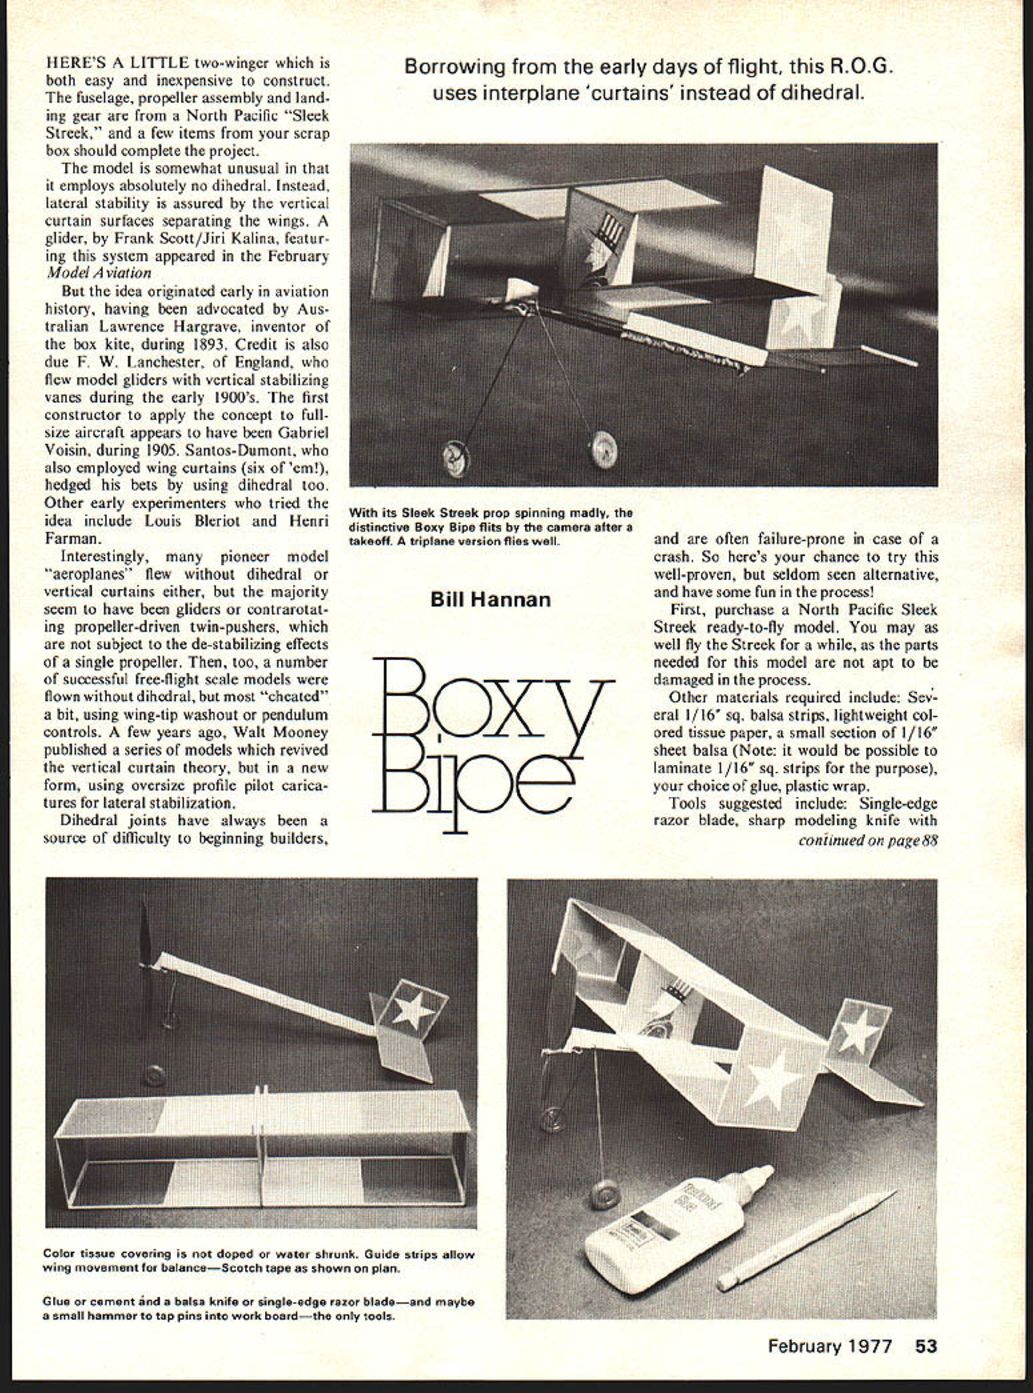
ALL FRAME STRUCTURE IS 1/16" SQUARE BALSA HERE'S A LITTLE two-winger which is both easy and inexpensive to construct. The fuselage, propeller assembly and landing gear are from a North Pacific "Sleek Streek," and a few items from your scrap box should complete the project.
The model is somewhat unusual in that it employs absolutely no dihedral. Instead, lateral stability is assured by the vertical curtain surfaces separating the wings. A glider, by Frank Scott/Jiri Kalina, featuring this system appeared in the February Model Aviation.
But the idea originated early in aviation history, having been advocated by Australian Lawrence Hargrave, inventor of the box kite, during 1893. Credit is also due F. W. Lanchester, of England, who flew model gliders with vertical stabilizing vanes during the early 1900's. The first constructor to apply the concept to full-size aircraft appears to have been Gabriel Voisin, during 1905. Santos-Dumont, who also employed wing curtains (six of 'em!), hedged his bets by using dihedral too. Other early experimenters who tried the idea include Louis Bleriot and Henri Farman.
Interestingly, many pioneer model "aeroplanes" flew without dihedral or vertical curtains either, but the majority seem to have been gliders or contra-rotating propeller-driven twin-pushers, which are not subject to the de-stabilizing effects of a single propeller. Then, too, a number of successful free-flight scale models were flown without dihedral, but most "cheated" a bit, using wing-tip washout or pendulum controls. A few years ago, Walt Mooney published a series of models which revived the vertical curtain theory, but in a new form, using oversize profile pilot caricatures for lateral stabilization.
Dihedral joints have always been a source of difficulty to beginning builders, and are often failure-prone in case of a crash. So here's your chance to try this well-proven, but seldom seen alternative, and have some fun in the process!
First, purchase a North Pacific Sleek Streek ready-to-fly model. You may as well fly the Streek for a while, as the parts needed for this model are not apt to be damaged in the process.
Other materials required include: Several 1/16" sq. balsa strips, lightweight colored tissue paper, a small section of 1/16" sheet balsa (Note: it would be possible to laminate 1/16" sq. strips for the purpose), your choice of glue, plastic wrap.
Tools suggested include: Single-edge razor blade, sharp modeling knife with
Boxy Bipe/Hannan
continued from page 53
pointed blade, scissors, common straight pins.
Construction
A soft building surface, such as insulation board, into which pins may be easily pushed, is recommended. Cover the full-size plan with plastic wrap to protect it from glue.
Wings: Construct the wings from 1/16" sq. balsa strips. By cutting the longest pieces first, waste will be reduced. Note that the upper and lower wings are almost, but not quite, alike. The lower wing has two extra members in the center section, which are shown on the plan in dotted lines. Secure all strips with straight pins while they are drying. "X" the pins over the strips, rather than piercing the strips, which might weaken them. Or, if you have any of the new pin-clamps or pin-down devices, they may be used more easily. Allow the glued joints to dry completely before removing the wings from the building board.
Tailplanes, and Wing Spreaders: The stabilizer, rudder and wing spreaders are constructed in the same manner as the wings. Try to make the three wing spreaders as nearly alike as possible.
Fuselage: The only modification to the Sleek Streek fuselage consists of cutting a portion from the rear, as indicated on the plan. This is not an essential operation, but serves to lighten the tail end for increased efficiency.
Covering: Only the tops of the wings and stabilizer are covered with tissue, and only one side each of the rudder and wing spreaders. Note the outer sides of the tip wing spreaders should be covered for best appearance. Flight performance will not suffer if you goof, however. The tissue may be applied with clear dope as an adhesive, but perhaps it is easier to employ white glue which has been slightly thinned with water, applied with a pointed brush. Do not use excessive amounts, or wood warping may occur. When the tissue adhesive has dried, trim off any excess, using a sharp razor blade. Do not water-shrink or dope the tissue, which could easily generate warps.
Colors: Although any color tissue could be used, we chose red, white and blue. The white stars and "Uncle Sam" were cut from ordinary white typing paper, with a pointed modeling knife, and glued in position.
Assembly:
Cement the stabilizer onto the top rear of the fuselage, being careful it is properly square as viewed from both the rear and top. Next, add the rudder, lining it up accurately in the center of the stabilizer, then the trim tab.
Pin or weight the lower wing flat on the building board, and glue on the wing spreaders, one at a time, with the tallest edges to the front of the wing, since they determine the incidence. Prop the spreaders to a vertical position while drying, using sugar cubes, dice, or something similar.
Add the top wing, adjusting the spreaders as needed to line up properly. Work carefully to assure precise alignment. When the complete wing assembly, called a cellule, is dry, turn it upside down, and glue on the wing mount members, which have been cut from 1/16" sheet. These should be spaced for a snug fit on either side of the fuselage. If too tight, use a folded piece of coarse sandpaper on the inner sides. If too loose, glue a strip of typing paper on the inner side of one mount. The wing is not glued on, but may be secured with a strip of scotch tape until its proper position has been determined.
Flying:
Try for a windless day, and if possible, test-fly over grass or weeds just in case. Glide the model a few times from shoulder height. If it dives, slide the wing cellule forward slightly. If it stalls, slide the assembly aft. Next, try a few turns of the propeller, launch gently (do not throw). Watch the flight path carefully, reshifting the wing cellule if required to achieve a smooth descent.
Increase number of hand winds, and repeat. If model turns excessively to one side, counter it by bending the paper rudder tab opposite the turn. In extreme cases, a tiny amount of clay ballast may need to be added to the wing tip opposite the direction of turn. Gradually increase the number of propeller winds until the model can safely handle a full row of knots or more. A rather peculiar skidding action of the model right after launch is characteristic of the stabilizing system, and is no cause for concern.
Up to this point, the standard North Pacific "gum band" has been employed. This can be replaced with a longer, lubed rubber motor for greater endurance. However, a longer motor may have a tendency to bunch up on the propeller hook, creating a prop-stopping bind. By carefully filing away more clearance in the plastic propeller support bearing, as shown on the drawing, the problem can be reduced. Experiment with different motor sizes and loop lengths. We use 2-mm size for slow flights, and 1/4" for snappier ROG starts and better climb.
Postlude:
Since our model was constructed, several different versions have been built by Russ Barrera and Warren Shipp (who came up with a triplane) and all have exhibited similar stable flight characteristics.
And, according to a newspaper clipping sent to me by my mother, both Boeing and Douglas engineers are giving serious consideration to vertical tips, which they call "winglets." Truly, history repeats itself!
Transcribed from original scans by AI. Minor OCR errors may remain.

