
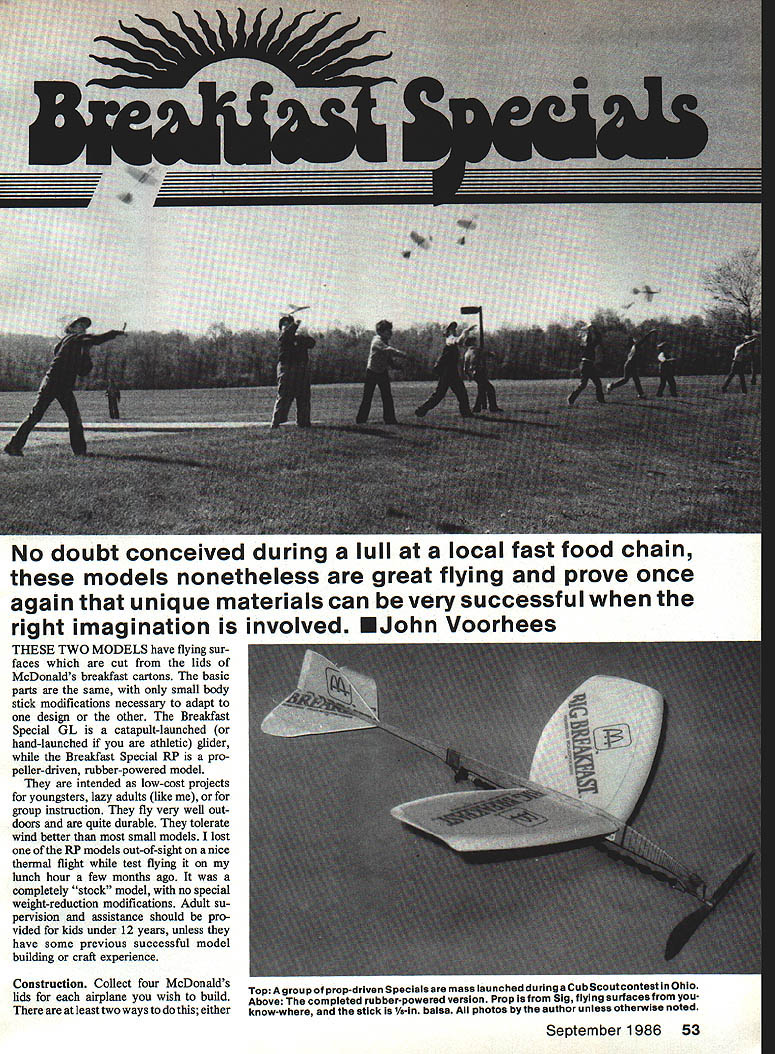

Breakfast Specials
No doubt conceived during a lull at a local fast-food chain, these two models are great fliers and show how unique materials can work well with the right imagination. The flying surfaces are cut from McDonald’s breakfast carton lids. The basic parts are the same; only small body‑stick modifications are necessary to adapt the airframe to either model.
- Breakfast Special GL — catapult‑launched (or hand‑launched if you are athletic) glider.
- Breakfast Special RP — propeller‑driven, rubber‑powered model.
They are intended as low‑cost projects for youngsters, groups, or lazy adults. They fly well outdoors, are durable, and tolerate wind better than many small models. Adult supervision and assistance should be provided for kids under 12 years unless they have previous successful model‑building or craft experience.
Materials and tools
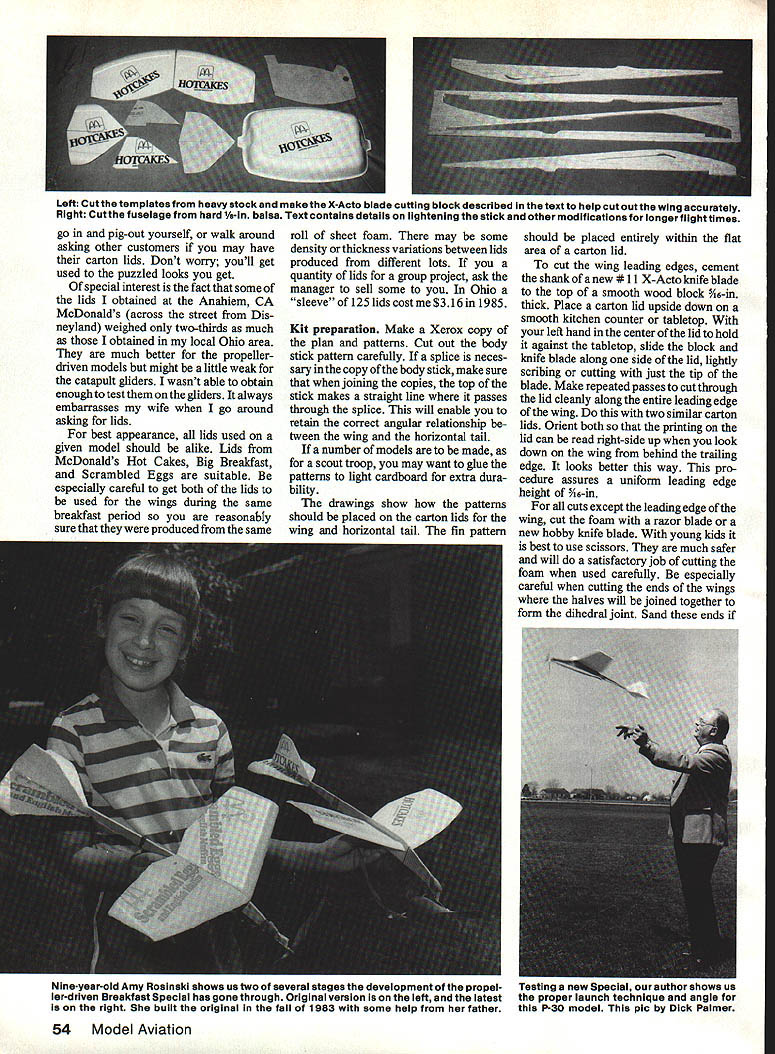
- 4 McDonald’s foam carton lids per airplane (Hot Cakes, Big Breakfast, Scrambled Eggs lids are suitable).
- 1/8‑in. balsa for body stick and tail parts (or equivalent).
- Hobby knife (#11 X‑Acto blade), new razor blades, and scissors (for younger builders).
- Smooth wood cutting block (about 5/16‑in. thick) with a blade shank cemented to the top for leading‑edge cuts.
- Sandpaper and sanding block.
- White aliphatic glue (Elmer’s, Titebond, Wilhold) for foam joints; CA (cyanoacrylate) with accelerator optional for experienced builders.
- Small clamps or clothespins.
- Propeller (6–7 in. plastic suggested) and prop shaft/hardware for RP.
- Rubber motor: about 24 in. of 1/4‑in. x .042 rubber strip (or two strands of 1/8‑in. rubber as equivalent).
- Small metal rings for motor ends (optional, from fishing tackle stores).
- Modeling clay for nose ballast.
- Catapult: 1/4‑in. dowel and a 1/4‑in. x .042 rubber loop or a 1/2‑in. wide nylon cord loop cemented to the fuselage for the GL.
- Lubricant for rubber motors (rubber lube, liquid hand soap, or Armor All).
- Wax paper (to protect surfaces while gluing).
Lids
- Collect four like lids for each airplane. For best appearance, use lids from the same breakfast period to minimize thickness/density variations.
- For group projects, ask the restaurant manager — they may sell or give sleeves of lids. (Author noted a sleeve of 125 lids cost $3.16 in 1985 in Ohio.)
Kit preparation
- Make a photocopy (Xerox) of the plan patterns.
- Cut out the body‑stick pattern carefully. If you must splice copies to make a full‑length stick, align the top of the stick so it makes a straight line through the splice to retain the correct angular relationship between the wing and horizontal tail. For larger runs, glue patterns to light cardboard for durability.
- Place the wing, horizontal tail, and fin patterns within the flat area of the carton lid as shown on the drawings.
Cutting the wing leading edges
- Use a new #11 X‑Acto blade cemented to a smooth wood cutting block about 5/16‑in. thick. Place the carton lid upside down on a smooth tabletop. Hold the lid in the center with your left hand and slide the block and blade along the side of the lid, lightly scribing with the tip of the blade. Make repeated passes until the lid is cut cleanly along the entire leading edge.
- Cut two similar lids for the two wing halves. Orient both so the printing can be read right‑side up when you look down the wing from behind the trailing edge — this ensures uniform leading‑edge height (about 5/16 in.).
- For all other cuts, use a razor blade, new hobby blade, or scissors (scissors recommended for younger children).
Be especially careful cutting and sanding the wing ends that form the dihedral joint. Sand mating surfaces to eliminate gaps. When joining the halves, apply a thin bead of glue along mating surfaces and clamp until dry.
Construction / Assembly
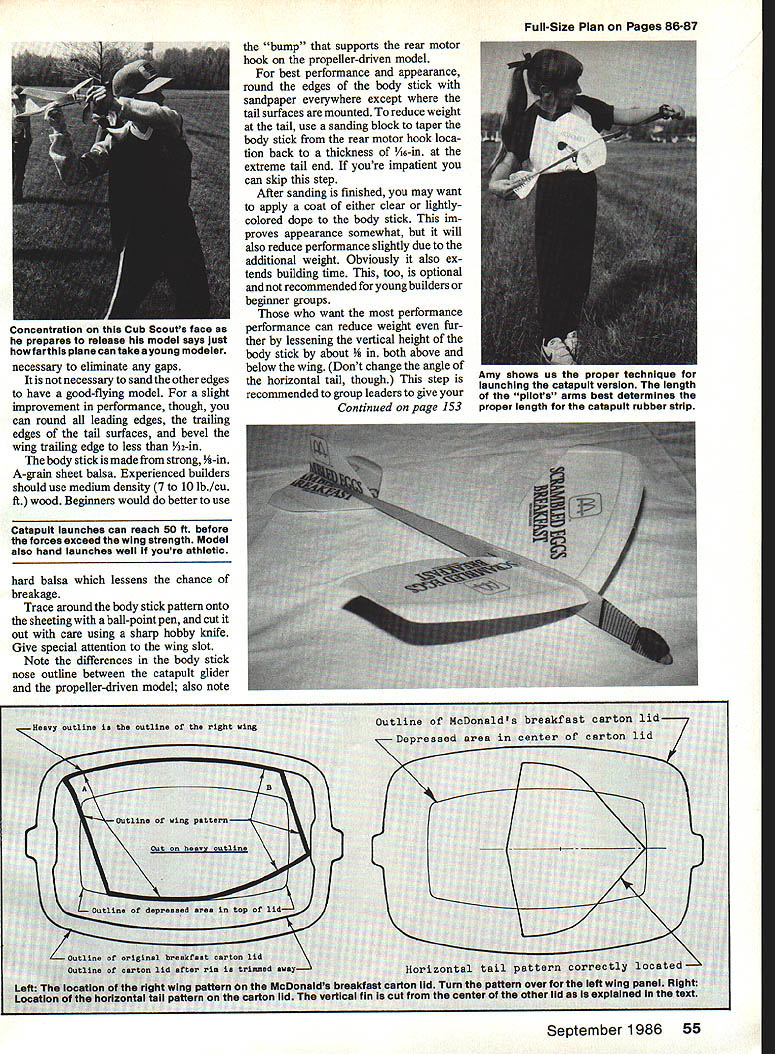
- Trace the body‑stick pattern onto the sheeting (balsa), and cut it out with a sharp hobby knife. Pay special attention to the wing slot and the nose outline differences between the GL and RP versions (the RP has a bump to support a rear motor hook).
- Round the edges of the body stick with sandpaper everywhere except where the tail surfaces mount. To reduce tail weight, taper the stick from the rear motor‑hook location back to about 1/16 in. thickness at the extreme tail end. (Optional but improves performance.)
- Optional finishing: a coat of clear or lightly colored dope improves appearance but adds weight (not recommended for beginners).
- Glue the wing halves together at the center with the tips blocked up 1½ to 1¾ in. above the joint to form the dihedral. Make sure the joint fits well to minimize gaps.
- If building the RP, glue the nose bearing and rear motor hook (wrap the hook with thread as shown on the plans). For the GL, reinforce the nose area with wrapped thread and glue.
- Pin the body stick flat on wax paper and glue the vertical fin in place. After drying, trim any small overhang of the fin in line with the bottom of the body stick.
- Pin and glue the horizontal tail in place. Glue it to the body stick only (not to the vertical fin) so both tail surfaces can be adjusted for initial trimming.
- Sand the wing center bottom so the wing will slide freely into the slot in the body stick. Pin the wing in place and apply a continuous thin fillet of glue where the wing meets the body stick on both sides, top, and bottom. Let all glue dry thoroughly.
Adhesive notes
- For kids use white aliphatic (PVA) glues on foam joints.
- Experienced builders may use CA sparingly; use an accelerator to stop CA from dissolving foam. One approach: tack parts with tiny dots of CA, immediately apply accelerator, then later apply a thin fillet of white glue over the joints and let dry overnight.
Propeller, motor, and catapult details
- Propeller: 6–7 in. plastic prop. Check the freewheeling notch at the prop hub and clean up rough edges. Balance the prop by trimming the heavier blade(s). Apply a small drop of oil on the thrust bearing and prop shaft.
- Rubber motor: about 24 in. of 1/4‑in. x .042 rubber strip is recommended; two strands of 1/8‑in. rubber can be used as an equivalent. Put a small metal ring on the motor ends to ease reconnecting to the rear hook. Lightly coat the rubber with lubricant before first use.
- Catapult: cement a 1/2‑in. wide nylon cord loop to the bottom of the fuselage stick and use a standard bungee on the catapult. For small kids, use a shorter loop so they can stretch it sufficiently.
Balance the airplane by adding modeling clay to the nose until it balances level when supported by your fingertips at the wing tips.
Flying and trimming — general
- Fly in calm air if possible (evenings often best).
- Required clear area: at least 100 ft. radius for the glider, 200 ft. for the propeller‑driven model; allow more room downwind in breezy conditions.
- Inspect the model from the front for any bend in the body stick or vertical fin misalignment before flight.
Initial trim for both versions
- Bend the rear part of the vertical fin slightly left (about 1/8 to 1/16 in. at the extreme rear edge) and hold the setting with a thin pin inserted upward through the bottom of the horizontal tail and edgewise through the vertical fin. This pins your initial turn adjustment. After trimming is satisfactory, fix the rear of the vertical tail with a little water‑soluble glue and remove the pin when dry.
Trimming the glider (GL)
- Catapult launch technique: hold the rear end of the body stick and the vertical tail between thumb and index finger of your right hand; extend the middle finger beneath the horizontal tail. Hold the catapult stick in your left hand and catch the rubber band in the nose notch. Bank the glider slightly to the right and aim upward at about 30°–45°. If there’s any breeze, aim into it. Stretch the rubber band and release the tail.
- Expected behavior: the glider should climb steeply overhead and roll into a left turn.
- Common trim fixes:
- If it circles right without climbing, increase left offset of the vertical fin.
- If it climbs vertically, stalls, and drops on its nose, the launch wasn’t strong enough — stretch the catapult more.
- If it rolls left but comes down fast in a left turn:
- If the left circle is smaller than ~50 ft. diameter, reduce left offset of the fin by about 1/32 in.
- If the left circle is around 50 ft. or larger, remove some nose weight.
- If the model descends in a left circle but oscillates up and down, add a small amount of nose clay to eliminate the dip.
- For stronger launches (older fliers with longer arms) you can add slight down elevator for more initial climb by inserting a thin wedge (balsa or scrap wood) about 1/16‑in. maximum thickness tapering to nothing over 1–1½ in under the bottom rear edge of the vertical fin. After this, remove a bit of clay from the nose if needed. Do not overdo: the wing folding on launch is the limit.
Trimming the prop‑driven model (RP)
- Initial settings: offset the rear edge of the vertical fin about 1/16 in. left and pin it. Balance the model with clay as described.
- Wind the lubricated motor about 150 turns for the first flights (increase gradually later). Launch with a gentle toss slightly upward but not more than about 15° above the horizon. Ideally the model climbs in a shallow climb, turning right under power (due to right thrust in the molded nose bearing), then descends in a smooth left gliding turn.
- Adjustments:
- Adjust the rear edge of the vertical fin no more than 3/32 in. at a time to tune the climb/turn relationship.
- A right climbing turn should not be smaller than ~50 ft. diameter; tight turns under power are dangerous.
- If the plane descends in a fast glide, remove nose clay.
- If it oscillates up and down in glide, add clay to the nose.
- If it stalls in climb, insert a thin balsa or foam shim (not over 1/16‑in. thick, tapering to nothing over 1–1½ in.) under the rear of the vertical fin to bend the horizontal stab down. If the plane fails to climb, the wedge may be too thick.
- Power increments: increase motor turns in small steps — add no more than about 50 turns per flight. A geared winder and a friend or stooge to hold the prop while winding are helpful. As you begin winding, stretch the motor to about 40 in., and move in as you continue winding so the motor returns to its original length at the end of winding.
Fine trimming
- A very fine adjustment to tail incidence can be made by sanding a taper at the rear edges of the tail surfaces; this subtly offsets the surfaces without shims.
Final notes
- Once satisfied with trim, glue the rear part of the vertical tail permanently to the horizontal tail with water‑soluble glue and remove the pin after drying.
- Keep test flights conservative and make only small trim changes between flights.
- Enjoy building and flying these inexpensive models made from recycled carton lids — good for introducing youngsters to model building and for inexpensive outdoor flying.
If you have questions, comments, or suggestions, you may call the author (after 6:00 p.m. Eastern time at the number printed in the original article).
Transcribed from original scans by AI. Minor OCR errors may remain.

