
The Brickizer
By E. P. Render
This compact, easily built unit lets you switch RC flight components from one model to another with a minimum of bother.
The 1991 requirements for more selective receivers will force many of us to retire radio equipment. If you enjoy flying a variety of planes with several flight packs, you're in for some real expense, since at the very least you'll have to replace multiple receivers.
Of course, you could transfer your new receiver from one model to another. With the relatively large size of some of the 1991 receivers, however, you'll have to completely redo the radio installation in small airplanes.
If you asked me to name my favorite modeling tasks, installing radios would be way down on the list.
"Looks like you're ready to fly that one!" comments a friend, admiring your just-built model.
"Oh no. I've still got to put in several hours installing the radio."
One way around this problem is to install most of your flight components into a single compact unit, called a brick radio, that you can easily transfer from one model to another. To make life easier in 1991 and beyond, I designed my own variation on the brick radio, which I dubbed the brickizer.
The brick radio isn't a new idea. The first proportional radio, called the space control brick because of its relatively compact size, was introduced in the 1960s.
I got the brick bug in the Seventies, when a manufacturer specializing in small systems packaged a receiver and two servos in a single unit. Now that, I thought, is neat (something most radio installations are not). As a 1/4A freak, I had to have one.
Looking the system over, I wondered how the manufacturer had fit in all the foam to protect the receiver. After a particularly spectacular crash, I opened up the case and had my answer. No foam had been used — and I needed a new crystal. One year and a second broken crystal later, the receiver came out of the brick and into a foam bed.
The brickizer uses standard components — and need I say it? — plenty of foam. Designed for quick mounting, it's installed, much like a wing, with two dowel keys and Velcro straps to secure the foam-cradled receiver in the model.
Construction
Before you begin, lay your servos and receiver over the plan to check fit. Your receiver may be smaller than the one shown, so you may need to reduce the receiver compartment size. Allow extra room for foam plugs and wiring.
- Servos: Use typical full-size units. Check that the servo output wheel will stand high enough above the top of the receiver compartment for the pushrods to clear the foam-wrapped receiver. If too low, relocate the servo rails.
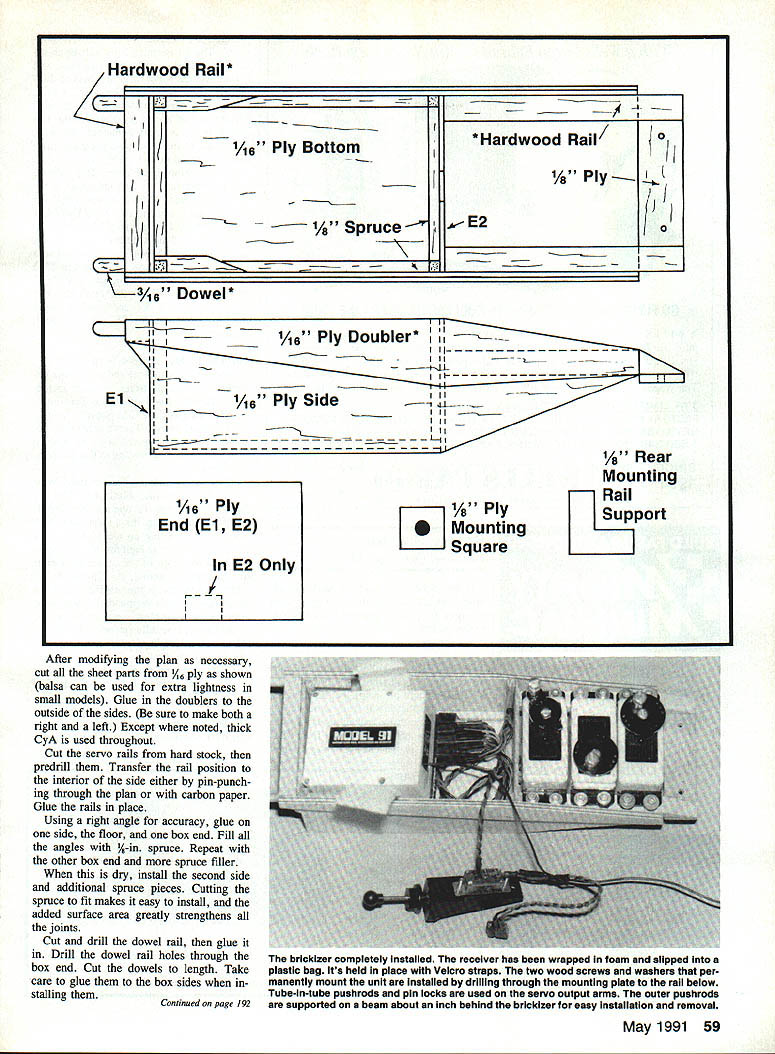
- Mounting: Two screws secure the mounting plate. Pushrods are attached with pin mounts; outer pushrods are supported by a beam about an inch behind the brickizer for easy installation and removal.
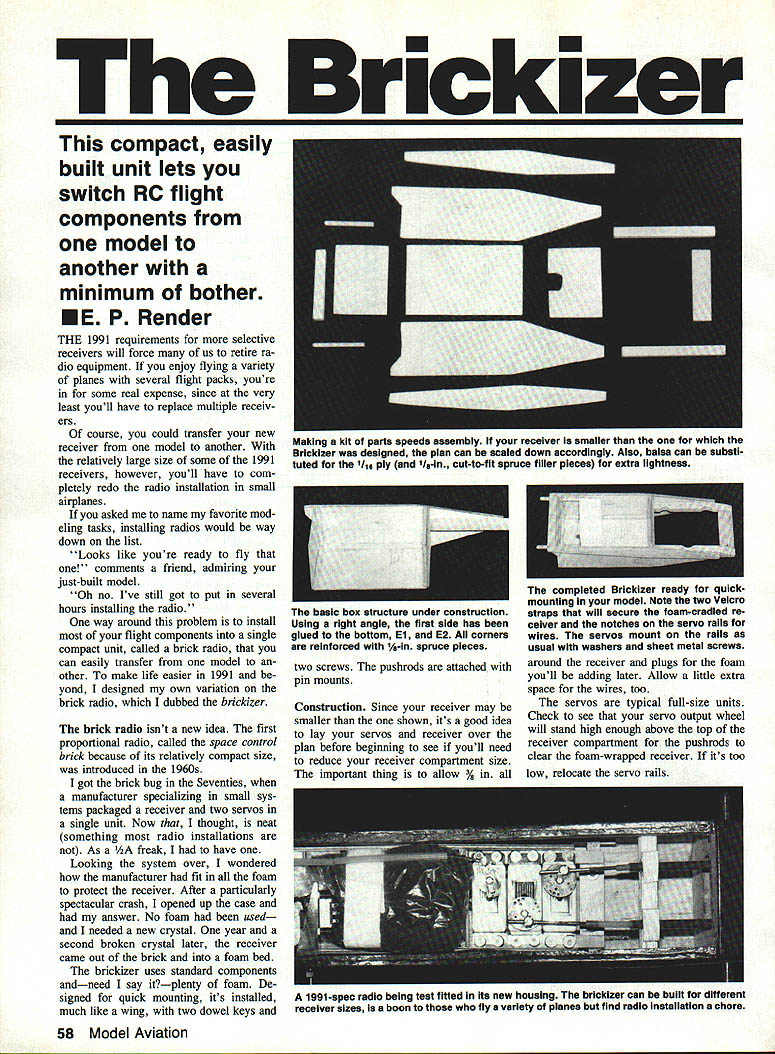
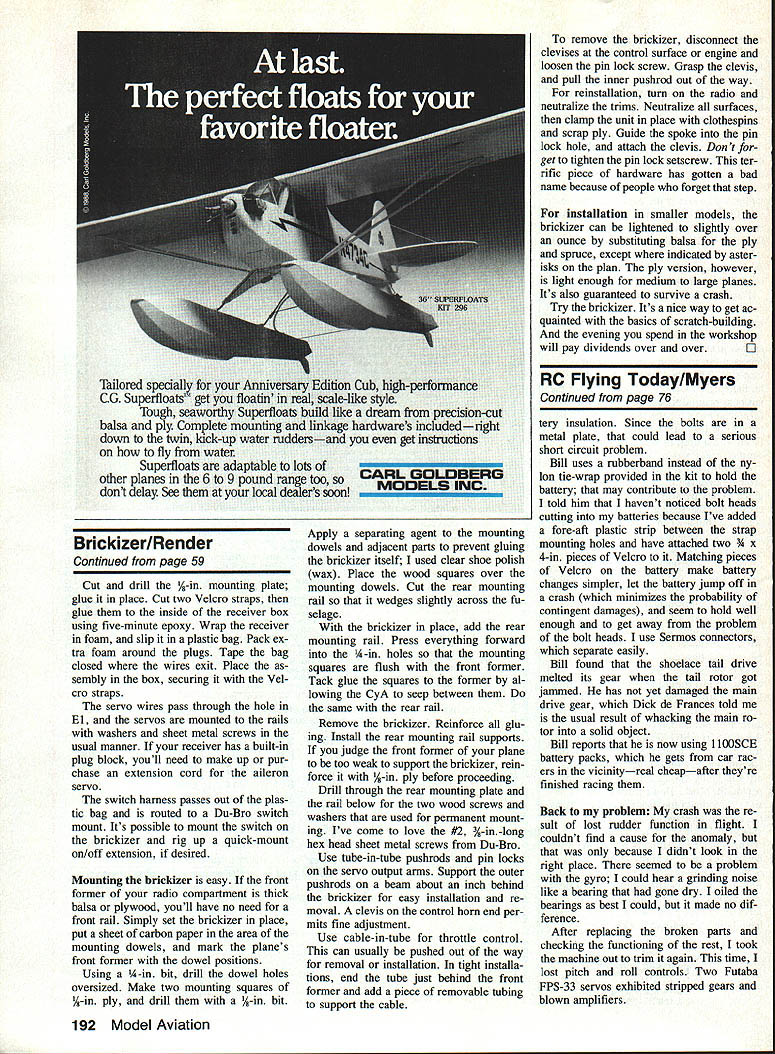
Materials and glue: Cut all sheet parts from 1/16-in. ply as shown (balsa can be used for extra lightness in small models). Glue in the doublers to the outside of the sides. Be sure to make both a right and a left. Except where noted, thick CyA (cyanoacrylate) is used throughout.
Steps:
- Cut the servo rails from hard stock, predrill them, and transfer the rail positions to the interior of the side (either by pin-punching through the plan or with carbon paper). Glue the rails in place.
- Using a right angle for accuracy, glue on one side, the floor, and one box end. Fill all angles with 1/8-in. spruce. Repeat with the other box end and more spruce filler.
- When dry, install the second side and additional spruce pieces. Cutting the spruce to fit makes installation easy and greatly strengthens the joints.
- Cut and drill the dowel rail, then glue it in. Drill the dowel rail holes through the box end. Cut the dowels to length and take care to glue them to the box sides when installing them.
- Cut and drill the 1/2-in. mounting plate; glue it in place.
- Cut two Velcro straps and glue them to the inside of the receiver box using five-minute epoxy.
- Wrap the receiver in foam, slip it into a plastic bag, pack extra foam around the plugs, and tape the bag closed where the wires exit. Place the assembly in the box and secure it with the Velcro straps.
The servo wires pass through the hole in E1, and the servos are mounted to the rails with washers and sheet-metal screws in the usual manner. If your receiver has a built-in plug block, you'll need to make or purchase an extension cord for the aileron servo.
The switch harness passes out of the plastic bag and is routed to a Du-Bro switch mount. It's possible to mount the switch on the brickizer and rig a quick-mount on/off extension, if desired.
Mounting the Brickizer in the Airframe
Mounting the brickizer is easy.
- If the front former of your radio compartment is thick balsa or plywood, you won't need a front rail. Simply set the brickizer in place, put a sheet of carbon paper in the area of the mounting dowels, and mark the plane's front former with the dowel positions.
- Using a 1/4-in. bit, drill the dowel holes oversized. Make two mounting squares of 1/8-in. ply and drill them with a 1/8-in. bit.
- Apply a separating agent to the mounting dowels and adjacent parts to prevent gluing the brickizer itself (clear shoe polish or wax works). Place the wood squares over the mounting dowels.
- Cut the rear mounting rail so that it wedges slightly across the fuselage. With the brickizer in place, add the rear mounting rail. Press everything forward into the 1/4-in. holes so the mounting squares are flush with the front former.
- Tack-glue the squares to the former by allowing CyA to seep between them. Do the same with the rear rail.
- Remove the brickizer, reinforce all gluing, and install the rear mounting rail supports. If you judge the front former of your plane to be too weak to support the brickizer, reinforce it with 1/8-in. ply before proceeding.
- Drill through the rear mounting plate and the rail below for the two wood screws and washers used for permanent mounting. Recommended: #2, 3/8-in.-long hex-head sheet metal screws from Du-Bro.
Linkage and Controls
- Use tube-in-tube pushrods and pin locks on the servo output arms. Support outer pushrods on a beam about an inch behind the brickizer for easy installation and removal. A clevis on the control horn end permits fine adjustment.
- Use cable-in-tube for throttle control. This can usually be pushed out of the way for removal or installation. In tight installations, bend the tube just behind the former and add a piece of removable tubing to support the end.
Removal and Reinstallation
To remove the brickizer:
- Disconnect the clevises at the control surface or engine and loosen the pin-lock screw.
- Grasp the clevis and pull the inner pushrod out of the way.
To reinstall:
- Turn on the radio and neutralize the trims. Neutralize all surfaces.
- Clamp the unit in place with clothespins and scrap ply.
- Guide the pushrod into the pin-lock hole and attach the clevis. Tighten the pin-lock setscrew — don't forget this step. This terrific piece of hardware has gotten a bad name because people sometimes forget to tighten it.
Variations and Notes
- For installation in smaller models, the brickizer can be lightened to slightly over an ounce by substituting balsa for the ply and spruce, except where indicated by asterisks on the plan. The ply version, however, is light enough for medium to large planes and is guaranteed to survive a crash.
- Try the brickizer. It's a nice way to get acquainted with the basics of scratch-building. The evening you spend in the workshop will pay dividends over and over.
Transcribed from original scans by AI. Minor OCR errors may remain.

