
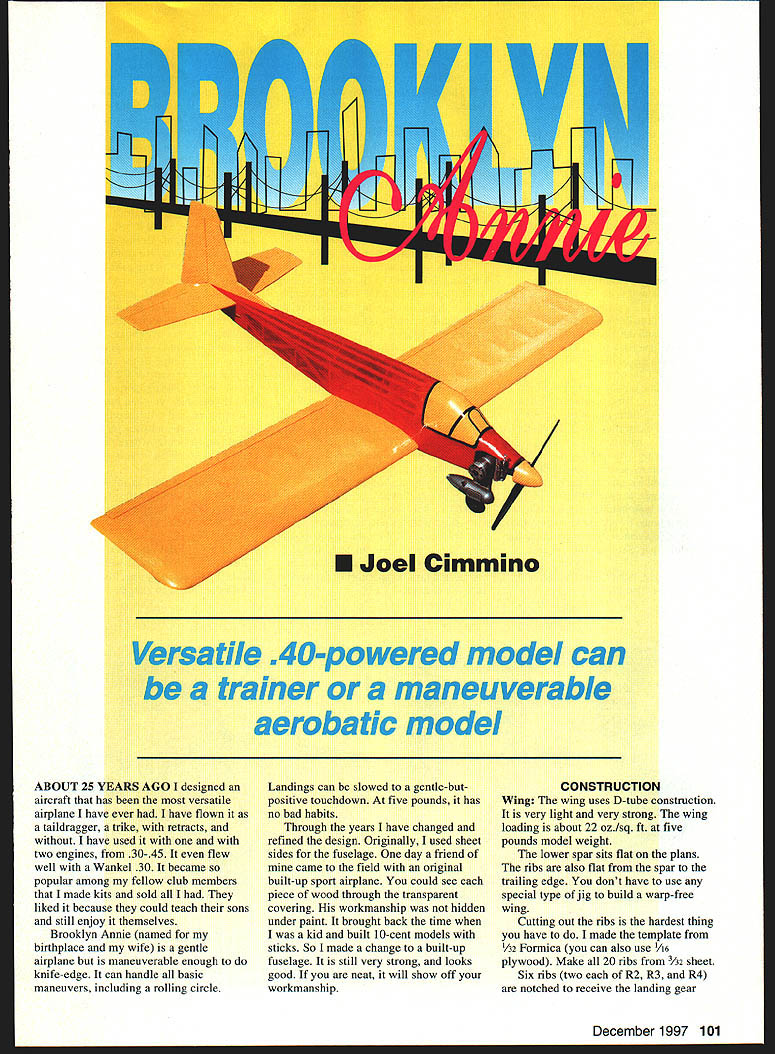
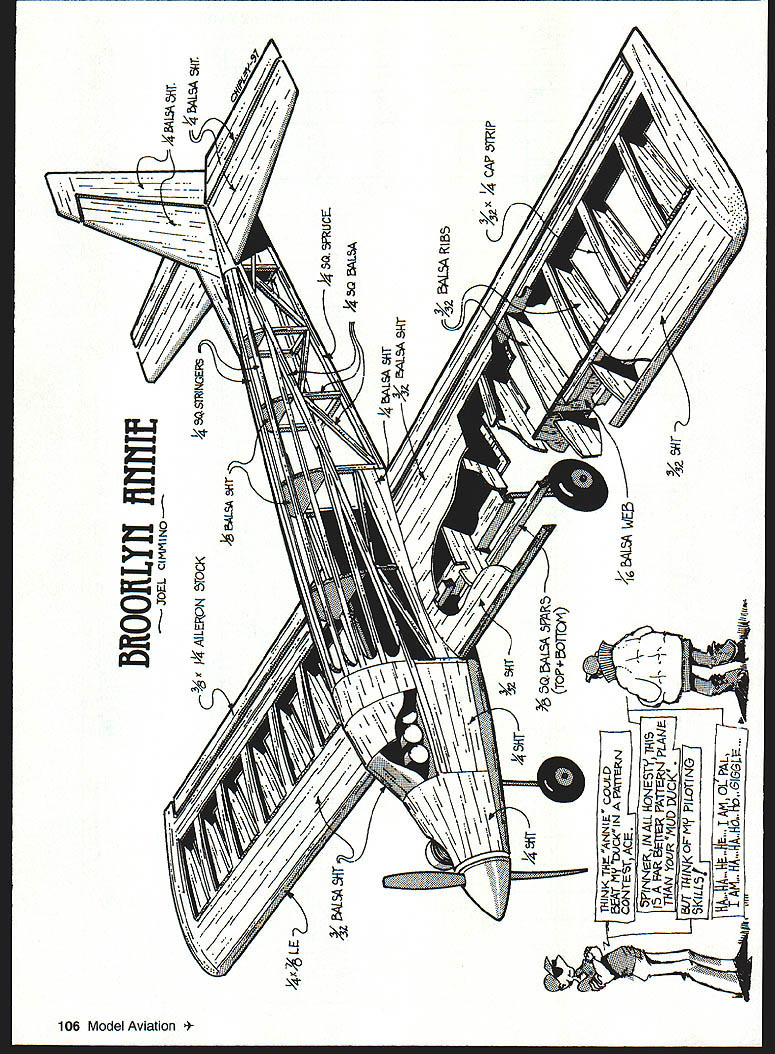
Brooklyn Annie
Joel Cimmino
Versatile .40-powered model can be a trainer or a maneuverable aerobatic model.
About 25 years ago I designed an aircraft that has been the most versatile airplane I have ever had. I have flown it as a taildragger, a trike, with retracts, and without. I have used it with one and with two engines, from .30 to .45. It even flew well with a Wankel .30. It became so popular among my fellow club members that I made kits and sold all I had. They liked it because they could teach their sons and still enjoy it themselves.
Brooklyn Annie (named for my birthplace and my wife) is a gentle airplane but is maneuverable enough to do knife-edge. It can handle all basic maneuvers, including a rolling circle.
Landings can be slowed to a gentle-but-positive touchdown. At five pounds, it has no bad habits.
Through the years I have changed and refined the design. Originally, I used sheet sides for the fuselage. One day a friend of mine came to the field with an original built-up sport airplane. You could see a piece of wood through the transparent covering. His workmanship was not hidden under paint. It brought back the time when I was a kid and built 10-cent models with sticks. So I made a change to a built-up fuselage. It is still very strong, and looks good. If you are neat, it will show off your workmanship.
Construction
Wing
The wing uses D-tube construction. It is very light and very strong. The wing loading is about 22 oz./sq. ft. at the five-pound model weight.
The lower spar sits flat on the plans. The ribs are also flat from the spar to the trailing edge. You don't have to use any special type jig to build a warp-free wing.
Cutting out the ribs is the hardest thing you have to do. I made the template from 1/32" Formica. You can also use 3/32" plywood. Make 20 ribs from 3/32" sheet. Six ribs (two each of R2, R3 and R4) are notched to receive the landing gear.
I made a photocopy of the rib and used a glue stick (you can buy them at stationery stores) to attach the rib pattern template. Lay down 1/8" square spars as shown. Glue ribs in place. Glue the trailing edge flat on the plans. I used Titebond II for the entire wing except where noted. Put the top 1/8" square spar in place and glue. Glue 3/16" x 3/8" x 3/8" trailing edge to the rear ribs. Sand and shape.
Make the trailing-edge sheeting from 3/32" sheet cut 26-1/2" long. Cut each sheet in half 1-1/2" wide for top and bottom. Save the leftover 1-1/2" piece for center-section sheeting. Use cyanoacrylate (CyA) glue for the 1/2" x 7/8" leading-edge front ribs centered above and below the rib. Cut leading-edge sheeting from 3/32" x 3/8" sheet. Cut 26-1/2" long and save leftover; cut 7/8" off the edge of the sheet. Bevel the edge to match the angle formed by the top rib leading edge and glue in place.
Cut A6 vertical webbing between ribs. Upon completion the structure will form the D-tube. Finish the top by adding two cap ribs. Sheet the center section and let dry. Flip the wing over and add 1/16" rib doublers to ribs #2 and #4. Glue a hardwood landing-gear anchor block in place.
Follow the same steps above to complete the bottom wing. Make the center-spar brace by adding 1/16" plywood sides and 1/8" sheet fitted between the top and bottom spar. Set the dihedral under the wingtip as shown on the plans. Glue the wing halves together and add wingtip blocks. Fit aileron torque rods in 6-32 TE stock and glue in place. Make right and left ailerons. Shape, sand, and set the wing aside.
Fuselage
Make the sides from 1/8" stock. Use very hard balsa for the bottom longeron; others can be medium balsa. Keep edges neat because they will show up later. Make formers F1–F8. Following the small triangle shown on the plan, cut A2 plywood doubler and glue to the side. Make left and right sides. Carefully mark the location of formers on both sides. Attach engine-mount former F2. Glue F2, F3, F5 and keep the formers square to the sides. This can be done with the fuselage upside down on the plan with F2 hanging off the building board. It is a good time to install the servo tray; it will help keep the sides square.
Taper the upper and lower longerons to the tail post (1/8"). Pull the sides together and glue formers F4, F6, F7, F8 and the tail post. Cut and fit the elevator saddle. Glue rear stringer F3a to F8. Add a tapered square stock fit between the lower longerons and tail post F5c. Note the V bottom on the forms. Add cross bracing in the bay. Add pushrod exits and glue flush with the outside of the fuselage. Add scrap for the switch mount. Add top and bottom nose blocks. Glue filler triangular block and triangle block for engine and tank compartments. Shape and sand the nose area.
Canopy
In the past I made canopy blocks; they took too much carving and sanding. On the plans I don't want to hunt down a canopy, and buying one can also be expensive. Romano Garibaldi, inventor of Romair retracts and a club member and great craftsman, broke his mold and found a better way. Using a method I learned in a drafting course in college, I developed a sheet-balsa canopy. It's light, strong, easy to build, and looks good. No canopy to buy.
Cut and glue the canopy backbone along the centerline of the fuselage. Cut canopy segments noting the grain. Dampen the outside and use CyA to glue the centerline of the segment to the centerline of the fuselage. Bend the segment around F2 and trim where it meets the top edge of the fuselage. Glue in place and repeat for C2 and C1. CyA the seams of the segments.
If you wish, you can build the canopy first and reinforce the seams from the inside and then install it on the fuselage, trimming where needed. Fill in behind F3a with 1/8" scraps.
Rudder and Stab
Cut the stab from 1/4" sheet. Glue the stab to the top of the fuselage. Keep it square with the sides. All surfaces are set at 0° incidence.
Cut and fit the rudder from 1/4" sheet. Glue to the top of the stab and fuselage. Make this a strong joint. Install fairing blocks and sand to shape.
After making the ailerons, elevator, and rudder, hinge all surfaces.
Finish
I like to put two coats of clear acrylic lacquer, sanding between coats, on the entire airframe. I find that this makes the wood stronger and the MonoKote sticks better.
My friends tease me because I always make my wings yellow and the fuselage red; they say I have 500 yards of each color. They are wrong—I have 1,000 yards of each. Anyway, they are the colors I see best in the air.
Preflight
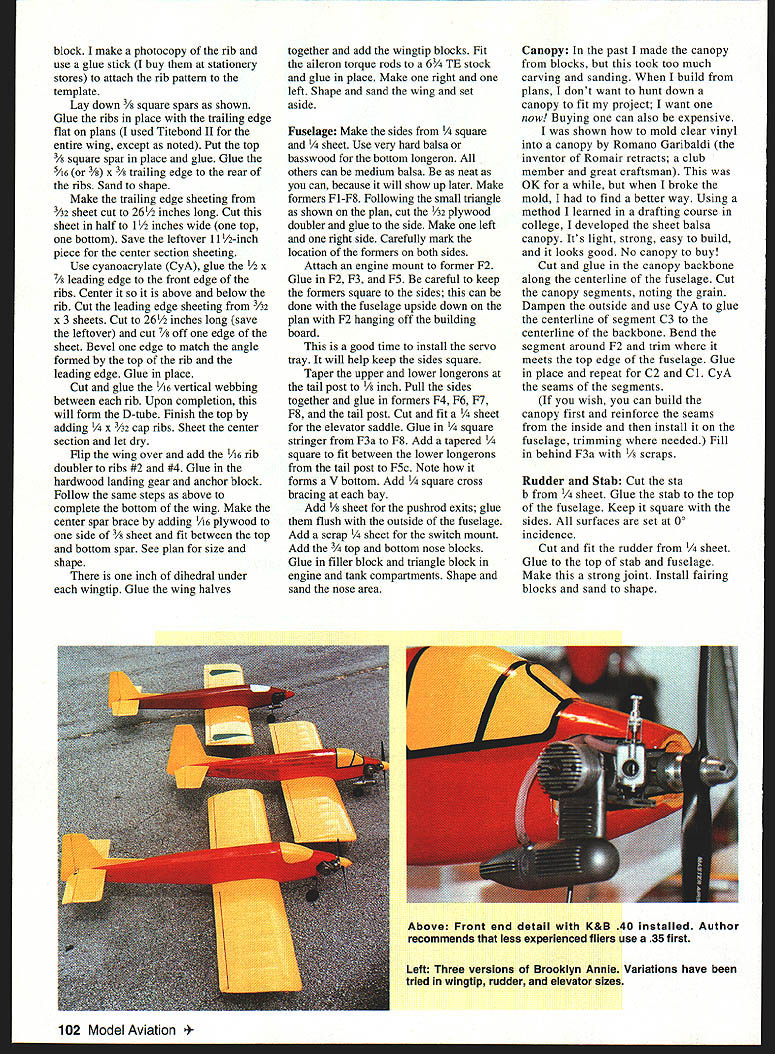
Install your engine and tank. If you are a beginner, don't put a .45 engine in it. A .35 will fly it quite nicely.
After all radio equipment is installed, check the center of gravity. It should be between the two marks shown. I found the rear mark best; that is at 30% of the mean chord.
Flying
Let it build up speed and pull back on the stick gently. With 3/8" up and down on the elevator it will lift nicely. After you become proficient, put in a good .40 and increase the throw on all surfaces.
If you choose to build the Brooklyn Annie, let me know how you like it and what you think I should change. Send me a picture too.
Thanks to my wife for her support and encouragement with this project.
Joel Cimmino 1701 DeWitt Terrace Linden, NJ 07036-3818 (summer) or 4206 NW 47th St. Tamarac, FL 33319-5820 (winter) E-mail: ancnim@aol.com
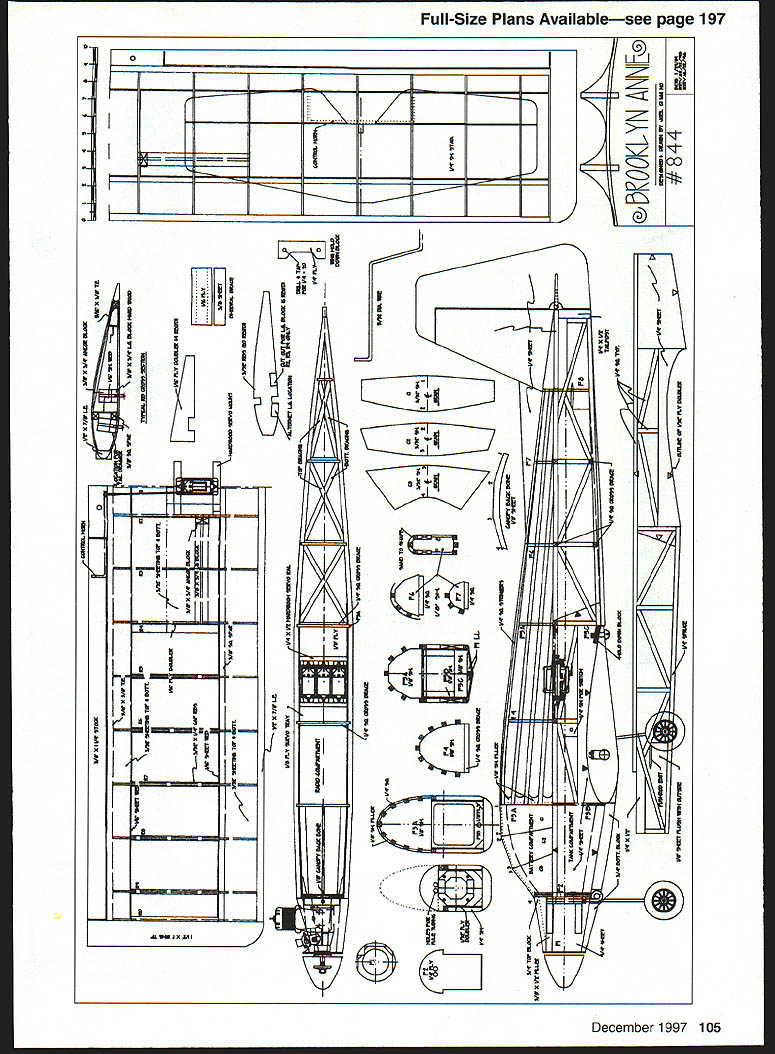
Plans
Full-size plans available—see page 197.
© BROOKLYN ANNIE #844
December 1997
No continuing article text appears on this page. The page contains the full-size plan illustration for "Brooklyn Annie" (labels and dimensions only) and a small cartoon/caption; there are no additional article paragraphs to transcribe.
Transcribed from original scans by AI. Minor OCR errors may remain.

