

Brown B-2 Miss Los Angeles
Gary E. Brown
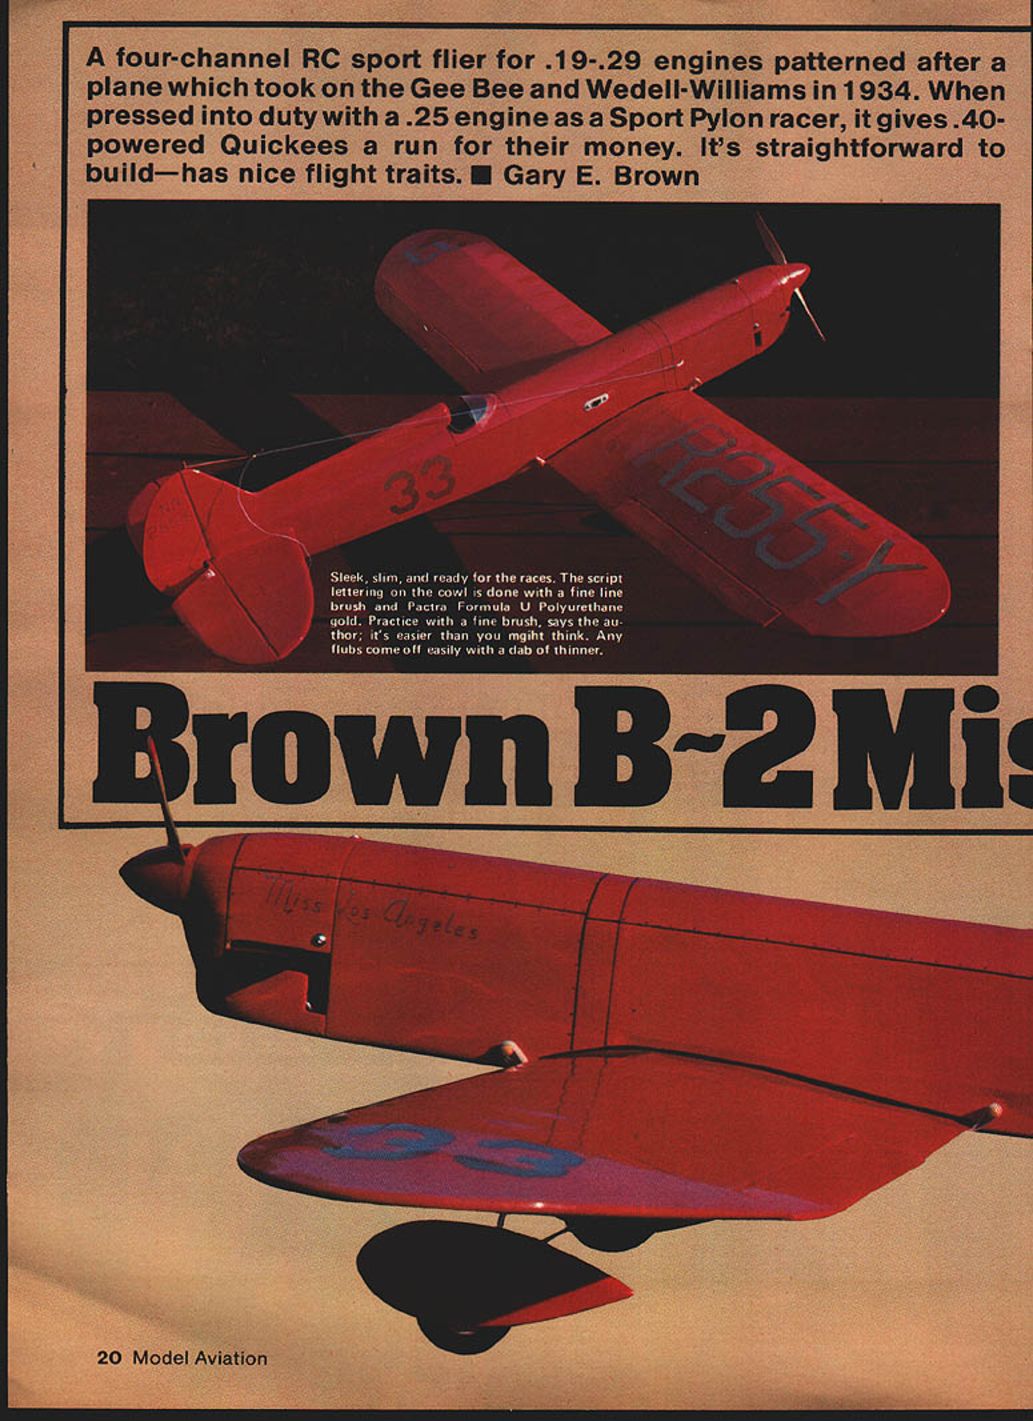
A four-channel RC sport flier for .19–.29 engines patterned after the full-size Miss Los Angeles, a plane that took on the Gee Bee and Wedell-Williams racers in 1934. When pressed into duty with a .25 engine as a sport-pylon racer, it gives .40-powered Quickees a run for their money. It is straightforward to build and has nice flight traits.
History
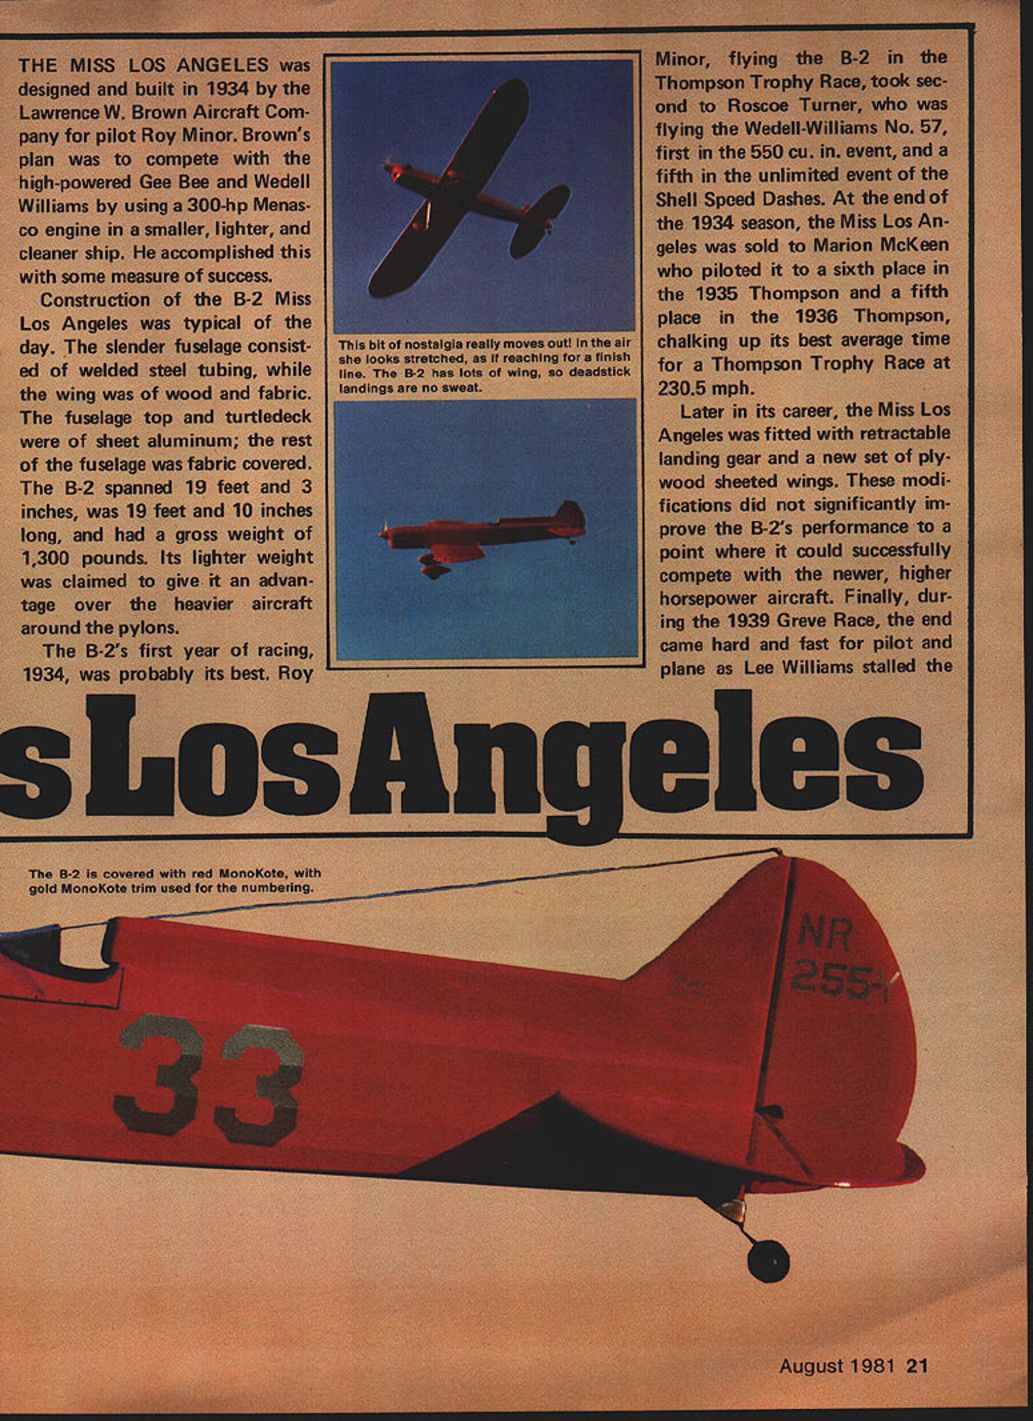
The Miss Los Angeles was designed and built in 1934 by the Lawrence W. Brown Aircraft Company for pilot Roy Minor. Brown’s plan was to compete with the high-powered Gee Bee and Wedell-Williams ships by using a 300-hp Menasco engine in a smaller, lighter, cleaner airframe. The B-2 spanned 19 ft. 3 in., was 19 ft. 10 in. long, and had a gross weight of 1,300 lb. Its lighter weight was claimed to give it an advantage around the pylons.
In 1934 Roy Minor flew the B-2 to second place in the Thompson Trophy Race (behind Roscoe Turner’s Wedell-Williams No. 57) and a fifth in the unlimited event of the Shell Speed Dashes. The Miss Los Angeles later placed sixth in the 1935 Thompson and fifth in the 1936 Thompson after being sold to Marion McKeen. Modifications later in its career included retractable landing gear and plywood-sheeted wings, but these did not restore competitiveness against newer, higher-horsepower racers. During the 1939 Greve Race Lee Williams stalled the B-2 while rounding the scatter pylon; the crash ended both pilot and plane.
The loss of Miss Los Angeles was emblematic of the end of the Golden Age of air racing in the U.S. Wartime developments shifted the focus to military aviation, and when postwar Thompson Trophy racing resumed it was dominated by wartime designs (Mustangs, Bearcats, Corsairs, Lightnings) rather than the prewar specials.
The design
I selected the B-2 for a sport-pylon project because of its clean lines and good proportions. Lacking a competitive .40, I designed the model around an O.S. Max .25 FSR and built it slightly smaller and lighter than the average .15–.50 design, hoping the smaller engine/airframe combination would be competitive with some .40-powered 15–500 designs.
The model proved quite fast and managed to best several Quickees in competition, though on average it was about 10 seconds slower than a .40-powered Quickee. As a sport flier the B-2 has shown itself to be stable and easy to fly: light wing loading and good proportions give it benign behavior and no tendency to tip-stall. It is a rewarding, sleek little Thompson Trophy–style racer.
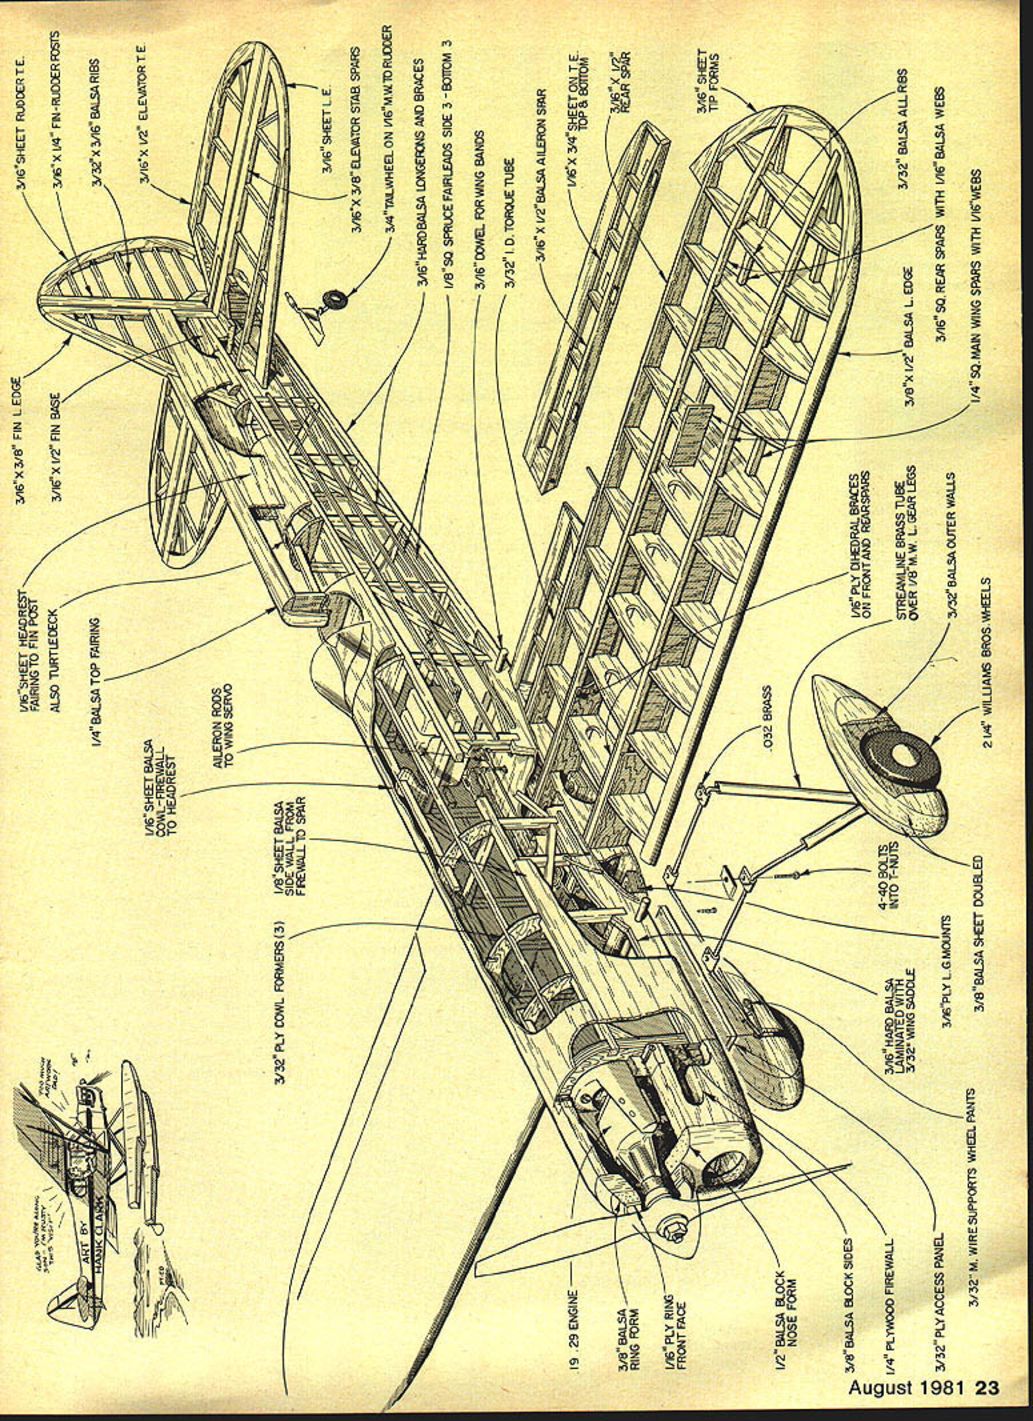
Construction
Before beginning, study the plans thoroughly and know how each piece fits.
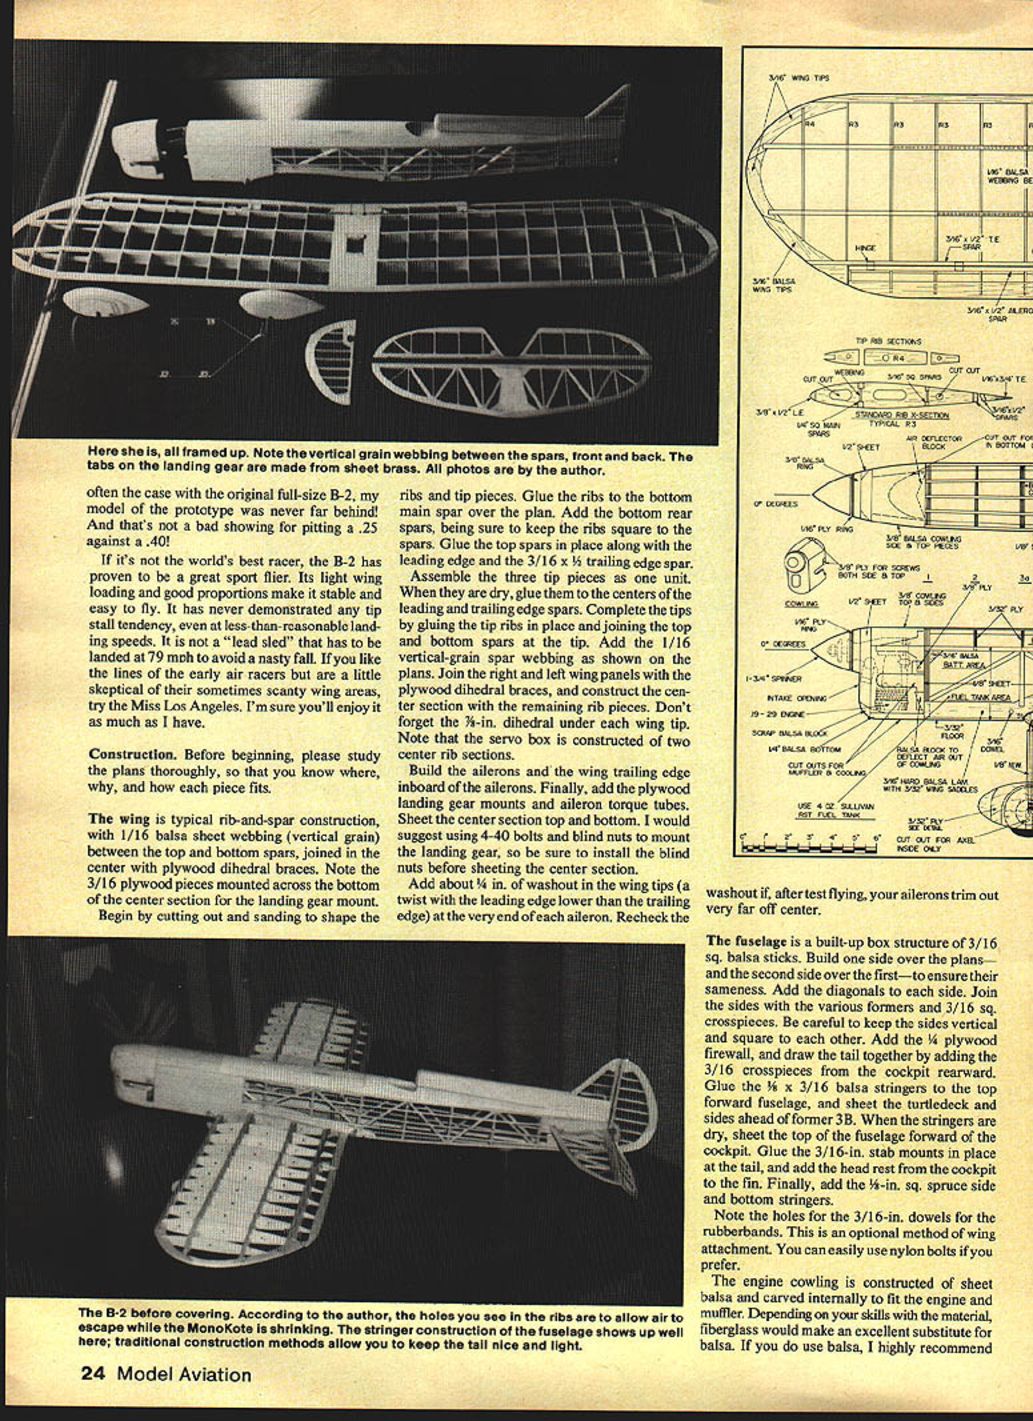
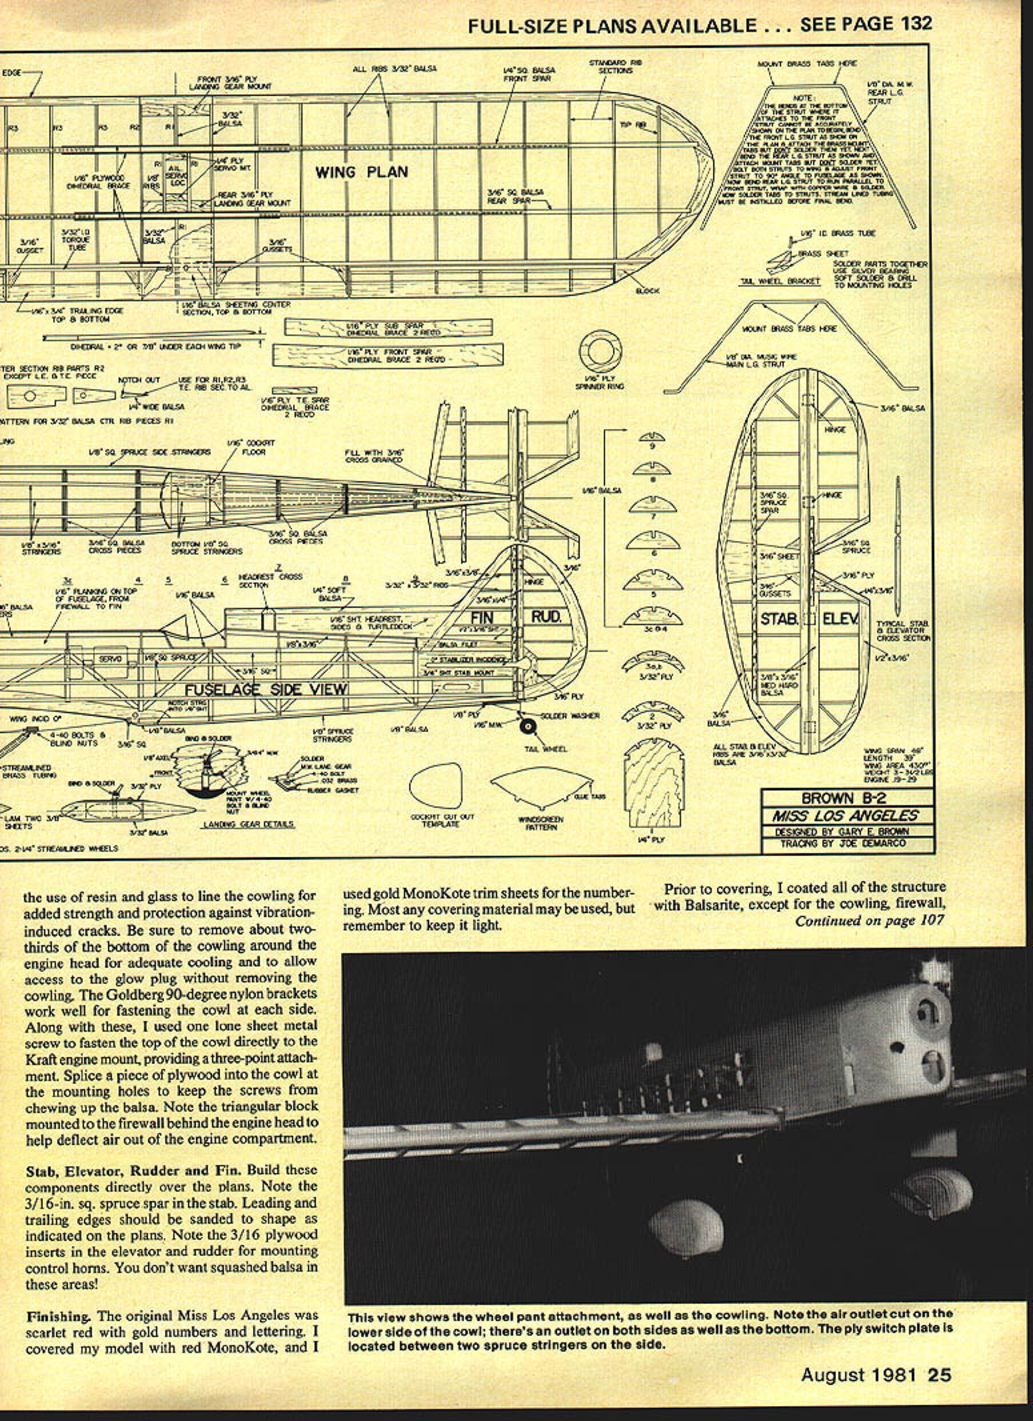
Wing
- Typical rib-and-spar construction. Use 1/16" balsa sheet webbing (vertical grain) between the top and bottom spars.
- Join center plywood dihedral braces. Note 3/16" plywood pieces mounted across the bottom center section for the landing-gear mount.
- Cut and sand shaped ribs and tip pieces. Glue ribs to the bottom main spar over the plan. Add bottom rear spars, keeping ribs square to the spars.
- Glue top spars in place along the leading edge (use a 3/16" leading-edge spar). Assemble three tip pieces as a unit; dry-glue centers of leading and trailing-edge spars. Complete tips, glue in tip ribs, and join top and bottom spars at the tip.
- Add 1/16" vertical-grain spar webbing as shown on the plans.
- Join right and left wing panels with plywood dihedral braces; construct the center section and remaining rib pieces. Don’t forget 1" dihedral under the wing tip.
- Note: the servo box is constructed in the two center rib sections. Build inboard ailerons on the wing trailing edge.
- Add plywood landing-gear mounts and aileron torque tubes. Sheet the center section top and bottom.
- I suggest using 4-40 bolts and blind nuts to mount the landing gear — install the blind nuts before sheeting the center section.
- Add about 1/4 in. of washout in the wing tips (leading edge lower than trailing edge) at the very end of each aileron. Recheck washout after test flying if the ailerons trim far off center.
Fuselage
- The fuselage is a built-up box structure of 3/16" sq. balsa sticks. Build one side over the plans and the second side over the first to ensure sameness.
- Add diagonals to each side. Join sides with formers and 3/16" spruce crosspieces. Keep sides vertical and square to each other.
- Add the 1/8" plywood firewall. Draw the tail together by adding the 3/16" crosspieces from the cockpit rearward.
- Glue 3/16" x 3/16" balsa stringers to the top forward fuselage and sheet the turtledeck and sides ahead of former 3B. When stringers are dry, sheet the top of the fuselage forward of the cockpit.
- Glue the 3/16" stab mounts in place at the tail and add the headrest from the cockpit to the fin. Finally, add 1/8" sq. spruce side and bottom stringers.
- Note holes for 3/16" dowels for rubberband wing attachment (optional). Nylon bolts are an easy alternative.
Cowling
- Construct the cowling of sheet balsa and carve internally to fit the engine and muffler. Fiberglass is an excellent substitute if available.
- If using balsa, line the cowling with resin and glass for strength and to resist vibration-induced cracks.
- Remove about two-thirds of the bottom of the cowling around the engine head for adequate cooling and to allow glow-plug access without removing the cowl.
- Use Goldberg 90-degree nylon brackets to fasten the cowl at each side. I also used one sheet-metal screw to fasten the top of the cowl directly to the Kraft engine mount for a three-point attachment; splice a piece of plywood into the cowl at mounting holes to prevent screws from chewing up the balsa.
- Note the triangular block mounted to the firewall behind the engine head to help deflect cooling air out of the engine compartment.
Stab, elevator, rudder and fin
- Build these components directly over the plans. Note the 3/16" sq. spruce spar in the stab.
- Sand leading and trailing edges to shape as indicated. Install 3/16" plywood inserts in the elevator and rudder for mounting control horns — do not rely on thin balsa in these areas.
Finishing
- The original Miss Los Angeles was scarlet red with gold numbers and lettering. The model was covered with red MonoKote and gold MonoKote trim sheets for numbering; most lightweight covering materials may be used.
- Prior to covering, coat structure with Balsarite except for areas to be coated with resin (cowling, firewall, etc.). The cowling should be lined with fiberglass and resin on the inside and coated on the outside. The firewall and about the first inch of the fuselage should receive a coat of resin inside and out for fuel protection.
- Sand the wood thoroughly so the resin will adhere properly. After resin hardens, sand lightly with fine paper to ensure good adhesion of covering.
- Miss Los Angeles lettering on the cowl can be done with Pactra Formula U polyurethane paint. Clean the MonoKote surface with thinner and use a fine brush; mistakes can be wiped off with thinner. Practice the script before applying.
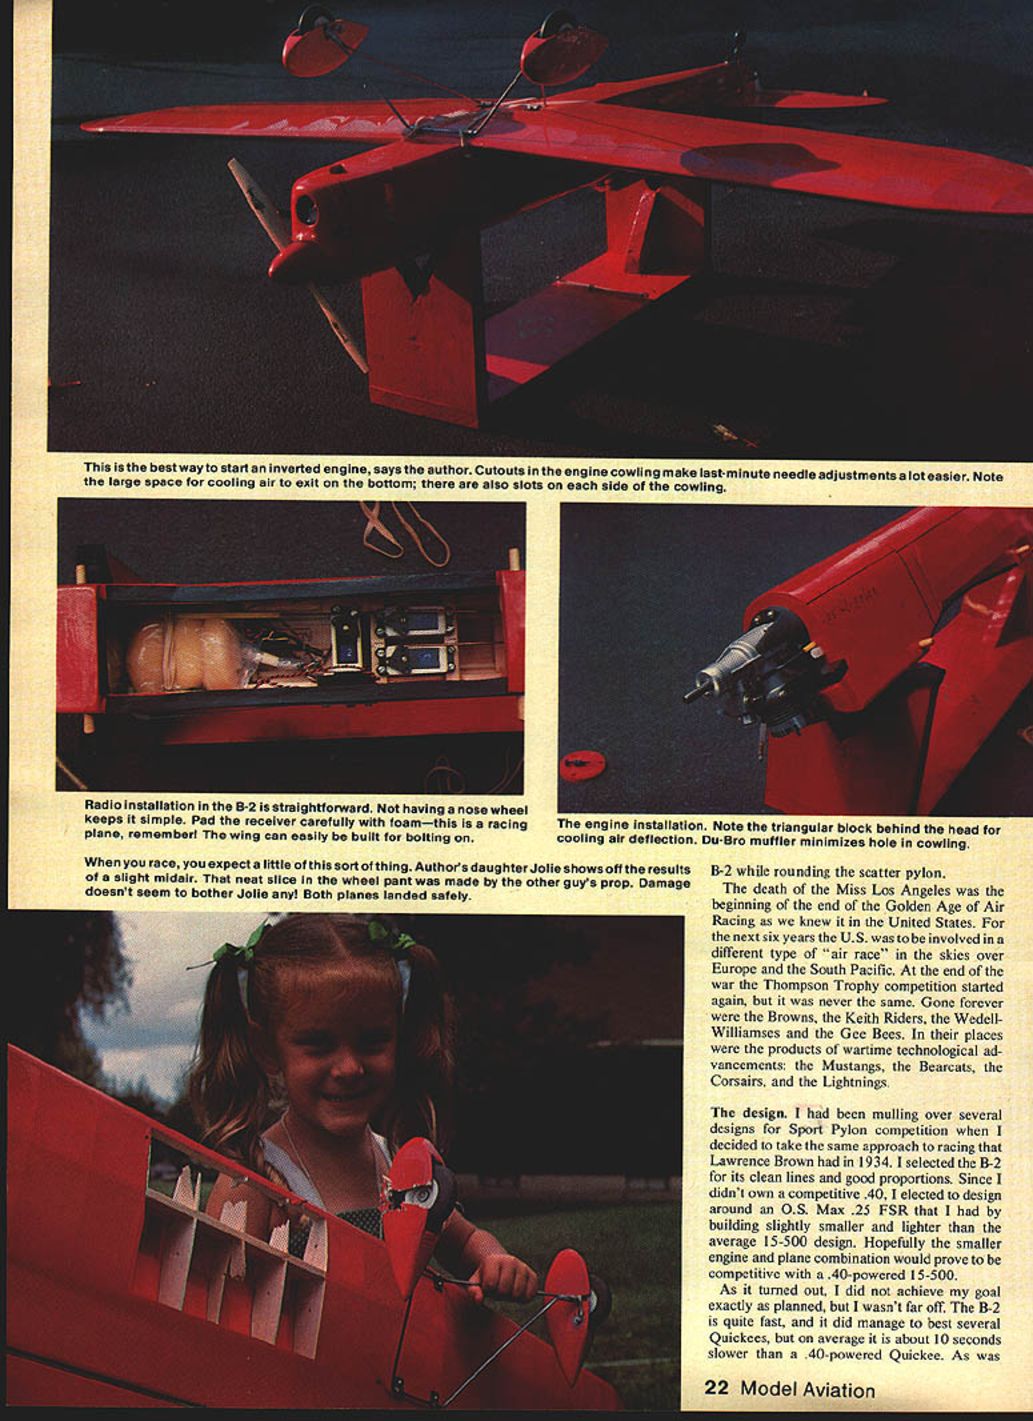
Radio installation
- Radio installation is straightforward. Having a nose wheel keeps things simple.
- Pad the receiver carefully with foam — this is a racing plane.
- The wing can be built for easy removal by bolting. Expect to remove and replace the wing often for racing and transport.
- Cutouts in the engine cowling make last-minute needle adjustments much easier. Provide a large cooling-air exit at the bottom and slots in the side cowl.
- A Du-Bro muffler minimizes the hole required in the cowling.
- Install the fuel tank (a 4-oz. Sullivan RST fits nicely) in the lower forward fuselage with tubing through a hole in the firewall. Seal around the tubing at the firewall with silicone to prevent oil/fuel leakage into the fuselage.
- Mount the battery pack on top of the fuel tank. Receiver and servos mount over the wing. Secure the receiver against the top of the fuselage with rubberbands; epoxy small music-wire hooks into the structure to attach the rubberbands.
- Position radio equipment to achieve the proper center of gravity (C.G.) as shown on the plans.
Engine mounting
- Inverted engines are not difficult to start and adjust. The easiest way to start an inverted engine is with a cradle that holds the entire model upside down (wheels up). Make one end of the cradle slightly higher so the nose is a bit higher than the tail to prevent gravity flooding the carburetor.
- A Robart Super Stand is an alternative.
- Ensure batteries, leads and the glow plug are in good shape. A 1.2-volt NiCad cell mounted in the fuselage and wired through a switch to the glow plug will help idle.
- Mount the engine on the firewall, allow access for adjustments, and follow the cowling instructions above (triangular deflector block, muffler clearance).
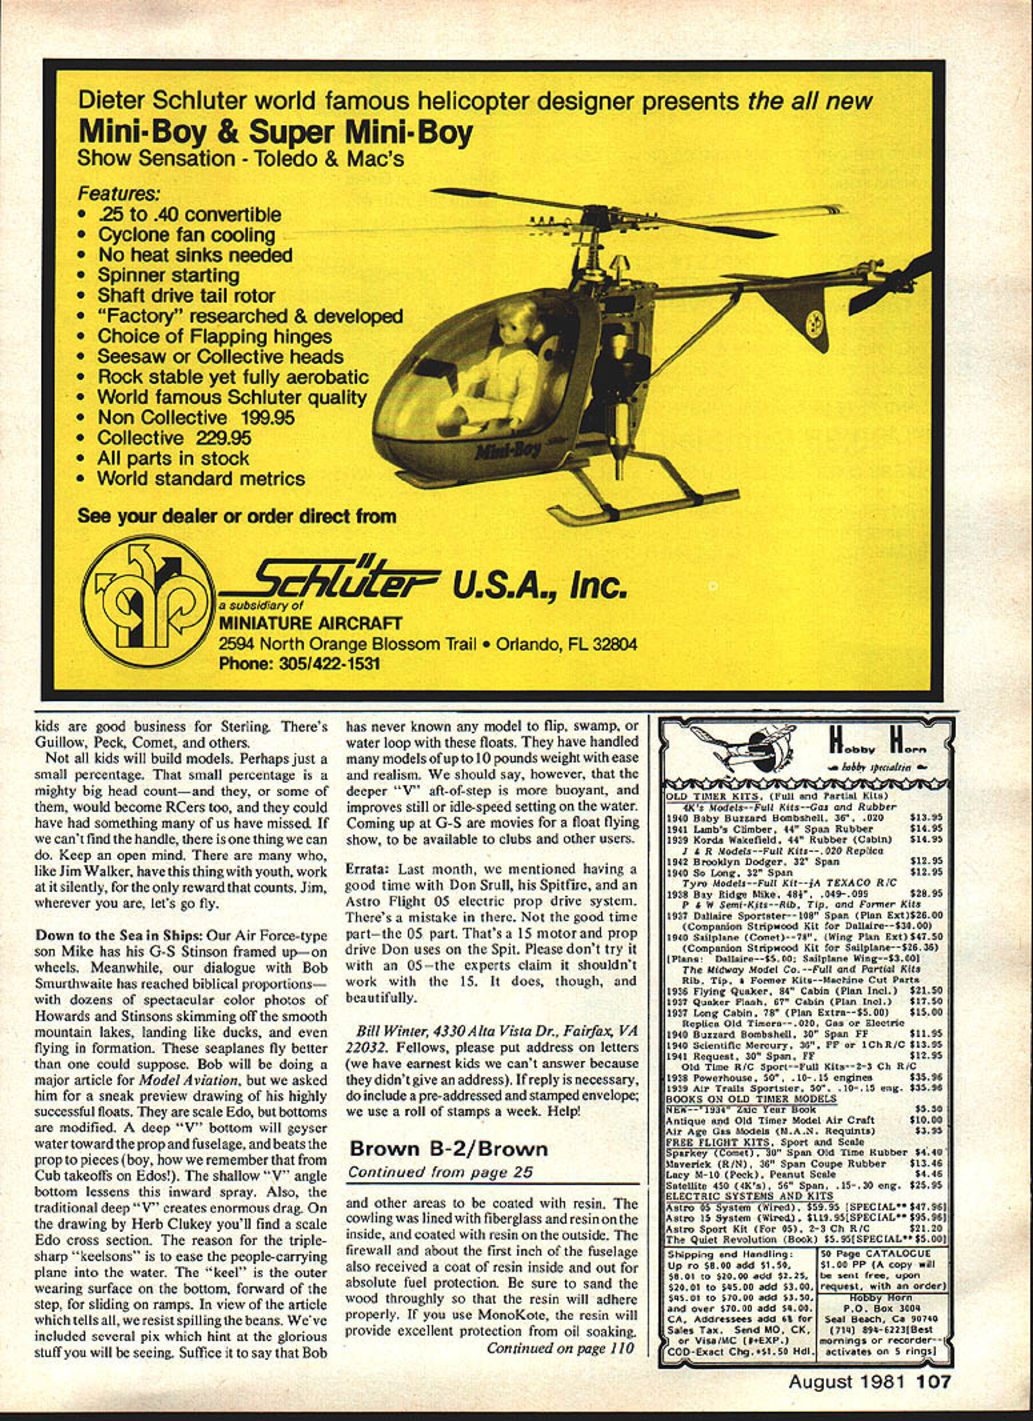
Landing gear and wheel pants
- Bend the two main gear legs out of 5/32" music wire. Wrap joints with copper wire and solder.
- Position the .032" brass sheet landing-gear mounting tabs on the gear (do not solder them in place yet). Screw both front and rear struts to the fuselage, mount the streamlined tubing, then make the final bend to join pieces. After legs are joined, solder the tabs in place.
- Small rubber gaskets made from inner tube material can be inserted between the brass mounting tabs and the wing to act as oil seals and prevent abrasion.
- Wheel pants: laminate from 1/2" balsa sheet in the center with 3/32" plywood sides. Leave at least 1/8" clearance between the wheel and the pant. The inside of the pant is a good place to use finishing resin for protection.
- My preferred wheel-pant mounting is a single-point attachment via a 4-40 bolt and blind nut behind the axle; this allows the front of the pant to pivot upward to avoid damage in a noseover or hard landing.
Flying
- Set the C.G. as shown on the plans. Make any C.G. adjustments in small increments.
- Start with small control throws:
- Ailerons: 1/4" up, 1/4" down
- Elevator: 1/2" up and down
- Rudder: 5/8" left and right
- Takeoffs are fast and smooth. Be prepared to hold right rudder until the model is off the ground and picking up airspeed.
- Once airborne the model is smooth and steady. If kept near the recommended 3 to 3-1/2 lb. total weight, landings can be slow and easy.
- Throttle back at the beginning of the downwind leg — the aerodynamically clean B-2 will glide a long distance and land with little more speed than a deBolt Champ, with no stalling tendencies.
- The B-2 may be a little quick for the newcomer to aileron flying, but anyone comfortable with aileron ships should find it manageable and enjoyable.
Try Miss Los Angeles — it’s a real pleasure to fly.
Transcribed from original scans by AI. Minor OCR errors may remain.

