
Bubblegun
R. J. Dunham
Bubble machines have long been a favorite way of detecting thermals. Here's a simple one made from an auto defroster.
HOW MANY OF YOU competition free-flight or RC sailplane fliers have gone to an important contest and know that you have the best ship on the field, only to be intimidated by some guy with a clunker of an airplane, but equipped with the latest electronic thermal detecting gear. Worse yet, he might have the best plane on the field and you the clunker. Since he obviously knows that he is taking unfair advantage of the rest of the fliers, he keeps his detecting gear carefully screened from his competition and makes sure that it is inoperative while you are taking your flights.
Well, now you can get even and take some of the guesswork out of thermal detection by whipping out your handy, portable, easy to use Bubblegun, and proceed to saturate the air with thousands of floating soap bubbles. By learning the action of bubbles under various atmospheric conditions, you can develop the art to where you can pretty accurately predict whether the time has arrived for you to put your plane into the air.
I watched this procedure followed recently at the '75 Nats and it produced a perfect string of seven maxes for the FAI Power event winner. This method of thermal detection is used by European fliers at important meets such as the FAI FF World Championships, where present rules prohibit using stationary thermal detecting gear within the designated launch area. Since the Bubblegun is hand held and portable it would be legal to have closeby. I find that in AMA competition that bubbles used in conjunction with a mylar streamer located closeby, the intensity of the lift can be better evaluated than with the bubbles alone.
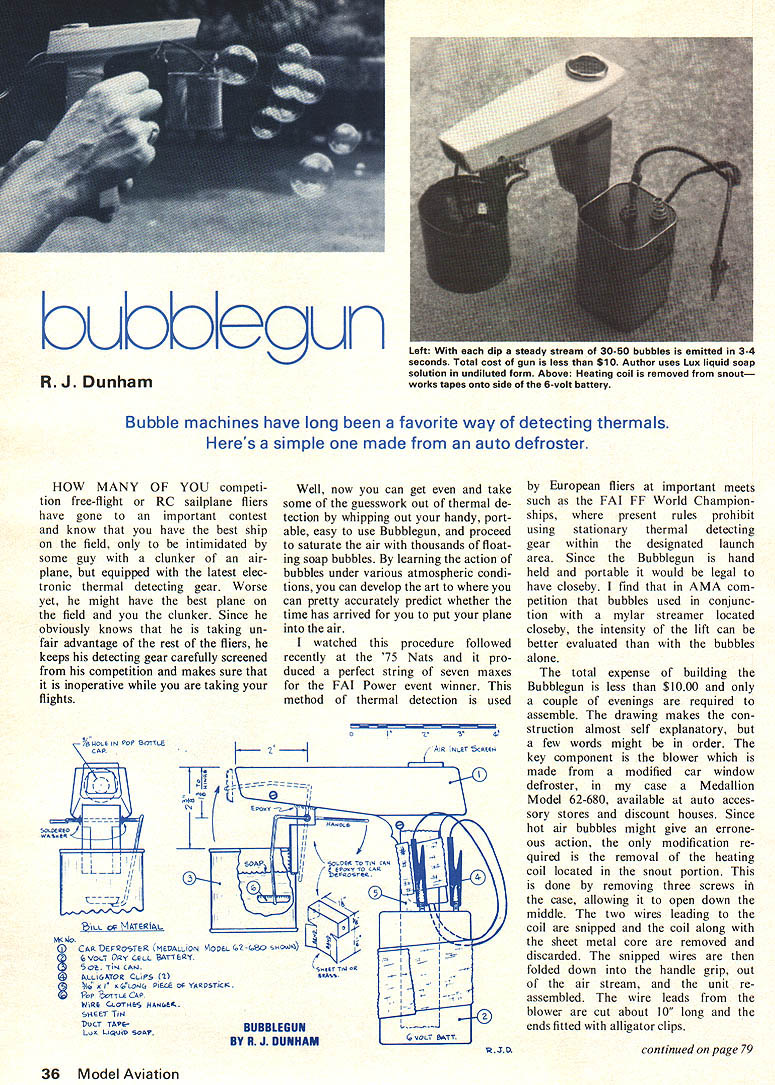
The total expense of building the Bubblegun is less than $10.00 and only a couple of evenings are required to assemble. The drawing makes the construction almost self explanatory, but a few words might be in order. The key component is the blower which is made from a modified car window defroster, in my case a Medallion Model 62-680, available at auto accessory stores and discount houses. Since hot air bubbles might give an erroneous action, the only modification required is the removal of the heating coil located in the snout portion. This is done by removing three screws in the case, allowing it to open down the middle. The two wires leading to the coil are snipped and the coil along with the sheet metal core are removed and discarded. The snipped wires are then folded down into the handle grip, out of the air stream, and the unit reassembled. The wire leads from the blower are cut about 10" long and the ends fitted with alligator clips.
Balance construction consists of sheet-metal forming and wire bending. I used coat hanger wire which is easy to bend. Removing paint at soldered areas on a small tin can used for the soap reservoir eases soldering; however, aluminum will not take solder attachments and will have to be epoxied. The can is epoxied in place. A pop bottle cap liner is removed and a 3/8" diameter hole drilled in the center of the cap and the wire dipper soldered in vertical position. The dipper is assembled off the blower and epoxied in place. The next step is to assemble the blower, 6-volt dry-cell battery, a 6" long piece of yardstick and tape. The original defroster set up for 12-volt operation; 6-volt battery results in better bubble formation by slightly reducing fan speed and air velocity. Use Lux liquid soap solution in undiluted form. Possibly other soap solutions or combinations might result in improvement. Dip until you find a steady stream of bubbles. The balance of the construction consists of sheet-metal forming and wire bending. I used coat hanger wire which is easy to bend, removing paint in the soldered areas. A small tin can is used for the soap reservoir for ease in soldering, however, aluminum will do but all attachments will have to be epoxied. The can and dipping wire is assembled off the blower and then epoxied into place as shown. The pop bottle cap liner is removed and a 3/8" diameter hole is drilled in the center. The cap is then soldered to the wire dipper so that it is in a vertical position when in the blowing position.
With this completed the next step is to assemble the blower and 6-volt dry-cell battery to a 6" long piece of yardstick with tape. Even though the original defroster is set up for 12-volt operation, the 6-volt battery results in better bubble formation by slightly reducing the fan speed and air velocity. I use Lux liquid soap solution in undiluted form, but possibly other soap solutions or combinations might result in improvement. With each dip I find that a steady stream of bubbles will be emitted for about 3–4 seconds, but in this short span of time 30–50 individual bubbles will be wafted into the air. If you have a good pair of lungs, it is possible to operate by blowing into the air inlet screen, leaving the battery disconnected. The method also serves as a good back-up in case you get to a meet and find your battery is dead from the previous week's outings.
If you have questions or suggested improvements, please let me know. If you cannot locate the defroster in your area, send $7.00 + $1.00 postage to me at P. O. Box 7151, Tulsa, Okla. 74105.
Transcribed from original scans by AI. Minor OCR errors may remain.

