
BUILD THE U.S. NAVY'S MARTIN MO-1 IN PISTACHIO SCALE SIZE
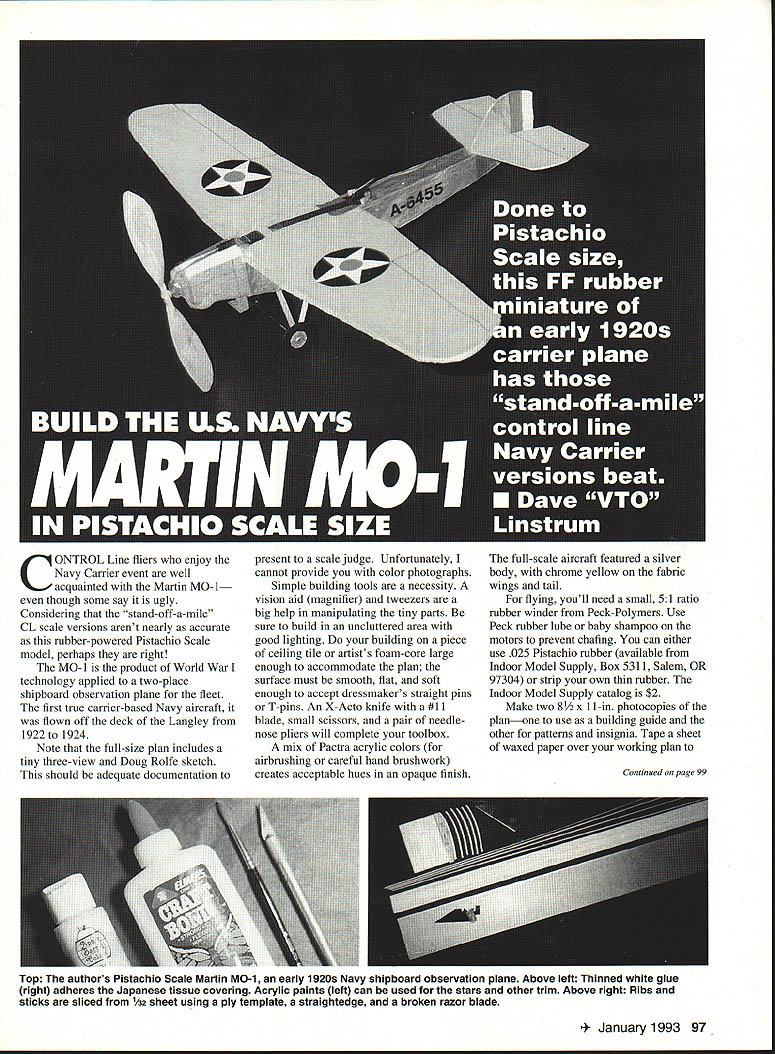
CONTROL-line fliers who enjoy the Navy Carrier event are well acquainted with the Martin MO-1—even though some say it is ugly. Considering that the "stand‑off‑a‑mile" CL scale versions aren't nearly as accurate as this rubber‑powered Pistachio Scale model, perhaps they are right!
The MO-1 is the product of World War I technology applied to a two‑place shipboard observation plane for the fleet. The first true carrier‑based Navy aircraft, it was flown off the deck of the Langley from 1922 to 1924.
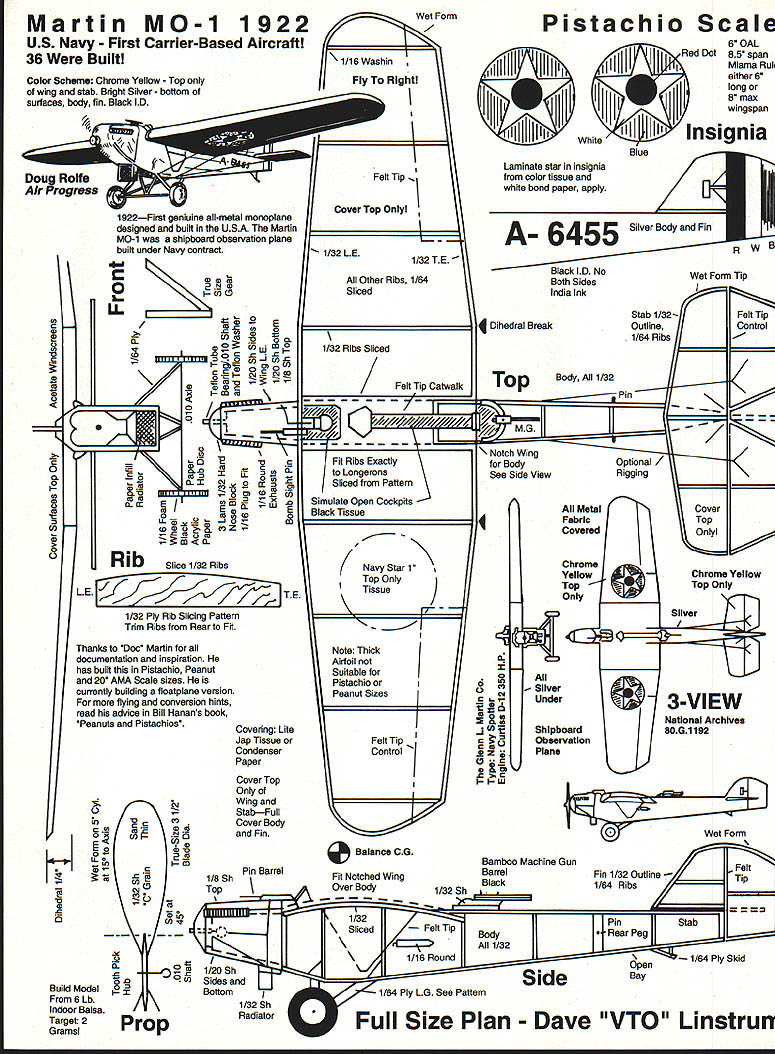
1922 — First genuine all‑metal monoplane designed and built in the U.S.A. The Martin MO-1 was a shipboard observation plane built under Navy contract.
Note that the full‑size plan includes a tiny three‑view and a Doug Rolfe sketch. This should be adequate documentation to present to a scale judge. Unfortunately, color photographs are not available.
Tools & Materials
- Small X‑Acto knife with #11 blade, small scissors, and needle‑nose pliers
- Vision aid (magnifier) and tweezers
- Smooth, flat, soft work surface (ceiling tile or artist's foam‑core) large enough for the plan
- Dressmaker's straight pins or T‑pins
- 1/32" balsa sheet (horizontal grain) for ribs
- 1/32" plywood for rib template
- Matboard for tail forms
- Peck‑Polymers white Japanese tissue (one sheet)
- Thinned Elmer's Craft Bond white glue
- Pactra acrylic colors (airbrush or brush)
- Red and blue waterproof fine‑point markers (Sharpie works), or acrylic paints for insignia
- Fine black pen for control outlines and detail
- Small 5:1 ratio rubber winder (Peck‑Polymers)
- Peck rubber lube or baby shampoo
- .025" Pistachio rubber (available from Indoor Model Supply, Box 5311, Salem, OR 97304) or strip your own thin rubber
- Indoor Model Supply catalog ($2)
Plans & Preparation
- Make two 8½ × 11 in. photocopies of the plan: one to use as a building guide and the other for patterns and insignia.
- Tape a sheet of waxed paper over your working plan to prevent balsa parts from sticking to the surface.
- Use the spare copy as a pattern for cutting matboard forms.
Construction
Build the wing first, the stabilizer and fin next, and the body and propeller last. Except for being entirely flat, the tail is constructed much the same way as the wing.
Wing
- Make a rib template from 1/32" plywood, sanding it smooth along the curve.
- Slice the ribs from a horizontal‑grained blank of 1/32" balsa sheet cut square to the width of the template:
- Position the template near the top of the blank and cut along the curve; discard the scrap.
- Move the template down about 1/2" (eyeball it) and make another cut; use two strokes if necessary.
- The finished ribs will have the correct curve.
- Slice two additional ribs from a slightly longer piece of balsa to form the wing mount in the body; the extra length allows for the leading and trailing edges at the center of the wing.
- Pin the leading and trailing edge strips and tips to the plan. Wet‑form the tips to fit the curve. Pair the pins in an X; never pin through wood strips.
- Fit and glue the ribs from the center outward. Trim them at the rear to fit the taper in the main panels.
- Be sure the ribs fit well at the dihedral breaks (denoted by small arrows on the plan). Raise each tip 1/4" for dihedral and glue the joints well.
- Add sheet gussets at the leading and trailing edges.
Tail (Stabilizer & Fin)
- Build the flat stabilizer the same way as the wing. Wet‑form the tips.
- Cut the matboard forms to shape using the spare copy of the plan as a pattern. Be sure the center is positioned straight.
Fuselage & Propeller
- Constructed after the wing and tail; follow the plan for shapes and mounting points.
- Use the two extra long ribs at the wing center to form the wing mount in the body.
Covering & Finish
- Paint the Peck‑Polymers white Japanese tissue on a frame and preshrink it before applying.
- Apply the tissue to the airframe with thinned Elmer's Craft Bond white glue.
- The full‑scale aircraft featured a silver body with chrome yellow fabric on the wings and tail. A mix of Pactra acrylic colors will produce acceptable opaque hues.
- Make stars and insignia with red and blue waterproof fine‑point markers (Sharpie) or with acrylic paints. Use a fine black pen for control outlines and detail.
Flying & Trim
- Use a small 5:1 ratio rubber winder from Peck‑Polymers.
- Start with a short length (8‑in. loop) of .025" rubber and trim for a loose right‑spiral climb.
- Lubricate motors with Peck rubber lube or baby shampoo to prevent chafing.
- Balance the model, with the motor installed, at the center‑of‑gravity shown on the plan. Adjust the balance and trim as needed for stable flight.
Tips & Notes
- Simple building tools and good lighting are necessities. Build in an uncluttered area.
- Work on a flat, soft surface to allow pinning without damaging parts.
- Never pin through thin wood strips; pair pins in an X for wet‑formed tips.
- Without factory tooling, the hand‑built project can be completed in a couple of evenings.
Acknowledgments
Thanks to "Doc" Martin for documentation and inspiration. He has built this model in Pistachio, Peanut, and 20" AMA Scale sizes and is currently building a floatplane version. For more flying and conversion hints, see Bill Hanan's book Peanuts and Pistachios.
Transcribed from original scans by AI. Minor OCR errors may remain.

