


Build Your Own RC Flight Box
It's not as difficult as you think, and it's easily done to fit your equipment!
Jon Putnam
When I was learning to fly, I'd arrive at the field carrying a flight box built from scraps of chipboard. I'd also have a cardboard box full of fuel, paper towels, and other odds and ends. From the back of his pickup, my instructor would pull out his beautifully made, varnished flight box. Everything seemed to be in the right place and easily at hand. My motley assortment of flightline paraphernalia looked tacky by comparison. After more than a few jokes about "What grade of chipboard do I buy to build a flight box like that?" I resolved to design and build a flight box of my own.
With good reason, you may be asking yourself, "Why would I want to build my own RC flight box when I can buy a precut kit for 20 bucks?" It's true. There are many factory-built boxes on the market—precut, prepainted, and predesigned to accommodate the needs of the average flier. You may not need to build your own flight box if one of these satisfies your needs. But if you need something more and like to work with wood, here are some reasons why you might want to build your own:
Personal Satisfaction
Building an RC flight box is a great project. If you have average-to-good woodworking skills and access to a table saw or radial saw, a flight box is a rewarding way to spend a few evenings producing something you will use. I can't guarantee you'll save a lot of money over a precut plywood box, but I will guarantee that you'll get more than your money back in satisfaction.
Besides the personal reward of gazing lovingly at your finished creation, you may win the admiration of your family members. When I finished my flight box, my wife began dropping hints about all of the household and furniture items I could build for her. The moral: Build your flight box now—you may not have time later.
Knowing Yourself and Your Flightline Style
Not everyone uses a starter, power panel, or an electric fuel pump on the flightline. If you use more or less than the average factory-built flight box holds, you may be a candidate for building your own version.
You may be a lightweight, a true flightline sprinter. You arrive at the flying field with a can of gas, a Ni-Cd glow starter, a hardwood chicken stick, and a couple of hand tools—little more than a shoebox full. Your model is in the air minutes after you hop out of your hatchback. As you land, you glance at the flier who arrived with you, his Chevy Suburban loaded with equipment.
Your heavier-weight friend looks at life with a different tint in his sunglasses. In fact, he may have brought several pairs of glasses to the field, just in case. Some of these would-be weightlifters come to the field with rolling field boxes, battery carts, and fueling stations capable of supporting a minor air force. They have tools and spare parts for every model they own, and probably the ones you're flying as well. If they don't have a certain part, they can probably make one on the lathe and milling machine in the back of their truck. If you're a friend in need, these flying-field spare-part stores are great friends to have.
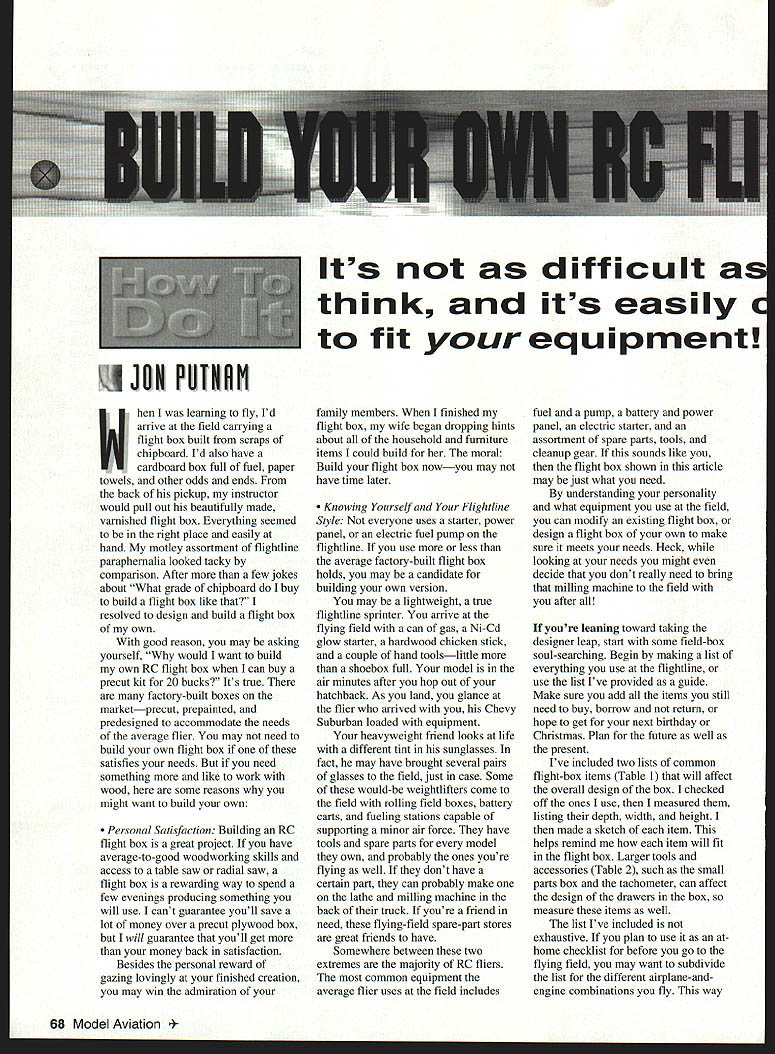
Somewhere between these two extremes are the majority of RC fliers. The most common equipment the average flier uses at the field includes fuel and a pump, a battery and power panel, an electric starter, and an assortment of spare parts, tools, and cleanup gear. If this sounds like you, then the flight box shown in this article may be just what you need.
By understanding your personality and what equipment you use at the field, you can modify an existing flight box, or design a flight box of your own to make sure it meets your needs. Heck, while looking at your needs you'll even decide that you don't really need to bring that milling machine to the field with you after all!
If you're leaning toward taking the designer leap, start with some field-box soul-searching. Begin by making a list of everything you use at the flightline, or use the list I've provided as a guide. Make sure you add all the items you still need to buy, borrow and not return, or hope to get for your next birthday or Christmas. Plan for the future as well as the present.
The list I've included is not exhaustive. If you plan to use it as an at-home checklist before you go to the flying field, you may want to subdivide the list for the different airplane-and-engine combinations you fly. This way you're less likely to leave all those special four-stroke wrenches back home on the workbench. You might also want to list spare parts. There's nothing worse than traveling 20 miles to the flying field, then burning out a glow plug or breaking a prop after a flight and being grounded for lack of a spare.
Building the Flight Box
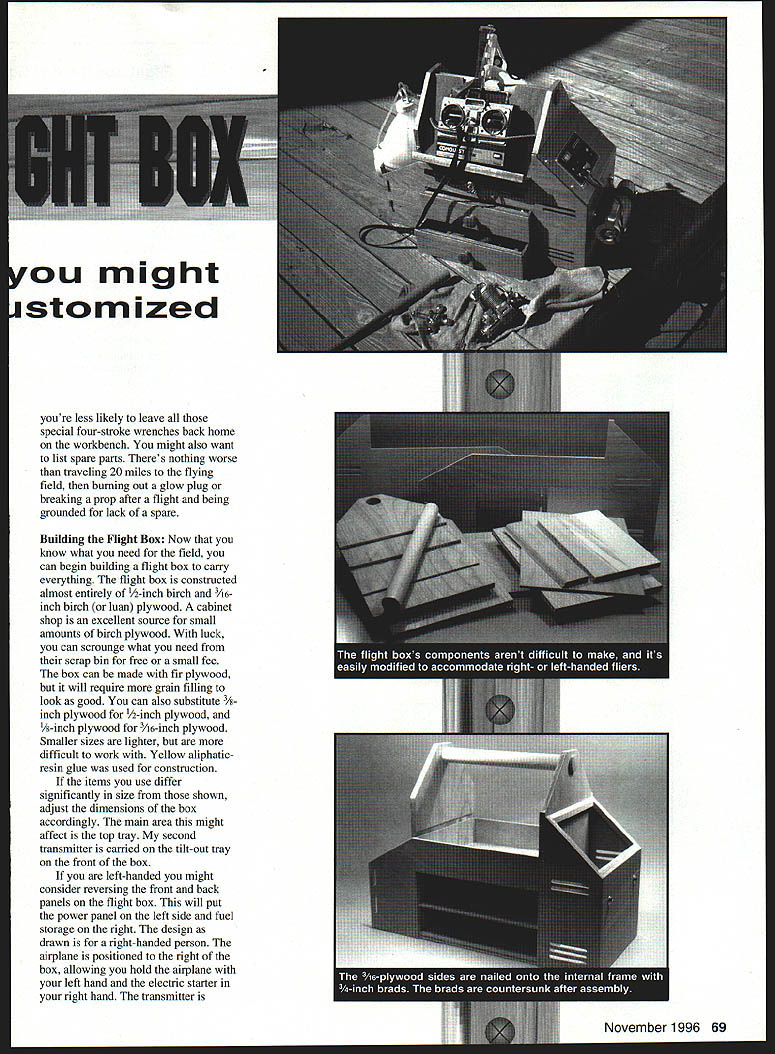
Now that you know what you need for the field, you can begin building a flight box to carry everything. The flight box is constructed almost entirely of 1/2-inch birch and 3/16-inch birch (or luan) plywood. A cabinet shop is an excellent source for small amounts of birch plywood. With luck, you can scrounge what you need from their scrap bin for free or a small fee. The box can be made with fir plywood, but it will require more grain filling to look as good.
You can also substitute 3/8-inch plywood for 1/2-inch plywood, and 1/8-inch plywood for 3/16-inch plywood. Smaller sizes are lighter, but are more difficult to work with. Yellow aliphatic-resin glue was used for construction.
If the items you use differ significantly in size from those shown, adjust the dimensions of the box accordingly. The main area this might affect is the top tray. My second transmitter is carried on the tilt-out tray on the front of the box.
If you are left-handed you might consider reversing the front and back panels on the flight box. This will put the power panel on the left side and fuel storage on the right. The design as drawn is for a right-handed person. The airplane is positioned to the right of the box, allowing you to hold the airplane with your left hand and the electric starter in your right hand. The transmitter is placed on the tilt-out tray, allowing you to easily reach it for throttle adjustments after starting the engine. A left-handed person will find the reversed design more user-friendly.
Before you begin chopping wood, give some thought to your woodworking skill level. The parts for the prototype flight box, with the exception of the drawer parts, were precut before assembly. This procedure is fine if you are accurate with your measuring and cutting; it leaves little room for error.
A safer procedure is to cut the parts as you need them. This is especially true when cutting out the back and front to match the assembled internal structure. Measure twice and cut once.
Cut out the 1/2-inch bottom, the battery-box end pieces, and the two uprights. After cutting the 9 x 20-inch bottom blank, glue and nail a 1/2 x 1/2-inch pine strip to one end. This will prevent the plywood end-grain from splitting. Mark the location of the uprights on the bottom and drill 3/32-inch guide holes for the #8 x 2-inch wood screws that hold the uprights in place.
Cut and drill the uprights so that they are identical. Here are some tricks that might help with this crucial part of the flight box:
- Cut two 9 x 15-1/2-inch rectangular blanks for the uprights.
- Mark the angles and center of the handle on one blank. Stack them on top of each other and drive a finishing nail through the center mark for the handle. Drive another finishing nail through both approximately three inches from the bottom. Make sure the nail does not come out the back side of the second piece or you'll scratch your table saw top.
- Cut both angles. Put a C-clamp on the upper portion of the stack and remove the upper finishing nail. Drill the hole for the handle.
- While they are still attached, mark the location of the dados on both edges. Remove the nail and clamp, and cut the 3/16-inch-wide and 1/2-inch-wide dados to a depth of 1/4 inch. Always test the depth and width of a dado on scrap.
You should now have two identical uprights.
The 1/2-inch battery-box end pieces are cut from one 9 x 12-inch piece. They can be ripped at the same time the bottom is ripped. After cutting the blank, rip the 1-1/2 x 9-inch reinforcing piece, as well as the shorter top piece from this blank. This will ensure matching grain on the end of your box. Leave the top piece of the battery-box end blank long, and hold off cutting the top angle until after the front and back of the box are cut. This will enable you to get a dead-on match between that angle and the sides.
Glue the 1-1/2 x 9-inch piece to the upper battery-box end piece and a piece of 1 x 1/2-inch pine to the bottom piece. Drill two holes for the 1/4-inch blind nuts and install them. Glue and nail the completed battery-box end to the bottom.
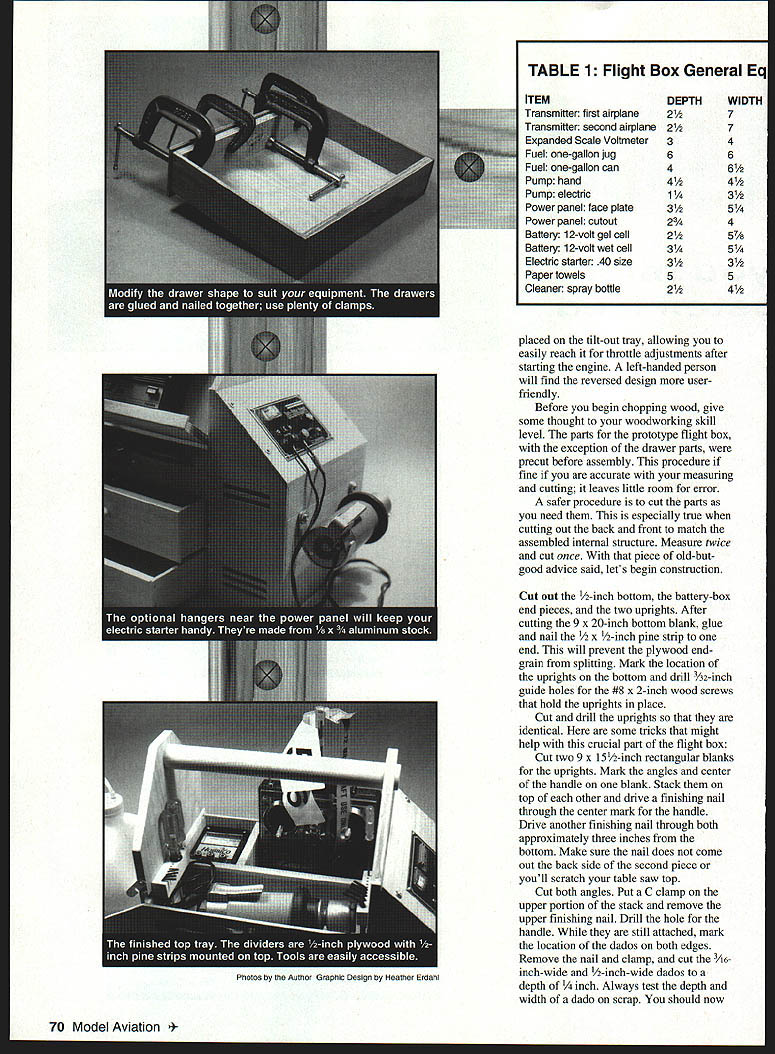
Cut out the two 9 x 11-1/2-inch drawer supports. Trial-fit these with the uprights. Glue the uprights to the bottom, and attach them with #8 x 2-inch wood screws. Glue the drawer supports in place. Check the uprights to make sure they are at right angles to the base.
Cut out the 12 x 21 x 3/16-inch luan plywood blanks that are used for the front and back of the box. A prettier (but more expensive) substitution for the luan plywood is 1/8-inch birch plywood. The sides are gang-cut and drilled using the same technique used for the 1/2-inch uprights.
Two things are worth remembering:
- Luan plywood usually has one side that is better than the other—the less-attractive side will have more grain showing. Use the grainy side for the inside of the box—it will save you a lot of filling and sanding later.
- Cut the drawer openings only out of the front piece.
Before taking the stacked parts apart, be sure to drill and cut the ventilation slots for the battery box in the right end, and the slot for a fuel-can hold-down strap in the left end. There are many ways to make these slots. I used a drill for the end holes, and finished them up with a portable saber saw. They can also be cut using a router or a scroll saw. Attach the front and back using glue and 5/8-inch wire brads. Countersink and fill these after the glue dries.
Once the front and back have been attached, cap the exposed, open-grain tops of the uprights with birch veneer. I used the kind that's packaged in rolls, and attached it with wood glue.
The battery box is now ready to finish. Cut a 9-3/8 x 7-inch blank for the power panel. Cut the angle at the top edge, trial-fit it, and cut the angle for the bottom edge. Now that the power panel blank is cut, finish cutting the angle in the top battery-box end piece. Glue 1/4 x 1/2-inch pine scrap to the 3/16-inch plywood front and back and the 1/2-inch uprights. This will give you some real wood to sink the screws into later. Cut the hole for the power panel (if you are using one). Glue 1/2-inch scrap to the underside of the power panel blank for the panel's attachment screws. I used #4 x 1/2-inch wood screws to attach the power panel to the blank, and the blank to the box. Use 1/4-inch screws in the blind nuts to hold the end pieces together.
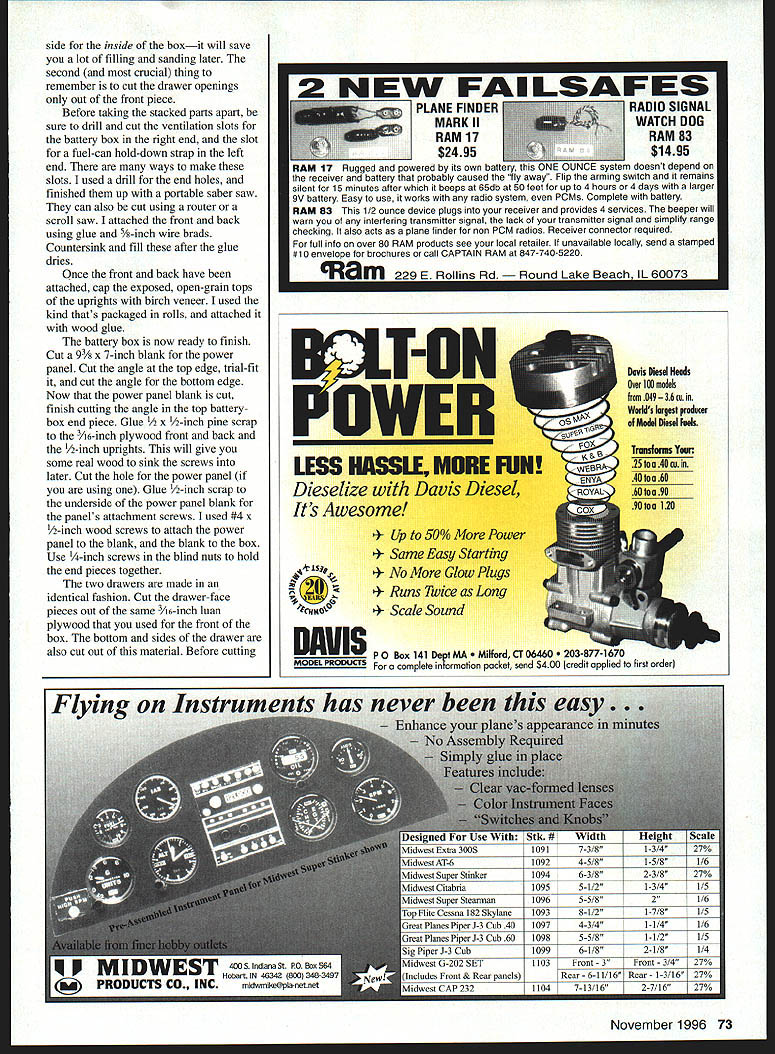
The two drawers are made in an identical fashion. Cut the drawer-face pieces out of the same 3/16-inch luan plywood that you used for the front of the box. The bottom and sides of the drawer are cut from 1/2-inch plywood. Glue the drawer pieces together and clamp them until the glue dries. When dry, sand the drawer faces flush with the sides. Drill and countersink for the drawer-face screws. I used small brass-plated hinges to attach the drawer faces; they work well and give a neat appearance.
Finish the entire box with several coats of clear lacquer or varnish, sanding lightly between coats. If you prefer, the box can be painted. A light sanding and a coat of primer are recommended before applying the finish color.
Install the power panel, switches, outlets, and starter receptacle. Mount a small bungee cord or strap in the fuel-can compartment to hold the fuel can in place. Add foam or rubber padding where necessary to protect instruments and batteries.
Arrange the drawers and compartments to suit your flying habits. Mine holds a starter, power panel, glow-plug clips, a small parts box, tools, and cleaning supplies. If you'll be transporting larger items, adjust the dimensions accordingly.
The last major items to build are the tilt-out tray for the transmitter, the tool racks, and the top-tray framing. The tilt-out transmitter tray back is an 8 x 10⁻¹/4-inch blank of 3/16-inch luan plywood cut and drilled to the shape shown in the plans. A 2 x 10⁻³/4-inch tray is cut out of 1/2-inch plywood. This is glued and nailed to the tray back. A small strip of 3/4 x 3/4-inch pine or mahogany scrap is glued to the front edge of the tray; this and the bungee cord hold the transmitter in place.
A 1/2-inch dowel is cut to fit into the 1/4-inch dado between the uprights. The right end of the dowel fits into the dado behind the 3/16-inch plywood front. The left side is held in place by the aluminum tray keeper. Cut 1/2 x 1/4-inch pine strips to fill in the rest of the dado. They hold the back of the tilt-out dowel in place. Mount 3/4 x 1 x 3-1/2-inch pine tool rests on the front end of these pine strips. Holes are drilled in these to hold screwdrivers, Allen drivers, and wrenches.
The internal framing of the top tray is built out of 1/2-inch plywood scrap with 1/2 x 1/4-inch-thick pine capstrips. My top tray holds a transmitter, voltmeter, starter, tools (in the tool racks), some cyanoacrylate glue, and after-run oil.
The electric-starter hangers on the right end of the box are a useful option well worth making. Purchase some 1/8 x 3/4-inch aluminum bar stock at a hardware store. Lay out the shape of the hanger. Compare this shape to the shape of both ends of your electric starter. I ended up making one of my hangers smaller than the other. Cut two lengths of the aluminum bar stock into pieces that are approximately 8 inches long. Drill 1/4-inch holes in one end of each piece. Make a form out of 2 x 4-inch scrap and drill a 1/4-inch hole in one end of the form. Put the straight piece of aluminum stock on the form, slip a 1/4-inch dowel in the hole, and clamp this end in a vise. Use a mallet to form the aluminum around the form. Grind the ends round when you're finished.
Finishing the Flight Box
Finishing can be done in a number of ways, but all of them demand proper surface preparation. Remove the "curse" from all the exposed edges by giving them a hairline bevel with sandpaper. All of the holes and imperfections were filled with Durham's Water Putty. Be sure to choose a filler that is stainable and sandable.
I sanded with 220- and 320-grit paper, raising the grain with a damp sponge before final sanding. Before applying the finish, go over the surface with a vacuum and a tack cloth. Watco Danish Oil Finish and three coats of clear, semigloss Minwax polyurethane were my choices for the final finish. This combination has held up well with 10% nitro fuel.
Other finishing alternatives include stain and spar varnish, enamel, and clear resin. Whatever finish you choose, make a test sample to see how it will hold up under the fuel you're using. You've put too much work into your flight box to ruin it now with the wrong finish.
A nylon pack strap holds on the fuel can and spray bottle. All that's left to do is to install the battery and power panel, fill up the compartments you've built, and head out to the flying field—with an airplane in one hand and your new flight box in the other!
Jon Putnam 2358 N.W. Birkende Portland, OR 97229
TABLE 1: Flight Box General Equipment
- Transmitter (first airplane) — Depth: 2-1/2 in, Width: 7 in
- Transmitter (second airplane) — Depth: 2-1/2 in, Width: 7 in
- Expanded scale voltmeter — Depth: 3 in, Width: 4 in
- Fuel: one-gallon jug — Depth: 6 in, Width: 6 in
- Fuel: one-gallon can — Depth: 4 in, Width: 6-1/2 in
- Pump: hand — Depth: 4-1/2 in, Width: 4-1/2 in
- Pump: electric — Depth: 1-1/4 in, Width: 3-1/2 in
- Power panel: face plate — Depth: 3-1/2 in, Width: 5-1/4 in
- Power panel: cutout — Depth: 2-3/4 in, Width: 4 in
- Battery: 12-volt gel cell — Depth: 2-1/2 in, Width: 5-1/2 in
- Battery: 12-volt wet cell — Depth: 3-1/4 in, Width: 5-1/2 in
- Electric starter: .40 size — Depth: 3-1/2 in, Width: 3-1/2 in
- Paper towels — Depth: 5 in, Width: 5 in
- Cleaner: spray bottle — Depth: 2-1/2 in, Width: 4-1/2 in
TABLE 2: Flight Box Tools and Accessories
- Chicken stick
- Glow-plug clip and wires
- Ni-Cd starter
- After-run oil
- Screwdriver: straight-bit
- Screwdriver: Phillips-head
- Pliers: needle-nose
- Pliers: slip-joint
- Wrench: adjustable
- Wrench: plug wrench
- Wrench: Allen set
- Wrench: engine
- Drivers: Allen
- Hobby knife
- Hobby knife blades
- Propellers: spares
- Glue: cyanoacrylate (CyA)
- Accelerator
- Small parts box
- Shim stock
- Rubber bands
- Spare glow plugs
- Buddy-box cord
- AMA card
- AMA insurance card
- Club card
- Pen
- Paper
Additional items with dimensions:
- Tachometer — Depth: 2-3/4 in, Width: 7-1/2 in, Height: 2 in — In box: yes
- Small parts box — Depth: 3-3/4 in, Width: 7 in, Height: 1-1/4 in — In box: yes
Transcribed from original scans by AI. Minor OCR errors may remain.

