
BUILDING A JIG FOR: FREE FLIGHT WINGS
By John Lorbiecki
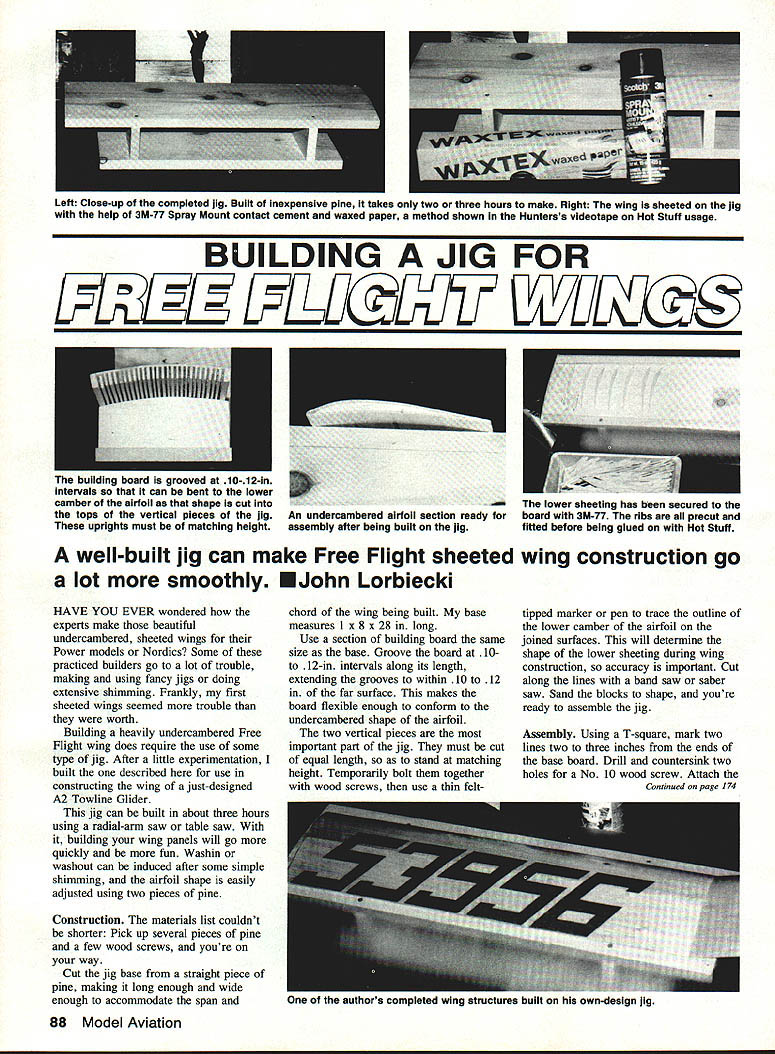
A well-built jig can make free-flight sheeted wing construction go a lot more smoothly. Have you ever wondered how the experts make those beautiful undercambered, sheeted wings for their power models or Nordics? Some practiced builders go to a lot of trouble, making and using fancy jigs or doing extensive shimming. Frankly, my first sheeted wings seemed more trouble than they were worth.
Building a heavily undercambered free-flight wing does require some type of jig. After a little experimentation, I built the one described here for use in constructing the wing of a newly designed A2 towline glider. This jig can be built in about three hours using a radial-arm saw or table saw. With it, building your wing panels will go more quickly and be more fun. Wash-in or wash-out can be induced after some simple shimming, and the airfoil shape is easily adjusted using two pieces of pine.
Construction
The materials list couldn't be shorter: pick up several pieces of pine and a few wood screws, and you're on your way.
- Materials and approximate size:
- Base: straight piece of pine, long and wide enough to accommodate the span and chord of the wing being built (my base measures 1 x 8 x 28 in.).
- Building-board section: same size as the base, to be grooved for flexibility.
- Two vertical blocks of pine for the airfoil profile.
- Wood screws (No. 10) and a few bolts/screws for temporary assembly.
- Waxed paper and contact cement (3M-77 Spray Mount).
- Hot Stuff adhesive (thick and thin consistencies).
Cut the jig base from a straight piece of pine, making it long and wide enough to accommodate the span and chord of the wing being built. My base measures 1 x 8 x 28 in.
Use a section of building board the same size as the base. Groove the board at 0.10–0.12 in. intervals along its length, extending the grooves to within 0.10 to 0.12 in. of the far surface. This makes the board flexible enough to conform to the undercambered shape of the airfoil.
The two vertical pieces are the most important part of the jig. They must be cut to equal length so they stand at matching height. Temporarily bolt them together with wood screws, then use a thin felt-tipped marker or pen to trace the outline of the lower camber of the airfoil on the joined surfaces. This will determine the shape of the lower sheeting during wing construction, so accuracy is important. Cut along the lines with a band saw or saber saw. Sand the blocks to shape, and you're ready to assemble the jig.
Assembly
- Using a T-square, mark two lines two to three inches from the ends of the base board.
- Drill and countersink two holes for a No. 10 wood screw at each marked location.
- Attach the vertical pieces to the base, making sure the leading-edge portion of each piece has the same orientation as the other.
- Lay the building-board section against the verticals. Drill and screw the board in place, using an edge block to align the top.
- Draw a line on the jig to mark the location of the leading edge.
I've borrowed the Hunters' "Hot Stuff" technique for holding sheeting in place. Trim a section of waxed paper to the proper length. Spray a light coat of contact cement (3M-77 Spray Mount) on the jig and apply the paper, making sure there are no wrinkles.
Cut the lower sheeting to the proper length and width. Since the leading and trailing edges will be used as references throughout construction, make sure they are straight and true. Spray the waxed paper with contact cement and lay the sheeting in place, making sure the leading edge is accurately positioned with respect to the airfoil. Check against the optional leading-edge guideline drawn on the jig. Use the palm of your hand to rub the sheeting in place and make sure it completely contacts the area. Attach the leading edge with Hot Stuff, mark the ribs, add webbing, etc. Sand the assembly while still on the jig. Before applying the upper sheeting, blow out all the sanding dust and inspect your work. Correct any deficiencies you find.
Because of the upper camber of the airfoil, the top sheet must be wider than the bottom sheet. Apply a bead of thick Hot Stuff—not the thinner consistency—along all the ribs, spars, webbing, leading edge, etc. Slide the sheeting against the leading edge. Using your palms, slide it down over the ribs toward the trailing edge. Rub the sheeting everywhere to make sure it's completely adhered. Wait a few seconds, and your wing panel is ready for final sanding.
Wash-in and wash-out
Adding wash-in and wash-out is simple. Loosen the attachment screws for the vertical pieces, slide in the shim (be sure it's an appropriate size for your wing), and you're ready to induce the wash-in or wash-out as required. This is done before you start the wing construction.
I built the jig, cut the ribs, and assembled three wing panels for my Nordic in six hours' time. Try that with standard Nordic construction!
Building your next sheeted wing should be easier than ever.
Transcribed from original scans by AI. Minor OCR errors may remain.

