
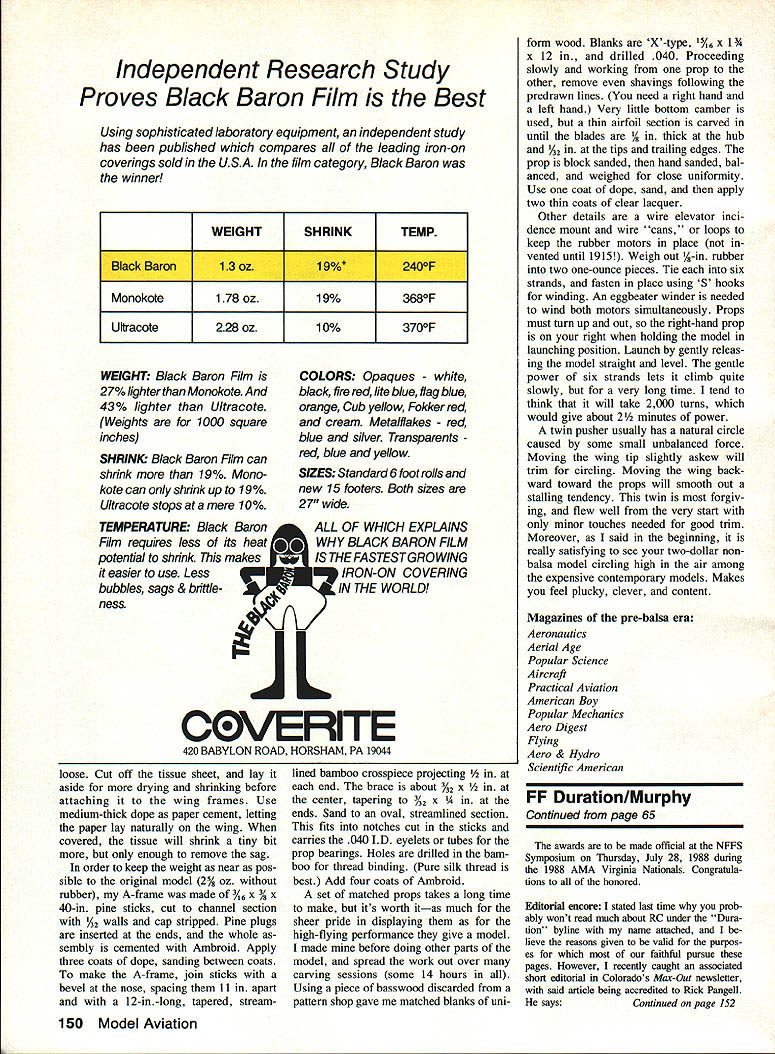
Building Model Planes
Before the Balsa Era
It's a special challenge and a source of great satisfaction to build a replica of a model plane with the same materials used in the pre-balsa era of 1907–1927. The original plans for such airplanes were published long ago in various magazines, which can be found in larger libraries today. Usually the magazines are in bound volumes, but individual pages can be photocopied, leaving the modeler only to produce a full-size line drawing over which the model can be built. A list of most of these magazines is found at the end of this article.
Some tractor models (those pulled by the prop or props) can be found, but the majority of the good fliers were the twin pusher variety. These came in all sizes and shapes, and ranged from the crude to the highly refined. Scale models of the era may be built, but as a rule they possess poor flying ability and are rarely true to scale.
There are also indoor tractors; the first of these was built in about 1920 by members of the Illinois MAC Club. The construction was of pine, and duration was about 60 seconds. In 1921, using a bamboo-and-balsa construction with superfine (silk) tissue covering and some refined technique in material selection to get minimum weight, Bert Pond managed a flight of 2 minutes, 50 seconds. (Bert still has the model!)
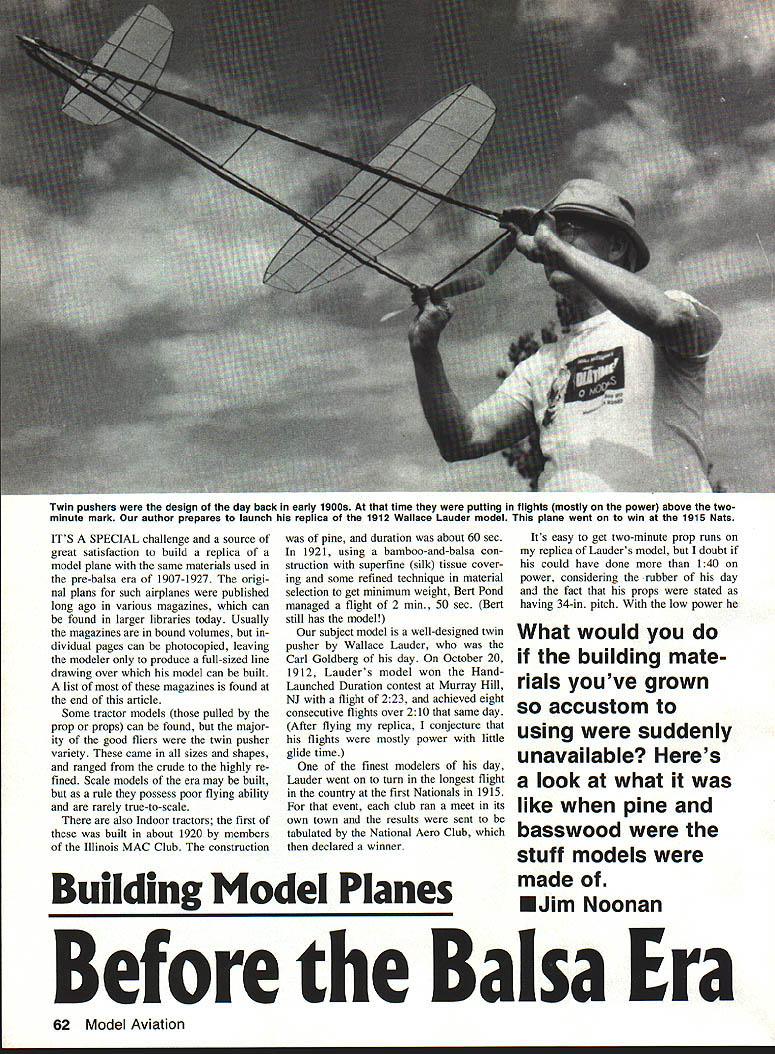
Our subject model is a well-designed twin pusher by Wallace Lauder, who was the Carl Goldberg of his day. On October 20, 1912, Lauder's model won the Hand-Launched Duration contest at Murray Hill, N.J., with a flight of 2:23, and achieved eight consecutive flights over 2:10 that same day. (After flying my replica, I conjecture that his flights were mostly power with little glide time.)
One of the finest modelers of his day, Lauder went on to turn the longest flight in the country at the first Nationals in 1915. For that event, each club ran a meet in its own town and the results were sent to be tabulated by the National Aero Club, which then declared a winner.
It's easy to get two-minute prop runs on my replica of Lauder's model, but I doubt if I could have done more than 1:40 on power, considering the rubber of his day and the fact that his props were stated as having 34‑in. pitch with low power.
— Jim Noonan
Since a twin pusher will float in the glide if you can lock the props in a horizontal position, I plan to fit the model with a prop stopper actuated by two bamboo bars, some rubber bands, and a dethermalizer fuse (idea by Don Lockwood). However, a flight recently at Bong Field makes me hesitate a bit about prolonging the glide. We wound up to about half capacity and launched into gentle thermals, resulting in the model being just visible under a cloud by the time the power wound out at about 70 seconds. The props back-wound and the model stalled, went into a long dive, leveled out, glided a bit, and repeated the sequence some four times before touching down on Bong's thick cushion of weeds. Best detherm I ever had!
Lauder's model was published in the May 1913 issue of Aeronautics as well as in the Harper's Aircraft Book of 1913. I saw it in these books many years ago, but it took until 1970 for me to copy the drawing — and until 1978 to build the model!
Elliptical wings were really new in 1912; Frederick Lanchester was building models in England by 1894 using an elliptical plan form. The really innovative concept for 1912 was the very light and efficient structure that Lauder used. In this area he was far ahead of anyone else, even the very progressive Illinois Model Club. It is interesting to note the superiority of the eastern modelers' approach to overall design compared to that of other parts of the country, and how in succeeding years the better ideas circulated via the model pages included in the aviation magazines.
Tools and Equipment
To build models such as this, you need good woodworking tools. A small drill press, bandsaw or scroll saw, and a table saw are the prime needs. Also required are a good assortment of pliers for wire bending, soldering irons, a carving knife, and a Zona handsaw. Last but not least, you'll need a drafting board with its allied tools. Proportional dividers will make scaling up drawings an easy task.
In selecting a carving knife, purchase a Ka-Bar or similar high-quality tool of carbon steel (avoid stainless steel) with a sharpening stone.
A word about circular saw blades: a 10‑in. blade is a bit too large for craft work; an 8‑in. hollow-ground planer blade and an 8‑in. hollow-ground plywood blade are all you need to cut anything from 1/32" to 3/32". Use these to cut balsa to pine and basswood prop blocks, sheet, and strip wood for these ancient models. Remember to hold and confine your wood to the saw table and fence. After making a cut, the blade tries to lift the wood upward. You will have to make pine guides to keep the wood exactly where you want it, as well as to keep your fingers from harm. Carefully plan all operations, and do a dry run before actually performing them. Sawing is not difficult, and it permits you to build models by any conceivable method at very low cost.
Locating Raw Materials
Ordinary Japanese tissue can be had from model supply houses; art supply stores, stationery stores, etc., also carry a variety of Japanese tissues, just as they did long before the model supply houses came along. Expect to pay about a dollar a sheet, but you will have a nice selection of weights and textures.
Really light silk and goldbeater's skins are no longer obtainable today; pre-doped tissue is your best bet. For authenticity use Japanese gampi, a silk-like tissue which is sometimes available today. We called it "superfine" long ago.
Basswood sheet and strip from several manufacturers is available in large hardware stores, dollhouse specialty stores, and hobby shops catering to the model railroad trade. Spruce strip can be found in hobby stores carrying radio-control model supplies. It must usually be resawed to the required sizes. Bamboo can sometimes be found listed in the yellow pages of telephone books in larger cities, where it is supplied to manufacturers of furniture, etc.
The best source of pine is a lumber/home supply store. Some really fine white pine is made into millwork, which can be resawed into the sizes needed for models. Ordinary 3/4‑in. boards are also available, and some good lumber can be found for carving props as well as for strip and sheet wood. Take enough time to look at as many as 50 boards, narrowing the final selection to about five, then choosing the best for clarity and absence of grain lines as well as for lightness.
Liquids
Rubber lube is not new. It was coming into popular use by 1915. You can make good lube without much trouble today by simply mixing tincture of green soap and glycerin in equal amounts. Both are sold at drugstores in small bottles.
Nitrate dope is your best bet today for both tissue cementing and proofing of tissue for wing covering. Banana oil was used until the early 1930s. Its ingredients varied somewhat, but it was basically amyl acetate into which nitrocellulose and some gums were dissolved. When purchasing nitrate dope (avoid butyrate in this case), always obtain the proper thinner for it. Commercial lacquer thinners are not always compatible.
Nitrate dope will also make model cement. Just let it stand open until it becomes as thick as you need. It built models in this way during the war. (Dope was easy to obtain from any liaison squadron.)
Construction
You will need to draw the wing and elevator full-size, using single-line drawing. A divider or compass will pick off dimensions from the small plan to your line layout.
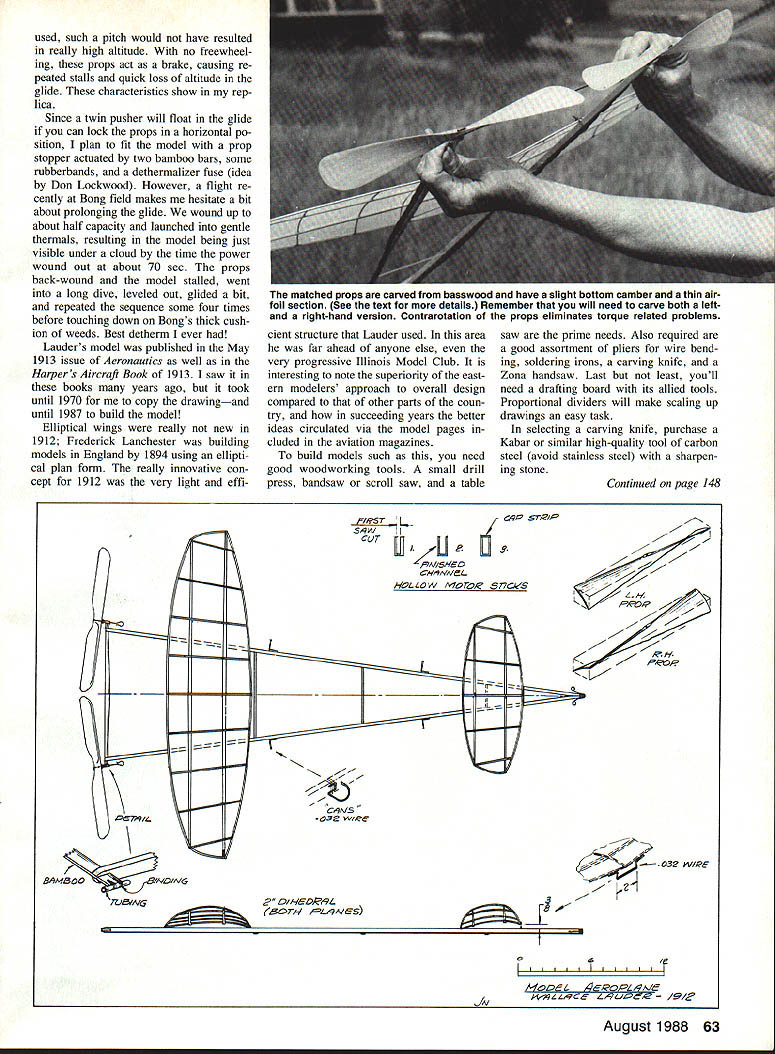
Draw in the two spars of the wing and elevator parallel to each other and three inches apart. Note that only the center rib is perpendicular; all the others have the trailing edges radiating outward. The drawing included here is at reduced size; therefore, use the scale ruler for reference. Locate all points with dividers, then draw the curved outlines by pinning a 1/4‑in. stick to the points and penciling in the curves. Once the side is laid out, the opposite side can be traced into a complete wing of exact outline.
Bamboo will be your principal material; use the shiny strips only. Strips of about 1/16 x 3/8 in. can be bent by water-soaking and then heating over a large electric soldering iron. Work the warm bamboo with your hands to a pre-drawn curve of the wing rib. When cooled, the strips are split down the middle repeatedly to produce 1/32 x 1/16 ribs. With the edge of a knife, scrape these to a nearly round section.
In the original model, the leading and trailing edges were also of bamboo. Since such long lengths are very rare today, my edges are made of two laminated pieces of spruce, 3/32 x 3/32 x 15 in. (making a 1/16 x 3/32 section tapered toward the wing tips). These were water-soaked and cemented with Elmer's carpenter glue, then bent and pinned over the plan. Allow the edges several days to thoroughly dry, then sand the corners to make thin wing tips of bamboo and bent and split to make identical outlines.
The main spars are of spruce, 1/8 x 1/4 in. at the center and tapered to 1/16 in. square at the tips; these are then sanded to round off all edges. Joining of parts is done with Ambroid at the butt joints, progressively applying more coats of Ambroid until a skin extends 1/32 in. in all directions at each joint. Dihedral joints are reinforced with thin slivers of bamboo for doublers and extensive coverage of Ambroid. Such "skin" joints are needed because Ambroid cannot penetrate hardwoods as it does on balsa.
Covering a single-surfaced wing with doped tissue is not a problem if the tissue is pre-doped on a wood frame and allowed to thoroughly dry and shrink before it is glued to the wing. Wings that I constructed almost 20 years ago using this method are completely intact and flying today.
Build a rectangular frame of rigid pine sticks about the size of a sheet of Japanese tissue. Cement a sheet of tissue on it, and spray with water. Allow to dry at least a day, then apply a very thin coat of nitrate dope to both sides. Repeat this procedure, and let the tissue dry a full day in hot sun or under a lamp. Now cut the tissue loose on three sides and let it dry another day hanging loose. Cut off the tissue sheet, and lay it aside for more drying and shrinking before attaching it to the wing frames. Use medium-thick dope as paper cement, letting the paper lay naturally on the wing. When covered, the tissue will shrink a tiny bit more, but only enough to remove the sag.
A-Frame and Fuselage
In order to keep the weight as near as possible to the original model (2 1/2 oz. without rubber), my A-frame was made of 3/16 x 3/8 x 40‑in. pine sticks, cut to channel section with 1/8‑in. walls and cap strips. Pine plugs are inserted at the ends, and the whole assembly is cemented with Ambroid. Apply three coats of dope, sanding between coats.
To make the A-frame, join sticks with a bevel at the nose, spacing them 11 in. apart and with a 12‑in.-long, tapered, streamlined bamboo crosspiece projecting 1/2 in. at each end. The brace is about 3/32 x 1/2 in. at the center, tapering to 3/32 x 1/4 in. at the ends. Sand to an oval, streamlined section. This fits into notches cut in the sticks and carries the 0.040 in. I.D. eyelets or tubes for the prop bearings. Holes are drilled in the bamboo for thread binding. (Pure silk thread is best.) Add four coats of Ambroid.
Props and Motor
A set of matched props takes a long time to make, but it’s worth it — as much for the sheer pride in displaying them as for the high-flying performance they give a model. I made nine before doing other parts of the model, and spread the work out over many carving sessions (some 14 hours in all). Using a piece of basswood discarded from a pattern shop gave me matched blanks of uniform wood. Blanks are 'X'-type, 15/16 x 1‑3/4 x 12 in., and drilled 0.040 in. Proceeding slowly and working from one prop to the other, remove even shavings following the pre-drawn lines. (You need a right-hand and a left-hand.) Very little bottom camber is used, but a thin airfoil section is carved until the blades are 1/8 in. thick at the hub and 3/32 in. at the tips and trailing edges. The prop is block sanded, then hand sanded, balanced, and weighed for close uniformity. Use one coat of dope, sand, and then apply two thin coats of clear lacquer.
Other details are a wire elevator incidence mount and wire "cans," or loops to keep the rubber motors in place (not invented until 1915!). Weigh out 7/8‑in. rubber into two one-ounce pieces. Tie each into six strands, and fasten in place using 'S' hooks for winding. An eggbeater winder is needed to wind both motors simultaneously. Props must turn up and out, so the right-hand prop is on your right when holding the model in launching position. Launch by gently releasing the model straight and level. The gentle power of six strands lets it climb quite slowly, but for a very long time. I tend to think that it will take 2,000 turns, which would give about 2 1/2 minutes of power.
Flying and Trimming
A twin pusher usually has a natural circle caused by some small unbalanced force. Moving the wing tip slightly askew will trim for circling. Moving the wing backward toward the props will smooth out a stalling tendency. This twin is most forgiving, and flew well from the very start with only minor touches needed for good trim. Moreover, as I said in the beginning, it is really satisfying to see your two-dollar non-balsa model circling high in the air among the expensive contemporary models. Makes you feel plucky, clever, and content.
Magazines of the Pre-Balsa Era
- Aeronautics
- Aerial Age
- Popular Science
- Aircraft
- Practical Aviation
- American Boy
- Popular Mechanics
- Aero Digest
- Flying
- Aero & Hydro
- Scientific American
Transcribed from original scans by AI. Minor OCR errors may remain.

