


Building With Speed and Efficiency
by Dave Garwood
There are times when you don't care how long it takes to build a model, because sometimes the journey is more important than the destination. Other times it becomes a priority to complete the project as quickly and efficiently as possible. Following is a compilation of tips and methods for organizing your shop and planning your activities to finish a building project rapidly and with minimum wasted time and effort.
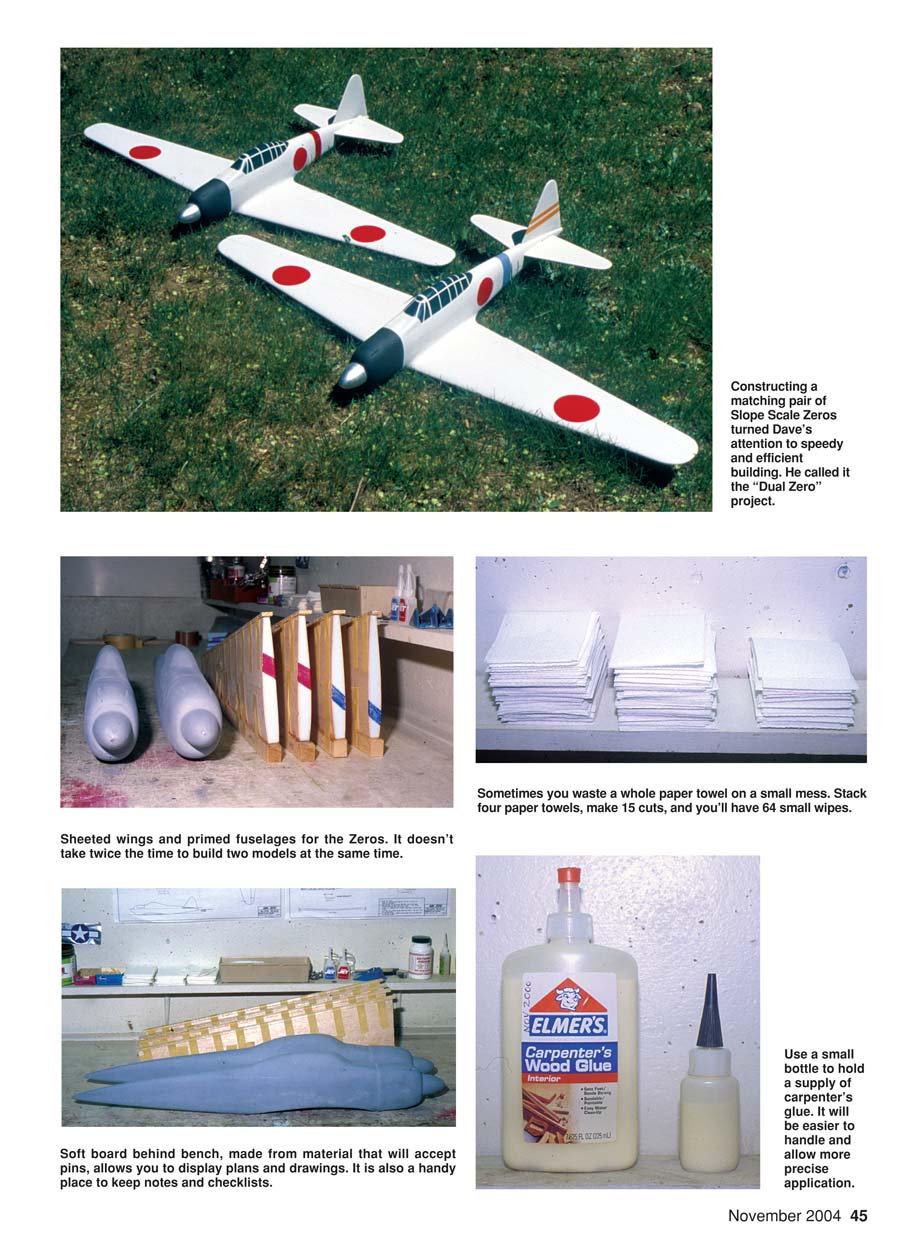
The "Dual Zero" project turned my attention to efficient construction methods. Endeavoring to produce two pairs of Slope sailplanes with matched flight characteristics, Joe Chovan and I agreed to each build a pair of Slope Scale models. He constructed a pair of Lockheed F-80 Shooting Stars and I built a pair of Mitsubishi A6M Zeros.
I summoned the tips, tricks, and techniques I knew to complete this project as rapidly as possible while maintaining my highest level of craftsmanship. I also asked my flying and building buddies to add to the list, and they generously shared their experience.
- Thoroughly read the kit instructions.
- This is one of the easiest ways to get rolling quickly, yet some of us skip this step thinking we'll save time by diving right in. Don't do that.
- Kit instructions add the designer's advice and counsel to your knowledge and experience. Their goals are aligned with yours: to complete the project with minimum expenditure of time and materials and with the best possible result.
- Well-prepared instructions give an overall idea of how the model goes together and the order of operations for component construction and assembly. Thinking through the project reveals opportunities for parallel operations, such as subassemblies you can work on while adhesives cure elsewhere; these can cut days off the overall building time.
- Carefully review the "materials needed" list and determine if you have all necessary supplies in stock. If you do not, make a checklist and visit the hobby store or mail-order the items you'll need. If you see unfamiliar materials or operations, get help from the kit maker or other sources.
- Review the tools you'll need.
- Having good tools and maintaining them makes any construction project go smoother.
- A sharp knife is safer to use than a dull one: it requires less force and is less likely to slip. Buy single-edge razor blades and hobby-knife blades in bulk and replace them frequently. Dispose of them safely by taping over the cutting edge and points as soon as they are worn.
- Make long, flat sanding blocks for several grades of sandpaper. Replace sandpaper as soon as you notice it’s worn — sandpaper is a precise cutting and shaping tool and works much better when it's new.
- Be sure you have long enough straightedges. I often use 18-inch and 1-meter aluminum ones. Prevent slipping by applying thin cork on the back or taping them down before you run a cutting tool along the edge.
- A heat gun is highly useful — not only for shrinking covering, but to get epoxy to flow freely and to wet out fiberglass. A razor saw is handy when a hacksaw blade is too thick or cutting with a blade would be too crude.
- Use power tools when possible: rough-sand large balsa, hardwood, and plywood with a belt or disc sander; use a rotary tool to cut and sand smaller parts quickly; and get a lot of use from a bench-top jigsaw.
- Consider whether you need new tools for your next project: a new soldering-gun tip, the drill and tap sizes you'll need, a second pair of scissors (one for rough stuff and sandpaper, one for heat-shrink covering and delicate work), replacement drill bits, extra razor blades, or a couple more small clamps. It's better to get the tools you'll use earlier in the project than later.
- Gather building supplies and materials.
- After a project is underway is no time to run out of paper towels, waxed paper, epoxy mixing cups, stir sticks, or masking tape; it disturbs your flow. Stock up on these items before you start.
- Ensure you have the adhesives you'll need:
- Epoxy and microballoons
- Fast and slow cyanoacrylate glue
- Titebond or your favorite wood glue
- ProBond or another specialty adhesive for EPP-foam work
- Shoe Goo for shock-mounting a servo tray into a fiberglass fuselage
- Make sure you have the solvents you'll need: fingernail-polish remover or other cyanoacrylate softener, alcohol for epoxy cleanup, and Ironex, acetone, or Goo Gone to clean your scissors and covering iron.
- Replace bent and rusty T-pins and stock several sizes of rubber bands and suitable weights of fiberglass cloth. Consider whether you'll need a can of expanding foam to fill a void or stiffen a fuselage.
- Is this the time for shop improvements?
- You can never have too much horizontal work space — especially since parallel operations let some work dry or cure while other building commences.
- Would two benches improve productivity? Think about two bench heights: a standing and a sitting work area. Some tasks go much easier with one or the other. A fixed workbench is wiggle-free; a freestanding bench lets you walk around and handle larger pieces.
- Would an extra set of shelves help you stay organized? My goal is to get everything off the floor — every new set of shelves fills rapidly. Steel shop shelving is cheap, custom-sized shelves make the maximum use of wall space, and some things (like finished wings or fuselages) deserve special storage.
- Check your shop lighting. Another fluorescent fixture over the workbench can substantially increase shadow-free lighting. A portable, clamp-on reflector light provides brighter task lighting when needed. Both are inexpensive.
- Check small parts inventory.
- Will you need wire, brass tubing, clevises, servo arms, or pushrods? How about nuts, bolts, screws, or washers?
- Do you have a receiver for this model? Servos, switch, and battery pack?
- It's often the small stuff that holds you up when a project is underway.
- Follow logical procedures.
- Clear off that bench! Before you start, clean up the workbench and put everything away so you can find the work surface when you need it. Put tools away during building; they're easier to find in a regular storage place than under piles on a messy bench.
- Plan dust-producing tasks together and separate them from tasks sensitive to airborne dust. Sanding wing leading edges creates plenty of sawdust, and you don't want sawdust settling while you apply paint or covering.
- Measure carefully before cutting and heavy sanding. Making templates often increases accuracy when cutting parts and saves time when making multiple identical parts. Measure in millimeters — not in inch fractions — to obtain more precise and easily remembered measurements and to simplify calculating ratios and fractions.
- Stack identical parts in manageable bundles when cutting and sanding outline shapes. Keep them together with tape or rubber bands. Make all similar parts before going to the next step.
- Store small parts such as screws, clevises, and control horns together in small containers for each model. I use film cans, snap-lid food containers, and zip-close plastic bags and label each with white vinyl tape. Small containers help you keep inventory and stay organized if you temporarily put an airplane away in its box while you work on another project.
- Prepare your finishing supplies and materials.
- Have your final color scheme in mind and your scale documentation on hand so you can order decals or cut-vinyl markings early in the project.
- Make sure you have enough iron-on covering, fiberglass, filler material, primer paint, masking tape, final paint colors, paint thinner, Testors Dullcote spray, and a couple of tack cloths to finish without running to the store.
- Keep safety in mind.
- Shop safety deserves its own article, but briefly: protect your eyes, lungs, hands, and other body parts.
- Wear eye protection for any cutting or grinding operation. Wear a dust mask when sanding. Ensure adequate ventilation or wear a suitable respirator when using paint, adhesives, or solvents.
- Cut so that a slipping knife or razor blade will cause no harm. Be mindful of solder drips, splatters, and hot parts when soldering.
- Get help if needed.
- If you face a new procedure or an unfamiliar adhesive, ask at your local hobby shop or where you buy kits and supplies. If you belong to a club, many times fellow members will be helpful. Post a question on an Internet modeling exchange. Some builders enjoy working in a group, and that’s a great way to learn new techniques.
- Make building an enjoyable time.
- Music sets a mood; make provisions for tunes in your shop. A radio, tape player, or CD player will greatly improve the atmosphere. I like big band music when I’m working on World War II aircraft.
- Dress for the occasion; wear shop clothes. Who needs another cyanoacrylate blob on a good T-shirt?
- Heat or cool the work area so you’re working in a comfortable temperature. Basement shops often benefit from a dehumidifier.
Probably the biggest payoff from time invested comes from reading and understanding the kit instructions before you start and thinking through the procedures. Make note especially of any operations that are unclear and any supplies, materials, and tools that would be helpful to have, and get these squared away before you start. Work safely and have fun. The journey is as important as the destination, no matter how fast you’re traveling.
Acknowledgments and Contact
Thanks to the guys who have increased my model‑building knowledge, skill, and ability: Robert Cavazos, Joe Chovan, Terry Dwyer, Jim Harrigan, Brian Laird, Mike Lee, Carl Maas, Bob Powers, Pete Young, and my dad David E. Garwood, MA.
Dave Garwood 5 Birch Ln. Scotia, NY 12302 DGarwood@att.net
Transcribed from original scans by AI. Minor OCR errors may remain.

