
Building Stick 'n Tissue Kits
Dolores A. Kester Pics by Burr Angle
It's a refresher course for old-timer balsa benders and an introduction for newcomers. If you haven't tried one before, you don't know what you're missing.
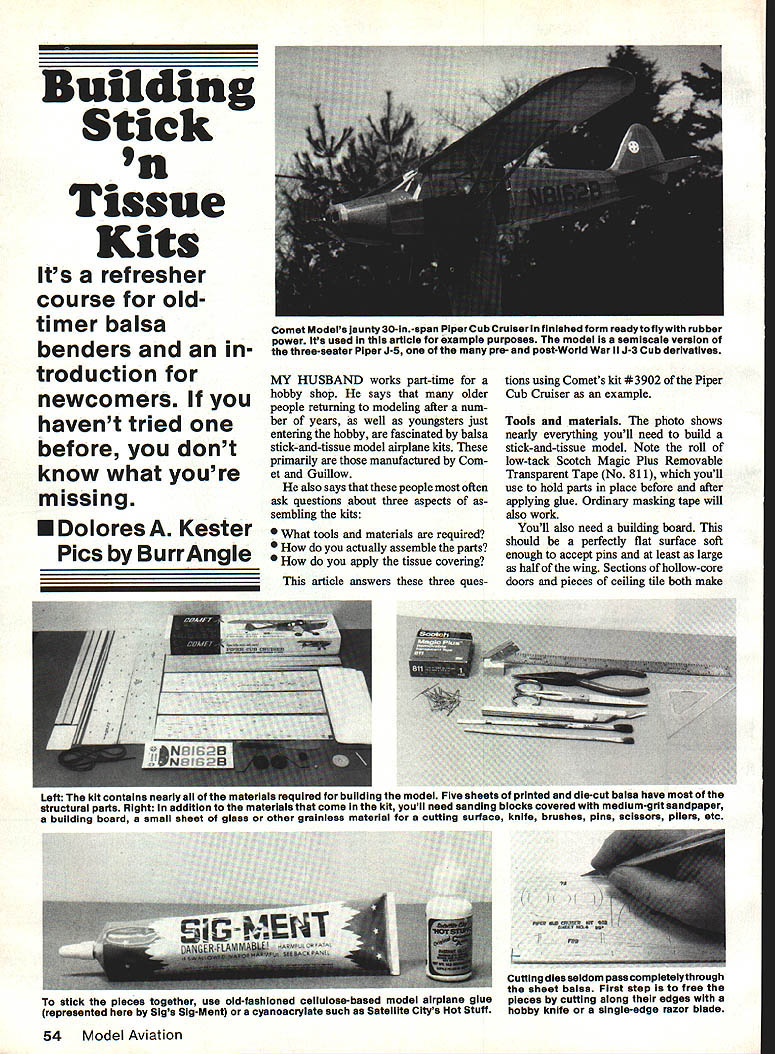
My husband works part-time for a hobby shop. He says many older people returning to modeling after a number of years, as well as youngsters just entering the hobby, are fascinated by balsa stick-and-tissue model airplane kits—primarily those manufactured by Comet and Guillow.
Most newcomers ask three questions:
- What tools and materials are required?
- How do you actually assemble the parts?
- How do you apply the tissue covering?
This article answers those questions using Comet's kit #3902 of the Piper Cub Cruiser as an example.
Tools and materials
The essentials you will need:
- Low-tack removable tape (e.g., Scotch Magic Plus Removable Transparent Tape No. 811) or ordinary masking tape to hold parts in place before and after gluing.
- A building board: a perfectly flat surface, soft enough to accept pins and at least as large as half the wing. Sections of hollow-core doors or pieces of ceiling tile work well.
- A cutting board made of glass or other grainless material.
- A sharp hobby knife or single-edge razor blade to free die-cut balsa pieces (cut along die edges—cutting dies seldom pass completely through the sheet).
- Pins for holding parts to the plans (place pins around pieces rather than through them).
- Several sanding blocks (scrap wood with medium-grit sandpaper glued or clipped in place).
- A well-lighted, well-ventilated workspace (even a kitchen table will do if you clean up after each session).
- Adhesives: traditional model airplane glues (Ambroid, Sig-Ment) or instant-setting cyanoacrylate super glues formulated for model building (Hot Stuff, Jet, Zap).
- Clear model airplane dope and dope thinner (for covering), plus flat camel-hair brushes about 1/4 to 3/8 in. wide.
- Tissue paper provided in the kit or sold separately (Peck-Polymers). In a pinch, ordinary gift-wrapping tissue will do. For larger models (over about 36 in. wingspan), use silkspan; still larger models often use synthetic fabric or plastic sheet coverings.
- Save scrap pieces of wood from the kit for later repairs or test-fitting.
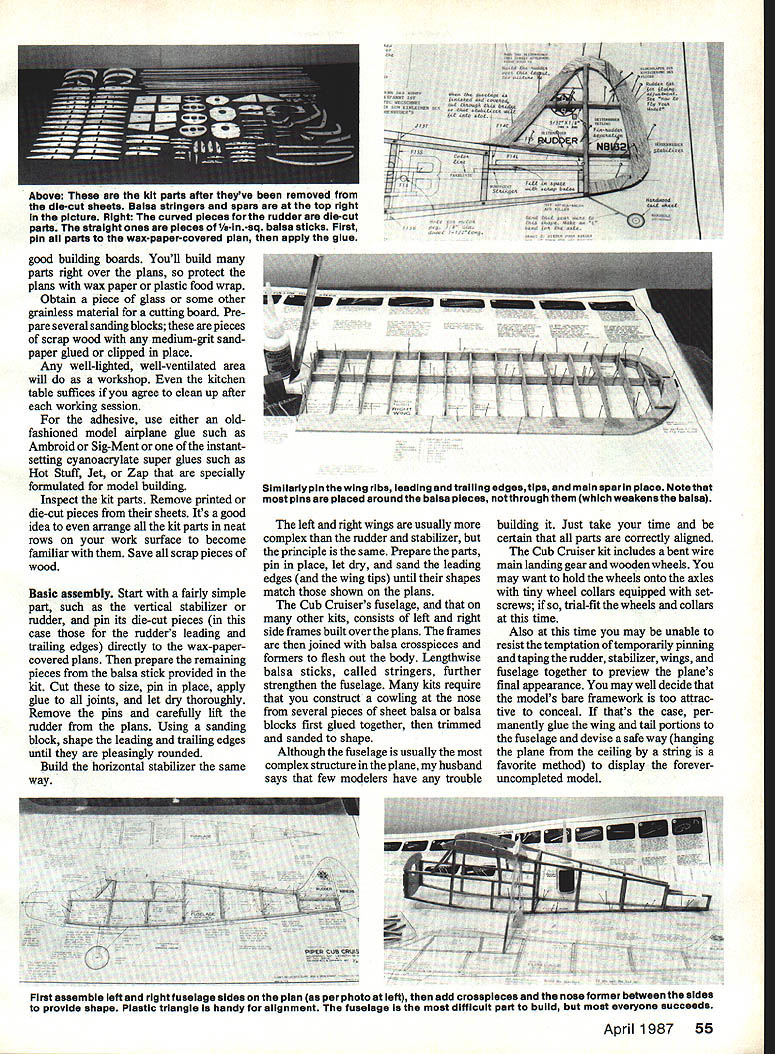
Basic assembly
Inspect the kit parts first: remove die-cut pieces from their sheets, arrange parts in neat rows on your work surface to become familiar with them, and save scraps.
Start with simple structures:
- Rudder and vertical stabilizer
- Pin the die-cut pieces in place on wax-paper-covered plans.
- Prepare remaining balsa from the kit (cut to size), pin in place, apply glue to all joints, and let dry thoroughly.
- Remove pins carefully and lift the part from the plans.
- Shape leading and trailing edges with a sanding block until pleasingly rounded.
- Horizontal stabilizer
- Build the same way as the rudder.
Wings
- Pin the wing ribs, leading and trailing edges, tips, and main spar in place.
- Most pins are placed around pieces, not through them, to avoid weakening the balsa.
- Prepare parts, pin in place, let dry, and sand leading edges and wing tips to match the plans.
- Typically you will use four pieces of tissue for a wing: top and bottom for each wing half.
Fuselage and cowling
- The fuselage usually consists of left and right side frames built over the plans, joined by balsa crosspieces and formers. Lengthwise balsa sticks called stringers further strengthen the structure.
- Many kits require constructing a cowling from sheet balsa or from balsa blocks glued together, then trimmed and sanded to shape.
- The fuselage is often the most complex structure; take your time and be certain parts are correctly aligned.
- The Cub Cruiser kit includes a bent-wire main landing gear and wooden wheels. Trial-fit wheels and consider tiny wheel collars with set screws to hold wheels on axles.
Previewing and display
- You may want to temporarily pin or tape rudder, stabilizer, wings, and fuselage together to preview the finished plane.
- If you find the bare framework attractive, you can leave it permanently uncovered and display the model (hanging it from the ceiling by a string is a favorite method).
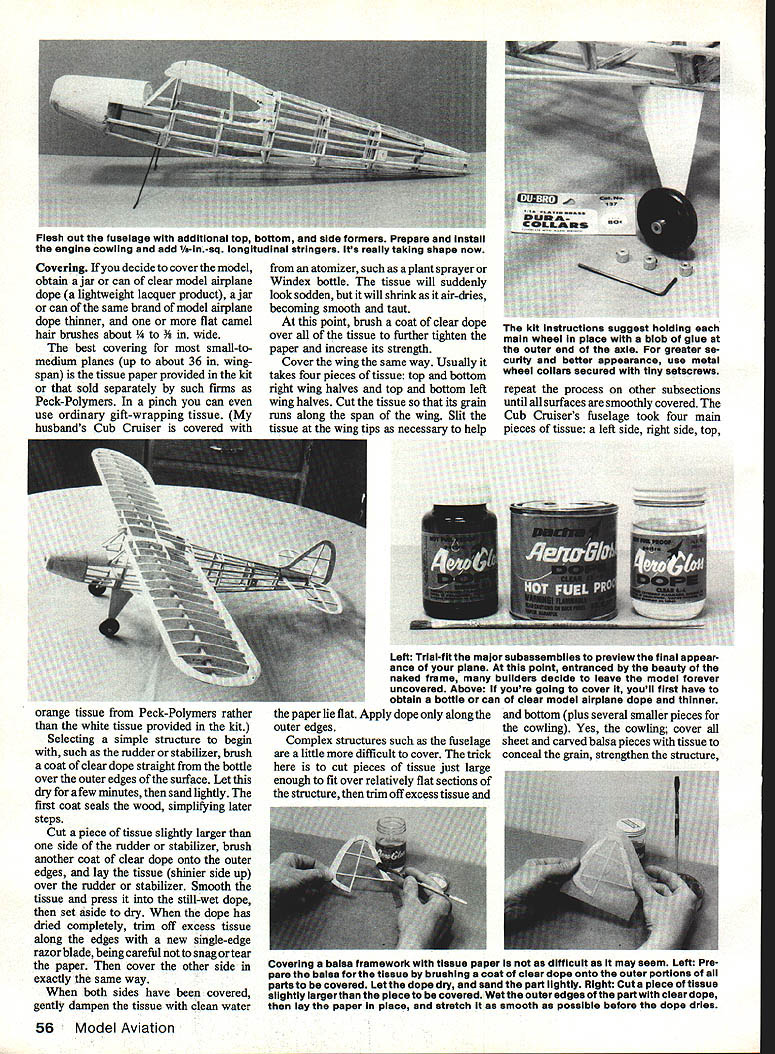
Covering
Materials and preparation
- Obtain clear model airplane dope, dope thinner of the same brand, and flat camel-hair brushes (about 1/4 to 3/8 in.).
- Use the tissue supplied with the kit or purchased separately (e.g., Peck-Polymers). For larger models use silkspan; slightly dampen silkspan (spread it on a wet towel) before laying it onto the clear-doped structure.
Covering procedure (start with a simple surface)
- Seal the wood:
- Brush a coat of clear dope (straight from the bottle) over the outer edges of the surface to be covered.
- Let dry a few minutes, then sand lightly. The first coat seals the wood.
- Apply tissue:
- Cut a piece of tissue slightly larger than the surface.
- Brush another coat of clear dope onto the outer edges and lay the tissue (shiny side up) over the part.
- Smooth the tissue and press it into the still-wet dope, then set aside to dry completely.
- Trim and finish:
- When dry, trim excess tissue along edges with a new single-edge razor blade (be careful not to snag or tear the paper).
- Cover the other side in the same way.
- Shrink and tighten:
- Gently dampen the tissue with clean water from an atomizer (plant sprayer or Windex bottle). The tissue will look sodden but will shrink as it air-dries, becoming smooth and taut.
- Brush a coat of clear dope over all the tissue to further tighten and strengthen it.
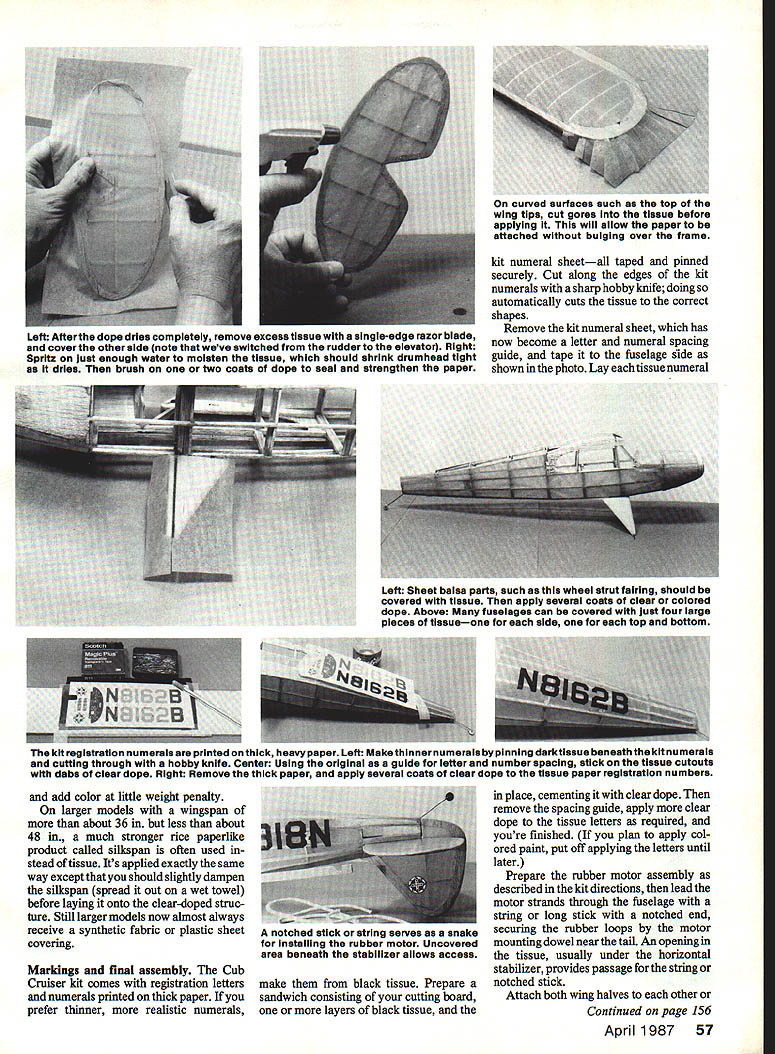
Wings and complex shapes
- For wings, cut tissue so the grain runs along the span; slit the tissue at wing tips as necessary to help it lie flat. Apply dope only along outer edges.
- For complex structures like the fuselage, cut tissue pieces just large enough to fit relatively flat subsections, trim excess, and repeat until the surface is smoothly covered.
- The Cub Cruiser's fuselage used four main pieces of tissue (left side, right side, top, bottom) plus smaller pieces for the cowling. Cover all sheet and carved balsa pieces with tissue to conceal grain, strengthen the structure, and add color at little weight penalty.
Color and alternatives
- If you can't find appropriately colored tissue, you can apply several coats of colored dope or lightweight white or aerosol paint (fuel-proofing is not required for a rubber-powered model). Use color coats sparingly—pigments add weight—unless you do not plan to fly the model.
Markings and final assembly
Markings
- The Cub Cruiser kit supplies registration letters and numerals printed on thick paper. For thinner, more realistic numerals, make them from black tissue:
- Prepare a cutting sandwich: cutting board, one or more layers of black tissue, and the kit numeral sheet taped and pinned securely.
- Cut along the kit numerals with a sharp hobby knife; this automatically cuts the tissue to the correct shapes.
- Remove the kit numeral sheet (now a spacing guide), tape it to the fuselage side, lay each tissue numeral in place, and cement with clear dope.
- Remove the spacing guide, apply more clear dope to the tissue letters as required.
- If you plan to apply colored paint, postpone applying the letters until after painting.
Final assembly
- Prepare the rubber motor assembly per the kit directions. Lead motor strands through the fuselage with a string or a long notched stick, securing the rubber loops by the motor mounting dowel near the tail. An opening in the tissue—usually under the horizontal stabilizer—provides passage for the string or stick.
- Attach both wing halves to each other or to the fuselage per kit instructions, making sure to build in the required wing dihedral.
- Attach tail pieces, mount struts or braces, install landing gear wheels, and glue sheet or molded plastic windshield/canopy pieces as required.
- Add any remaining covering (for example, the top of the cabin between the wings on the Cub Cruiser), then give the entire model another coat or two of clear dope.
- Ink on panel lines and control surface outlines to taste.
Cleaning the dope brush
- After each use, swish the brush in a fraction of an ounce of dope thinner mixed with almost as much liquid dishwashing detergent and an ounce or two of warm water. Rinse the brush in fresh water, swish again in the thinner/detergent/water mixture, rinse, and repeat until clean. Let the brush air-dry.
Flight, repairs, and next steps
- Follow the kit's concise instructions for preparing the model for test flights. Choose a calm day for the maiden flight.
- Expect that a non-scale, high-wing model will fly better than a low-wing scale model.
- Your model will sustain flight damage; because you built it and saved kit scraps and extra tissue, most repairs are straightforward.
- When the model is too patched to fly, start another stick-and-tissue kit or use your skills to build a gas- or electric-powered radio-control model, scratch-build a Peanut Scale model, or try an indoor gossamer-like flyer. You'll have fun and develop new skills.
Addresses
- Comet Industries Corp., 3630 South Iron St., Chicago, IL 60609
- Paul K. Guillow, Inc., Wakefield, MA 01880
- Peck-Polymers, Box 2498, La Mesa, CA 92041
- Sig Manufacturing Co., Montezuma, IA 50171
Many Comet kits and most other supplies mentioned in this article are available by mail order from Sig if you can't obtain them locally. The Sig catalog is $3.00.
Transcribed from original scans by AI. Minor OCR errors may remain.

