
BumbleBee Mk. II
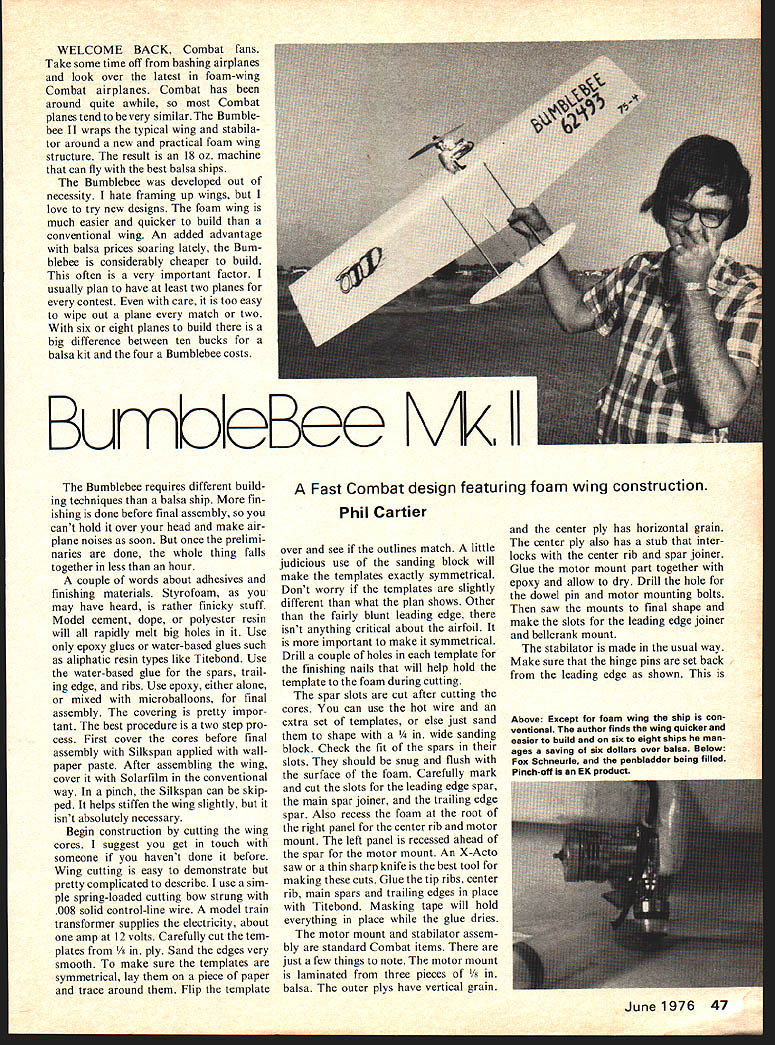
WELCOME BACK. Combat fans. Take some time off from bashing airplanes and look over the latest in foam-wing Combat airplanes. Combat has been around quite awhile, so most Combat planes tend to be very similar. The Bumblebee II wraps the typical wing and stabilator around a new and practical foam wing structure. The result is an 18 oz. machine that can fly with the best balsa ships.
The Bumblebee was developed out of necessity. I hate framing up wings, but I love to try new designs. The foam wing is much easier and quicker to build than a conventional wing. An added advantage with balsa prices soaring lately, the Bumblebee is considerably cheaper to build. This often is a very important factor. I usually plan to have at least two planes for every contest. Even with care, it is too easy to wipe out a plane every match or two. With six or eight planes to build there is a big difference between ten bucks for a balsa kit and the four a Bumblebee costs.
A Fast Combat design featuring foam wing construction.
Phil Cartier
The Bumblebee requires different building techniques than a balsa ship. More finishing is done before final assembly, so you can't hold it over your head and make airplane noises as soon. But once the preliminaries are done, the whole thing falls together in less than an hour.
A couple of words about adhesives and finishing materials. Styrofoam, as you may have heard, is rather finicky stuff. Model cement, dope, or polyester resin will all rapidly melt big holes in it. Use only epoxy glues or water-based glues such as aliphatic resin types like Titebond. Use the water-based glue for the spars, trailing edge, and ribs. Use epoxy, either alone, or mixed with microballoons, for final assembly. The covering is pretty important. The best procedure is a two step process. First cover the cores before final assembly with Silkspan applied with wallpaper paste. After assembling the wing, cover with Solarfilm in the conventional way. In a pinch, the Silkspan can be skipped. It helps stiffen the wing slightly, but it isn't absolutely necessary.
Begin construction by cutting the wing cores. I suggest you get in touch with someone if you haven't done it before. Wing cutting is easy to demonstrate but pretty complicated to describe. I use a simple spring-loaded cutting bow strung with .008 solid control-line wire. A model train transformer supplies the electricity, about one amp at 12 volts. Carefully cut the templates from 1/8 in. ply. Sand the edges very smooth. To make sure the templates are symmetrical, lay them on a piece of paper and trace around them. Flip the template over and see if the outlines match. A little judicious use of the sanding block will make the templates exactly symmetrical. Don't worry if the templates are slightly different than what the plan shows. Other than the fairly blunt leading edge, there isn't anything critical about the airfoil. It is more important to make it symmetrical.
Drill a couple of holes in each template for the finishing nails that will help hold the template to the foam during cutting. The spar slots are cut after cutting the cores. You can use the hot wire and an extra set of templates, or else just sand them to shape with a 1/4 in. wide sanding block. Check the fit of the spars in their slots. They should be snug and flush with the surface of the foam. Carefully mark and cut the slots for the leading edge spar, the main spar joiner, and the trailing edge spar. Also recess the foam at the root of the right panel for the center rib and motor mount. The left panel is recessed ahead of the spar for the motor mount. An X-Acto saw or thin sharp knife is the best tool for making these cuts. Glue the tip ribs, center rib, main spars, and trailing edges in place with Titebond. Masking tape will hold everything in place while the glue dries.
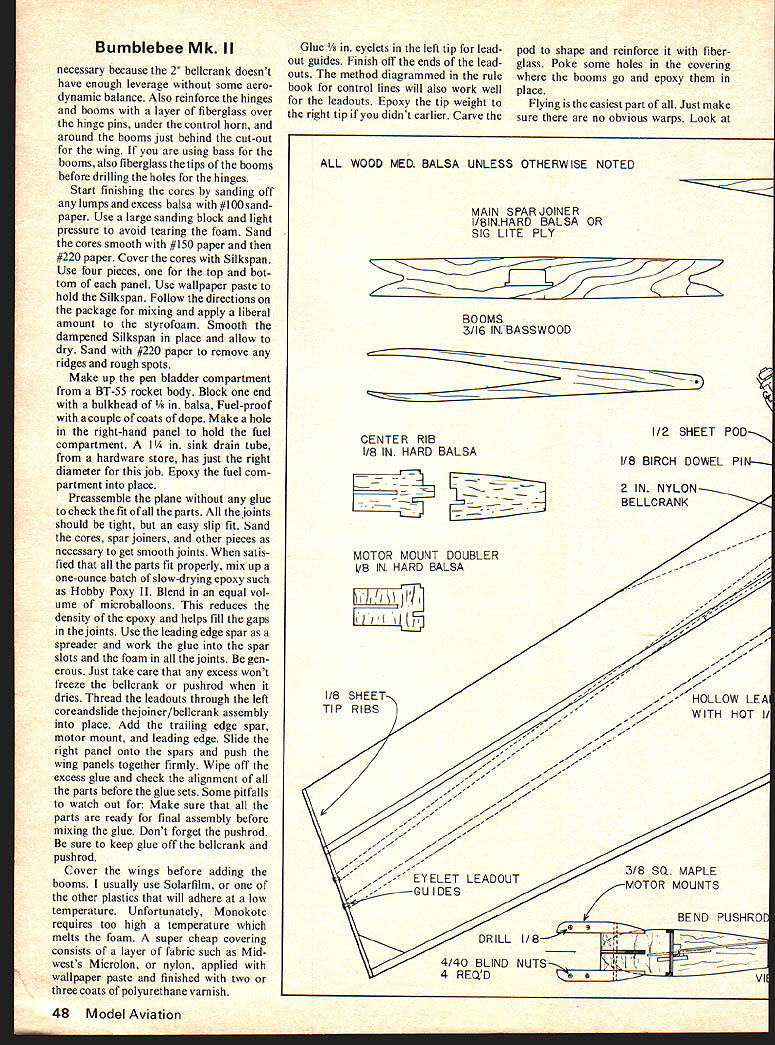
The motor mount and stabilator assembly are standard Combat items. There are just a few things to note. The motor mount is laminated from three pieces of 1/8 in. balsa. The outer plys have vertical grain, and the center ply has horizontal grain. The center ply also has a stub that interlocks with the center rib and spar joiner. Glue the motor mount parts together with epoxy and allow to dry. Drill the hole for the dowel pin and motor mounting bolts. Then saw the mounts to final shape and make the slots for the leading edge joiner and bellcrank mount.
The stabilator is made in the usual way. Make sure that the hinge pins are set back from the leading edge as shown. Bellcrank doesn't have enough leverage without some aerodynamic balance. Also reinforce the hinges and booms with a layer of fiberglass over the hinge pins, under the control horn, and around the booms just behind the cut-out for the wing. If you are using basswood for the booms, also fiberglass the tips of the booms before drilling the holes for the hinges.
Start finishing the cores by sanding off any lumps and excess balsa with #100 sandpaper. Use a large sanding block and light pressure to avoid tearing the foam. Sand the cores smooth with #150 paper and then #220 paper. Cover the cores with Silkspan. Use four pieces, one for the top and bottom of each panel. Use wallpaper paste to hold the Silkspan. Follow the directions on the package for mixing and apply a liberal amount to the styrofoam. Smooth the dampened Silkspan in place and allow to dry. Sand with #220 paper to remove any ridges and rough spots.
Make up the pen bladder compartment from a BT-55 rocket body. Block one end with a bulkhead of 1/8 in. balsa, fuel-proof with a couple of coats of dope. Make a hole in the right-hand panel to hold the fuel compartment. A 1-1/4 in. sink drain tube from a hardware store has just the right diameter for this job. Epoxy the fuel compartment into place.
Preassemble the plane without any glue to check the fit of all the parts. All the joints should be tight, but an easy slip fit. Sand the cores, spar joiners, and other pieces as necessary to get smooth joints. When satisfied that all the parts fit properly, mix up a one-ounce batch of slow-drying epoxy such as Hobby Poxy II. Blend in an equal volume of microballoons. This reduces the density of the epoxy and helps fill the gaps in the joints. Use the leading edge spar as a spreader and work the glue into the spar slots and the foam in all the joints. Be generous. Just take care that any excess won't freeze the bellcrank or pushrod when it dries. Thread the leadouts through the left core and slide the joiner/bellcrank assembly into place. Add the trailing edge spar, motor mount, and leading edge. Slide the right panel onto the spars and push the wing panels together firmly. Wipe off the excess glue and check the alignment of all the parts before the glue sets. Some pitfalls to watch out for: Make sure that all the parts are ready for final assembly before mixing the glue. Don't forget the pushrod. Be sure to keep glue off the bellcrank and pushrod.
Cover the wings before adding the booms. I usually use Solarfilm, or one of the other plastics that will adhere at a low temperature. Unfortunately, Monokote requires too high a temperature which melts the foam. A super cheap covering consists of a layer of fabric such as Midwest's Microlon, or nylon, applied with wallpaper paste and finished with two or three coats of polyurethane varnish.
Glue 1/8 in. eyelets in the left tip for leadout guides. Finish off the ends of the leadouts. The method diagrammed in the rule book for control lines will also work well for the leadouts. Epoxy the tip weight to the right tip if you didn't earlier. Carve the pod to shape and reinforce it with fiberglass. Poke some holes in the covering where the booms go and epoxy them in place.
Flying is the easiest part of all. Just make sure there are no obvious warps. Look at the rear of the plane from an arm's length away. Gradually tilt the nose up and down. Since the rear portion of the airfoil is flat, the trailing edge will go to block the rest of the wing from view if there are no warps. Remove any warps by gently twisting the wing in the opposite direction and ironing the covering.
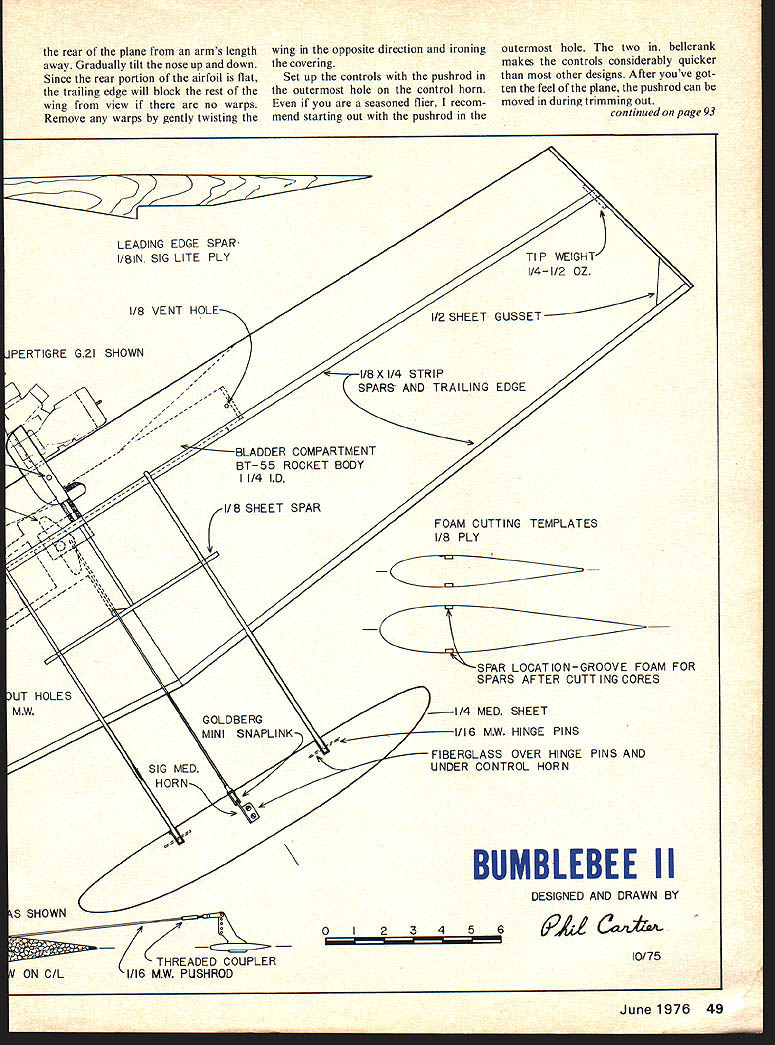
Set up the controls with the pushrod in the outermost hole on the control horn. Even if you are a seasoned flier, I recommend starting out with the pushrod in the outermost hole. The two-in. bellcrank makes the controls considerably quicker than most other designs. After you've gotten the feel of the plane, the pushrod can be moved in during trimming out.
BumbleBee/Cartier
At the flying field, check everything once again and fire it up. Take a couple of level laps. If everything seems okay, try a couple of large loops and figure-eights. Warps will show up as a decrease in line tension during maneuvers. If the lines get light during inside loops, the plane has a left-rolling warp. Light lines during an outside loop mean there is a right-rolling warp. If any warps do show up, take them out before flying again. Warps can make a Combat plane very hairy to fly.
Check the tip weight by watching the plane carefully during some tight figure-eights. It should remain square on the lines and never show the top or the bottom of the wing during maneuvers. Too little tip weight will make the plane bank in during maneuvers. Too much will make it bank out. Add or subtract tip weight until the plane doesn't bank at all during maneuvers.
The rest of the trimming is done by adjusting the stab movement and position of the balance point. Increase the stab travel and move the balance point back to make the plane more responsive. If it is too touchy on the controls, use a heavier engine or cut down the movement of the stab. This is a highly personal thing. Some people like very responsive (meaning hair-trigger) controls. Others like smoother, less sensitive controls. So don't be afraid to experiment to find out what suits you.
A Combat article always has some speed and performance claims, so I won't make any. Use a Supergrde G21 or a Fox Schneurle. Use an 8x8 prop and as much nitro as your pocketbook can stand. More than 20% nitro, and you'll probably spend as much time repairing engines as building planes.
Last, but not least, join MACA, the Miniature Aircraft Combat Assoc., and be an "in" Combat flier. Send your name and address along with a check or money order for $5.00 to Tom Southern, 2207 Paul, Longview, TX 75601. MACA puts out a dynamite newsletter with the latest Combat news and happenings.
Transcribed from original scans by AI. Minor OCR errors may remain.

