
This Business of Flying
I suppose that there are as many different ways to teach a person to fly a radio-controlled aircraft as there are people flying them. The techniques of teaching range from the very personal one-on-one instructional sets to the classic method of teaching your kid sister to swim—throw her in. As you might well surmise, the success rates of these methods are as varied as the number of methods. Some people never learn with the very personal one-on-one instruction and a lot of kid sisters are great pilots. By and large, the majority couldn't remember how they learned—they just did.
My home club, the Greater Cincinnati Radio Control Club, recognized a need around training. Sure, we had club instructors and we even went so far as to designate two training nights each week during the flying season. That sounds good until you talk to some of the students and look at our success rates with new members. They told us of "lack of consistence in maneuvers being taught," "no method to our training," and "no standards." Those are not very nice feedback statements from our new members. Those comments, coupled with a noticeable lack of new fliers at the field, caused us to look at improving our training program.
The club asked me, as an ex-Air Force instructor pilot and a nut on instruction techniques, to develop a training program that is a little more professional. The result of that charge is what I call FLI—Five Level Instruction. We used it throughout the summer of 1978 with results of more pilots developed in less time with fewer broken airplanes. Guests have taken copies back to their clubs in Cleveland and Pittsburgh, and a second local Cincinnati club is now using it. I feel so strongly about its potential use in your club that I'd like to share it through Model Aviation—the AMA magazine.
Let's suppose that there was a modeling FAA, and that a highly qualified consultant were commissioned to develop the ideal training program which would make competent fliers, without the present agonies of broken trainers and the deficiencies of many-tongued improvised local schemes. Impossible? Not at all. The Greater Cincinnati Radio Club appointed the author to devise such a program — FLI — Five-Level Instruction. It is thoroughly tested and it works. — Tom Burdin
Our hobby sport is not a different situation as far as learning environments are concerned. We have a requirement for learning a motor skill that begins usually at zero level and proceeds through various levels of competence, while gaining the ability to operate a new piece of machinery. Notice the use of the word "level." The ultimate result of any training effort must be devoted to a final level of competence in the skill being taught. In our case, it is the solo flight of an RC model.
Attaining the final skill level is not a single unique, giant leap which can be singly taught, but rather it is the fitting together of an associated series of intermediate attainable skill levels, each of increasing difficulty. If we can tailor the intermediate levels so that each builds on the last and leads to the next, then training can be optimized, interest kept high, and the quality of the final skill, flying, is greatly improved. If we can build a flying training program on the "attainable skill level" premise with precise task descriptions, definable skill levels, and clear progress measurement, we should be able to answer the complaints of the GCRCC and, I'm sure, other clubs' students concerning training quality. The FLI training program does precisely that. Let's look at it.
The FLI program is divided into five levels. I could have used six, but FLI sounds more aeronautical than SLI. The first level is devoted totally to preflight. It assures the airworthiness of the aircraft and teaches engine tuning and preflight inspection. Level II gets the student into the air and concentrates on straight and level, shallow turns, and racetrack patterns. Level III sharpens the student's skills on Level II maneuvers, steepens the medium-bank turns, and adds procedure turns and two aerobatic maneuvers. Level IV adds the takeoff, stall recovery at altitude, and a traffic pattern and approach—no touchdown. Finally, in Level V, the student is allowed to land the aircraft, in addition to practicing cross-wind landings and forced landing patterns.
The exact descriptions of the maneuvers and the reason for each are discussed in detail later in the article, but it can be seen that the levels are well defined, tasks are well defined, and the work is progressive. Finally, each student participating in the FLI program is given a progress chart. On it, each flight is recorded and progress noted. There is also a set of rules associated with the use of the progress chart, and indeed the whole program. The chart and rule set are included in the discussion.
Finally, it is important to say that the FLI program does not teach anyone to fly, tell you how to teach, or do away with the need for an instructor. This program is only a course of instruction which requires instructors to make it usable. If your club has not established instructor status among your members, then you sorely need to do so. Once you get past the initial grumbling concerning "special members," your club, like mine, will be much better off. The growth of new members into competent pilots demands competent instructors and an organized program. Let's get started. Let's FLI.
FLI—LEVEL I
Task Descriptions and Measurement Criteria:
- The student will present an aircraft ready for flight instruction and an airworthiness check. The airworthiness check must include:
a) Trimmed for hands-off flight. b) CG in proper location. c) Flying surfaces warp-free. d) Nose-wheel steering to complete a full circle in a diameter smaller than 30-foot at full deflection on the transmitter stick. e) Engine idles reliably. f) Adequate power.
- The student will learn and demonstrate correct range check procedures for his/her radio, per manufacturer's recommendation.
- The student will learn and demonstrate the correct setting of the needle valve to assure full power at all flight altitudes and reliable idle.
Discussion:
Although no flying occurs in this level, it is perhaps the most important level. This statement is no more true than in the choice of aircraft. Many a potential flier has been turned away from model aviation because of a poor choice of first aircraft. This leads to frustration which destroys the learning process and thus the student's desire to learn. I strongly recommend a high/mid-wing cabin-style machine in the 40 to 60-inch wingspan range.
Select a machine that flies well on rudder only, and then use rudder, elevator, and motor control with steerable nose wheel. Do not use a conventional gear machine. If the student desires to build the model, then the Sig Kadet, Miss World, Falcon 56 and Sure Flite Cessna 150 type of machines are fine choices. If the built-up type of aircraft is used, it is imperative that the student receive construction reviews during the building to avoid problems in the air.
In the ready-to-fly market, Futaba's new RTF trainer is an excellent new entry. This Veco .19-powered machine is as close to being ready-to-fly out of the box as anything I've seen. The only work required of the flier is to glue on the horizontal and vertical stabilizers, bolt on the landing gear, and make minor adjustments to the controls. The construction is rugged and reinforced in the key stress areas. The high-wing tricycle gear design makes it a super trainer. The package is expensive but you're ready to go with minimum effort and a good investment in radio and aircraft.
The final part of aircraft selection is a flight check by an instructor. It is so easy to casually pass off a check flight by saying, "If it flies, it is fine." But the truth is that the student will learn faster if the aircraft doesn't fight back because it is out of trim, warped, underpowered, or out of CG range. Make sure the airplane is right for the audience.
FLI—LEVEL II
Task Descriptions and Measurement Criteria:
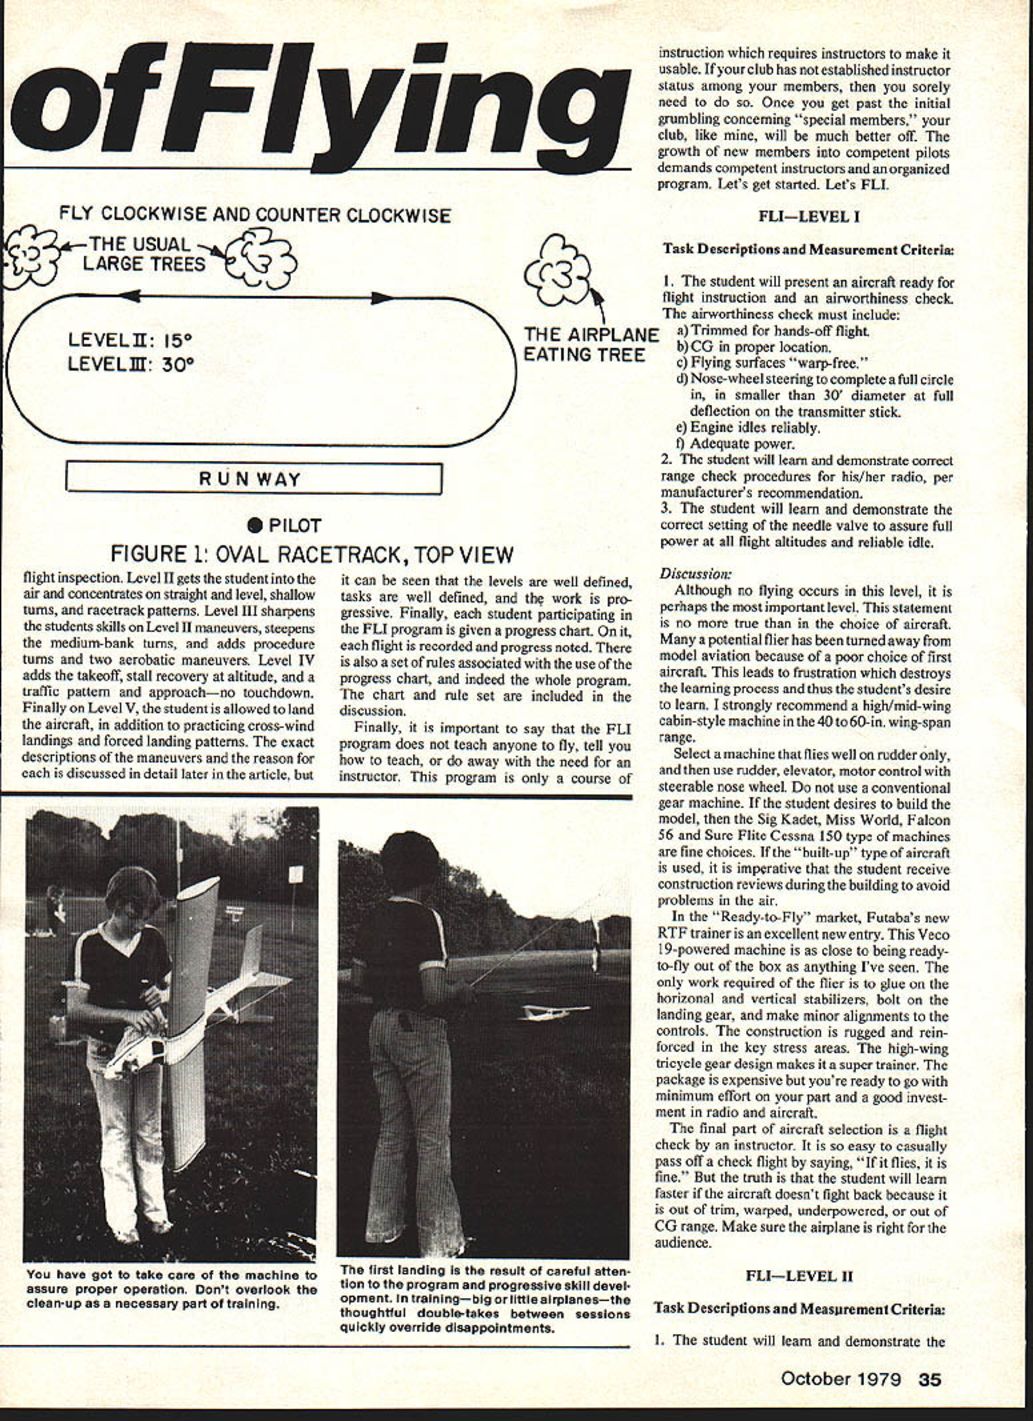
- The student will learn and demonstrate the ability to control the aircraft in straight and level flight with some input from the instructor as to attitude and altitude control. Ground track should roughly be parallel to the runway.
- The student will demonstrate the ability to control the aircraft in a 15° banked turn with some input from the instructor as to altitude and bank angle control.
- The student will learn and demonstrate an oval racetrack flight path parallel to the runway. Same flight criteria as Items 1 and 2 (see Fig. 1).
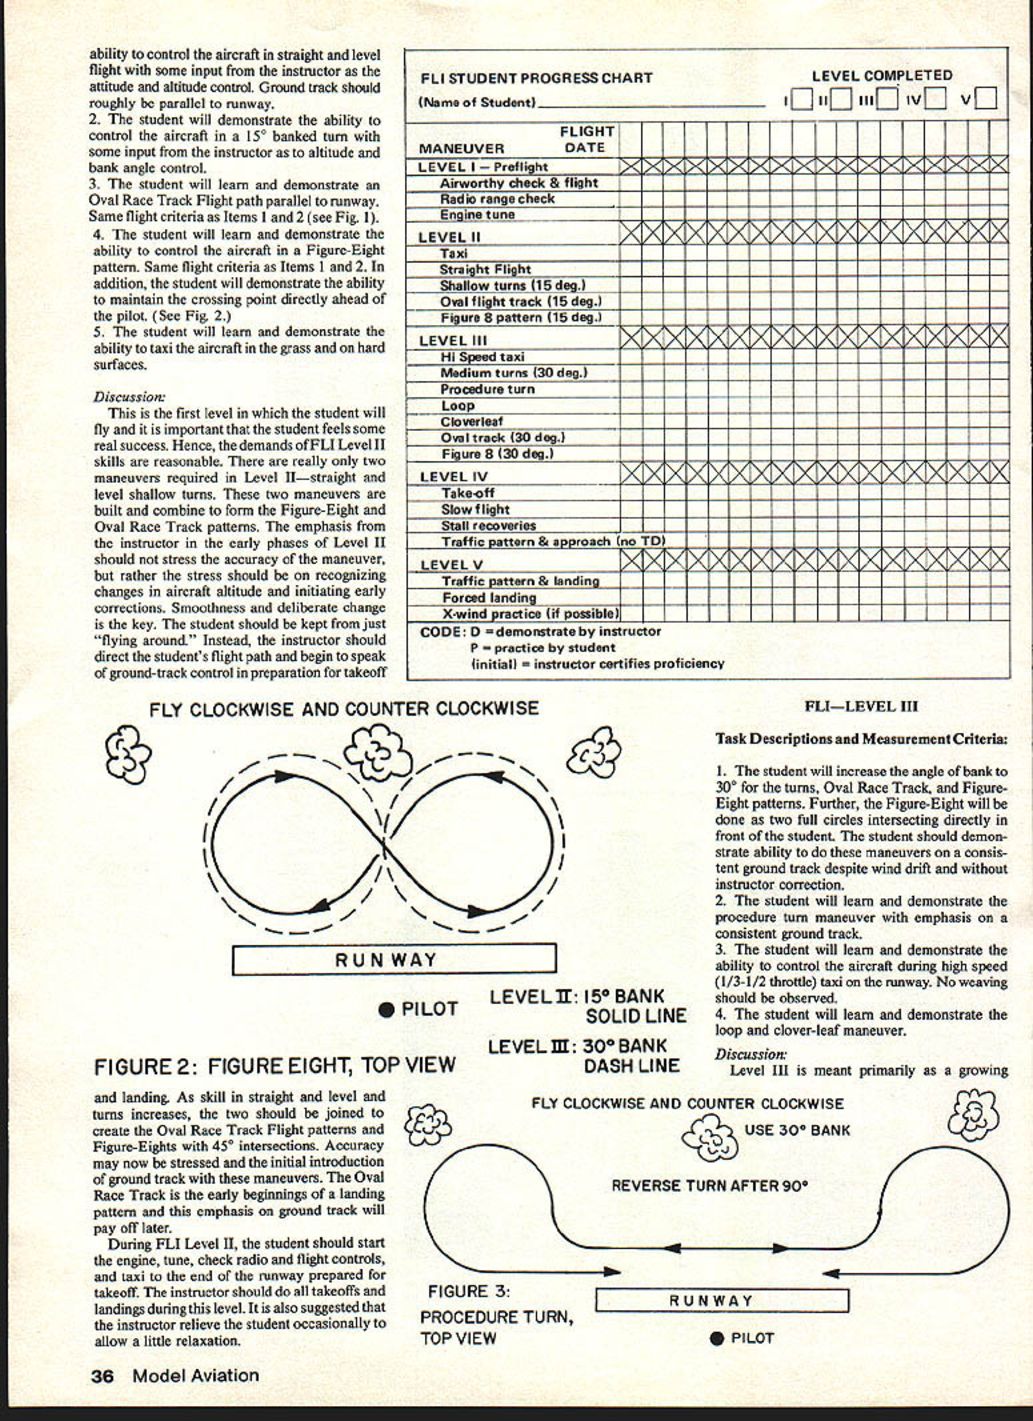
- The student will learn and demonstrate the ability to control the aircraft in a figure-eight pattern. Same flight criteria as Items 1 and 2. In addition, the student will demonstrate the ability to maintain the crossing point directly ahead of the pilot (see Fig. 2).
- The student will learn and demonstrate the ability to taxi the aircraft in the grass and on hard surfaces.
Discussion:
This is the first level in which the student will fly and it is important that the student feels some real success. Hence, the demands of FLI Level II skills are reasonable. There are really only two maneuvers required in Level II—straight and level and shallow turns. These two maneuvers are built and combined to form the figure-eight and oval racetrack patterns.
The emphasis from the instructor in the early phases of Level II should not be on the absolute accuracy of the maneuver, but rather on recognizing changes in aircraft altitude and initiating early corrections. Smoothness and deliberate control is the key. The student should be kept from just "flying around." Instead, the instructor should direct the student's flight path and begin to speak of ground-track control in preparation for takeoff and landing.
As skill in straight and level and turns increases, the two should be joined to create the oval racetrack flight patterns and figure-eights with 45° intersections. Accuracy may now be stressed and the initial introduction of ground track with these maneuvers. The oval racetrack is the early beginning of a landing pattern and this emphasis on ground track will pay off later.
During FLI Level II, the student should start the engine, tune, check radio and flight controls, and taxi to the end of the runway prepared for takeoff. The instructor should do all takeoffs and landings during this level. It is also suggested that the instructor relieve the student occasionally to allow a little relaxation.
FLI—LEVEL III
Task Descriptions and Measurement Criteria:
- The student will increase the angle of bank to 30° for the turns, oval racetrack, and figure-eight patterns. Further, the figure-eight will be done as two full circles intersecting directly in front of the student. The student should demonstrate ability to do these maneuvers on a consistent ground track despite wind drift and without instructor correction.
- The student will learn and demonstrate the procedure turn maneuver with emphasis on a consistent ground track.
- The student will learn and demonstrate the ability to control the aircraft during high speed (1/3–1/2 throttle) taxi on the runway. No weaving should be observed.
- The student will learn and demonstrate the loop and clover-leaf maneuvers.
Discussion:
Level III is meant primarily as a growing experience. Previous maneuvers are practiced and difficulty is increased by moving to a 30° bank angle in turns. The student should concentrate on building self-confidence to reduce dependency on the instructor. This will require the instructor to allow the student to recover from difficult situations without interference. The classic "hairy situation" can easily result, requiring judgment on the part of the instructor as to when to "take over."
The inclusion of the procedure turn in this level allows the student to perform another combinational maneuver requiring straight and level flight, turns, and turn reversals (see Fig. 3). When practicing the FLI Level III maneuvers at 30° bank and with the procedure turn, special emphasis should now begin on ground track as affected by wind drift. Just "flying around" doing these maneuvers doesn't do the job. Flying is a sport of self-discipline and that discipline developed now will pay off in the landing pattern. Work hard here—student and instructor. The airplane you save may be your own.
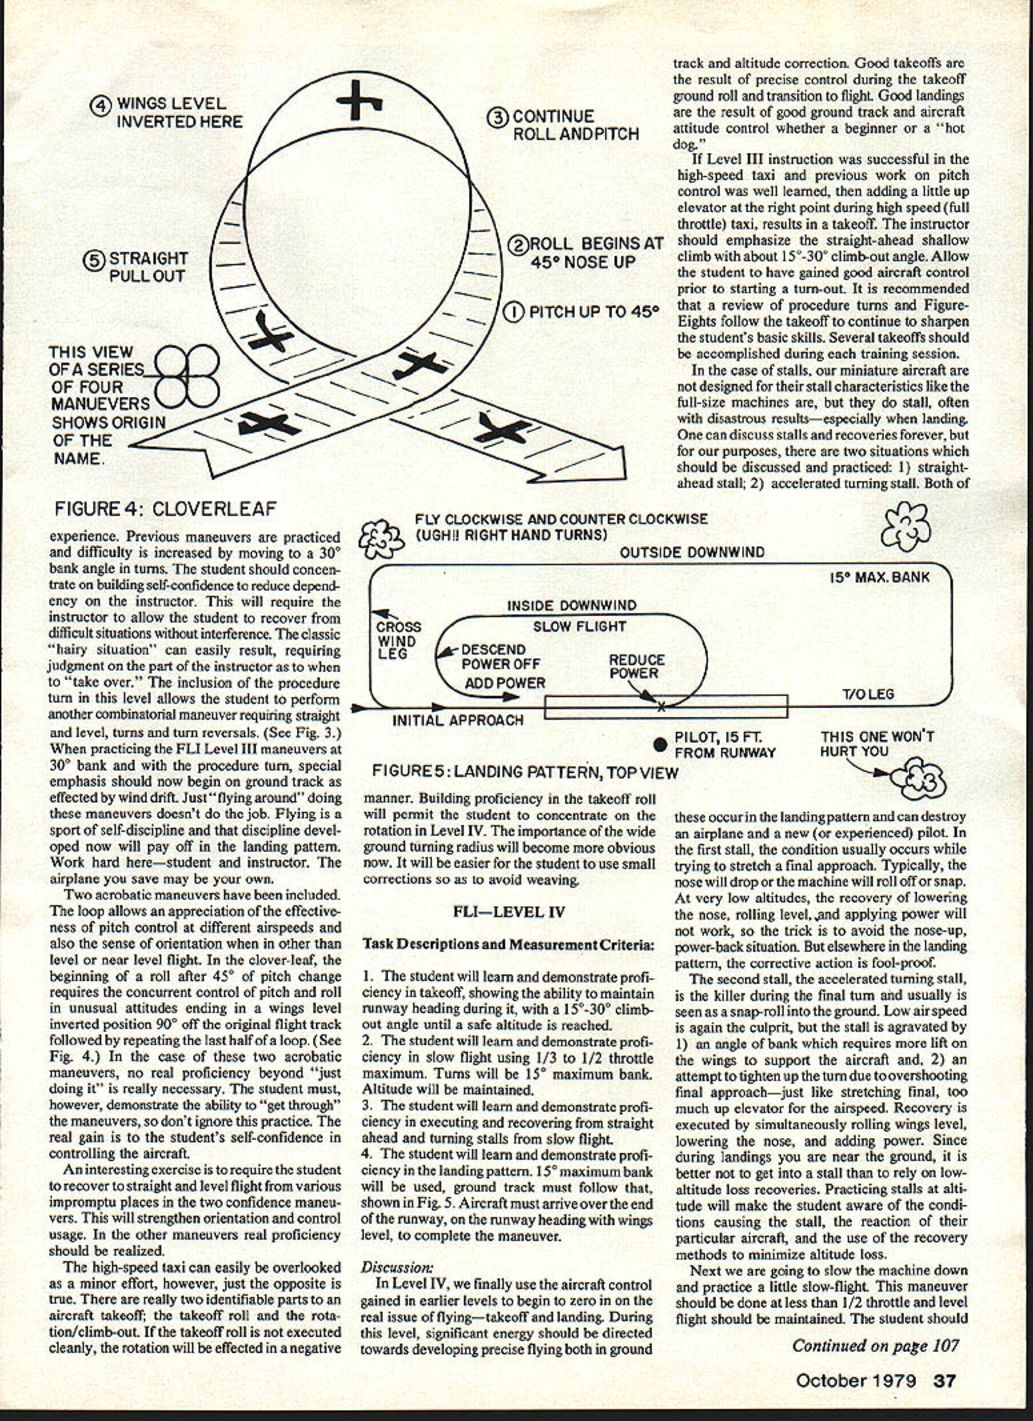
Two acrobatic maneuvers have been included. The loop allows an appreciation of the effectiveness of pitch control at different airspeeds and also the sense of orientation when in other than level or near-level flight. In the clover-leaf, the beginning of a roll after 45° of pitch change requires the concurrent control of pitch and roll in unusual attitudes ending in a wings-level inverted position 90° off the original flight track, followed by repeating the last half of a loop (see Fig. 4). In the case of these two acrobatic maneuvers, no real proficiency beyond "just doing it" is really necessary. The student must, however, demonstrate the ability to "get through" the maneuvers, so don't ignore this practice. The real gain is to the student's self-confidence in controlling the aircraft.
An interesting exercise is to require the student to recover to straight and level flight from various impromptu places in the two confidence maneuvers. This will strengthen orientation and control usage. In the other maneuvers real proficiency should be realized.
The high-speed taxi can easily be overlooked as a minor effort; however, just the opposite is true. There are really two identifiable parts to an aircraft takeoff: the takeoff roll and the rotation/climb-out. If the takeoff roll is not executed cleanly, the rotation will be effected in a negative track and altitude correction. Good takeoffs are the result of precise control during the takeoff ground roll and transition to flight. Good landings are the result of good ground track and aircraft attitude control whether a beginner or a "hot dog."
If Level III instruction was successful in the high-speed taxi and previous work on pitch control was well learned, then adding a little up elevator at the right point during high speed (full throttle) taxi results in a takeoff. The instructor should emphasize the straight-ahead shallow climb with about 15°–30° climb-out angle. Allow the student to gain good aircraft control prior to starting a turn-out. It is recommended that a review of procedure turns and figure-eights follow the takeoff to continue to sharpen the student's basic skills. Several takeoffs should be accomplished during each training session.
In the case of stalls, our miniature aircraft are not designed for the benign stall characteristics of full-size machines, but they do stall, often with disastrous results—especially when landing. For our purposes, there are two situations which should be discussed and practiced:
- Straight-ahead stall.
- Accelerated turning stall.
Both of these should be practiced at altitude so the student can see the characteristics of the stall for their particular aircraft and learn the recovery techniques without risk. Practicing recoveries will make the student aware of the conditions causing the stall, the reaction of the aircraft, and the use of recovery methods to minimize altitude loss.
Figure 4: Cloverleaf — This view of a series of four maneuvers shows the origin of the name.
Figure 5: Landing pattern, top view.
The next step is to build proficiency in the takeoff roll and rotation. Building proficiency in the takeoff roll will permit the student to concentrate on the rotation in Level IV. The importance of a wide ground turning radius will become more obvious now. It will be easier for the student to use small corrections so as to avoid weaving.
FLI—LEVEL IV
Task Descriptions and Measurement Criteria:
- The student will learn and demonstrate proficiency in takeoff, showing the ability to maintain runway heading during it, with a 15°–30° climb-out angle until a safe altitude is reached.
- The student will learn and demonstrate proficiency in slow flight using 1/3 to 1/2 throttle maximum. Turns will be 15° maximum bank. Altitude will be maintained.
- The student will learn and demonstrate proficiency in executing and recovering from straight-ahead and turning stalls from slow flight.
- The student will learn and demonstrate proficiency in the landing pattern. 15° maximum bank will be used; ground track must follow that shown in Fig. 5. Aircraft must arrive over the end of the runway, on the runway heading with wings level, to complete the maneuver.
Discussion:
In Level IV, we finally use the aircraft control gained in earlier levels to begin to zero in on the real issue of flying—takeoff and landing. During this level, significant energy should be directed towards developing precise flying both in ground track and altitude correction. Good takeoffs are the result of precise control during the takeoff ground roll and transition to flight. Good landings are the result of good ground track and aircraft attitude control whether a beginner or an experienced pilot.
Both of the common stall situations can destroy an airplane and a new (or experienced) pilot. In the first stall, the condition usually occurs while trying to stretch a final approach. Typically, the nose will drop or the machine will roll off or snap. At very low altitudes, the recovery of lowering the nose, rolling level, and applying power may not work, so the trick is to avoid the nose-up, power-back situation. Practicing stalls at altitude will make the student aware of the stall conditions and recovery methods.
The second stall, the accelerated turning stall, is the killer during the final turn and usually is seen as a snap roll into the ground. Low airspeed is again the culprit, but the stall is aggravated by 1) an angle of bank which requires more lift on the wings to support the aircraft, and 2) an attempt to tighten up the turn due to overshooting the final approach—just like stretching final, too much up elevator for the airspeed. Recovery is executed by simultaneously rolling wings level, lowering the nose, and adding power. Since during landings you are near the ground, it is better to not get into a stall than to rely on low-altitude recoveries.
Next we slow the machine down and practice slow flight. This maneuver should be done at less than 1/2 throttle and level flight should be maintained. The student should be shown the high rate of turn possible at low airspeed and shallow banks. Steep turns are a no‑no in slow flight. Remember the stalls. Also notice the sloppiness of the controls at lower airspeeds. All these characteristics relate directly to the landing pattern and good slow-flight skills will be of significant value.
The final piece of FLI Level IV is the landing pattern. It is my opinion that learning is optimized by practicing a standard maneuver. Therefore, the landing pattern used in FLI is a rectangular pattern that allows the student to see the same picture each time. It may not look like your pattern, but it works. It is time consuming, but worth it. Entering on initial approach, power is reduced on the turn to downwind so as to be in slow flight on downwind. A power-off glide is started during the descending base and continues in the turn to final. Power is added on final to maintain flying speed. A "go-around" is to be executed after arriving wings level at the end of the runway ready to touchdown. Ground track should then proceed back to initial approach for another go at it. No touchdown is to be attempted during this level.
The instructor should emphasize smooth control, ground track, and consistency. A friendly reminder of the stall-recovery procedure will also instill caution during slow flight and turns. There are usually local landmarks and checkpoints which the instructor can point out and which are of significant benefit in establishing a consistent pattern.
FLI—LEVEL V
Task Descriptions and Measurement Criteria:
- The student will learn and demonstrate the ability to land the aircraft to a full stop on a runway and also to execute a touch-and-go landing.
- The student will learn and demonstrate the ability to land the aircraft on the runway from an unexpected forced landing, from altitudes as low as the normal traffic patterns.
- The student will practice cross-wind landings if possible.
Discussion:
Well, this is it. All the marbles are on the line—or rather the runway. The quality of the previous four levels of training should really pay off now if the effort was sincerely devoted to mastering them. The landing pattern is a complete maneuver and the instructor's job is to evaluate the student's ability to fly the aircraft through the entire pattern without assistance and to determine whether solo flight should be authorized.
Specific checks include proper altitude and position on downwind; descent rate and glide path; power management; proper wind correction on base and final; speed control; and smoothness of touchdown. The instructor is looking for the ability to perform all previous level tasks while maintaining good control and disciplined judgment.
Transcribed from original scans by AI. Minor OCR errors may remain.

