
Cardinal Sinner
THROUGH THE YEARS control-line stunt has provided the author with many hours of pleasure, both in the construction of a long line of models and in the thousands of patterns flown. The ever-present challenge to make all the intersections, keep proper elevations and turn radius provides the incentive to practice harder and develop better designs.
A good competitive-level flight pattern requires a good airplane. Many so-called stunters do more to set back the state of the art and discourage potentially good fliers than to improve the flying skills. A properly designed and constructed stunter will settle into the "groove" and requires little or no thought to flying the model, allowing full concentration on perfecting the maneuvers. If the flier is busy fighting an unstable, over-sensitive, under- or over-powered model, or one simply out of trim, his chances of putting in an acceptable pattern are minimal. In other words, a good model is a must. The Cardinal Sinner is a good model.
Most stunt designs evolve from a long line of experimental models. In the case of the Cardinal Sinner this is not entirely true. My previous stunters were developed around the partially sheeted D-tube wing construction with a few foam-cored wings thrown in for variety. Moment arms began to show some standardization and wing areas and airfoils were worked up to optimum values. The old standby Fox 35 stunt engine, a constant battle with weight led me to investigate the virtues of the "Detroiter" type or bird-cage wing structure. This method of building a wing had always fascinated me but I was leery of its strength and the apparent delicacy of all those strip ribs without the protection of sheeting. I finally gave way to curiosity and built the Cardinal Sinner with a bird-cage wing. After flying this design three years I am totally satisfied that its strength is more than adequate, with normal care it is not fragile, and most important, it is a much lighter structure.
I cannot emphasize enough the importance of keeping the weight down on any stunter. The Cardinal Sinner was designed to use contest grade 4-6 pound per cubic foot balsa throughout with the exception of the wing leading and trailing edges and the spar caps which should be firm stock. Built and finished as recommended should give you a finished model around 45 ounces. I'm firmly convinced a light model will beat a heavy one every time, especially in the wind when the heavy ships build up terrific speeds in the consecutive maneuvers to the point of being practically uncontrollable. A light ship means a light power loading making the engines work much easier in windy conditions. A light wing loading fights bad effects of centrifugal force and gravity.
Perhaps I should mention that the name has no relation to the performance of the model. It was named after the Cardinals of North Idaho College, which provides me with employment.
Building a model of this type is a little different than a conventional stunter; being sort of a unitized body, the ship builds all together. Maybe that's why bird-cage wings are called "Detroiters."
Start by building up the wing spar. You will note the plans call for both wings equal span. I quit building the outboard wing shorter several years ago and found that the models fly fine this way and look much better. The plywood doublers on the top and bottom center are to make up any moment-area typical of an all-out stunt machine. A slight rudder offset is used. No engine offset is required. The ship is adequately powered by a .35.
Cut out 1/32" plywood fuselage doublers; bond to 3/16" sides with contact cement. Cut spar, leading and trailing edge holes in sides using doublers as guide. Taper sides to 3/32" thickness at rear; sanding block; add motor mounts. Cut out formers, bellcrank platform. Clear T-shaped space in building bench large enough to accommodate wing-fuselage assembly. Slide fuselage sides over spar; fit up formers F-1, F-2, bellcrank platform. Place assembly inverted on bench over wing plan. Check alignments carefully: spar level, fuselage square, formers straight. Glue securely; allow adequate drying time. Install temporary spacers at F-3, F-4, F-5 locations; join fuselage sides; tail spacer. Work flap horn position through trailing edge holes; slide trailing edge position splice should be reinforced with 1/8" plywood doubler as shown. strength lost by bellcrank clearances in the spar web.
Cut out 1/32" plywood fuselage doublers and bond to 3/16" sides with contact cement. Cut spar, leading and trailing edge holes in sides using doublers as a guide. Taper sides to 3/32" thickness at rear; sanding block; add motor mounts. Cut out all formers and the bellcrank platform.
Clear a tee shaped space on your building bench large enough to accommodate the wing and fuselage assembly.
Slide the fuselage sides over the spar and fit up to formers F-1, F-2 and the bellcrank platform. Place this assembly inverted on your bench over wing plan. Check alignments carefully: spar level, fuselage square, formers straight. Glue securely and allow adequate drying time.
Install temporary spacers at F-3, F-4 and F-5 locations and join fuselage sides at tail with 1/8" sq. spacer.
Work flap horn into position through trailing edge holes and slide 1/2" sq. trailing edge into position. The splice should be reinforced with a 1/8" plywood doubler as shown on plan. Align trailing edge with plan and block up at tips until perfectly level. Repeat process with leading edge. Anchor tips of spar to prevent movement in any direction. Install 1/8" sheet wing tips to aid alignment. Install full length sliced ribs to the bottom surface of wing beginning with the 1/2" root rib. Trim ribs to length at trailing edge. As you progress toward tip you may need to trim a slight amount from the leading edge of the ribs to get them to seat on the spar. Add false ribs. When dry and before moving the model, carefully sand ribs in chordwise direction using a sanding block that spans at least six ribs to insure a uniform airfoil. Turn model over and repeat for upper wing surfaces. Cement 1/8" x 1/2" laminations in place on wing tips and give a finishing sanding, rounding the leading edge and shaping the trailing as shown on plan.
Install a 3/16" nylon bellcrank and flexible leadouts. Secure leadout guides to bottom of wing tip in location shown. Epoxy wire weight to right wing.
Bird-cage wings tend to be a little snappy prone around the shop in the uncovered state, so I suggest giving the structure a couple coats of clear dope and covering with lightweight Silkspan followed by two or three coats of clear dope.
Select some light 1/8" stock for the flaps. Sand to shape and hinge the wing fitting carefully to flap horn. Similarly, fabricate stabilizer and elevator assembly tapering to 1/8" at tips and assemble, paying particular care to insure proper alignment horizontally and laterally. Be sure the flap and elevator horns you select have some type of bearing and that you anchor the bearing securely. For long life you should bush pushrod holes with a short length of brass tubing secured with soldered washers on each side.
Install fuselage formers and plywood pushrod guide. Hook up all controls using 3/32" music wire pushrods. Note holes used on plan.
A low wide-stance landing gear adds grace and class while providing the shock absorption for smooth landings. Often such landing gears tend to sag and distort or crack their fairings. To eliminate this problem and to provide a better mounting for the leg fairings and wheel pants fabricate a reinforcement from .046 music wire. Bind in three places with copper wire as shown and solder to main gear legs. Fair-
Cardinal Sinner
Fairings are made from two pieces of 3/16 x 3/4" balsa sandwiching the gear leg. The wheel pants are one piece built around the installed wheels. Solder a washer to the axle on the inboard side of the wheel and retain the wheel with the wire retainer-part mount. Wheel pants mounted in this fashion are extremely durable. Complete the landing gear through the sanding stage before installing to F-2.
The tailwheel mount may seem a little beefy. It has been designed to withstand the loads imposed by a take-off stooge if you fly alone.
Use very light 3/32" balsa sheet for the bottom. If you don't have the proper material, tack glue, shape, remove and hollow and reinstall bottom permanently. As you begin to seal up the fuselage be sure the controls are free and well lubricated with petroleum jelly.
Install 3/32" sheet turtle deck sides. Sand top even and cap with 1/8" sheet. Sand to shape blending in with 1/4" sheet fin and rudder. Note rudder offset.
Drill engine mounts for your favorite engine. You may use one or two degrees right offset if you wish. Install 4-40 blind nuts. Tack glue 3/4" top block in place and carve to shape. Remove and hollow as indicated. Reinstall securely. Build up cowl from 1/8" sheet. Reinforce inside corners with 1/4" triangle stock. If you have an old engine for a construction dummy, install it with an old 2" spinner mounted or carefully plug the exhaust and intake ports of your good engine and install it.
Trim the interior of the cowl to fit and tack glue over engine. Fit 1/16" plywood nose ring. Sand nose of model to its final contours. Pop off cowling and install alignment dowel, bike-spoke retainer and plywood reinforcement. I recommend using the following openings with metal: exhaust port, glow-plug access, needle-valve hole and "carb" air intake. The cooling air exit may or may not be lined. Assorted brass tubing and tin can stock are good for these uses.
Rivet a 4 oz. T-21 E Veco stunt tank as shown and mount to lower edge of engine mounts behind F-1. Cover tank compartment with 1/8" sheet balsa. This procedure allows you to shape the nose without vents being in the way and provides easy access to the tank if necessary later.
Give the entire model a light sanding and fill any dents or scars with filler. Finishing as a stunter is nearly as controversial as politics. I'll offer my method for your consideration.
First of all, I prefer dope finishes. I believe they are lighter, easier to work with, much easier to repair and last at least five years, which is adequate for our purposes. I also like to use nitrate dope for the base because of its less severe shrinking qualities and its excellent bonding ability. Butyrate is used from the color coats on. But the reverse is not true! Butyrate can be used throughout with good results.
Begin by applying two coats clear to the bare wood, sanding with 400 grit after each coat. Cover all wood with tissue adhered with a mixture of 75% thinner and 25% dope. I suggest Japanese tissue on all areas with a single curvature. Just lay the tissue in place and brush the above mixture on. This will adhere the tissue in a wrinkle-free manner. If Japanese tissue is not available use "00" or "rubber power" Silkspan. Cover any compound curved areas with "00" Silkspan, dampened with water spray from a Windex bottle and adhere in the same manner. Use more pieces of smaller size if necessary and avoid overlapping seams if possible. Try for neat butt seams with no gap.
Brush on approximately five more coats of clear dope, sanding lightly with well-worn 400 grit or 600 grit paper used dry. Be very careful when sanding over wing ribs as you can easily sand through. Sand in the direction of the ribs. Try to sand only between ribs and the rest will take care of itself.
At this point apply fillets to wing, stabilizer and rudder to fuselage intersections. I like micro-balloons mixed with Formula 1 Hobbypoxy best. Just mix micro-balloons in the epoxy until a workable putty is formed. Apply mixture with a bare finger. Smooth to approximate dimension. Dip a clean finger in dope thinner and smooth and work fillet to finished shape. Let dry, sand lightly and admire! No shrinking! No fuss or bother!
The purpose of waiting until this point in the finish procedure is to keep the dope build-up on fillets to a minimum. Butyrate dope never quits shrinking and if you have a thick build-up in an inside curve, such as a fillet, lifting is the usual result.
Any desired cockpit detail and interior finish should be added now and covered with a well-fitted canopy. Mask off canopy and fair into fuselage with micro-balloons and epoxy.
Prepare a filler by adding talcum powder to clear dope to a brown gravy consistency. Thin for brushing and apply one coat to all wood areas except over fillets. When this is dry, sand back to clear, leaving filler in grain only. Spray on one final coat of clear, sanding very lightly when completely dry. You should now be ready for color.
Apply color with spray gun or air brush. Use just enough to cover as pigmented dope is very heavy. Allow to dry two or three days before masking for trim. You can run tape through your fingers to remove some of the sticking ability and lessen likelihood of tape lifting base color when removing masking tape. I apply large trim areas with a spray gun but resort to a brush for striping. If you do use a brush for trim, seal the edges of your masking tape with a light coat of clear before applying the color to avoid seepage under the tape. After all trimming and lettering have been applied sand raised edges lightly with 600 grit paper. Give the model a minimum of six sprayed coats of clear butyrate dope. Be sure no plasticizer has been added and do not apply all coats at one session. Let dope dry well between coats. Butyrate dope has a tendency to soften all coats at each application and hurrying this step will give you problems by over-softening the finish too deep.
Cardinal Sinner
THROUGH THE YEARS control-line stunt has provided the author hours of pleasure — both construction and flying of long-line models, thousands of patterns flown. The ever-present challenge to make intersections, keep proper elevations and turn radius provides incentive to practice harder and develop better designs. A good competitive-level flight pattern requires a good airplane. So-called stunters set back the state of the art and discourage potentially good fliers. To improve flying skills, a properly designed and constructed stunter will settle into a groove and require little or no thought in the flying mode, allowing full concentration on perfecting maneuvers. A flier busy flying an unstable, over-sensitive, under- or over-powered model simply has little chance of putting an acceptable pattern together. In other words, a good model must be a good model — Cardinal Sinner is a good model.
Most stunt designs evolve from long-line experimental models. In the case of the Cardinal Sinner this is entirely true. Previous stunters developed around partially sheeted D-tube wing construction; a few foam-cored wings have been tried. As moment arms began to show, some standardization of wing areas and airfoils worked up to optimum values. The old standby Fox .35 stunt engine and the constant battle with weight led me to investigate the virtues of the Detroiter-type bird-cage wing structure. The method of building this wing always fascinated me. Leery of its apparent delicacy — strip ribs and protection by sheeting — curiosity finally gave way and I built the Cardinal Sinner birdcage wing.
After flying the design three years I am totally satisfied its strength is adequate with normal care. It is not fragile; the important point is the much lighter structure. I cannot emphasize enough the importance of keeping weight down. The stunter Cardinal Sinner was designed to use contest-grade 4–6 lb per cubic foot balsa throughout, the exception being the wing leading and trailing edges and spar caps, which should be of firm stock. Built and finished as recommended it should give a finished model around 45 ounces. I'm firmly convinced a light model will beat a heavy one time after time, especially in wind. Heavy ships build up terrific speeds in consecutive maneuvers; the point being they are practically uncontrollable. A light ship means light power loading, making engines work.
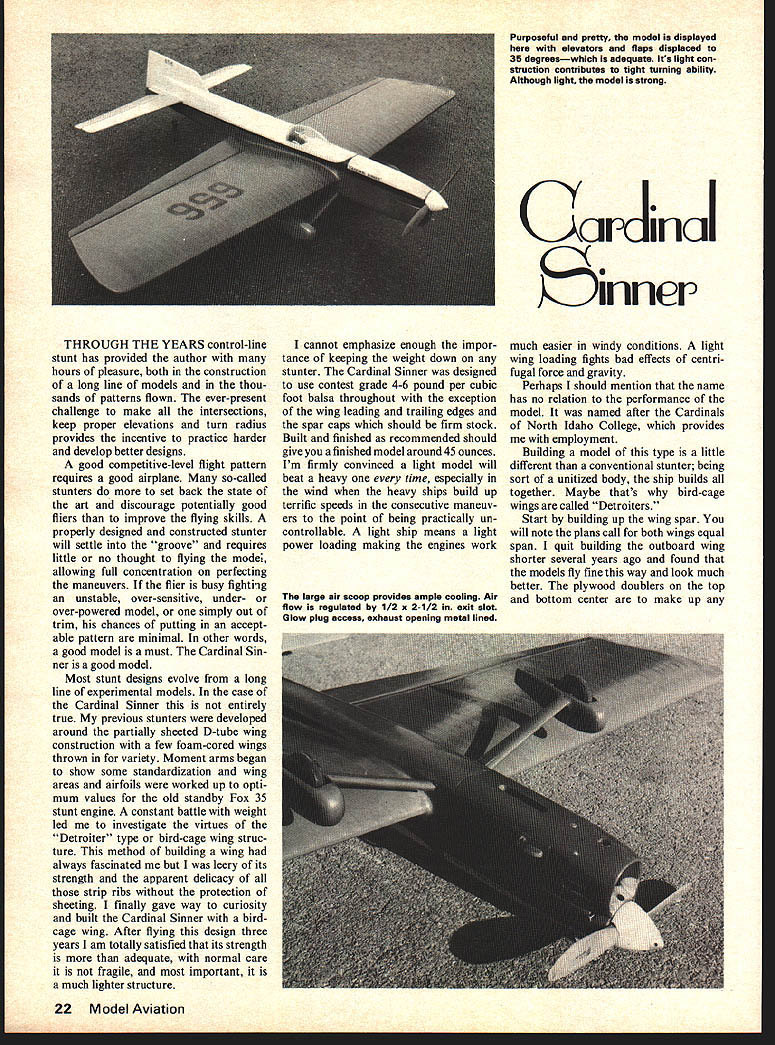
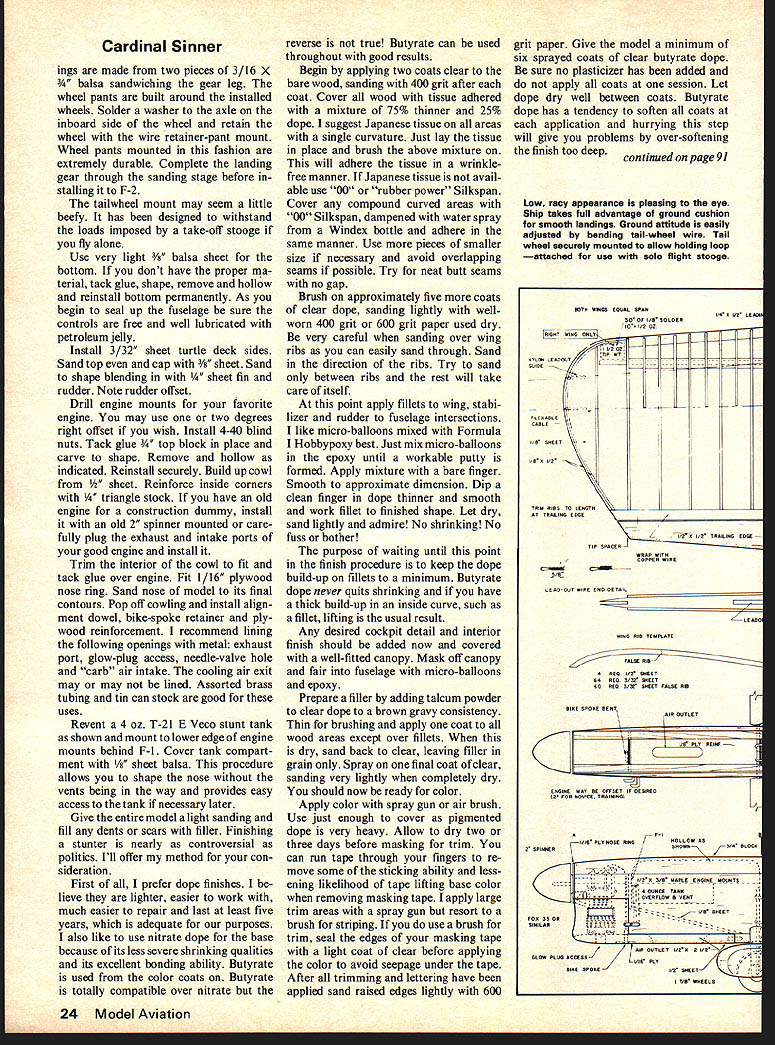
A purposeful, pretty model — displayed elevators and flaps displaced 35 degrees, which is adequate. Its light construction contributes to tight turning ability. Although light, the model is strong; final trimming is much easier in windy conditions. Light wing loading fights the bad effects of centrifugal force and gravity. Perhaps I should mention the name has no relation to performance — the model was named after the Cardinals of North Idaho College, which provides employment.
Building this type of model is a little different from a conventional stunter, being a sort of unitized body-ship that builds together. Maybe that's why bird-cage wings are called Detroiters.
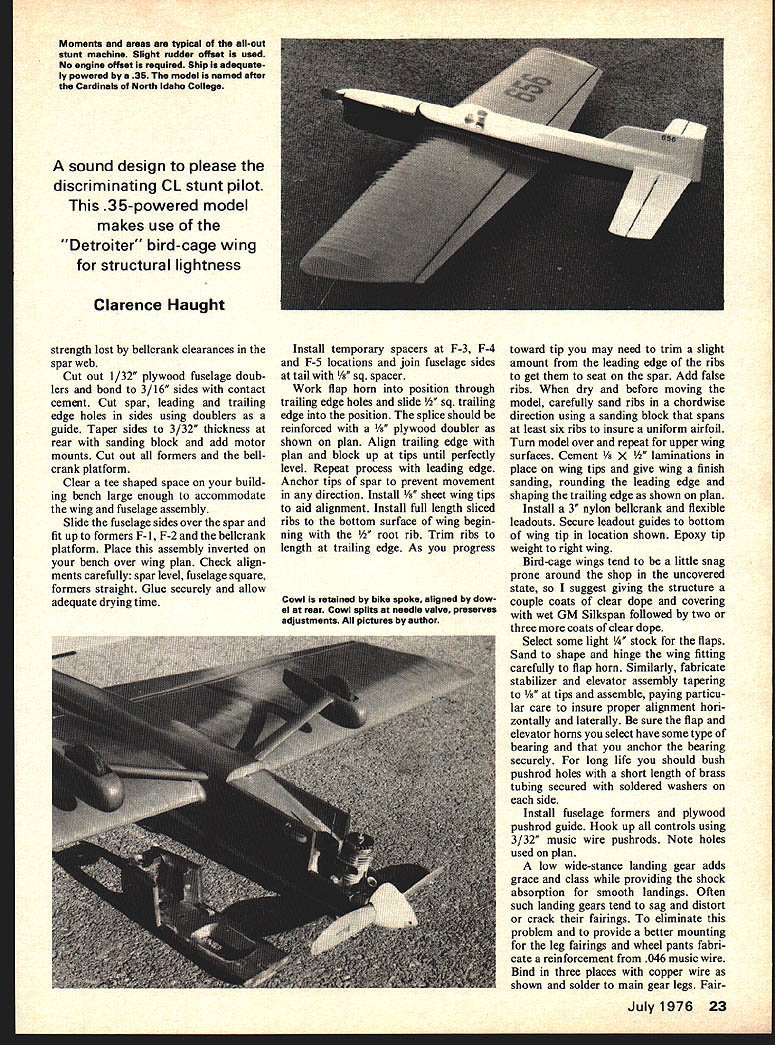
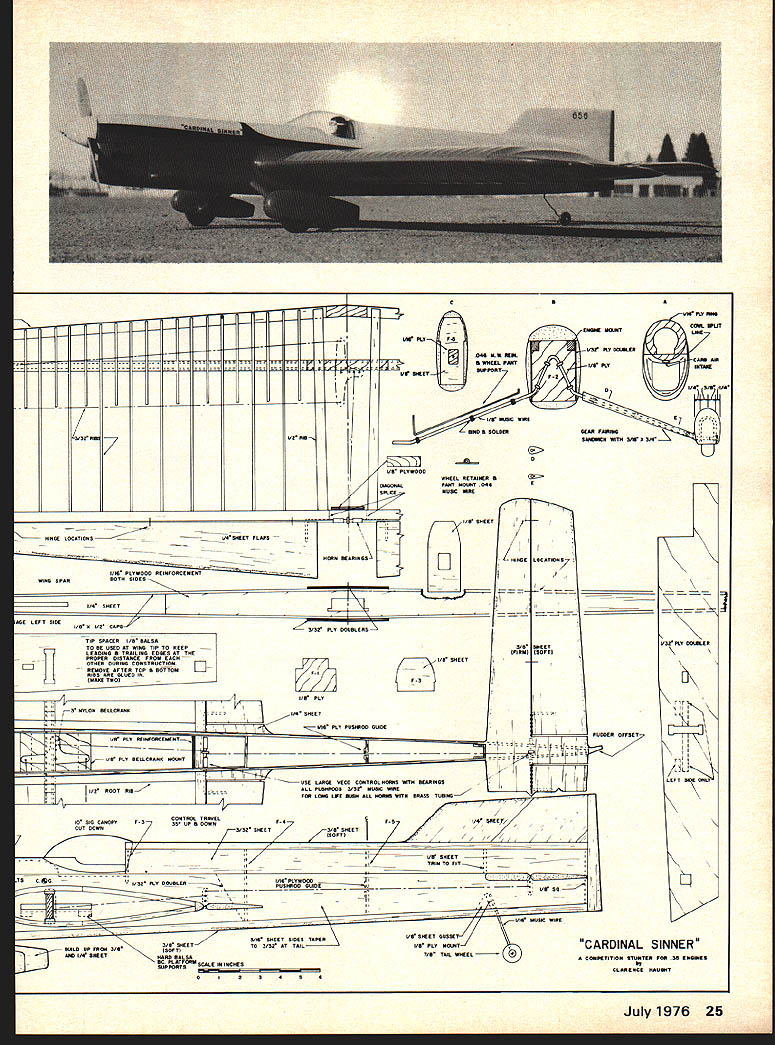
Start building up the wing spar. You will note the plans call both wings equal span. I quit building the outboard wing shorter several years ago and found models fly fine that way and look much better. Plywood doublers top and bottom at center are used. A large air scoop provides ample cooling. Air flow is regulated by a 1/2" x 2-1/2" exit slot. Glow-plug access and exhaust opening are metal lined. Moment areas are typical for an all-out stunt machine. Slight rudder offset is used. No engine offset is required. The ship is adequately powered by a .35.
Cut out 1/32" plywood fuselage doublers and bond to 3/16" sides with contact cement. Cut spar, leading and trailing edge holes in the sides using the doublers as a guide. Taper the sides to 3/32" thickness from the rear. Sanding block and add motor mounts. Cut out formers and bellcrank platform. Clear a T-shaped space on the building bench large enough to accommodate the wing-fuselage assembly.
Slide fuselage sides over the spar and fit up formers F-1, F-2 and the bellcrank platform. Place the assembly inverted on the bench over the wing plan. Check alignments carefully: spar level, fuselage square, formers straight. Glue securely and allow adequate drying time. Install temporary spacers at F-3, F-4 and F-5 locations and join fuselage sides at the tail spacer. Work flap horn position through trailing edge holes and slide trailing edge position splice into place; the splice should be reinforced with 1/8" plywood doubler as shown.
Transcribed from original scans by AI. Minor OCR errors may remain.

