
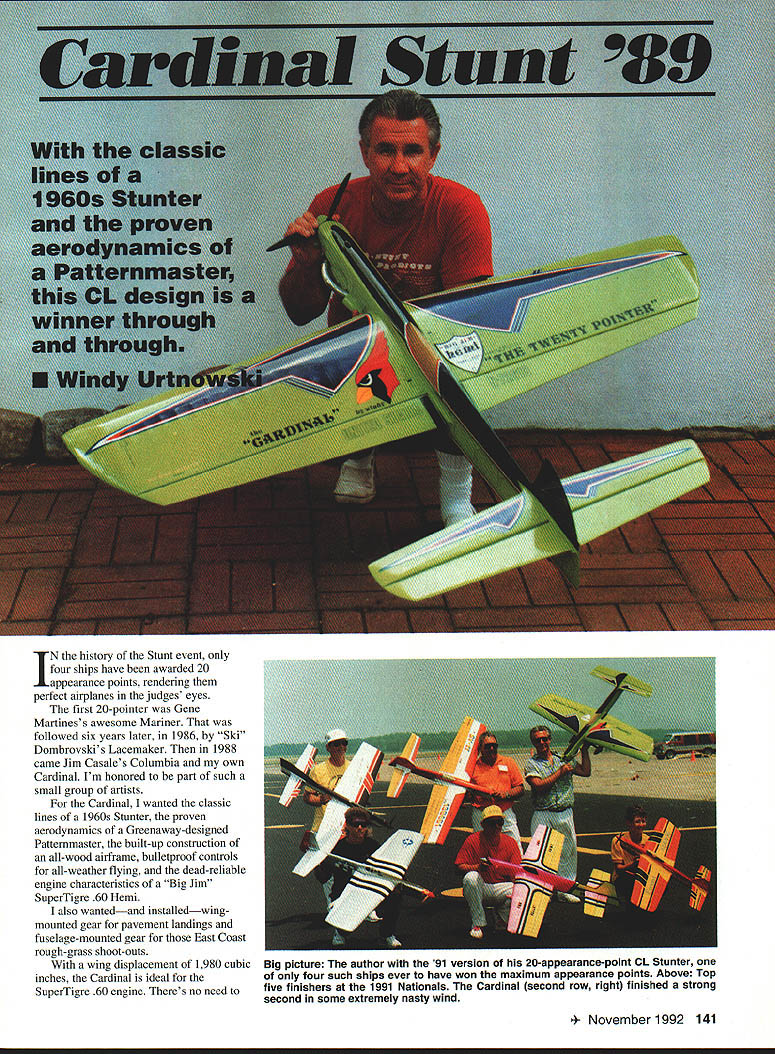
Cardinal Stunt '89
With the classic lines of a 1960s Stunter and the proven aerodynamics of a Patternmaster, this CL design is a winner through and through.
Windy Urtnowski
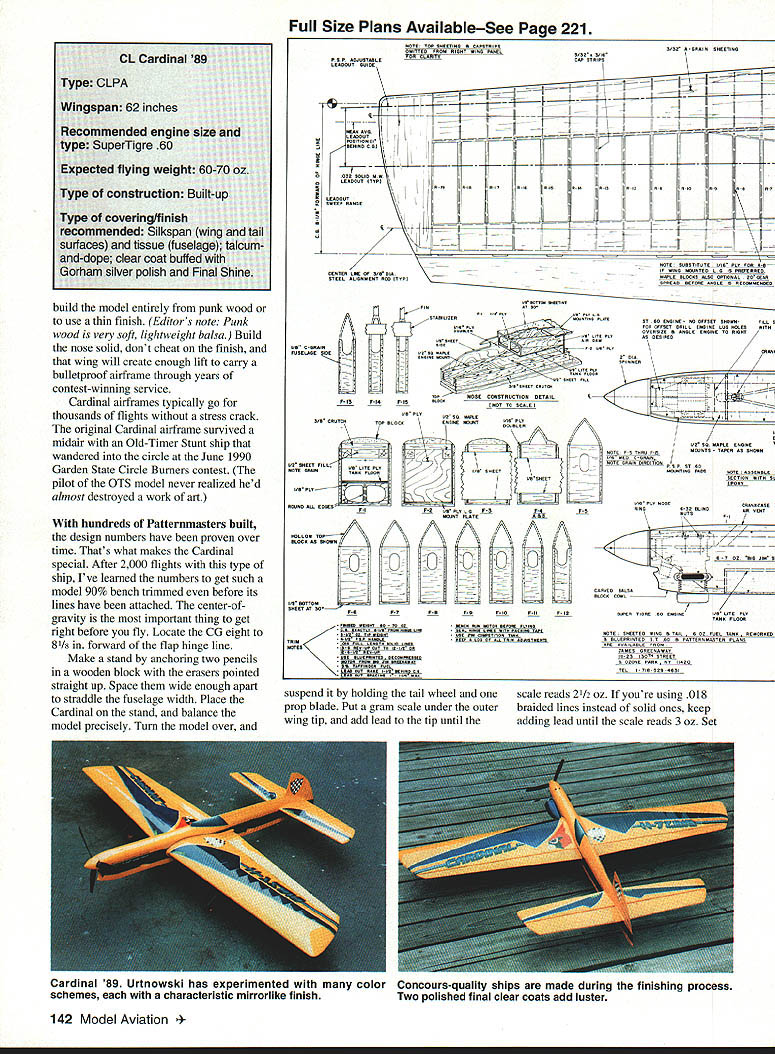
In the history of the Stunt event, only four ships have been awarded 20 appearance points, rendering them perfect airplanes in the judges' eyes. The first 20-pointer was Gene Martines's awesome Mariner. That was followed six years later, in 1986, by "Ski" Dombrovskis's Lacemaker. Then in 1988 came Jim Casale's Columbia and my own Cardinal. I'm honored to be part of such a small group of artists.
For the Cardinal, I wanted the classic lines of a 1960s Stunter, the proven aerodynamics of a Greenaway-designed Patternmaster, the built-up construction of an all-wood airframe, bulletproof controls for all-weather flying, and the dead-reliable engine characteristics of a "Big Jim" SuperTigre .60 Hemi.
I also wanted—and installed—wing-mounted gear for pavement landings and fuselage-mounted gear for those East Coast rough-grass shoot-outs.
There's no need to build the model entirely from punk wood or to use a thin finish. (Editor's note: punk wood is very soft, lightweight balsa.) Build the nose solid, don't cheat on the finish, and that wing will create enough lift to carry a bulletproof airframe through years of contest-winning service.
Cardinal airframes typically go for thousands of flights without a stress crack. The original Cardinal airframe survived a midair with an Old-Timer Stunt ship that wandered into the circle at the June 1990 Garden State Circle Burners contest. (The pilot of the OTS model never realized he'd almost destroyed a work of art.)
With hundreds of Patternmasters built, the design numbers have been proven over time. That's what makes the Cardinal special. After 2,000 flights with this type of ship, I've learned the numbers to get such a model 90% bench-trimmed even before its lines have been attached. The center of gravity is the most important thing to get right before you fly. Locate the CG 8 to 8-1/8 in. forward of the flap hinge line.
Make a stand by anchoring two pencils in a wooden block with the erasers pointed straight up. Space them wide enough apart to straddle the fuselage width. Place the Cardinal on the stand, and balance the model precisely. Turn the model over, and suspend it by holding the tail wheel and one prop blade. Put a gram scale under the outer wing tip, and add lead to the tip until the scale reads 2-1/2 oz. If you're using .018 braided lines instead of solid ones, keep adding lead until the scale reads 3 oz.
Set the average of the two lead-outs at 6-1/2 in. forward of the flap hinge line — in other words, 1-1/2 in. of lead-out rake. Use 1-1/4 in. of rake for solid lines. These ballpark numbers ensure good performance.
Once bench trimming has been completed, run the engine twice with the plane on the ground, tighten all bolts, clean the fuel line filter — and you're ready for some very competitive flying on your first day out. All the guesswork has been eliminated from this program.
A Greenaway engine and fuel tank will give you years of hassle-free flying and consistent engine runs.
Don't drill lightning holes in the engine mounts or substitute parts in the nose in a mistaken attempt to make it lighter. The fuselage will weigh 10 to 10-1/2 oz. when properly built, and it won't self-destruct halfway through the season. Years later, you'll appreciate the wisdom of this type of engineering. Nothing is more frustrating than a model that begins to self-destruct just when it's trimmed out and the Nationals is only a few weeks away.
A list of sources for the required hardware is included on the plan. Don't use .35-size control parts or compromise the design with inadequate hardware.
I flew the Cardinal prototype at the 1987 Nationals, using the model as the test bed for Craig Gunders' experimental exhaust system. The ship battled Lincoln's heavy winds to take third place and won both the Sheeks Innovation Award and the Concours d'Elegance. I built two more Cardinals in 1988 and 1989, and used them to develop tuned pipe systems for the SuperTigre .60. The evolution of the tuned pipe system is well documented in a set of videotapes, available from Pro-Stunt Videos, 9 Union Ave., Little Ferry, NJ 07643.
Several Cardinals have been built with modifications such as clipped wings and flat wing tips, but none seem to have flown better than the ones built strictly to print. I've flown nearly every Cardinal built, and they've all performed well.
If this is your first .60-powered ship, don't try to come up with any cute inventions aimed at a superlight design — swiss-cheesing the engine mounts or doublers, for instance. The nose construction guarantees consistent runs with a .60 engine. If you choose foam wings, reinforce the wing center with fiberglass; don't skimp on strength.
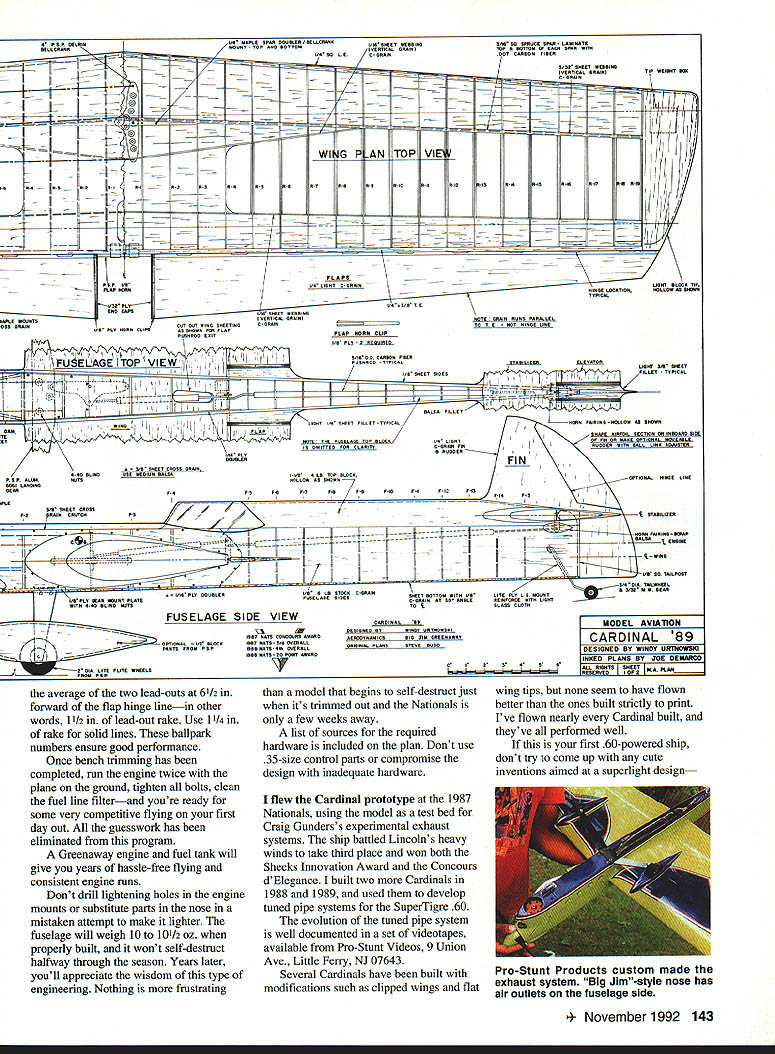
Specifications
- Type: CLPA
- Wingspan: 62 inches
- Recommended engine size and type: SuperTigre .60
- Expected flying weight: 60–70 oz.
- Type of construction: Built-up
- Type of covering/finish recommended: Silkspan (wing and tail surfaces) and tissue (fuselage); talcum-and-dope; clear coat buffed with Gorham silver polish and Final Shine.
Construction
Wood selection
- Use only C-grain, 4- to 6-lb. density wood for the wing ribs, fuselage sides, tail feathers, and formers if possible.
- Use A-grain sheeting for the wing.
- Use lightweight blocks for the wing tips and the fuselage top block.
Even if some of your wood isn't up to standard, the Cardinal won't disappoint you. Greenaway did a professional job in working out the aerodynamics, and he deserves most of the credit for the unbelievable success of this design. The Cardinal is truly a classic.
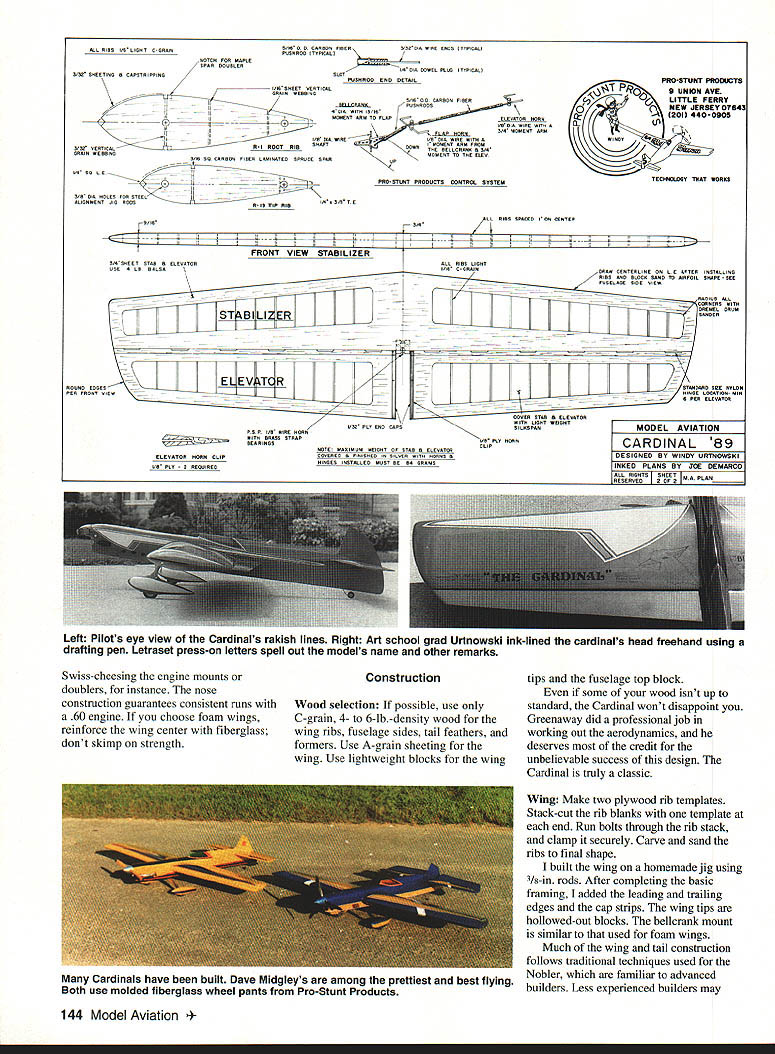
Wing
- Make two plywood rib templates. Stack-cut the rib blanks with one template at each end. Run bolts through the rib stack and clamp it securely. Carve and sand the ribs to final shape.
- I built the wing on a homemade jig using 3/8-in. rods. After completing the basic framing, add the leading and trailing edges and the cap strips.
- The wing tips are hollowed-out blocks.
- The bellcrank mount is similar to that used for foam wings.
Much of the wing and tail construction follows traditional techniques used for the Nobler, which are familiar to advanced builders. Less experienced builders may want to check out the thousands of hints and tips in the Nobler construction videotapes available from Pro-Stunt Videos.
As an alternative, foam wings for the Cardinal are available, sheeted or unsheeted, exclusively from Big Jim Greenaway. Call (718) 529-4631 for Big Jim's latest prices on wings, tanks, and engines.
Build the stabilizer and elevator using the lightest wood available.
Covering and finishing
- Cover the wing and tail surfaces with silkspan.
- Add unscented talcum powder mixed with clear dope for a silver luster. The dope will harden while you're building the fuselage. Be fussy—fill every nick in the silver now for a flawless, glasslike finish.
I used Sig finishing products exclusively for this model. They provide a beautiful finish while adding minimal weight.
It's during the finishing process that Concours ships are made or lost. Sand out every flaw, and fix every ding. Keep at it until the model looks machined from a billet of solid aluminum.
Since I chose a translucent color coat—candy apple red—the base had to be absolutely perfect. The 1987 ship used candy apple red over silver; the 1988 version had a pearl white undercoat.
After adding trim, lettering (I use Letrasets), and ink lines, mix the clear coats as follows:
- Two quarts Sig Litecoat
- Two quarts DuPont 3608S
- One tablespoon Dave Brown Flexal
- Three drops of fisheye killer
Spray on half this amount with the air pressure at 20–25 psi. Wait two weeks for the gases to completely evaporate, then sand to a dull satin finish with 600- or 1,200-grit paper. Spray the final half of the clear coat, again at 20–25 psi. Wait at least six weeks, then sand with 1,200-grit paper. Buff with Gorham silver polish and Final Shine, then buff again in about six months. The mirrorlike finish will last for many seasons.
I also like to spray some Imron around the nose section to protect it from droplets of raw fuel. Note: Imron is not for amateurs. Inhaling fumes from Imron can lead to extremely serious health problems—observe proper safety precautions.
Fuselage
- Begin by building the engine crutch. Place aluminum pads on the engine mounts, and attach both mounts to the engine with the correct offsets. Fill in the area between the mounts with 1/2-in. cross-grained balsa. Remove the engine, and build the body around the crutch.
- Use epoxy on all nose construction.
- Carve and hollow the top block.
- Sand the fuselage to final contour before installing the wing.
- Place fuselage parts on a perfectly flat table and align them on centerlines. A machinist's rule helps.
- Cover the fuselage with tissue, adding the dope-and-talcum mixture for a silver luster.
Propeller
I've always liked big-diameter wood props on this design. The small, multiblade carbon props will give you a bit more cornering ability in the square maneuver, but at the price of faster airspeed. Start with a Rev-Up or Top Flite 13 x 6 prop and a 13 x 6 cut to 12-1/2 in. for windy conditions.
Tailoring the corner
- Get the static balance at exactly 8-1/8 in.
- Test-fly the ship with the lines spaced 4-1/2 in. apart at the handle; you'll have 1-1/2 in. of overhang.
- To increase cornering ability, space the lines farther apart at the handle.
- To increase the power-steering feel, shorten the overhang to 1-1/4 in.
Do your fine-tuning at the handle, not by altering the center of gravity. Somewhere in that range you'll achieve a super, tight turn at the corners and control response to suit your skill level.
Community, sources, and acknowledgements
Why not consider joining PAMPA? PAMPA is the Precision Aerobatics Model Pilots Association (special interest group). Send your dues of $15 per year to Mike Keville, 6109 E. Ivyglen St., Mesa, AZ 85205. The bimonthly newsletter Stunt News offers many interesting tips.
If you build a Cardinal, please send me a photo to add to my album. With so many of the models built and flying well, Cardinal owners could benefit from exchanging information.
A very special thanks to Big Jim Greenaway for his help with every aspect of my Stunt program over the years. Big Jim is the one to call if you need advice or assistance with engines.
Pro-Stunt Videos: 9 Union Ave., Little Ferry, NJ 07643. Big Jim Greenaway: (718) 529-4631.
The Stunt event has changed little since its inception, and the classic lines of the great Stunt ships are alive and well. As timeless as a '55 Chevy, these vintage designs still arouse the artist in me. They make me wish I were young again.
Transcribed from original scans by AI. Minor OCR errors may remain.

