
Catapult Canard CC-1
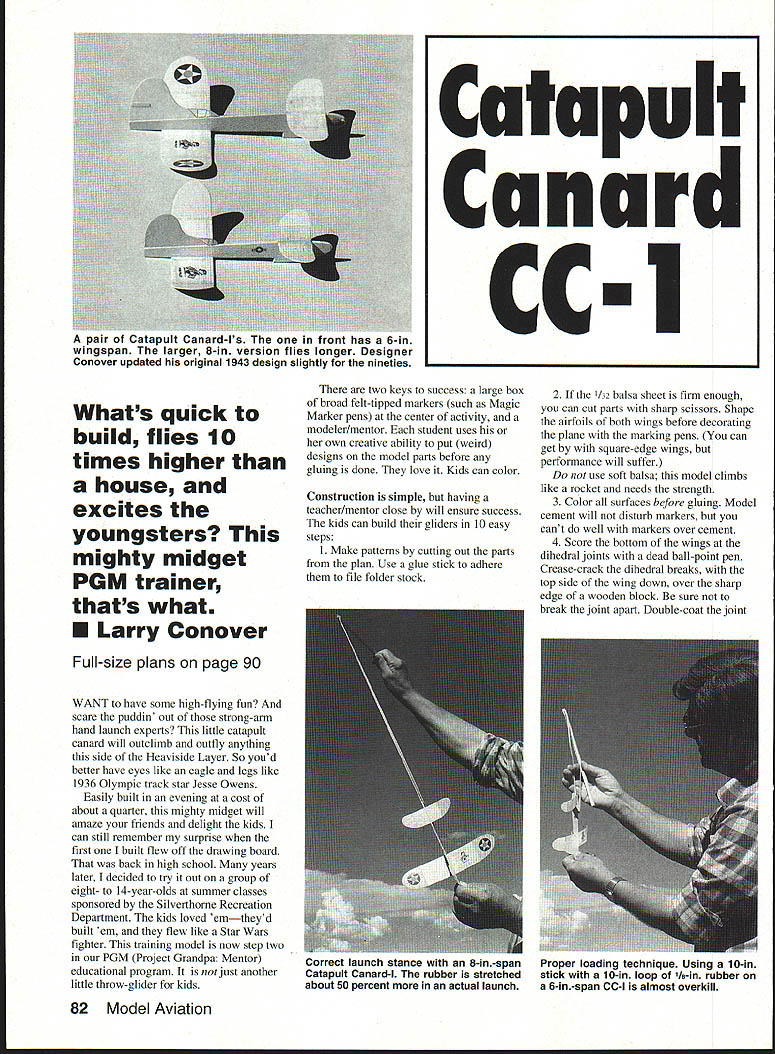
What's quick to build, flies 10 times higher than a house, and excites the youngsters? This mighty midget PGM trainer, that's what. Larry Conover
Full-size plans on page 90
WANT to have some high-flying fun? And scare the puddin' out of those strong-arm hand-launch experts? This little catapult canard will outclimb and outfly anything this side of the Heaviside Layer. So you'd better have eyes like an eagle and legs like 1936 Olympic track star Jesse Owens.
Easily built in an evening at a cost of about a quarter, this mighty midget will amaze your friends and delight the kids. I can still remember my surprise when the first one I built flew off the drawing board. That was back in high school. Many years later, I decided to try it out on a group of eight- to 14-year-olds at summer classes sponsored by the Silverthorne Recreation Department. The kids loved 'em—they'd built 'em, and they flew like Star Wars fighters. This training model is now step two in our PGM (Project Grandpa Mentor) educational program. It is not just another little throw-glider for kids.
There are two keys to success: a large box of broad felt-tipped markers (such as Magic Marker pens) at the center of activity, and a modeler/mentor. Each student uses his or her own creative ability to put (weird) designs on the model parts before any gluing is done. They love it. Kids can color.
Construction is simple, but having a teacher/mentor close by will ensure success. The kids can build their gliders in 10 easy steps:
- Make patterns by cutting out the parts from the plan. Use a glue stick to adhere them to the file folder stock.
- If the 1/32" balsa sheet is firm enough, you can cut parts with sharp scissors. Shape the airfoils of both wings before decorating the plane with the marking pens. (You can get by with square-edge wings, but performance will suffer. Do not use soft balsa; this model climbs like a rocket and needs the strength.)
- Color all surfaces before gluing. Model cement will not disturb markers, but you can't do well with markers over cement.
- Score the bottom of the wings at the dihedral joints with a dead ball-point pen. Crease-crack the dihedral breaks with the top side of the wing down, over the sharp edge of a wooden block. Be sure not to break the joint apart. Double-coat the joint.
- Carefully draw the fuselage pattern on 3/32" balsa sheet. It's important to get the angle (decalage) between wings correct for best performance. Round fuselage corners slightly using a piece of fine sandpaper. Keep the airfoil flat. Add a 3/32" gripper after the rear wing has been glued; the gripper keeps fingers from disturbing rudder adjustment.
- Glue and pin both wings in place; make sure they look straight while drying.
- Carefully cut the fin from firm C-grain 1/32" balsa sheet. The fin will be quite fragile at the narrow front part until it has been glued in place. Taper the structure at the top rear rudder area. Make sure the glue is straight on the fuselage centerline. The cabin can be drawn on the fin with a ball-point pen before assembly for an impressive effect. Try simulating aluminum foil after assembly.
- Note thin glue skin at dihedral joints and nose and wing leading edges. Thin some cement with Sigment acetone thinner to achieve a thin glue skin. Paint glue with a small brush for the neatest job.
- Add soda-can adjuster strips and a No. 8 pin at the catapult attachment point. Coat them thinly with glue.
- Brush light (thinned) clear dope on all surfaces. Sand with fine paper. Brush on a second coat. Don't sand the gripper area; you need a good grip there. Don't worry about too much weight from dope. It adds only 1/2 gram, and you need the strength. You get maximum climb from slick flying surfaces.
FF Catapult Canard (Specifications)
- Type: Outdoor Catapult Glider
- Wingspan: 8 inches
- Wing area: Not available
- Recommended size of rubber loop: 18-inch length of 1/8-inch FAI tan rubber; formed into a 7- to 9-inch loop
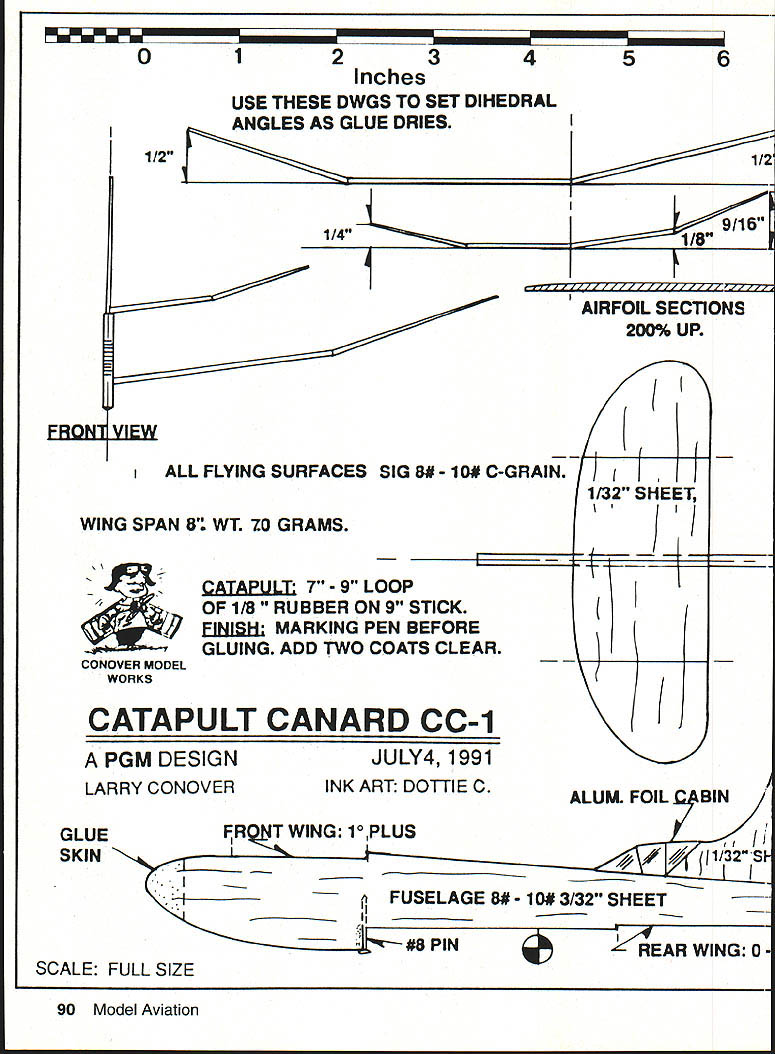
Use these drawings to set dihedral angles as glue dries.
Front view notes:
- All flying surfaces: SIG 8#-10# C-grain.
- Wingspan: 8". Weight: 70 grams.
- Catapult: 7"–9" loop of 1/8" rubber on 9" stick.
- Finish: Marking pen before gluing. Add two coats clear.
Plan Notes / Drawing Notes
- Catapult Canard CC-1 — A PGM Design — July 4, 1991
- Larry Conover. Ink art: Dottie C.
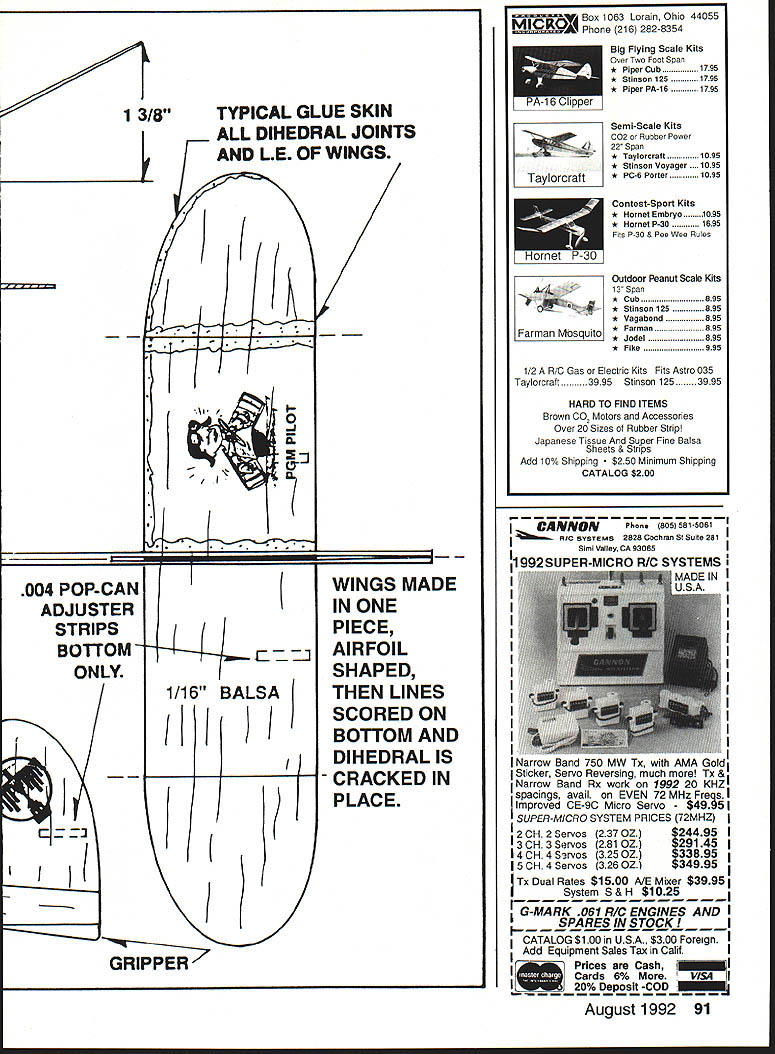
- Glue skin: Typical glue skin on all dihedral joints and leading edges of wings.
- Front wing: 1° plus.
- Fuselage: 8#-10# 3/32" sheet.
- #8 pin.
- Alum. foil cabin.
- Airfoil sections: 200% up.
- Scale: Full size (1 3/8").
- PGM pilot: 1/16" balsa.
- .004 pop-can adjuster strips bottom only.
- Gripper.
- Wings made in one piece, airfoil shaped, then lines scored on bottom and dihedral is cracked in place.
Trimming and Adjustment
Now the fun begins. Three reasons why the CC-1 makes a good first flying and training model:
- It's easy and quick to build and repair.
- It's a teaching tool that shows students/mentors how to adjust flying models, a key to early success.
- Performance is outstanding. Can you imagine the effect of a Star Wars climb 10 times higher than a kid's home?
Adjustments for flight begin by doing hand glides under a mentor's guidance. You could begin by balancing the model in the vee of scissors at the CG point indicated on the plan. But it's easier just to test glide and add a spot of clay on the nose. Some will require no clay at all. Many of our students had a picnic hand-gliding their models in the windy municipal lawn when it was too windy outside.
Your goal should be to get a streaking, tight spiral climb that rolls out on top. You may have to bend a slight amount of down reflex in the rear wing opposite the glide circle. This model must have a glide circle or you'll lose it downwind in the brush. Try 1/32" right rudder for glide turn and 1/32" down elevator in the rear wing for starting trim. That should give you a safe left bank in launch and a right glide circle. The kids get to see what a big difference even a small amount of trim makes in how the model flies.
If your model comes screaming down off the top in a 9-G dive, you may have to bend a bit of up elevon on one or both sides. One of Newton's laws, paraphrased, says that the reaction from up elevon will push that side of the wing down. If flight is too loopy and doesn't achieve much altitude, try down elevon on both sides. I prefer to adjust only the main (rear) wing and rudder. The soda-can adjuster strips help you make fine trim adjustments that stay put.
This trimming phase is an ideal time to teach students the basics of flight adjustment. It will apply to all flying models they build in the future, and even to full-scale aircraft. The impact is like teaching a young person to read and write properly. Both can have far-reaching effects on the rest of their lives.
Prelaunch Catapult Technique
Make up a catapult to match the flier's arm length. Small kids need about a seven-inch loop of 1/8-inch FAI tan rubber on a 9 x 14-inch dowel or on a piece of hard 1/4-inch square slat. Longer arms can use a nine-inch loop on a nine-inch catapult or a 10-inch loop on a 10-inch stick. If the loop is too long, the model will catch and flop.
For space shots, I use a 12 x 3/8-inch dowel and an 11-inch loop of 1/8-inch rubber. The current AMA rules allow a 30-inch loop of 1/4-inch rubber mounted on a pole six feet high. That's overkill.
I was using brute force in launching 12-inch-span high-speed deltas 30 years ago. It was spectacular but dangerous. Your CC-1 will reach higher altitudes launched with a nine-inch loop of rubber on a nine-inch catapult than I ever did with the high-powered deltas. It's considerably safer, too.
Launch Program
Grasp the rear of the fuselage in your left thumb and forefinger. Don't touch the rudder or you'll lose your trim. Hold the catapult stick, pointed up, near the lower end, and allow the rubber loop to drape on your palm. Hold the model nose up, and guide the loop onto the notch. Stretch the model well back, and hold the stick high to effect a 70° nearly vertical launch attitude. Bank the craft to the left if you have a tight glide circle.
You don't have to launch the CC-1 into the wind. In fact it's better not to try in much wind. If you do, you may have to chase the model long distances. Avoid thermal conditions, too, unless you want to risk the sight of your airplane disappearing overhead. Don't launch the model in the direction of the sun. You'll lose sight of it in the glare.
Secrets for Winning
- Build two or three models for competition flying. Expect to lose them on thermal flights.
- Use bright colors. Keep your eyes on the exact spot where the model comes down. Line up with a reference point downwind. The small model seldom goes as far downwind as you think it has. Keep your eyes on your search path. It's easy to step on the model in the weeds—not good!
- I don't agree with current AMA rules for catapult launching. The combination of a six-foot pole and a 30-inch loop is not user friendly, either to spectators or to contest directors. The six-inch limit on the length of the launching stick for hand launching restricts both small arms and small models. You can and should be able to maneuver a nine- or 12-inch stick to advantage for all shoot-'em-up contests.
- Make your catapult stick from 1/4-inch or 3/8-inch dowel. Groove the stick 1/4 inch from the top. Loop the rubber in upon itself, and cinch it up in the groove. Use 1/8-inch FAI tan rubber—it's snappy. Hold the stick near the bottom so you get some spring out of it along with the rubber.
- Experiment with launch angle and degree of bank to achieve good pullout at the top of the climb. Always shoot upward at high angle.
- Get a copy of Dave Thornburg's Old Buzzard's Soaring Book if you want to launch into thermals.
- Try a larger version of the CC-1. Through the miracle of modern photocopiers, you can enlarge the plan to 9-, 10-, or 11-inch wingspans. Larger models stay in sight longer and glide a little better.
The Joy of Flying (Anecdotes)
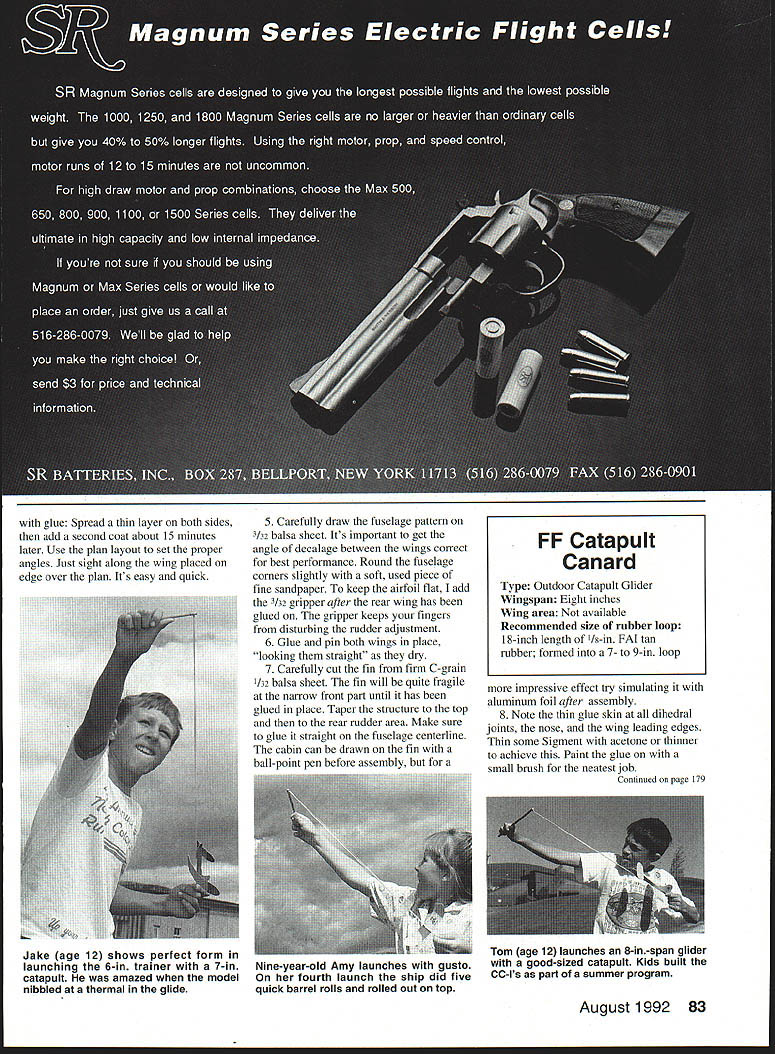
Nine-year-old Amy had never built or flown a balsawood model. Her brother Jake brought her along to our PGM class. She had great things to say about our flying sessions. She was taught to fly with our six-inch CC-1 club trainer. On her fourth launch, the model went screeching almost straight up doing five quick barrel rolls, and rolled out on top—way up there!
Amy was awestruck. "Look at it go!" she hollered. "Look at it go!" She was ready to start building her own right away.
Eleven-year-old Joe is one of our best launchers. He consistently gets high-altitude launches and super flights. We had to cut off his flying at about 10:30 because he nearly lost the club trainer in a Colorado mini-boomer.
Twelve-year-old Jake too loves this little mighty midget flier. Coming in from a high-altitude two-minute flight, his model nipped the edge of a thermal vortex about 30 feet up, did a double roll, and just maintained attitude in its downwind leg.
You just gotta try our mighty midget CC-1. It's a blast!
Catapult Canard CC-1 Materials List
- One 1/32 x 3 x 9-inch medium-hard B-C balsa sheet
- One 3/32 x 1-1/4 x 6-1/4-inch medium-hard balsa sheet
- One 18-inch length of 1/8-inch flat rubber
- One 1/4 x 9-inch dowel stick
- Balsa cement, clear dope, marking pens, aluminum beverage can strips, clay
Transcribed from original scans by AI. Minor OCR errors may remain.

