
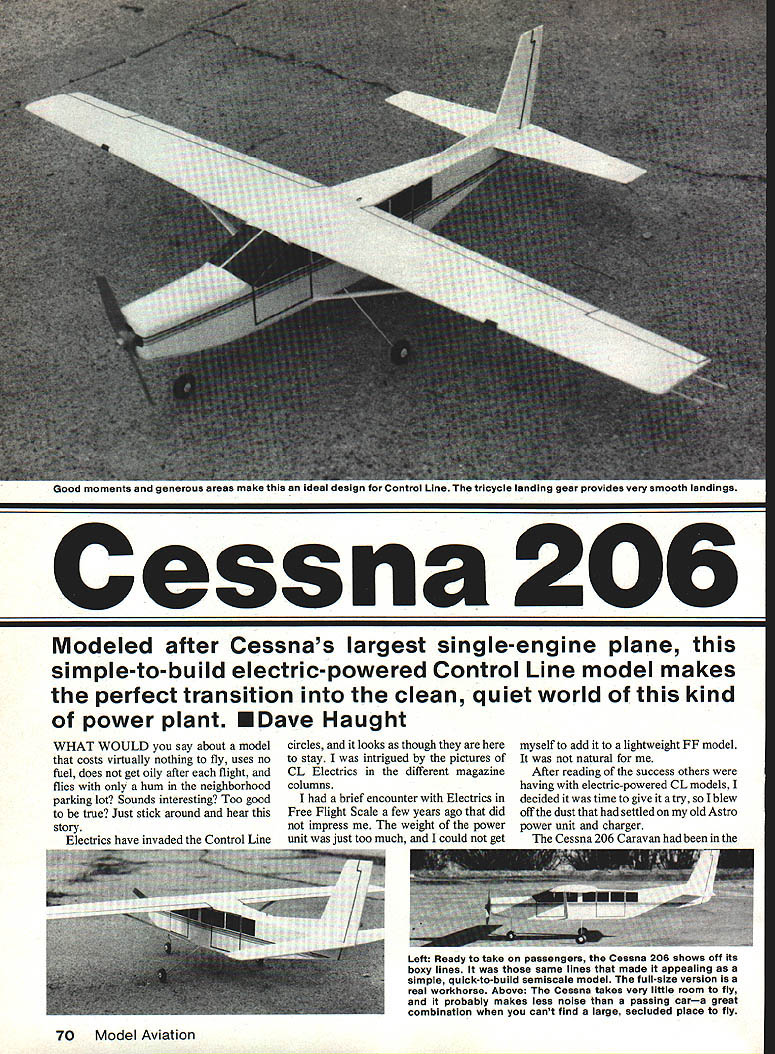
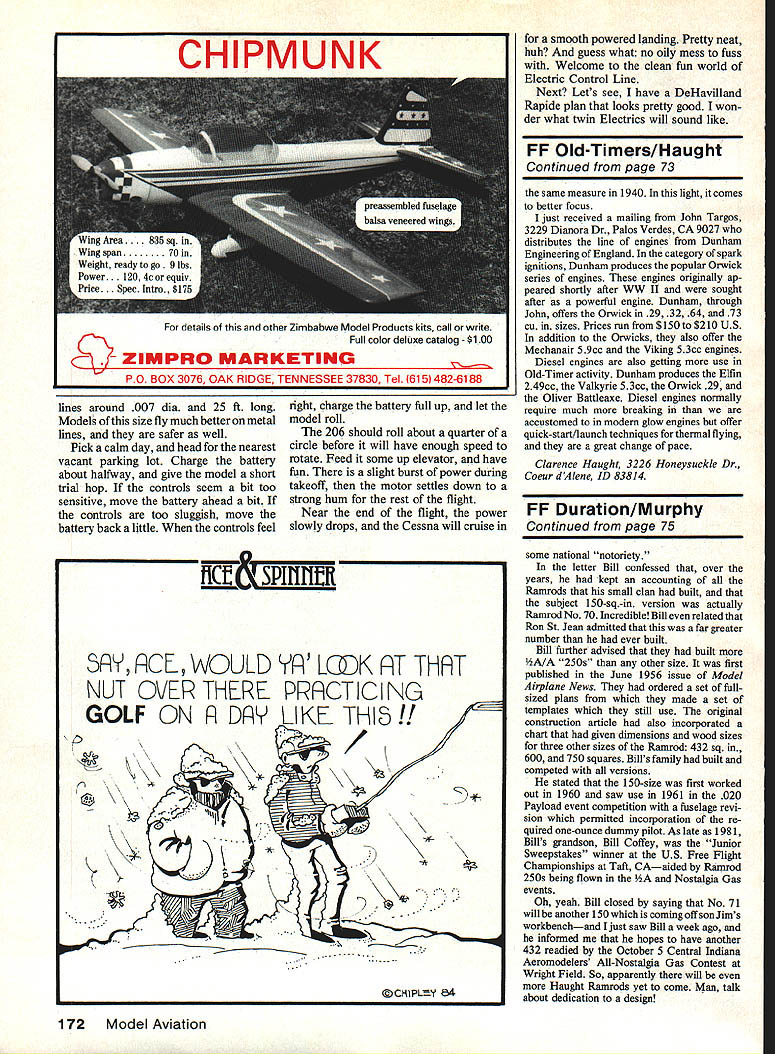
Cessna 206
Modeled after Cessna's largest single-engine plane, this simple-to-build electric-powered Control Line model makes the perfect transition into the clean, quiet world of this kind of power plant. — Dave Haught
Introduction
What would you say about a model that costs virtually nothing to fly, uses no fuel, does not get oily after each flight, and flies with only a hum in the neighborhood parking lot? Sounds interesting? Too good to be true? Stick around and hear this story.
Electrics have invaded the Control Line circles, and it looks as though they are here to stay. I was intrigued by pictures of CL electrics in the magazines. I had a brief encounter with electrics in Free Flight Scale a few years ago that did not impress me — the weight of the power unit was just too much for a lightweight FF model. After reading about the success others were having with electric-powered CL models, I decided it was time to give it a try. I blew the dust off my old Astro power unit and charger.
I had the Cessna back of my mind as a good starting model for scale because of its simple, boxy characteristics. After watching a TV special on its use as a bush plane in Alaska, my imagination was sparked for modeling it with electric power.
Full-size Cessna 206
The full-size Cessna 206 is quite an airplane. It premiered at the 1983 Paris Air Show as the largest single-engine Cessna ever produced. With its 51-ft. wingspan and Pratt & Whitney PT6A turboprop engine, the 206 can carry 14 people comfortably for 1,000 miles. Its tricycle gear and short takeoff/landing ability make it a popular bush plane.
The 206 is also popular with parachute operations and commuter services; many examples are seen at local airfields and larger airports.
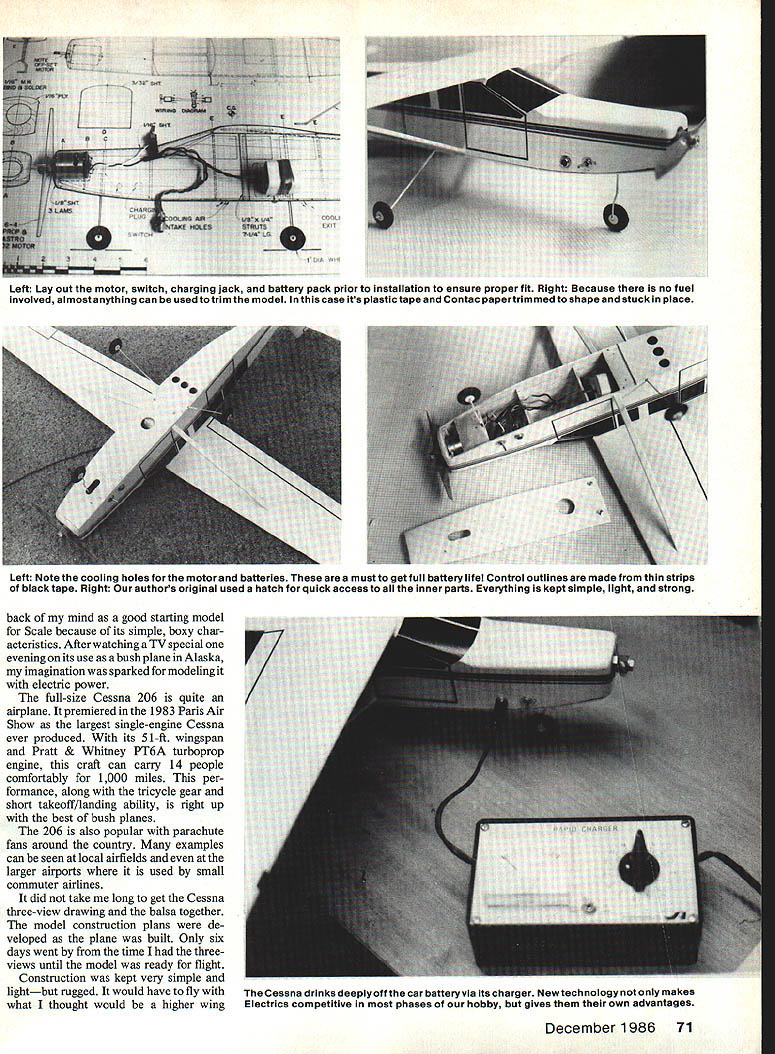
Getting started — motor system and charger
The first thing to do is obtain the electric motor system you intend to use. There are many units available that offer different features. The model in the pictures is adequately powered by an Astro .02 unit purchased for free-flight use years ago. If you want more performance, try an Astro .035 — the .02 and .035 have about the same outside diameter, with the .035 a bit longer.
- Use a good charger compatible with your motor and battery pack.
- Pay careful attention to the charging process to ensure safety and long life for the battery and motor.
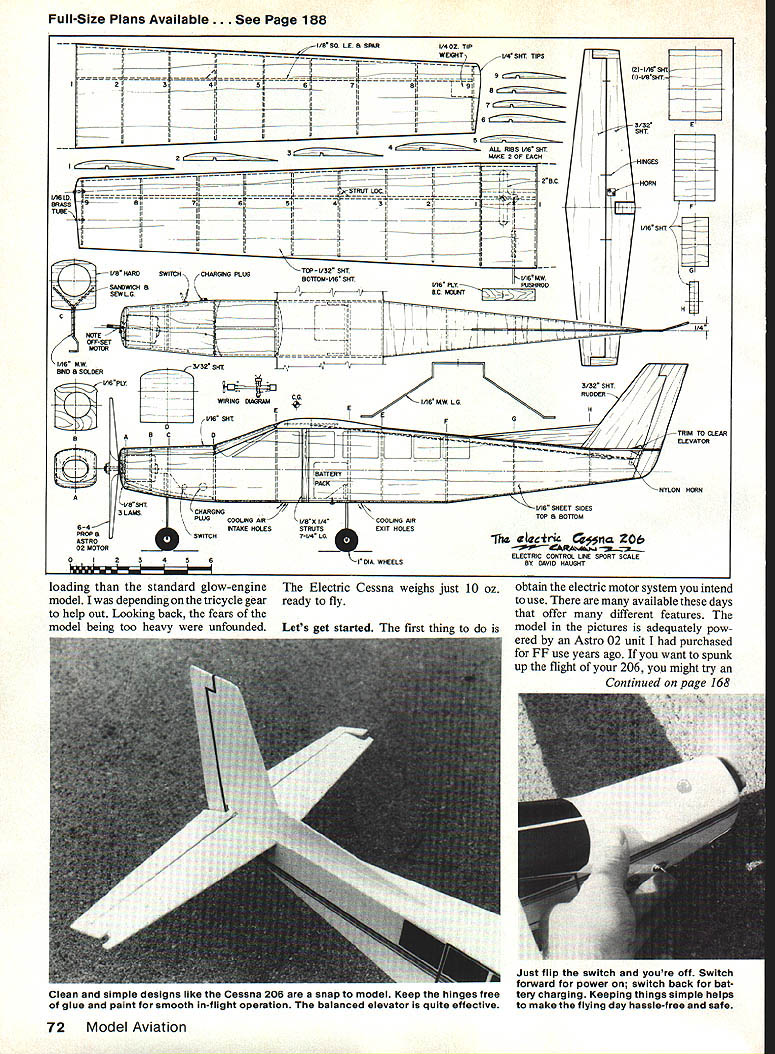
The electric Cessna weighs just 10 oz. ready to fly — about the same as a standard glow-engine model, depending on the tricycle gear to help out. Concerns about excessive weight proved unfounded.
Materials
- Medium-light balsa throughout for minimum weight.
- Use firmer balsa in tail assemblies to prevent warps and flutter.
- Sheets called out in the construction: 1/16", 1/8", 3/32", 1/32".
- Plywood former for nose-gear attachment.
- Small nylon hinges with pins for control surfaces.
- Contact brand self-adhesive plastic film and colored electrical tape for trim (optional).
Construction
#### Fuselage
- Study the plans, noting the cooling air holes on the fuselage bottom — include both intake and exit holes for cooling the battery and motor.
- Cut out all fuselage formers and label them.
- Cut fuselage sides from medium-hard 1/16" sheet. Try to match the two sheets in firmness and grain.
- Begin gluing the E fuselage formers in place, taking time to keep the fuselage square.
- When the glue has dried on these formers, pull the tail together and add formers F–H. Note the notches in these formers for the pushrod to pass through.
- While this dries, laminate the nose block from three layers of 1/8" sheet balsa. Pull the nose together and glue the nose piece in place.
- When dry, add formers B–D, offset Former B to the right for additional thrust offset. This amount of offset helps keep the model out at the end of the lines in flight, maintaining tension for control operation.
Fitting the power unit:
- Seat the motor first. It should be a tight fit into Formers A and B; if too loose, wrap the motor with masking tape.
- A small drop of white glue will hold the motor in place until final assembly.
- Wire the switch, charging jack, and battery pack per the motor manufacturer's instructions. In this installation, when the toggle switch faces forward the motor runs; when the toggle is back the motor is off and the battery can be charged.
- Add a floor of 3/32" balsa for the battery pack, plus rear landing gear strut, gussets, and braces.
- Install the switch and charging plug into the right side of the fuselage as shown on the plans.
Nose gear and bottom planking:
- Bend the nose gear to shape and fasten it to the plywood former with heavy thread; coat the thread with epoxy.
- Plank the fuselage bottom with cross-grain 1/16" sheet — remember to put in the cooling holes.
- Plank the top of the fuselage. Consider making the bottom front of the fuselage (between Formers A and E) a removable hatch for easy adjustments and motor changes.
#### Tail surfaces
- Cut out the stabilizer and elevator parts. Note the small balances on the tips of the elevators; trim them to clear the stabilizer when hinged.
- Use small nylon hinges with pins to keep movement free.
- Sand exposed edges to a rounded contour, attach the elevator horn, and glue the stabilizer assembly to the fuselage, checking alignment in both plan (top) and front views.
- While drying, cut out and assemble rudder and fin parts. Add the rudder offset and set aside to dry.
#### Wing
- Build the wing in one piece, flat on the building board.
- Edge-glue two sheets of 1/16" balsa if necessary for the bottom skin. Pin the bottom sheet to the plan and glue and pin the leading edge and main spar in place.
- Add the bellcrank mount, wing ribs, tip blocks, wing strut gussets, and lead-out tubes.
- When dry, unpin the wing and notch the ribs for the lead-outs to pass through. Install the bellcrank and tip weight, and fit the pushrod. Make the pushrod exit through the bottom of the wing center section as shown on the plans.
- Check the control system for smooth operation. Sand the tip blocks to shape and sheet the top of the wing with 1/32" balsa.
- When top sheet is dry, shape and sand the wing to final contour. Align the wing with the fuselage and glue it in place. Hook up the controls to the elevator horn.
- Add the fin and rudder.
- Shape the wing struts and fit them, but do not glue them in place until after final painting.
The model is now structurally complete.
Finishing
Since electrics do not need fuel-proofing, finishing choices are wide open.
- Give the model two coats of sanding sealer, sanding after each coat.
- Spray two light coats of white acrylic enamel from a spray can — it dries fast and adds little weight.
- For color trim use self-adhesive plastic film and colored electrical tape.
- For thin striping and window details: adhere the plastic to a sheet of thick Plexiglas, then cut shapes with a single-edge razor blade and a straightedge for quick, clean results.
Add wheels and propeller. Check the balance point (CG). Control Line models are more docile with a forward balance point — begin flying with the CG as shown on the plans. Move the battery forward or rearward as necessary. Secure the battery with foam rubber wedges but ensure there is room for air to pass around the battery for cooling.
Flight preparation and flying
- Use a set of steel flying lines (nylon lead-outs save money on wear).
- Check all controls for smooth operation and secure hinges.
- With the toggle switch forward, the motor runs; switch back for charging.
- Practice smooth powered landings — the model lands without any oily mess and with a quiet propeller hum.
Welcome to the clean, fun world of electric Control Line flight.
Closing remarks
The Electric Cessna weighs just 10 oz. ready to fly, about the same as a standard glow-engine model. The tricycle gear helps ground handling and takeoffs. Simple, boxy designs like the Cessna 206 snap together; keep hinges free, glue and paint smooth, and a properly balanced elevator will be quite effective.
Next on my list is a De Havilland Rapide plan — I wonder what twin electrics will sound like. Just flip the switch and you're off.
Transcribed from original scans by AI. Minor OCR errors may remain.

