
CGS Hawk
Background
The trip from model building, to hang gliders, to powered flight is becoming a rather familiar one nowadays, particularly with the advent of the ultralight aircraft industry.
In recent years, commercial aircraft have become so complex that individual designers are only rarely given credit for their work, a circumstance in direct contrast to the early days of aviation when it was the individual that counted. The age of the ultralight has spawned what Walter J. Boyne calls "the second Golden Age of Aviation." As inflation and complexity hiked up the price of all aircraft, including the smallest Piper Cub types, would-be pilots and engineers began to seek their own solution in homebuilt aircraft, hang gliders, ultralights, and in some instances the restoration of old classics. As a result, one finds reappearing the phenomenon of individual genius imprinted upon design.
As we look around the world of ultralight, Boyne's analysis rings particularly true in the case of Chuck Slusarczyk, the founder and president of CGS Aviation, the largest, and by reputation, the most advanced manufacturer of powerplants for ultralights.
As a boy, Chuck began by building, and later designing, model airplanes. By age 13 he began to win model airplane contests, and over the years he has accumulated over 400 trophies and ribbons in AMA-sanctioned events. He still retains an avid interest in model aviation today, remembering what first sparked his interest in the magic of flight.
After high school Chuck went into a five-year apprenticeship with NASA, working on such projects as the B-70, the X-15, and the Lunar Orbiter. Following his stint with NASA, Chuck joined the Scheutzow Helicopter Corporation; while employed there he began designing and building hang gliders. As a natural evolutionary step, in the early 1970s Chuck's attention turned toward powering hang gliders. A five-year research and development program culminated in his marketing the first commercial reduction-drive unit called the CGS Power Hawk. The accomplishments and success Chuck had with the first Power Hawk changed the industry's outlook on reduction drives and large-diameter propellers for ultralights.
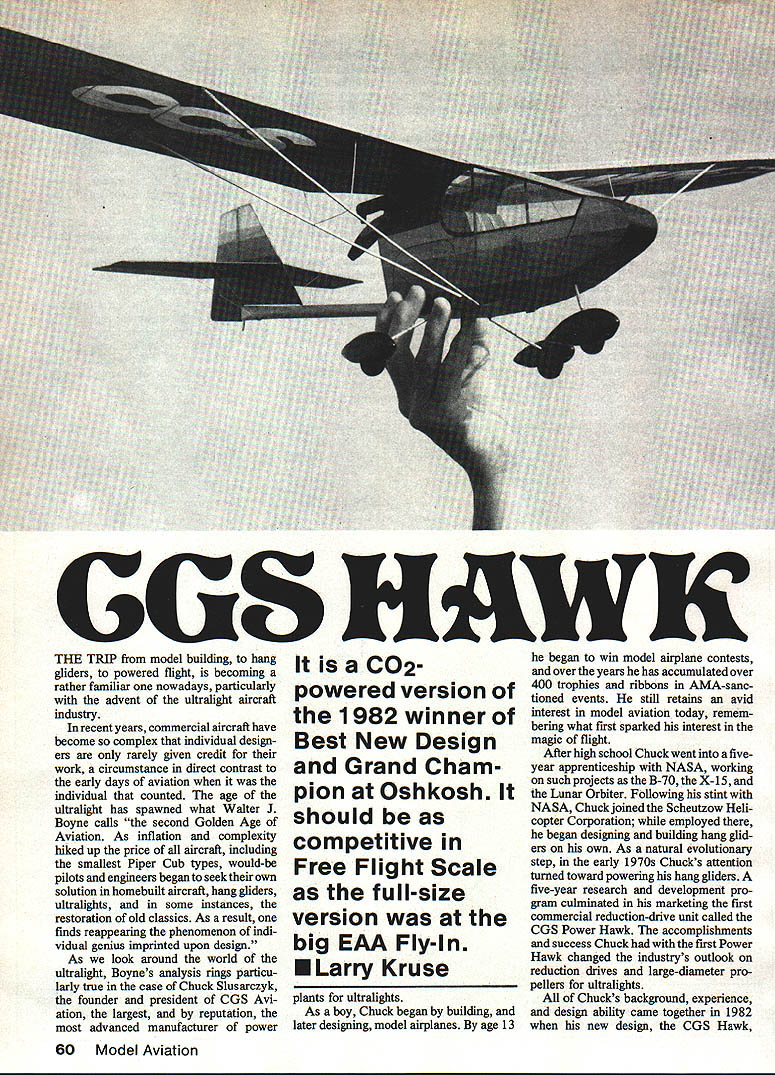
All of Chuck's background, experience, and design ability came together in 1982 when his new design, the CGS Hawk, complete with a reduction-drive unit in pusher configuration, was named Best New Design and Grand Champion at Oshkosh.
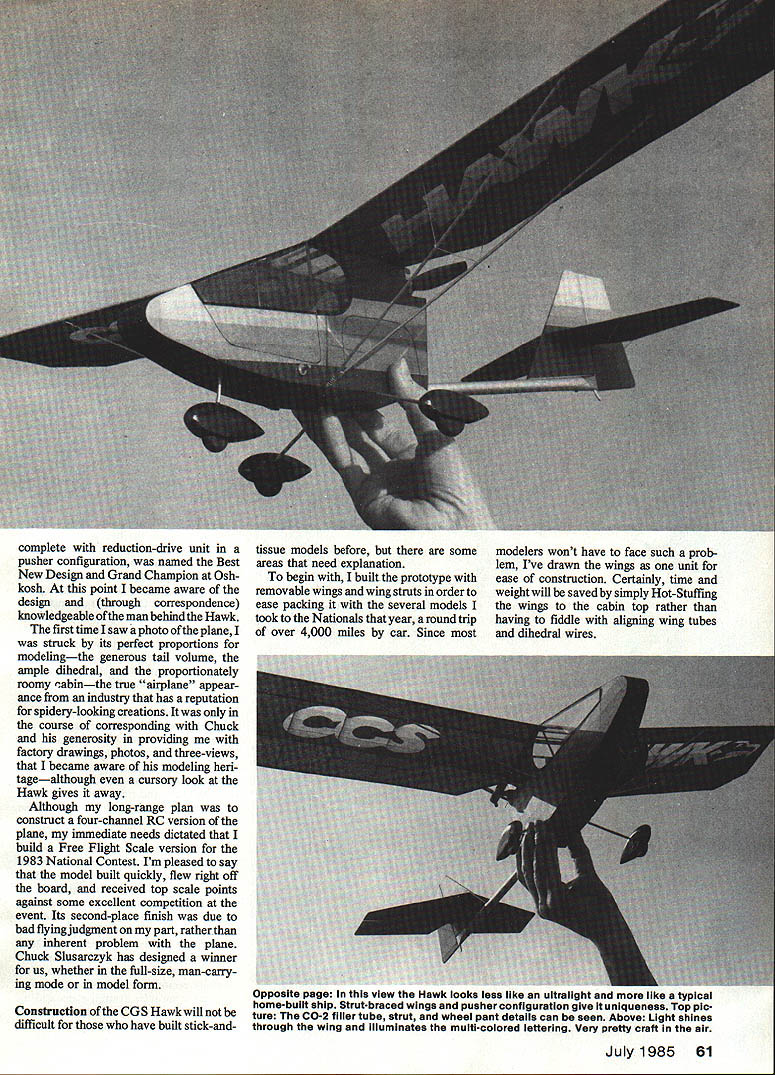
I first became aware of the design through correspondence with the knowledgeable man behind the Hawk. The first time I saw a photo of the plane I was struck by its perfect proportions—the generous tail volume, ample dihedral, and proportionately roomy cabin—the true airplane appearance in an industry that has a reputation for spidery-looking creations. Chuck's generosity in providing factory drawings, photos, and three-views made me aware of its modeling heritage, although a cursory look gives the Hawk away.
Although long-range plans to construct a four-channel RC version of the plane were in mind, my immediate needs dictated building a Free Flight Scale version for the 1983 National Contest. I'm pleased to say the model, built quickly, flew right off the board and received top scale points against some excellent competition in the event. Its second-place finish was due to bad flying judgment on my part rather than an inherent problem with the plane.
It is a CO2-powered version of the 1982 winner of Best New Design and Grand Champion at Oshkosh. It should be as competitive in Free Flight Scale as the full-size version was at the big EAA Fly-In. — Larry Kruse
Construction
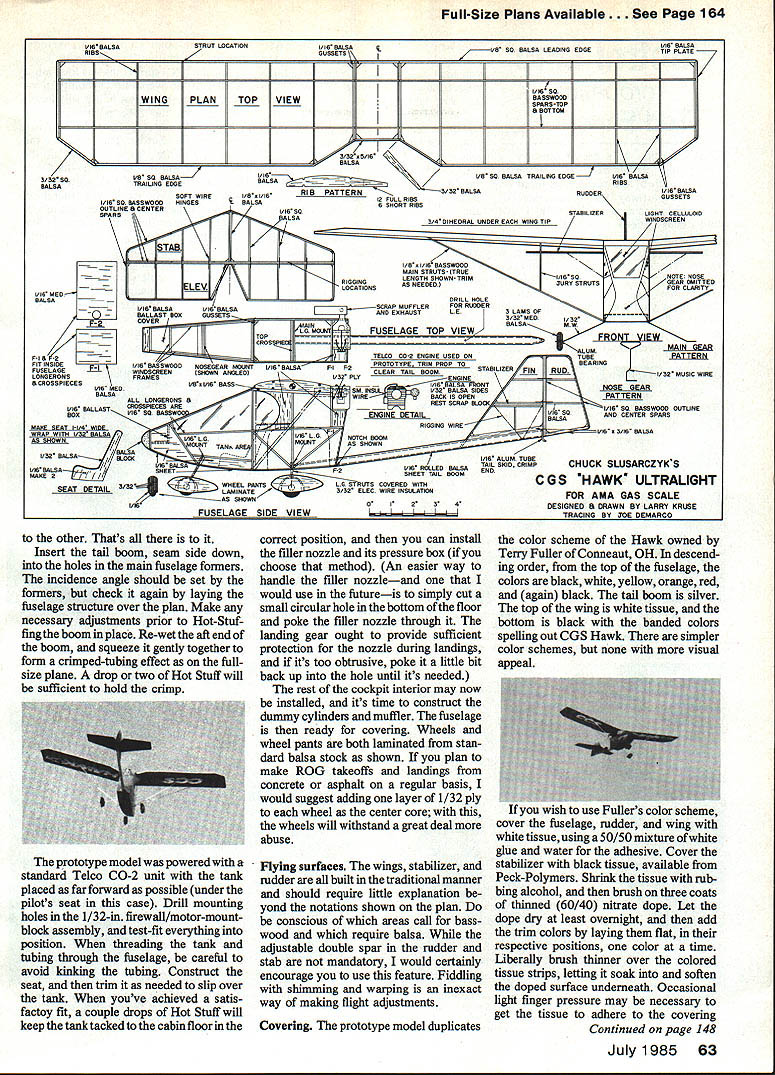
The CGS Hawk will not be difficult if you have built stick-and-tissue models before; some areas need explanation. The prototype was built with removable wings and wing struts for ease of packing. Several models made the trip to the Nationals last year—round trip over 4,000 miles by car. Since modelers won't have to face such a problem, I've drawn the wings as a unit for ease of construction. Time and weight will be saved simply by hot-stuffing the wings to the cabin top rather than having to fiddle with aligning wing tubes and dihedral wires.
Also, as will be noted on the plan, the model uses a lot of 1/16-in. square basswood strips for basic outline and stringer construction. Do not be tempted to substitute balsa; it simply does not have the required strength in most areas. Likewise, where balsa is specified instead of basswood, use the balsa. You'll incur unacceptable weight penalties if you use basswood all the way in construction. The best source I have found for basswood is your local model railroad emporium, although some model aircraft hobby dealers are beginning to stock it.
Materials and adhesives
- Use 1/16-in. sq. basswood strips where called for; use balsa where specified.
- Hot Stuff is used for quick joints; epoxy is recommended for structural joints.
- For covering, use lightweight tissue, 50/50 mixture of white glue and water for adhesive when applying white tissue, rubbing alcohol to shrink tissue, and thinned nitrate dope (60/40 thinner/dope mix) for sealing.
Fuselage
- Build one side of the fuselage over the other, separating the two with a layer of Saran Wrap.
- Construct the fuselage "box" by adding tail boom formers and cross members.
- Install the main landing gear and nose gear before planking the fuselage bottom.
- Cut and fit the top of the nose ballast box, then lay it aside until after test flights are successfully accomplished so ballast can easily be added or subtracted.
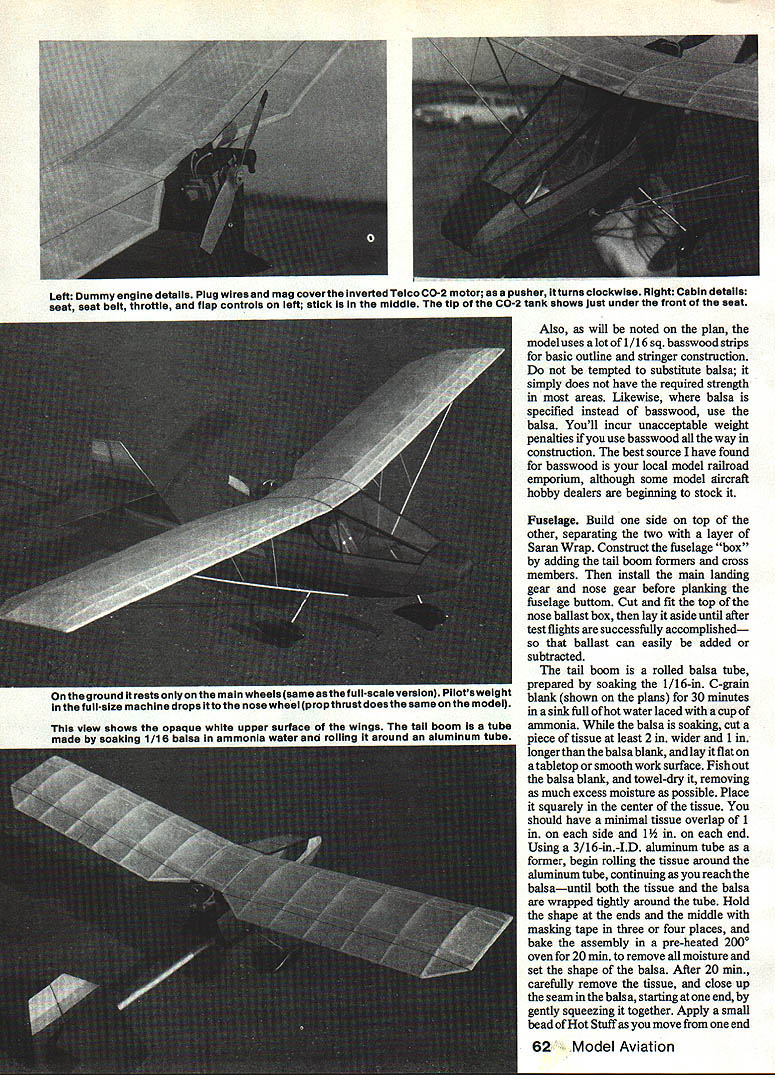
The prototype model was powered with a standard Telco CO2 unit with the tank placed as far forward as possible (under the pilot's seat in this case). Drill mounting holes in the 1/32-in. firewall/motor-mount block assembly, and test-fit everything into position. When threading the tank and tubing through the fuselage, be careful to avoid kinking the tubing. Construct the seat, and then trim it as needed to slip over the tank. When you've achieved a satisfactory fit, a couple drops of Hot Stuff will keep the tank tucked to the cabin floor in the correct position, and then you can install the filler nozzle and its pressure box (if you choose that method).
An easier way to handle the filler nozzle—and one that I would use in the future—is to simply cut a small circular hole in the bottom of the floor and poke the filler nozzle through it. The landing gear will generally provide sufficient protection for the nozzle during landings, and if it's too obtrusive, poke it a little bit back up into the hole until it's needed.
The rest of the cockpit interior may now be installed, and it's time to construct the dummy cylinders and muffler. The fuselage is then ready for covering. Wheels and wheel pants are both laminated from standard balsa stock as shown on the plans. If you plan to make ROG takeoffs and landings from concrete or asphalt on a regular basis, add one layer of 1/32-in. plywood to each wheel as the center core; with this, the wheels will withstand a great deal more abuse.
Tail boom
The tail boom is a rolled balsa tube, prepared by soaking the 1/16-in. C-grain blank (shown on the plans) for 30 minutes in a sink full of hot water laced with a cup of ammonia. While the balsa is soaking, cut a piece of tissue at least 2 in. wider and 1 in. longer than the balsa blank, and lay it flat on a tabletop or smooth work surface.
- Fish out the balsa blank and towel-dry it, removing as much excess moisture as possible.
- Place it squarely in the center of the tissue; you should have a minimal tissue overlap of 1 in. on each side and 1/2 in. on each end.
- Using a 3/16-in. I.D. aluminum tube as a former, begin rolling the tissue around the aluminum tube, continuing as you reach the balsa—until both the tissue and the balsa are wrapped tightly around the tube.
- Hold the shape at the ends and the middle with masking tape in three or four places, and bake the assembly in a preheated 200°F oven for 20 minutes to remove all moisture and set the shape of the balsa.
- After 20 minutes, carefully remove the tissue, and close up the seam in the balsa, starting at one end, by gently squeezing it together. Apply a small bead of Hot Stuff as you move from one end to the other.
- When dry, sand lightly and trim to the length indicated.
Fit the boom to the fuselage with the half-circle slip-in detail shown on the plans. When assembling the boom, epoxy the two halves to the formers only and leave the aft end free to flex a little during landings. Insert the tail boom, seam side down, into the holes in the main fuselage formers. The incidence angle should be set by the formers, but check it again by laying the fuselage structure over the plan. Make any necessary adjustments prior to hot-stuffing the boom in place. Re-wet the aft end of the boom, and squeeze it gently together to form a crimped-tubing effect as on the full-size plane. A drop or two of Hot Stuff will be sufficient to hold the crimp.
Tail surfaces
The tail surfaces are built up from 1/16-in. sheet and 1/16-in. square strips.
- The elevator is built as one piece with a center hinge of 1/32-in. music wire.
- The rudder is built of two pieces, glued and sanded to shape.
Cover all surfaces with lightweight tissue and dope as required.
Flying surfaces
The wings, stabilizer, and rudder are all built in the traditional manner and should require little explanation beyond the notations shown on the plan. Be conscious of which areas call for balsa and which require basswood. While the adjustable double spar in the rudder and stabilizer is not mandatory, it is recommended. Fiddling with shimming and warping is an inexact way of making flight adjustments.
Covering and finish
The prototype model duplicates the color scheme of the Hawk owned by Terry Fuller of Conneaut, OH. In descending order from the top of the fuselage, the colors are black, white, yellow, orange, red, and (again) black. The tail boom is silver. The top of the wing is white tissue, and the bottom is black with the banded colors spelling out "CGS Hawk." There are simpler color schemes, but none with more visual appeal.
If you wish to use Fuller's color scheme:
- Cover the fuselage, rudder, and wing with white tissue, using a 50/50 mixture of white glue and water for the adhesive.
- Cover the stabilizer with black tissue (available from Peck-Polymers).
- Shrink the tissue with rubbing alcohol, and then brush on three coats of thinned (60/40) nitrate dope. Let the dope dry at least overnight.
- Add the trim colors by laying them flat in their respective positions, one color at a time. Liberally brush thinner over the colored strips, letting it soak into and soften the doped surface underneath. Occasional light finger pressure may be necessary to get the tissue to adhere to the covering beneath it or to smooth out any wrinkles.
- Apply three more coats of thinned nitrate dope on top of the tissue trim to seal all surfaces.
All detailing, including the seat, celluloid windscreens, wheel pants, struts, rigging, and dummy engine, can now be added to complete the model and make it come "alive."
Flying
Balance the plane as shown on the plan by adding lead shot and/or clay to the ballast box. I don't like to test-glide CO2-powered models, because that doesn't give much of a feel for how the ship is going to perform under power. Wait for a calm evening, find the softest grass surface you can, set the motor for a low power setting, and give it a gas charge from the last of a filler cartridge.
- Flick the prop to get the motor started (remember that it's a pusher!).
- Aim the model at a spot about 50 ft. in front of you, and give it a gentle toss.
- If it settles to the ground without stalling or diving, increase the gas charge (no liquid, yet, please!), and try it again.
- It should show a slight tendency to climb and to gently turn to the right. If it turns too tightly, bend the rudder just a shade to the left, and try it again.
- If the power pattern seems safe, increase the motor speed a bit, and watch it climb to the right and come back overhead.
A full gas charge, with the model being hand-launched, should get you flights ranging from 45 seconds on up—depending on how buoyant the air is—and the quality of the CO2 charge.
The Hawk has been one of the most enjoyable Free Flight Scale ships I've built in a number of years. It is unique enough to elicit both admiration and questions from spectators—and competitive enough to win any Scale contest in the nation. If you decide to build it and have questions or comments, please write to me:
Larry Kruse Box 1137 Liberal, KS 67901
I'll be happy to supply documentation information at cost.
Transcribed from original scans by AI. Minor OCR errors may remain.

