

Challenger
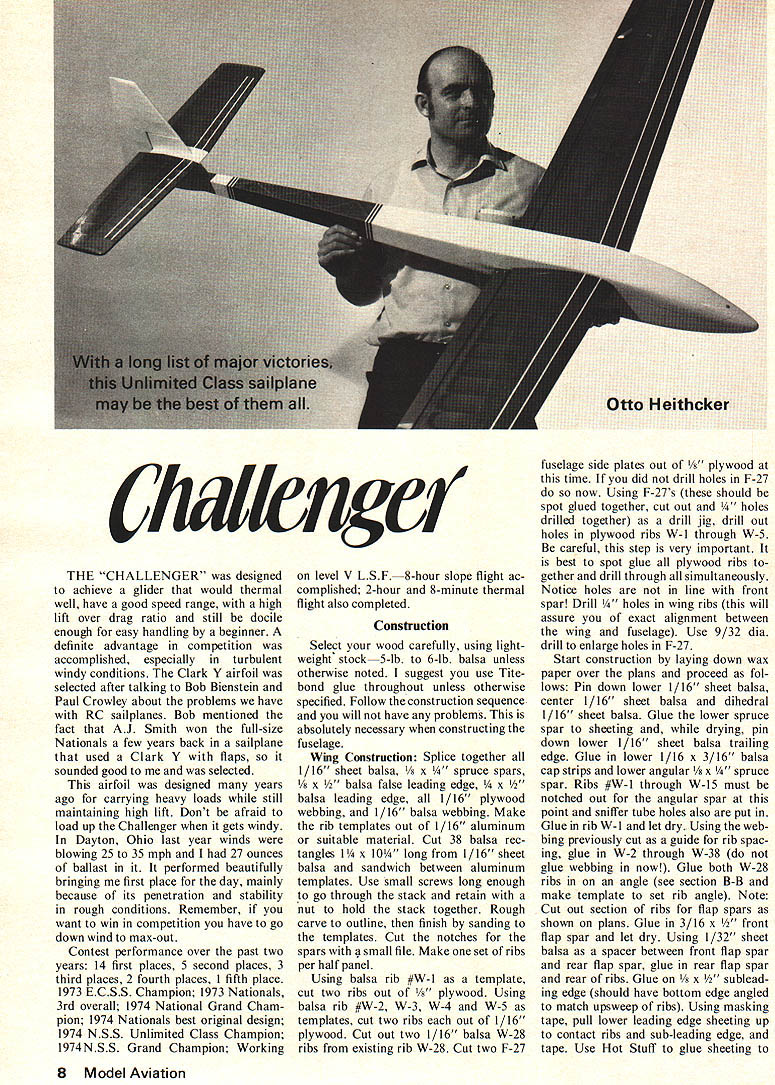
THE "CHALLENGER" was designed to achieve a glider that would thermal well, have a good speed range, with a high lift over drag ratio and still be docile enough for easy handling by a beginner. A definite advantage in competition was accomplished, especially in turbulent windy conditions. The Clark Y airfoil was selected after talking to Bob Bienstein and Paul Crowley about the problems we have with RC sailplanes. Bob mentioned the fact that A. J. Smith won the full-size Nationals a few years back in a sailplane that used a Clark Y with flaps, so it sounded good to me and was selected.
This airfoil was designed many years ago for carrying heavy loads while still maintaining high lift. Don't be afraid to load up the Challenger when it gets windy. In Dayton, Ohio last year winds were blowing 25 to 35 mph and I had 27 ounces of ballast in it. It performed beautifully, bringing me first place for the day, mainly because of its penetration and stability in rough conditions. Remember, if you want to win in competition you have to go down wind to max-out.
Contest performance over the past two years: 14 first places, 5 second places, 3 third places, 2 fourth places, 1 fifth place. 1973 E.C.S.S. Champion; 1973 Nationals, 3rd overall; 1974 National Grand Champion; 1974 Nationals best original design; 1974 N.S.S. Unlimited Class Champion; 1974 N.S.S. Grand Champion. Working level V.L.S.F.: 8-hour slope flight accomplished; 2-hour and 8-minute thermal flight also completed.
Construction
Select your wood carefully, using lightweight stock — 5-lb. to 6-lb. balsa unless otherwise noted. I suggest you use Tite-Bond glue throughout unless otherwise specified. Follow the construction sequence and you will not have any problems. This is absolutely necessary when constructing the fuselage.
Wing Construction
Splice together all 1/16" sheet balsa, 1/8" x 1/4" spruce spars, 1/8" x 1/2" balsa false leading edge, 1/16" x 1/2" balsa leading edge, 1/16" plywood webbing and 1/16" balsa webbing. Make rib templates out of 1/16" aluminum or suitable material. Cut 38 balsa rectangular ribs 1/16" x 10" long. Sandwich between aluminum templates. Use small screws long enough to go through the stack and retain with a nut to hold the stack together. Rough carve the outline, then finish by sanding to the templates. Cut notches for the spars with a small file. Make one set of ribs per half panel.
Using balsa rib #W-1 as a template, cut two ribs out of 1/16" plywood. Using balsa rib #W-2, W-3, W-4 and W-5 templates, cut two ribs out of 1/16" plywood. Cut out two 1/16" balsa W-28 ribs from existing rib W-28. Cut two F-27 fuselage side plates out of 1/8" plywood at this time. If you did not drill holes in F-27 do so now. Using F-27's (these should be spot-glued together; cut out and 1/4" holes drilled together) as a drill jig, drill out holes in plywood ribs W-1 through W-5. Be careful; this step is very important. It is best to spot-glue all plywood ribs together and drill through all simultaneously. Notice holes line front spar. Drill 3/16" holes in wing ribs (this will assure you of exact alignment between the wing and fuselage). Use 9/32" dia. drill to enlarge holes in F-27.
Start construction by laying down wax paper over the plans and proceed as follows: Pin down lower 1/16" sheet balsa center, 1/16" sheet balsa dihedral and 1/16" sheet balsa. Glue lower spruce spar to sheeting and, while drying, pin down lower 1/16" sheet balsa trailing edge. Glue lower 1/16" x 3/16" balsa cap strips and lower angular 1/8" x 1/4" spar. Ribs #W-1 through W-15 must be notched out for the angular spar; point sniffer tube holes also put in. Glue rib W-1 and let dry. Using webbing previously cut as a guide for rib spacing, glue W-2 through W-38 and glue webbing now. Glue both W-28 ribs at angle (see section B-B); make template set rib angle. Note: Cut out section ribs and flap spars shown on plans. Glue 3/16" x 1/4" flap spar; let dry. Using 1/32" sheet balsa spacer between front flap spar and rear flap spar, glue rear flap spar and rear ribs. Glue 1/8" x ? leading edge; it should have bottom edge angled to match upsweep ribs. Using masking tape, pull lower leading edge sheeting up to contact ribs and sub-leading edge; tape. Use Hot Stuff glue for sheeting.
Glue upper 1/16" sheet balsa sheeting and 1/16" sheet balsa center. Glue top 1/16" x 3/16" balsa cap strips and upper angular 1/8" x 1/4" spar. Glue ribs W-16 through W-38 to cap strips and sheeting. Cut out flap and aileron areas and install hinge doublers as shown on plans. Finish sanding entire wing smooth and true to section. Cover with your choice of film or tissue and dope.
Rudder
Cut out ribs R-1 through R-15 and R-21 out of 1/4" sheet balsa. Use spar stock 3/4" x 11/2". Pin down R-21 and glue ribs R-1 through R-15 using 1/16" x ? brace and balsa block and 1/16" sheet balsa trailing edge. Unpin and add soft balsa blocks at either end. Sand and shape; bevel R-21 for rudder movement shown in section A-A. Cover with MonoKote.
Vertical Stabilizer
Cut out R-16 through R-20, F-25, F-26 and F-26A per plans and materials. Spot-glue R-20's and soft balsa block; shape as shown in side view section A-A including cutouts for leading edge horn. Remove R-20's and contoured balsa block in half to accept fuselage former F-25. Glue R-20's to F-25, then insert horn and rear 3/32" I.D. brass tube to horn (epoxy). Glue each half of balsa block between two R-20's and insert 3/32" I.D. brass tubing through horn and epoxy eyelets to R-20's retaining horn. Glue F-26 with F-26A (F-26A previously glued to F-26) to R-20's. Glue in rib R-16, leading edge (leading edge preshaped as shown in section A-A), two piece R-19, R-18, R-17, 1/8" balsa brace and 1/8" balsa support. Finally, sheet both sides with 1/16" balsa and sand lightly. MonoKote.
Fuselage
Lay wax paper over plans and pin down lower 3/16" spruce longerons (pre-bend by steaming all longerons). F-1 and F-2 formers should hang over front of building board. Use rubber bands to hold together for gluing F-1 and F-2 to longerons. Make up wing strut former assembly as follows: sandwich front brass tubing between formers F-7 and F-8 using F-8B and F-8C spacers (use epoxy). Likewise, sandwich rear brass tubing between formers F-10 and F-11 using F-11A and F-11B spacers. Bend flap-drive wire as shown and solder 1/16" brass horn to wire (brass tubing and horn is put on wire before bending) as shown on plans. Take tubing assemblies and glue F-27's to each side, along with formers F-6, F-12 and four 1/4" x 3/8" plywood braces as shown on plans. Epoxy flap horn in place along with 1/8" plywood braces. Glue this assembly in place onto lower longerons, then glue in formers F-1 through F-5, F-5A, F-13 through F-24 and glue in both top 3/16" sq. spruce longerons. Make up pushrods and put them into fuselage now (cannot be installed after fuselage is complete unless you use nylon rods — do not recommend).
Unpin wing, slide to edge of board and use two 36" aluminum yardsticks (buy at local hardware for approximately .50 each) for washout of trailing edge of wing (screw yardsticks into building board). Epoxy in wing down to board with trailing edge over washout yardsticks. Epoxy brass wing tubes in place and add hardwood, plywood and balsa webbing (all webbing out to rib W-9 epoxy, W-10 through W-36 Titebond). Add 1/8" plywood front corner brace, hardwood blocks for eyescrews, balsa fill-in between W-1 and W-2, and glue top 1/16" sheet balsa sheeting and 1/16" sheet balsa center. Glue top 1/16" x 3/16" balsa cap strips and upper angular 1/8" x 1/4" spar. Glue ribs W-16 through W-38 to cap strips and sheeting. Cut out flap and aileron areas and install hinge doublers as shown on plans. Finish sanding entire wing smooth and true to section. Cover with your choice of film or tissue and dope.
Challenger
sniffer tube. Cut out ribs W-17 through W-21 for spoiler and glue in 3/16" sq. balsa for spoiler. Add 1/8" balsa brace at W-27, and front flap spar. Trim the balsa to false leading edge using a razor-blade plane, followed by sanding to final angular shape. Next, glue on upper 1/16" balsa sheeting, 1/16" trailing edge and 1/16" balsa flap top surface (bevel edge as shown on plans). Add 1/16" x 3/16" cap strips, center 1/16" sheeting, dihedral 1/16" sheeting and 1/16" sheeting between ribs W-18 and W-19.
Remove from board when dry and trim the front sheeting flush with the false leading edge. Glue on 1/4" x 1/2" balsa leading edge, add the wing tip block, then carve and sand to final shape shown. Sand entire wing, cut flap loose and cut wing tip and add dihedral using 1/8" plywood braces as shown.
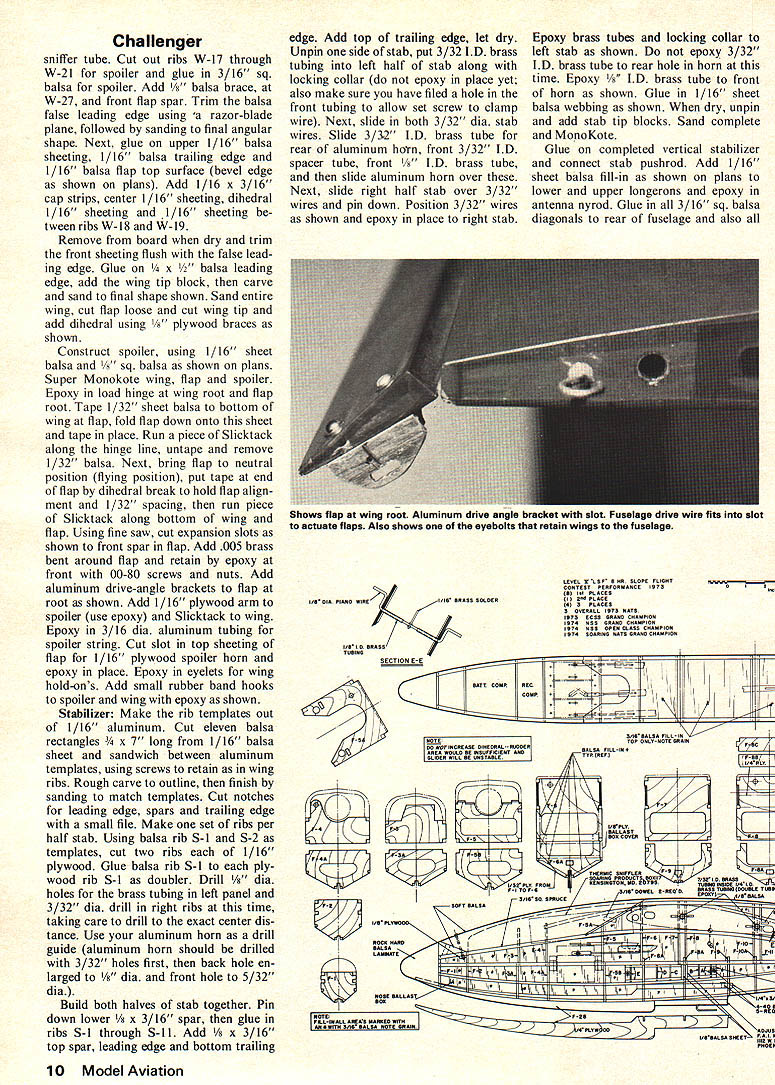
Construct spoiler, using 1/16" sheet balsa and 1/8" sq. balsa as shown on plans. Super Monokote wing, flap and spoiler. Epoxy in load hinge at wing root and flap root. Tape 1/32" sheet balsa to bottom of wing at flap, fold flap down onto this sheet and tape in place. Run a piece of Slicktack along the hinge line, untape and remove 1/32" balsa. Next, bring flap to neutral position (flying position), put tape at end of flap by dihedral break to hold flap alignment and 1/32" spacing, then run piece of Slicktack along bottom of wing and flap. Using fine saw, cut expansion slots as shown to front spar in flap. Add .005" brass bent around flap and retain by epoxy at front with 00-80 screws and nuts. Add aluminum drive-angle brackets to flap at root as shown. Add 1/16" plywood arm to spoiler (use epoxy) and Slicktack to wing. Epoxy in 3/16" dia. aluminum tubing for spoiler string. Cut slot in top sheeting of flap for 1/16" plywood spoiler horn and epoxy in place. Epoxy in eyelets for wing hold-ons. Add small rubber band hooks to spoiler and wing with epoxy as shown.
Stabilizer: Make the rib templates out of 1/16" aluminum. Cut eleven balsa rectangles 1/4" x 7" long from 1/16" balsa sheet and sandwich between aluminum templates using screws to retain as in wing ribs. Rough carve to outline, then finish by sanding to match templates. Cut notches for leading edge, spars and trailing edge with a small file. Make one set of ribs per half stab. Using balsa rib S-1 and S-2 as templates, cut two ribs each of 1/16" plywood. Glue balsa rib S-1 to each plywood rib S-1 as doubler. Drill 1/8" dia. holes for the brass tubing in left panel and 3/32" dia. drill in right ribs at this time, taking care to drill to the exact center distance. Use your aluminum horn as a drill guide (aluminum horn should be drilled with 3/32" holes first, then back hole enlarged to 1/8" dia. and front hole to 5/32" dia.).
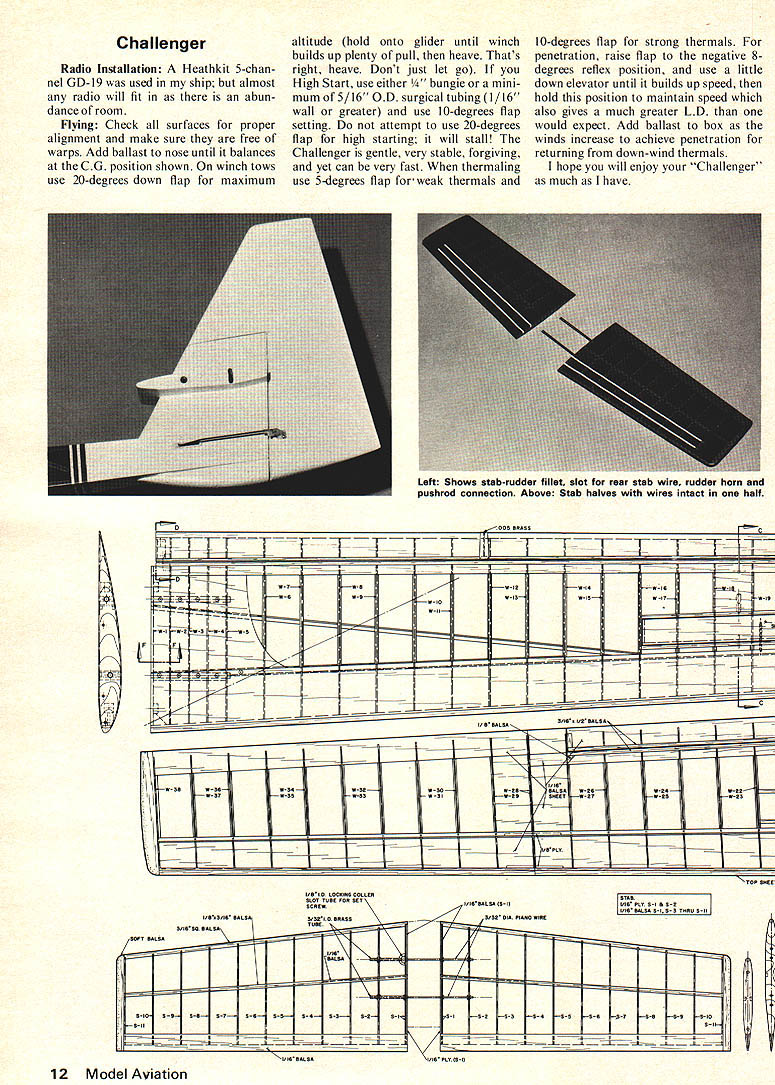
Build both halves of stab together. Pin down lower 1/8" x 3/16" spar, then glue in ribs S-1 through S-11. Add 1/8" x 3/16" top spar, leading edge and bottom trailing edge. Add top of trailing edge, let dry. Unpin one side of stab, put 3/32" I.D. brass tubing into left half of stab along with locking collar (do not epoxy in place yet; also make sure you have filed a hole in the front tubing to allow set screw to clamp wire). Next slide in both 3/32" dia. stab wires. Slide 3/32" I.D. brass tube for rear of aluminum horn, front 3/32" I.D. spacer tube, front 1/8" I.D. brass tube, and then slide aluminum horn over these. Next, slide right half stab over 3/32" wires and pin down. Position 3/32" wires as shown and epoxy in place to right stab.
Epoxy brass tubes and locking collar to left stab as shown. Do not epoxy 3/32" I.D. brass tube to rear hole in horn at this time. Epoxy 1/8" I.D. brass tube to front of horn as shown. Glue in 1/16" sheet balsa webbing as shown. When dry, unpin and add stab tip blocks. Sand complete and MonoKote.
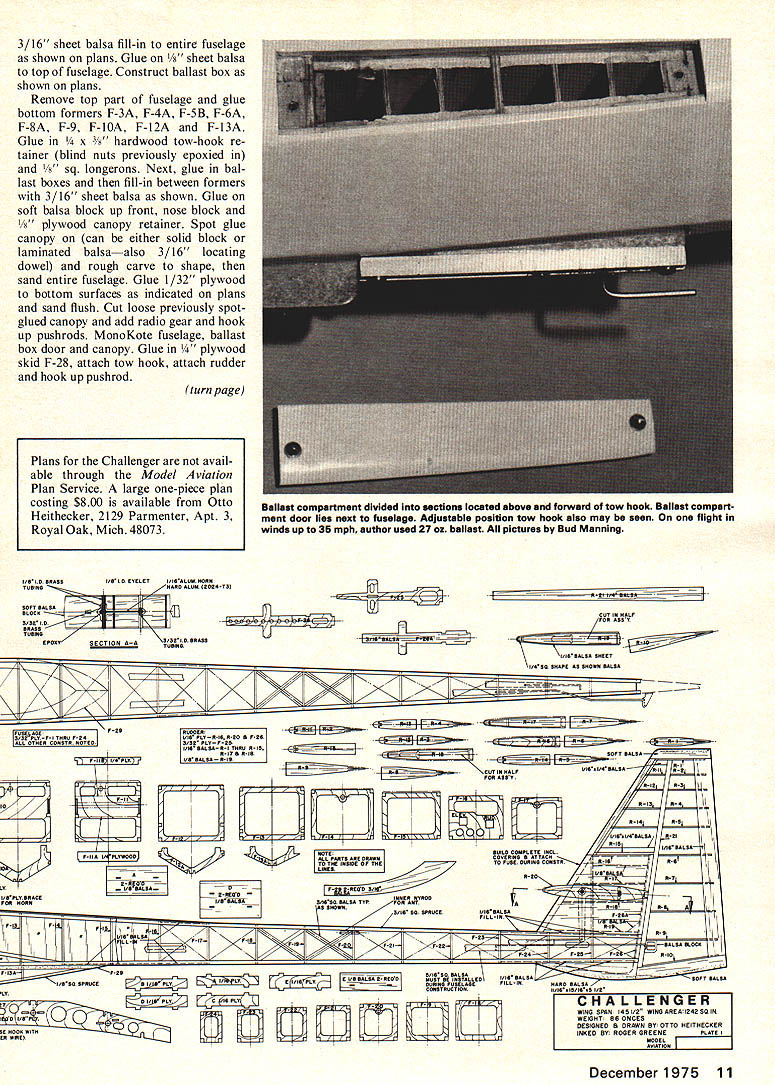
Glue on completed vertical stabilizer and connect stab pushrod. Add 1/16" sheet balsa fill-ins as shown on plans to lower and upper longerons and epoxy in antenna nyrod. Glue in all 3/16" sq. balsa diagonals to rear of fuselage and also all necessary doublers and blocks called out on the plans. 3/16" sheet balsa fill-in to entire fuselage as shown on plans. Glue on 1/8" sheet balsa to top of fuselage. Construct ballast box as shown on plans.
Remove top part of fuselage and glue bottom formers F-3A, F-4A, F-5B, F-6A, F-8A, F-9, F-10A, F-12A and F-13A. Glue in 1/4" x 3/8" hardwood tow-hook retainer (blind nuts previously epoxied in) and 1/8" sq. longerons. Next, glue in ballast boxes and then fill-in between formers with 3/16" sheet balsa as shown. Glue on soft balsa block up front, nose block and 1/8" plywood canopy retainer. Spot glue canopy on (can be either solid block or laminated balsa—also 3/16" locating dowel) and rough carve to shape, then sand entire fuselage. Glue 1/32" plywood to bottom surfaces as indicated on plans and sand flush. Cut loose previously spot-glued canopy and add radio gear and hook up pushrods. Monokote fuselage, ballast box door and canopy. Glue in 1/4" plywood skid F-28, attach tow hook, attach rudder and hook up pushrod.
Plans for the Challenger are not available through the Model Aviation Plan Service. A large one-piece plan costing $8.00 is available from Otto Heithecker, 2129 Parmenter, Apt. 3, Royal Oak, Mich. 48073. Radio Installation: A Heathkit 5-channel GD-19 was used in my ship; but almost any radio will fit in as there is an abundance of room.
Flying: Check all surfaces for proper alignment and make sure they are free of warps. Add ballast to nose until it balances at the C.G. position shown. On winch tows use 20-degrees down flap for maximum altitude (hold onto glider until winch builds up plenty of pull, then heave. That's a right, heave. Don't just let go). If you High Start, use either 1/4" bungie or a minimum of 5/16" O.D. surgical tubing (1/16" wall or greater) and use 10-degrees flap setting. Do not attempt to use 20-degrees flap for high starting; it will stall! The Challenger is gentle, very stable, forgiving, and yet can be very fast. When thermaling use 5-degrees flap for weak thermals and 10-degrees flap for strong thermals. For penetration, raise flap to the negative 8-degrees reflex position, and use a little down elevator until it builds up speed, then hold this position to maintain speed which also gives a much greater L.D. than one would expect. Add ballast to box as the winds increase to achieve penetration for returning from down-wind thermals.
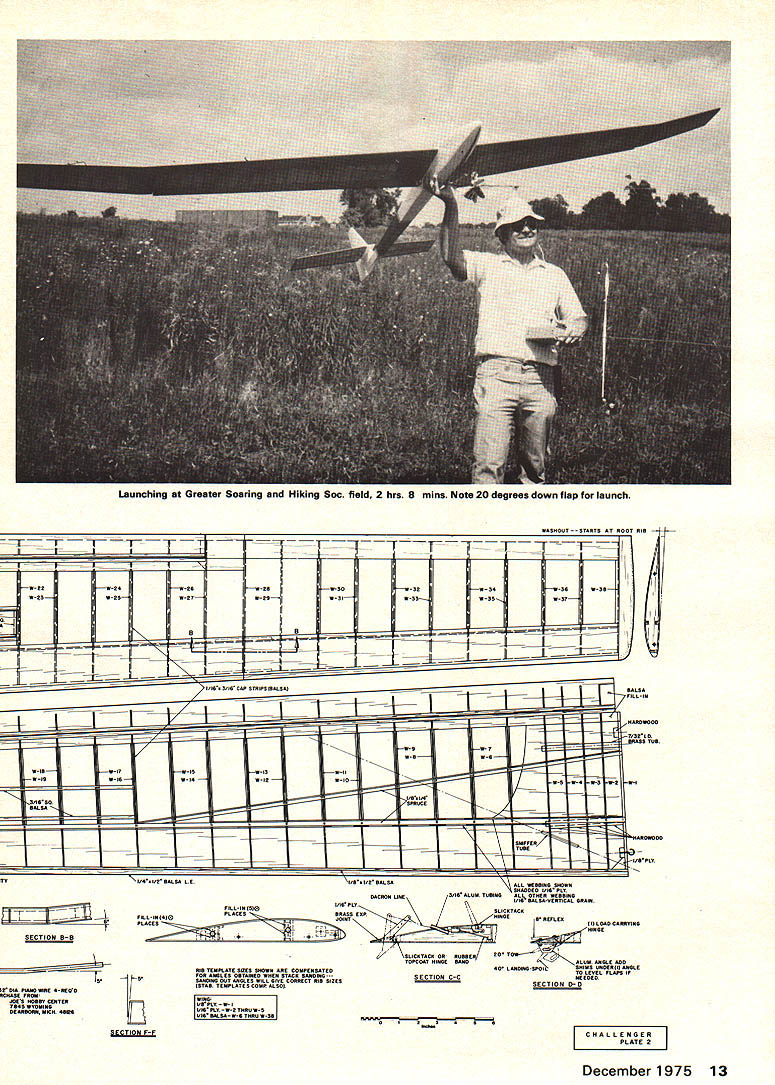
I hope you will enjoy your "Challenger" as much as I have. Launching at Greater Soaring and Hiking Soc. field, 2 hrs. 8 mins. Note 20 degrees down flap for launch.
Transcribed from original scans by AI. Minor OCR errors may remain.

